background image

Current customer service contact information: 


Servicing dealership personnel are trained professionals. They should be able to answer any question you may 
have. If you encounter a problem that your dealer does not solve to your satisfaction, please discuss it with the 
dealership's management. The Service Manager, General Manager, or Owner can help. Almost all problems 
are solved in this way.  

United States, Puerto Rico, and U.S. Virgin Islands: 

If you are dissatisfied with the decision made by the dealership's management, contact the Honda Regional 
Engine Distributor for your area (

www.honda-engines.com/dea.htm

). 

If you are still dissatisfied after speaking with the Regional Engine Distributor, you may contact the Honda 
Office as shown. 

American Honda Motor Co., Inc. 
Power Equipment Division 
Customer Relations Office 
4900 Marconi Drive 
Alpharetta, GA 30005-8847 

Or telephone: (770) 497-6400 M-F, 8:30 am - 7:00 pm EST 

When you write or call, please provide the following information: 

  Equipment manufacturer's name and model number that the engine is mounted on 

  Engine model, serial number, and type 

  Name of the dealer who sold the engine to you 

  Name, address, and contact person of the dealer who services your engine 

  Date of purchase 

  Your name, address, and telephone number 

  A detailed description of the problem 


Summary of Contents for GX110

Page 1: ......

Page 2: ......

Page 3: ...emain with the engine if it is resold Pay special attention to statements preceded by the following words rmm Indicates a strong possibility of severe personal injury or loss of life if instructions are not followed CAUTION Indicates a possibility of personal injury or equipment damage if instructions are not followed NOTE Gives helpful information If a problem should arise or if you have any ques...

Page 4: ... BATTERY CONNECTIONS for electric starter 5 REMOTE CONTROL LINKAGE 6 PRE OPERATION CHECK 7 STARTING THE ENGINE 13 OPERATION 16 STOPPING THE ENGINE 18 High altitude operation 19 MAINTENANCE 20 TRANSPORTING STORAGE 30 TROUBLESHOOTING 31 SPECIFICATIONS 33 WIRING DIAGRAM 34 WARRANTY SERVICE 36 2 ...

Page 5: ...hat the filler cap is closed securely l If any fuel is spilled clean it up completely before starting the engine l Do not smoke or allow flames or sparks where the engine is refueled or where gasoline is stored l Exhaust gas contains poisonous carbon monoxide Avoid inhalation of exhaust gases Never run the engine in a closed garage or confined area l Operate the engine on a level surface If the en...

Page 6: ...MPONENT IDENTIFICATOON MUFFLER THROTTLE LEVER SPARK PLUG AIR CLEANE RECOIL STARTER CHOKE LEVER FUEL VALVE S ARTER GRIP FUEL FILLER CAP I ENGINE SWITCH SERIAL NUMBER AN ENGINE TYPE FILLER OIL DRAIN PLUG CAP ...

Page 7: ...or eyes may cause severe burns Wear protective clothing and a face shield If electrolyte gets on your skin flush with water If electrolyte gets in your eyes flush with water for at least 15 minutes and call a physician immediately l Electrolyte is poisonous If swallowed drink large quantities of water or milk and follow with milk of magnesia or vegetable oil and call a physician KEEP OUT OF REACH ...

Page 8: ...wing illustrations show installation examples for a solid wire cable and for a braided wire cable If using a braided wire cable add a return spring as shown It is necessary to loosen the throttle lever friction nut when operating the throttle with a remote cable RETURN SPRING THROTTLE LEVER PIVOT NUT Flexible wire core WIRE HOLDER WIRE HOLDER CHOKE LEVER 6 ...

Page 9: ...0 is recommended for general all temperature use 30 20 10 0 10 20 30 40 C Other viscosities shown in the chart Ambient temperature may be used when the average temperature in your area is within the indicated range 1 Remove the oil filler cap and wipe the dipstick clean 2 Insert the dipstick into the oil filler neck but do not screw it in 3 If the level is low fill to the top of the oil filler nec...

Page 10: ...7 Oil capacity 0 5 e 0 53 US qt 0 44 Imp qt DIPSTICK FILLER CAP UPPER LEVEL DRAIN BOLT l 6 reduction 1 Remove the oil level bolt 2 Check the oil level it should reach the edge of the oil level bolt hole If the oil level is low remove the filler bolt and add oil until it starts to flow out the oil level bolt hole Use the same oil recommended for the engine see engine oil recommendations on page 7 3...

Page 11: ...l element type Check the air cleaner elements to be sure they are clean and in good condition Clean or replace the elements if necessary page 22 Cyclone type 1 Check the air cleaner elements to be sure they are clean and in good condition Clean or replace the elements if necessary page 23 2 Check the cyclone housing and clean it if it is clogged or excessively dir ty page 23 ELEMENTS CYCLONE 9 ...

Page 12: ... Oil bath type 1 Check the air cleaner element to be sure it is clean and in good condition Clean or replace the element if necessary page 24 2 Check oil level and condition OIL CEVEL 10 ...

Page 13: ... Failure to do so is con sidered misuse and damage caused by misuse is not covered by Honda s Limited Warranty Occasionally you may experience light spark knock while operating under heavy loads This is no cause for concern it simply means your engine is operating efficiently l Gasoline is extremely flammable and is explosive under certain conditions l Refuel in a well ventilated area with the eng...

Page 14: ...more than 5 methanol even if it has cosolvents and corrosion inhibitors NOTE l Fuel system damage or engine performance problems resulting from the use of fuels that contain alcohol is not covered under the warranty Honda cannot endorse the use of fuels containing methanol since evidence of their suitability is as yet incomplete l Before buying fuel from an unfamiliar station try to find out if th...

Page 15: ...6 STARTING THE ENGINE 1 Turn the fuel valve to the ON position 2 Move the choke lever to the CLOSE position NOTE Do not use the choke if the engine is warm or the air temperature is high 13 ...

Page 16: ...3 Move the throttle lever slightly to the left 4 Start the engine l With recoil starter Turn the engine switch to the ON position Type with electric starter and oil alert system 14 ...

Page 17: ...lectric starter Turn the engine switch to the START position and hold it there until the engine starts NOTE Do not use the electric starter for more than 5 seconds at a time If the engine fails to start release the switch and wait 10 seconds before operating the starter again When the engine starts allow the engine switch to return to the ON position Type with electric starter and oil alert system...

Page 18: ...7 OPERATION 1 As the engine warms up gradually move the choke lever to the OPEN position 2 Position the throttle lever for the desired engine speed 16 ...

Page 19: ...e engine will not run If this occurs add engine oil page 7 OIL ALERT LAMP without electric starter ENGINE SWITCH ENGINE SWITCH v CIRCUIT BREAKER with electric starter OIL ALERT LAMP Circuit Breaker for electric starter The circuit breaker protects the battery charging circuit A short circuit or a battery connected in reverse polarity will trip the circuit breaker The green indicator inside the cir...

Page 20: ...an emergency turn the engine switch to the OFF position Under normal conditions use the following procedure 1 Move the throttle lever fully to the right 2 Turn the engine switch to the OFF position Type with electric starter and oil alert system 18 ...

Page 21: ...gine at altitudes higher than 6 000 feet above sea level have vour authorized Honda Engine dealer perform these carburetor modifications Even with suitable carburetor jetting engine horsepower will decrease ap i proximately 3 5 for each 1 000 foot increase in altitude The effect of altitude on horsepower will be greater than this if no carburetor modifica k tion is made CAUTION Operation of the en...

Page 22: ...hich are not of equivalent quality may damage the engine Maintenance Schedule Check level 0 Engine oil Change 0 0 Reduction gear oil Check level 0 applicable models only Change 0 0 Air cleaner Check 0 Sediment cup Spark plug Clean O 1 Clean 0 Check clean 0 Spark arrester optional part Clean 0 Valve clearance Fuel tank and strainer Check Adjust Clean O 2 O 2 Fuel line Check Replace if necessarvl Ev...

Page 23: ...0 53 US qt 0 44 Imp qt DIPSTICK FILLER CAP DRAIN BOLT CAUTION Used motor oil may cause skin cancer if repeatedly left in con tact with the skin for prolonged periods Although this is unlikely unless you handle used oil on a daily basis it is still advisable to thoroughly wash your hands with soap and water as soon as possible after handling used oil NOTE Please dispose of used motor oil in a manne...

Page 24: ...eparate them Careful ly check both elements for holes or tears and replace if damaged Foam element Wash the element in a solution of household de tergent and warm water then rinse thoroughly or wash in nonflammable or high flash point solvent Allow the element to dry thoroughly Soak the element in clean engine oil and squeeze out the excess oil The engine will smoke during in itial start up if too...

Page 25: ...gine will smoke during initial start up if too much oil is left in the foam 3 Paper element Tap the element lightly several times on a hard sur face to remove excess dirt or blow compressed air through the filter from the inside out Never try to brush the dirt off brushing will force dirt into the fibers Replace the paper element if it is excessive ly dirty 4 Cyclone Housing Remove the three speci...

Page 26: ...lement in clean engine oil and squeeie out the excess oil The engine will smoke during initial start up if too much oil is left in the element 4 Empty the oil from the air cleaner case and wash out any accumulated dirt with nonflammable or high flash point solvent Dry the case 5 Fill the air cleaner case to the level mark with the same oil tha t is recom mended for the engine see engine oil recomm...

Page 27: ...cleaning Turn the fuel valve to OFF Remove the sediment cup and O ring and wash them in nonflammable or high flash point solvent Dry them thoroughly and reinstall securely Turn the fuel valve ON and check for leaks 25 ...

Page 28: ...e a spark plug wrench to remove the plug m If the engine has been running the muffler will be very hot Be careful not to touch the muffler 2 Visually inspect the spark plug Discard it if the insulator is cracked or chipped Clean the spark plug with a wire brush if it is to be reused 3 Measure the plug gap with a feeler gauge The gap should be 0 7 0 8 mm 0 028 0 031 in Correct as necessary by bendi...

Page 29: ...g wrench to com press the washer NOTE When installing a new spark plug tighten l 2 turn after the spark plug seats to compress the washer When reinstalling a used spark plug tighten l 8 l 4 turn after the spark plug seats to compress the washer CAUTION The spark plug must be securely tightened An improperly tightened spark plug can become very hot and may damage the engine 27 ...

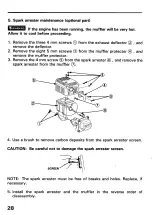
Page 30: ...from the muffler protector and remove the muffler protector 3 Remove the 4 mm screw from the spark arrester and remove the spark arrester from the muffler 0 4 Use a brush to remove carbon deposits from the spark arrester screen CAUTION Be careful not to damage the spark arrester screen SCREEN NOTE The spark arrester must be free of breaks and holes Replace if necessary 5 Install the spark arrester...

Page 31: ...orrect setting will usually be Dual element or Oil Bath Air Filter GXl IO 3 turns out GX140 1 5 8 turns out Cyclone Air Filter GXI IO 2 turns out GXI 40 I l 2 turns out CAUTION Do not tighten the pilot screw against its seat the pilot screw or seat this will damage 3 After the pilot screw is correctly adjusted turn the throttle stop screw to obtain the standard idle speed Standard idle speed 1 400...

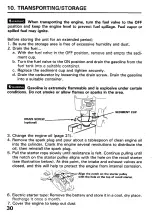
Page 32: ...v flammable and is exolosive under certain conditions Do not smoke or allbw flames or sparks in the area DRAIN SCREW optional SEDIMENT CUP 3 Change the engine oil page 21 I I 4 Remove the spark plug and pour about a tablespoon of clean engine oil into the cylinder Crank the engine several revolutions to distribute the oil then reinstall the spark plug 5 Pull the starter rope slowly until resistanc...

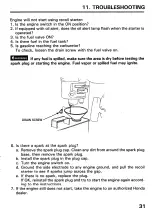
Page 33: ...starting the engine Fuel vapor or spilled fuel may ignite SCREW 6 Is there a spark at the spark plug a Remove the spark plug cap Clean any dirt from around the spark plug base then remove the spark plug b Install the spark plug in the plug cap c Turn the engine switch on d Ground the side electrode to any engine ground and pull the recoil starter to see if sparks jump across the gap e If there is ...

Page 34: ... connected and free of corrosion 2 Is the battery fully charged NOTE If the engine does not charge the battery check the circuit breaker 3 If the starter motor operates but the engine will not start follow the troubleshooting procedures described under recoil starter operation 32 ...

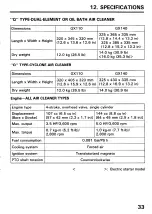
Page 35: ...405 x 320 mm 325 x 430 x 335 mm 12 6 x 15 9 x 12 6 in 12 8 x 16 9 x 13 2 in IDry weight 112 0 kg 26 5 lb 114 0 kg 30 9 lb Engine ALL AIR CLEANER TYPES Engine type I 4 stroke overhead valve single cylinder 107 cc 6 5 cu in 144 cc 8 8 cu in 157 x 42 mm 2 2 x 1 7 in 1 64 x 45 mm 2 5 x 1 8 in 1 Max output 13 5 HP 3 600 rpm 15 0 HP 3 600 rpm Max torque 0 7 kg m 5 2 ft lb 2 800 rpm 1 O kg m 7 7 ft lb 2 ...

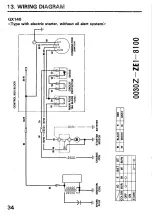
Page 36: ...W Gr BIIWG BllW rl IGNITION CHARGE STARTER BATTERY COIL COIL MOTOR CONTROL BOX BLOCK BllR 1 MAIN FUSE CIRCUIT DIODE 5A BLADE PROTECTOR TYPE1 COMBINATION SWITCH BI BLACK 1 R 1 RED W 1 WHITE 1 Gr 1 GRAY 0030Z ZEl 8100 ...

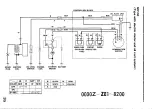
Page 37: ...NTROL BOX BLOCK I I i W Gr BllW OlI Bl W rI BllW W OIL ALERT UNIT BllW 3 I BI MAIN FUSE CIRCUIT DIODE l5A BLADE PROTECTOR COMBINATION TYPE SWITCH OIL LEVEL CHARGE STARTER BATTERY SWITCH COIL MOTOR 1 I t 1 ...

Page 38: ...n reviewed with the Service Manager contact the owner of the dea lership or the General Manager l If your problem still has not been resolved to your satisfaction contact American Honda Motor Co Inc P O Box 100021 Duluth Georgia 301361942 1 Telephone 404 497 6400 We still need the following information in order to assist you Your name address and telephone number Engine model and serial number Dat...

Page 39: ...ine Distributor for your area www honda engines com dea htm If you are still dissatisfied after speaking with the Regional Engine Distributor you may contact the Honda Office as shown American Honda Motor Co Inc Power Equipment Division Customer Relations Office 4900 Marconi Drive Alpharetta GA 30005 8847 Or telephone 770 497 6400 M F 8 30 am 7 00 pm EST When you write or call please provide the f...

Page 40: ......

Page 41: ......

Reviews: