background image

Instructions

12

(3) Click the        button in the upper right corner to switch between video 

files of the front view lens and video files of the rear-view mirror head.

Smartphone Interaction

Ins

tr

uc

tio

ns

Honda App Instructions

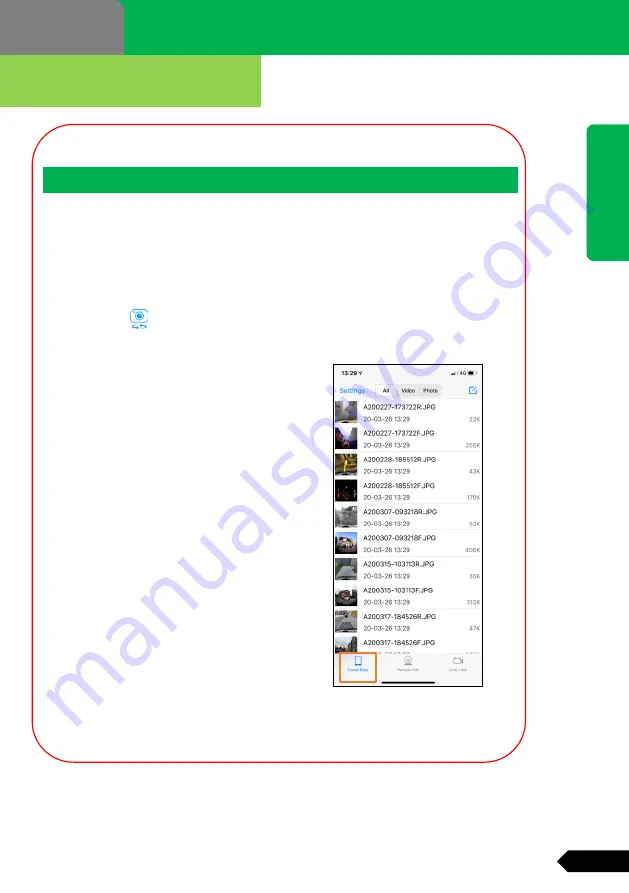
Local file page

Note: If video playback fails when you use the built-in smartphone player, 

choose the built-in DVR-Link player instead.

(1) Click the [video playback] button at the bottom of the screen to enter 

the remote file list of the DVR.

(2) Click the corresponding file in the file list to perform remote playback.

(4) Press and hold the list of files to 

delete files or download them to your 

mobile phone.

(5) Different types of video files are on 

the "ordinary video", "collision 

protection", "manual protection" and 

"parking monitoring" pages respectively. 

You can switch between the above pages 

to find the corresponding type of video 

file.

Summary of Contents for Drive Recorder

Page 1: ......

Page 2: ...Drive Recorder User Manual Please read the instruction manual carefully before using This product should be installed by an authorised Honda dealer ...

Page 3: ...er DVR Please read these instructions carefully before using For after sales support please contact your Honda dealer There may be some differences between the pictures shown in this instruction manual and the actual product Please refer to the actual product ...

Page 4: ...esture Induction Function 5 3 Indicator LED and Buzzer Status 6 4 Features and Functions 7 5 Smart Phone Interaction 9 Interconnection Introduction 9 Honda App Installation 10 Wireless Connection Instruction 11 Honda App Instructions 12 6 HDMI Functions 16 7 HDMI Guidance 17 Reference 1 Q A 18 2 Precautions for Use 19 3 FAQ 20 ...

Page 5: ...ct a Honda dealer If you continue to use the DVR it may cause an accident fire or electric shock Before inserting and removing the memory card make sure that the DVR is fully turned off and the LED is off otherwise the memory card may be damaged When inserting a memory card make sure that the metal contacts are facing upwards otherwise it may damage the card slot Do not use a non original memory c...

Page 6: ... malfunction Do not subject the equipment to pressure or the equipment may malfunction Adjust the camera angle to ensure that it covers the bonnet of the vehicle and the traffic lights Do not insert or remove a memory card during DVR recording otherwise it will damage the current video file and it may damage the memory card After a certain period of use memory card fragmentation increases which ma...

Page 7: ...an be used Loose break Press the button When not on gear P press the button When on gear P press the button When vehicle is started the DVR will enter general mode automatically and start recording Button type OFF Mode Car key type LOCK Mode Orange indicator flickers Button type ACC Mode Car key type ACC Mode Orange indicator Blue indicator Orange indicator Power ON Power OFF After 3 min Preface N...

Page 8: ...ton Forward start and stop recording button Back video protection button Microphone HD output interface HD output interface rubber plug Memory card slot Wireless status LED indicator Blue Power LED indicator Orange Infrared gesture sensing area Double sided tape for mounting Appearance Parts and Functions 4 Instructions ...

Page 9: ...mode 3 Instructions 5 Note 1 General mode The DVR starts video recording by default 2 General mode The device automatically enters HDMI mode when it detects the insertion of the HDMI wire harness In HDMI mode users can play back video by pressing the appropriate buttons 3 Do not unplug the memory card during recording as it will damage the current video file Gesture General mode HDMI mode Move to ...

Page 10: ...nstructions LED Indicator Status Status Wireless indicator Blue Power indicator Orange OFF Wireless connection deactivate Power OFF ON Wireless connection activate Stop recording Flicker 1 Live view data transferring Recording video and sound Fast blink 2 Video lock prompt 2 Slow blink 1 Recording video only Note 1 In General mode the power indicator flickers at 1Hz for both video and audio record...

Page 11: ...ile in standby mode it will start video recording for 1 minute The maximum number of video files for parking monitoring is five When the number reaches five the oldest files will be overwritten In normal operation mode the DVR will detect the motion of the vehicle in front in real time In road conditions such as a traffic light junction or a traffic jam the DVR will prompt the driver by making a s...

Page 12: ...n the vehicle display device Operate the image with the previous next play pause return button on the DVR 8 Features and Functions Instructions Smartphone connection Installing the dedicated app DVR Link on a smartphone allows the user to connect the DVR with the smartphone The DVR provides live streaming playback and various settings and functions that make use of this smartphone application Para...

Page 13: ...Normal Ayymmdd hhmmssF JPG Normal Ayymmdd hhmmssR JPG Instructions Smartphone Interaction Instructions Connectivity Introduction File system and file name logic Note yy YEAR mm MONTH dd DAY hh HOUR mm MINUTE ss SECOND When the DVR Link app is pre installed on a smartphone and wirelessly connected to the DVR real time preview file playback and DVR system settings can be accessed through the smartph...

Page 14: ...for DVR Link in the Google Play store to download 10 Instructions Smartphone Interaction Instructions Honda App Installation Android Google Play store Apple App Store Method 1 Download and install from the Apple App store Click on the App Store app on an Apple iPhone Type in DVR Link from the search option box Download and install DVR Link Note does not support WeChat QR code installation ...

Page 15: ...ults To protect user privacy change the DVR SSID name and or password on first use See page 16 for more information about how to manage wireless settings 2 If you forget the connection password refer to the following operation to restore factory settings When the power is on video recording is stopped and the wireless connection is activated press the Then press the and hold down simultaneously fo...

Page 16: ...ilt in DVR Link player instead 1 Click the video playback button at the bottom of the screen to enter the remote file list of the DVR 2 Click the corresponding file in the file list to perform remote playback 4 Press and hold the list of files to delete files or download them to your mobile phone 5 Different types of video files are on the ordinary video collision protection manual protection and ...

Page 17: ... built in smartphone player choose the built in DVR Link player instead 2 Click the photo or video The file will play browse 3 DVR photo files automatically search and download to the phone storage after entering the mobile phone album page 2 Click on the download button in the the lower right corner of the screen Download the file The file is saved to the smartphone memory 3 The download dialogue...

Page 18: ...n in the live view window image quality will be lower than the actual video file 2 Issues with wireless communication may cause a lag time during Live view 1 Click on the bottom right of the screen to enter the Live view 2 Click the video key on the real time screen to stop start video recording 3 Click the photo button on the real time screen to take photos 4 Double tap on the Live view window to...

Page 19: ...e external display in order to output normal images Time synchronisation manually force a time sync between the smartphone and the DVR Motion detection in front of vehicle adjust the switch that detects motion in front of the vehicle The default setting is OFF In the calibration option follow the prompts to calibrate the vehicle motion detector Collision protection adjust the sensitivity of the au...

Page 20: ... immediately Video player option set the default video player Choose between the built in smartphone video player and the built in DVR Link video player for video playback Instructions HDMI Functions There is an HDMI interface on the DVR After you connect with the vehicle display device through the HDMI cable you can play the image on the vehicle display device Use the button on the DVR to operate...

Page 21: ...he HDMI cable to connect the DVR and the display device After connection the display device displays the playlist interface The files in the red box are the selected files Press or on the DVR or use gestures to operate You can switch to the last section or the next section of video files Press to play Quickly press to stop the video Press and hold to return to the playlist page Press and hold in t...

Page 22: ...as the device may malfunction After the engine starts confirm that the orange indicator on the DVR is flickering before you commence driving Install the latest version of the app if available High definition video files tend to be large Downloading too many video files may use up the storage capacity of your phone Video files are automatically saved on the memory card of the DVR The maximum durati...

Page 23: ...ea in direct sunlight Install the DVR in a safe location on the upper middle part of the vehicle s windscreen Before use calibrate the DVR with the DVR Link app Otherwise the vehicle motion detecting function will be affected Because the DVR detects the motion of the preceding vehicle with an image algorithm the following situations may cause false or missing information strong light insufficient ...

Page 24: ... display completely during HDMI playback The output resolution of the DVR is inconsistent with the resolution of the display equipment Use the smartphone app to change to a compatible resolution The video image is blurred Dust or foreign matter on the lens Dirt on the front windscreen Video recording in extreme situations bad weather or poor driving conditions Clean the lens and front windscreen w...

Reviews: