


38
Servicing Your Honda
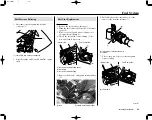
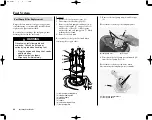
Subframe
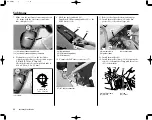
7. Make sure the air cleaner connecting tube tab
(11) aligns with the air cleaner connecting
tube clamp hole (12).
(11) air cleaner connecting tube tab
(12) air cleaner connecting tube clamp hole
8. Tighten the screw (13) on the air cleaner
connecting tube clamp to the specified torque:
0.5 lbf·ft (0.7 N·m, 0.1 kgf·m)
Check the distance between the band ends is
0.18 ± 0.06 in (4.5 ± 1.5 mm).
(12)
(11)
9. Hook the fuel tank band (14).
Install the ECM mounting rubber (15) to the
ECM bracket (16).
(14) fuel tank band
(15) ECM mounting rubber
(16) ECM bracket
(15)
(14)
(16)
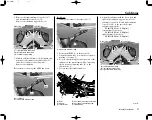
(18) muffler clamp
(20) exhaust pipe
(19) gasket (new)
13. Install the muffler (21).
14. Install the muffler clamp (18) by aligning the
tab (22) of the muffler clamp with the cutout
(23) of the muffler.
(18)
(19)
(20)
(13) screw
(13)
0.18
±
0.06 in
(4.5
±
1.5 mm)
(17) IAT sensor connector
(17)
(18) muffler clamp
(22) tab
(21) muffler
(23) cutout
(23)
(21)
(22)
(18)
11. Remove the old gasket from exhaust pipe.
12. Install the muffler clamp (18) and a new
gasket (19) to the exhaust pipe (20).
10. Connect the IAT sensor connector (17).
Summary of Contents for crf250r 2012
Page 1: ......
Page 2: ...2012 Honda CRF250R OWNER S MANUAL COMPETITION HANDBOOK ...
Page 7: ......
Page 17: ...10 Instruments Controls ...
Page 21: ...14 Before Riding ...
Page 27: ...20 Basic Operating Instructions ...
Page 147: ...140 Adjustments for Competition ...
Page 165: ...158 Technical Information Wiring Diagram ...
Page 174: ...MEMO ...
Page 175: ...MEMO ...
Page 176: ...MEMO ...