background image


 14

2.

 H77 

 H78

 H79

1.

H79

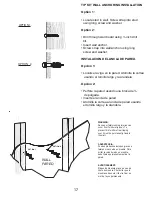
TIP KIT WALL ANCHORING INSTALLATION

4. Move unit towards wall and insert strap 

    through cut out. 

5. Screw strap into underside of top of unit 

    using short screw and washer. 


INSTALACION DEL ANCLA DE PARED

4. Mueva la unidad hacia la pared e inserte

    la correa por la parte cortada.

5. Atornille la correa por la parte de abajo

   de la tapa de la unidad usando el tornillo

   corto y la arandela

19

Summary of Contents for 109058

Page 1: ..._____ Date Purchased __________________ DO NOT RETURN YOUR UNIT TO THE STORE CONTACT US FIRST For FAST FRIENDLY and EFFICIENT service call Toll Free 1 800 668 0490 8 00am 5pm Monday Friday EST United...

Page 2: ...mero de lote ____________________ Fecha de compra __________________ NO DEVUELVA LA UNIDAD A LA TIENDA CONT CTENOS PRIMERO Para servicio r pido amable y eficiente llame a N mero gratuito 1 800 668 049...

Page 3: ...ES BESOINS FUTURS Num ro du lot ____________________ Date d achat __________________ NE PAS RETOURNER VOTRE UNIT AU MAGASIN VEUILLEZ D ABORD NOUS CONTACTER Pour un service RAPIDE AMICAL et EFICACE veu...

Page 4: ...ing READTHEINSTRUCTIONS Beforeyoubeginassembly readtheinstructionscarefully Note the arrow direction on each panel when assembling the case Our easy to assemble furniture is easy to put together Just...

Page 5: ...cional pueden ser solicitados para validar reclamaci n Cuidado de Muebles Para quitar las etiquetas de piezas frote suavemente con un pa o suave humedecido con un limpiador dom stico suave Windex o Pl...

Page 6: ...chiffon doux imbib d un d tergent m nager non agressif Windex ou Pledge surl tiquette de la pi ce en question Ensuite soulevez un coin de l tiquette puis tirez dessus fermement mais doucement jusqu c...

Page 7: ...7 Parts list Liste des pi ces Lista de piezas x3 9058 T 9058 BTM 9057 GL 9057 GR 9057 DF PWP DB 635x160 PWP DSL 350x160 PWP DSR 350x160 9914A DBM 706 001 CTN 9058 BP...

Page 8: ...mencer l assemblage tudiez attentivement les illustrations des vis ci dessous TAILLE R ELLE El uso del tornillo incorrecto puede provocar da os al producto Antes de ensamblar revise los tipos de torni...

Page 9: ...9 ACTUAL SIZE TAILLE R ELLE ESCALA REAL M4x8mm M5x40mm M8x25mm 6 3x10mm 6 8x40mm M3x19mm M6x35mm 2 1 3 4 5 6 7 8 9 10cm PHILLIPS ESTRELLA TOILE HAMMER MARTILLO MARTEAU 4x16mm 4x32mm...

Page 10: ...necesarias No incluido Outils n cessaires Non inclus Hammer Martillo Marteau Phillips screwdriver Desarmador en cruz Tournevis Philips 3 x H71 6 x H60 3 x H71 6 x H60 Finished Edge Borde Terminado Bor...

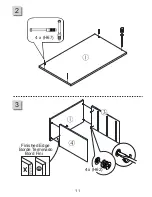
Page 11: ...11 2 3 4 x H67 4 x H62 Finished Edge Borde Terminado Bord Fini...

Page 12: ...12 4 5 5 x H90 4 x H50 Finished Edge Borde Terminado Bord Fini 4 x HM1 HM2...

Page 13: ...7 13 6 5 x H89 30 x H53 90...

Page 14: ...14 8 4 x H67 3x...

Page 15: ...15 9 10 4 x H64...

Page 16: ...16 11 12 4 x H68 1 x HH1 15 LBS MAX...

Page 17: ...meuble Pour viter que le meuble ne bascule il faut le fixer au mur de fa on permanente 17 TIP KIT WALL ANCHORING INSTALLATION Option 1 Locate stud in wall Screw strap into stud using long screw and wa...

Page 18: ...OPTION 2 OPTION 1 H78 x 2 H79 x 1 H77 x 1 H82 x 1 OPTION 1 H78 x 2 H77 x 1 H79 x 1 H82 x 1 OPTION 2 13 18 H81 x1 option 1 option 2...

Page 19: ...hrough cut out 5 Screw strap into underside of top of unit using short screw and washer INSTALACION DEL ANCLA DE PARED 4 Mueva la unidad hacia la pared e inserte la correa por la parte cortada 5 Atorn...

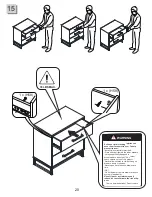
Page 20: ...l Do not remove WARNING Serious or fatal crushing injuries can occur from furniture tip over To help prevent tip over Install tip over restraint provided Place heaviest items in the lower drawers Unle...

Page 21: ...sa en materiales o mano de obra Para obtener informaci n m s detallada sobre la garant a del producto puede ponerse en contacto con nosotros en 1 800 668 0490 Esta garant a le otorga derechos legales...

Reviews: