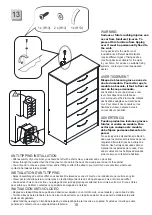
and pull firmly but smoothly until the label comes off. Dust as needed with a
cleanser (Windex or Pledge) over the part label. Then life a corner of the label
To remove part labels, gently rub a soft cloth moistened with a mild household
stick, shoe polish, or a crayon.
Photos and additional information may be requested to validate claim.
If you feel the item is defective beyond resolution with part replacements,
between 8:00am-5:00pm, Monday through Friday (Eastern Time). Holiday
If you have any questions about your new furniture, just call
locate the right item when you need it. If any parts are missing or defective
attractive and functional.
step-by-step instruction carefully, and you will have furniture that is both
We suggest starting with the subassembly of the parts before beginning
READ THE INSTRUCTIONS. Before you begin assembly, read the instructions carefully.
4
Our easy-to-assemble furniture is easy to put together. Just follow these
NOTE!
This cabinet should take an average time of 75 minutes to build. Having a
helper with building this unit will simplify and speed up the assembly process.
Assembly should be done in a dry location on a flat, level surface.
Here’s How:
NOTE: SOME PARTS MAY NOT BE IDENTIFIED WITH LABELS.
Furniture Care
please return this product with your receipt to the place of purchase.
weekends will not be sta
ff
ed. Have the part number handy when you call.
the main assembly.
IDENTIFY THE PIECES AND HARDWARE. First, lay all the parts and hardware
out on the floor surface as you see them in the Parts List. This will help you
please contact our customer service.
clean, lint-free absorbent cloth. Spray furniture polish may be used when
cleaning. Scratches and nicks can be touched up with a furniture touch-up
Summary of Contents for 108735
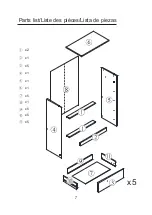
Page 7: ...7 x 2 x 5 x 1 x 1 x 5 x 1 x 5 x 5 x 5 x 1 x 1 x5 Parts list Liste des pi ces Lista de piezas...
Page 9: ...9 ACUTAL SIZE TAILLE R ELLE ESCALA REAL H2 H3 H9 H10 H12 H13 2 1 3 4 5 6 7 8 9 10cm...
Page 11: ...11 2 3 6X H5 6X H2 H1 4 x H11...
Page 12: ...12 4 5 4X H5 4X H7...
Page 13: ...13 6 4X H8 30X H4 90...
Page 14: ...14 7 2 x H11 5x...
Page 15: ...15 8 9 2X H6...
Page 16: ...16 10 11 4X H10 2X H12 1X H15...
Page 17: ...17 12 1X H3 1X H3...


