8
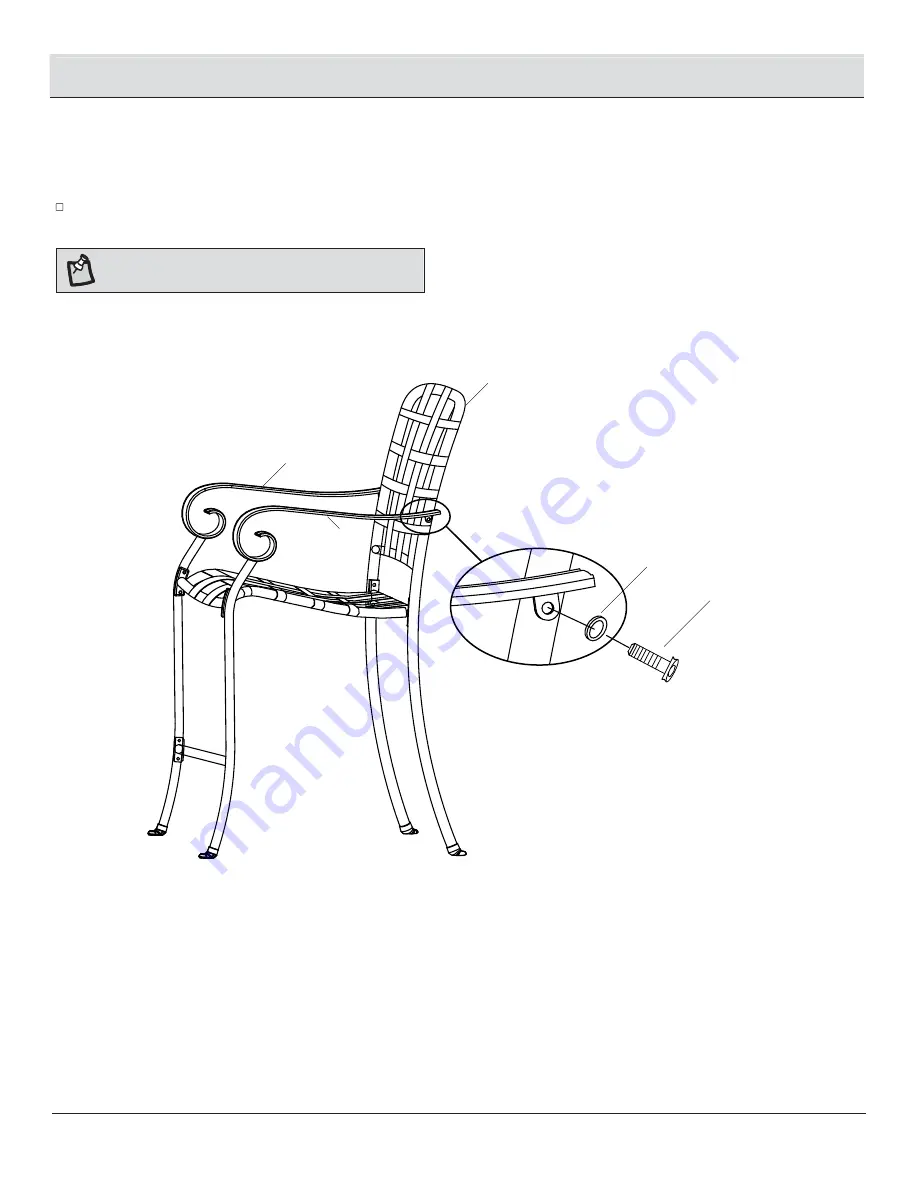
Chair Assembly (continued)
4
Securing the chair back
Secure the chair back (D) to the back of the right arm (A) and the left arm (B) using M6x18 bolts (AA) and M6 washers (DD).
AA
D
A
B
DD
NOTE: Loosely tighten all bolts using the hex wrench (FF).
Page 1: ...em 584 472 Model FSS61118HA YLW USE AND CARE GUIDE SUMMERVILLE 3 PIECE STEEL BALCONY SET Questions problems missing parts Before returning to the store call Customer Service 1 888 628 1888 HOMEDEPOT C...
Page 2: ...the substitutions with similar merchandise if the model is question is no longer in production Contact the Customer Service Team at 1 888 628 1888 or visit www HomeDepot com PLANNING ASSEMBLY Read al...
Page 3: ...s i s s a r e h t r u f r o f 888 628 1888 1 t c a t n o c e s a e l P Pre Assembly continued CHAIR PACKAGE CONTENTS Part Description Quantity A Right arm 2 B Left arm 2 C Chair seat 2 D Chair back 2...
Page 4: ...4 Pre Assembly continued TABLE PACKAGE CONTENTS Part Description Quantity F Table top 1 G Table leg 4 H Leg connector 1 G F H...
Page 5: ...P Chair Assembly 1 Attaching the chair arms to the chair seat Attach the right arm A to the front of the chair seat C using M6x18 bolts AA and M6 washers DD Repeat step 1 to attach the left arm B to...
Page 6: ...ring the front bar to the chair arms Secure the front legs of the right arm A and the left arm B together with the front bar E by using M6x18 bolts AA and M6 washers DD AA DD E B NOTE Loosely tighten...
Page 7: ...628 1888 t c a t n o c e s a e l P Chair Assembly continued 3 Attaching the back to the chair seat Insert M6x18 bolts AA and M6 washers DD through the chair seat C and into the chair back D NOTE Loose...
Page 8: ...continued 4 Securing the chair back Secure the chair back D to the back of the right arm A and the left arm B using M6x18 bolts AA and M6 washers DD AA D A B DD NOTE Loosely tighten all bolts using t...
Page 9: ...t r u f r o f 1 888 628 1888 t c a t n o c e s a e l P Chair Assembly continued 5 Tightening the bolts Once all bolts are in place fully tighten all bolts and place M6 bolt covers EE on them Ensure t...
Page 10: ...ching the table legs Place the table top F upside down on a soft surface Attach the four table legs G to the table top F using M6x15 bolts BB and M6 washers DD G F BB DD NOTE Loosely tighten all bolts...
Page 11: ...28 1888 t c a t n o c e s a e l P Table Assembly continued 2 Connecting the leg connector to the table legs Connect the leg connector H to the table legs G by using M6x25 bolts CC and M6 washers DD F...
Page 12: ...e Care and Cleaning For best results clean frames with a damp cloth and dry thoroughly This will help prevent mildew by removing dirt particles that may accumulate Do not clean with abrasive materials...
Page 13: ...Questions problems missing parts Before returning to the store call Customer Service 1 888 628 1888 HOMEDEPOT COM Retain this manual for future use...
Page 14: ...elo FSS61118HA YLW GU A DE USO Y MANTENIMIENTO JUEGO PARA BALC N SUMMERVILLE DE ACERO DE 3 PIEZAS Preguntas problemas o piezas faltantes Antes de regresar a la tienda llama al Servicio al Cliente 1 88...
Page 15: ...e no est n cubiertas bajo esta garant a Nos reservamos el derecho de sustituir el producto por mercanc a similar si el modelo en cuesti n ya no se fabrica Comun cate con el Equipo de Servicio al Clien...
Page 16: ...tencia llama al 1 888 628 1888 Preensamblaje continuaci n CONTENIDO DEL PAQUETE DE LA SILLA Pieza Descripci n Cantidad A Brazo derecho 2 B Brazo izquierdo 2 C Asiento de la silla 2 D Respaldo de la si...
Page 17: ...4 Preensamblaje continuaci n CONTENIDO DEL PAQUETE DE LA MESA Pieza Descripci n Cantidad F Superficie de la mesa 1 G Pata de la mesa 4 H Conector de la pata 1 G F H...
Page 18: ...tar los brazos al asiento de la silla Fija la barra derecho A al frente del asiento C con los cuatro pernos M6x18 AA y las arandelas M6 DD Repite el paso 1 para montar el brazo izquierdo B al asiento...
Page 19: ...ar la barra frontal a los brazos de la silla Fija la barra frontal E a la parte trasera del brazo derecho A y el brazo izquierdo B con pernos M6X18 AA y arandelas M6 DD AA DD E B NOTA Aprieta ligerame...
Page 20: ...Ensamblaje de la Silla continuaci n 3 Fijar el respaldo del asiento Inserta pernos M6x18 AA y arandelas M6 DD a trav s del asiento de la silla C y en el respaldo de la silla D AA D C A B DD NOTA Apri...
Page 21: ...n 4 Respaldo de la silla Fija el respaldo de la silla D a la parte trasera del brazo derecho A y el brazo izquierdo B con pernos M6x18 AA y arandelas M6 DD AA D A B DD NOTA Aprieta ligeramente todos l...
Page 22: ...ia llama al 1 888 628 1888 Ensamblaje de la Silla continuaci n 5 Apretar los pernos Aprieta todos los pernos cuando est n en su lugar y c brelos con las cubiertas M6 EE Aseg rate de que todas las cone...
Page 23: ...10 Ensamblaje de la Mesa 1 C mo conectar las patas de la mesa H F BB DD NOTA Aprieta ligeramente todos los pernos con la llave hexagonal FF...
Page 24: ...mblaje de la Mesa continuaci n 2 C mo ensamblar el conector de las patas a las patas de la mesa Fija el conector de la pata H a las patas de la mesa G con pernos M6x25 CC y arandelas M6 DD F G H CC DD...
Page 25: ...Para mejores resultados limpia el armaz n con un pa o h medo y s calo completamente Esto ayudar a prevenir la aparici n de moho al quitar las part culas de polvo que puedan acumularse No limpiar con...
Page 26: ...Preguntas problemas o piezas faltantes Antes de regresar a la tienda llama al Servicio al Cliente 1 888 628 1888 HOMEDEPOT COM Conserva este manual para uso en el futuro...