


Once you’ve connected all the leads, turn on your DVR and you are ready to go, so just follow
these simple instructions to get your home security system up and running;
1. Connecting your DVR to your broadband router.
Make sure the DVR is turned off and
using the Ethernet cable provided, plug one end into the LAN Port (7) on your DVR and
connect the other end into an available port on your broadband router.
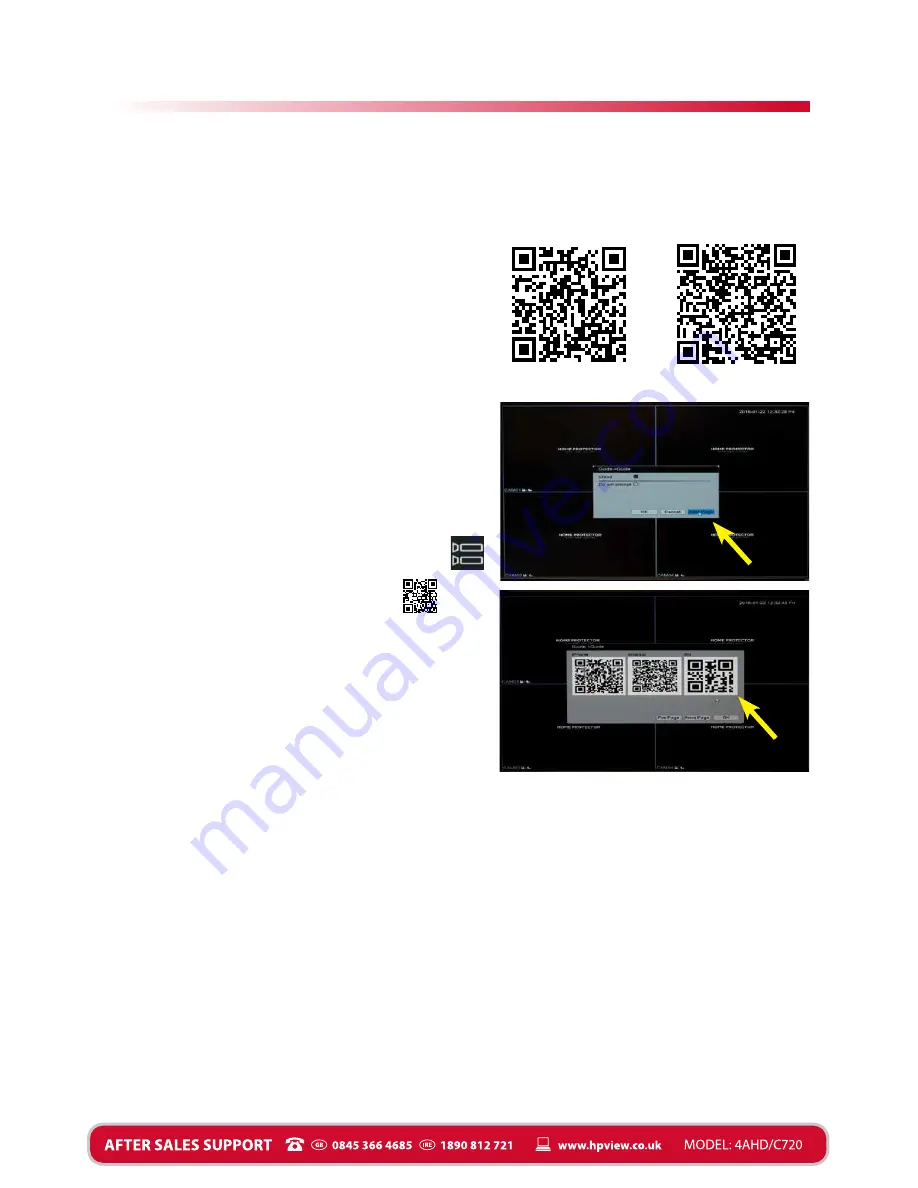
2. Downloading the NPview App to your iOS
or Android phone.
You can either scan the appropriate QR code
opposite, using your device, to take you straight
to the App or alternatively visit iTunes or
Google Play and search for the NPview App.
3. Scanning the QR code from your DVR.
• Turn on your DVR and display and the
SCREEN 1
opposite will appear. Press “Next Page” and
SCREEN 2
will appear.
• Open the App on your iOS or Android phone.
(if you have not already created your username,
select “Register” to create your unique login).
• Login using your username and password.
• On your phone select Device Management (
)
• Click “Add device”
• On your phone next to Cloud ID click
then
with your phone scan the SN QR Code on
display
SCREEN 2
see opposite.
NB: The ID number of your DVR will be displayed
next to Cloud ID when you have scanned the code
successfully.
• Click Save and the message “Successfully Added”
will appear.
• The App will return to the Device List and your
DVR ID number will be displayed in the list.
• Click on your DVR number to view your cameras live.
4. Selecting your preferred recording settings.
The default recording mode is continuous
mode for each camera, which means that the cameras will record continuously to the built-in
hard drive. The capacity of the hard drive is about thirty days and when the disk is full it will
overwrite the previous video starting from the earliest recording. (If you want to know more
about changing recording options, please refer to the online User Guide*).
Now you’ve completed the setup your home security system is ready to go. You can view your
cameras remotely using the NPview App providing you have a Wi-Fi or 3G/4G data connection
on your device.
If you have any questions, contact us on the appropriate number in the panel below or go to
the website shown in the panel. Alternatively you can use the Producty Info QR code on page 5
to access the online User Guide.
4
Connecting the DVR to the Internet
4
Android
iOS
SCREEN 1
SCREEN 2


