background image

Questions, problems, missing parts? Before returning to the store,  

call Home Decorators Collection Customer Service 

8 a.m. - 7 p.m., EST, Monday - Friday, 9 a.m. - 6 p.m., EST, Saturday

1-800-998-7021 

HOMEDEPOT.COM/HOMEDECORATORS

Retain this manual for future use.

Summary of Contents for 1007572528

Page 1: ... 6 p m EST Saturday 1 800 998 7021 HOMEDEPOT COM HOMEDECORATORS Item 1007572528 Model 1906VA60 312925 THANK YOU We appreciate the trust and confidence you have placed in Home Decorators Collection through the purchase of this bathroom furniture We strive to continually create quality products designed to enhance your home Visit us online to see our full line of products available for your home imp...

Page 2: ...ead to product damage Small parts may present choking hazard prior to assembly Do not stand step or climb on unit CAUTION USE preventative cleaning measures to keep your stone pristine USE sealers according to the product specific directions Blot spills quickly and wash with mild soap and warm water Stone countertop is surprisingly resilient to stains and scratches However as a preventative measur...

Page 3: ...clusion or limitation of incidental or consequential damages so the above limitations may not apply to you This warranty gives you specific legal rights and you may also have other rights that vary from state to state and province to province Please see a store or contact 1 800 998 7021 for more details Minnesota Residents IMPORTANT HEALTH NOTICE SOME OF THE BUILDING MATERIALS USED IN THIS HOME OR...

Page 4: ...sing or damaged do not attempt to assemble the product Estimated Assembly Time 45 minutes 24 hours for silicone caulk to dry TOOLS REQUIRED NOT INCLUDED Phillips Screwdriver Utility Knife Silicone Caulk Power Drill With Drill Bit Measuring Tape Level HARDWARE INCLUDED NOTE Hardware not shown to actual size AA BB CC Part Description Quantity AA Touch Up Pen 1 BB Handle Options 2 CC Knob Options 8 ...

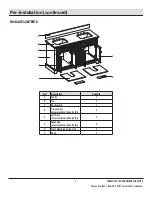
Page 5: ...ce Pre Installation continued PACKAGE CONTENTS G H F E I B C A Part Description Quantity A Vanity 1 B Top 1 C Backsplash 1 E Tip out Door preassembled to Vanity A 2 F Left Door preassembled to Vanity A 2 G Right Door preassembled to Vanity A 2 H Floor Plumbing Cutout Lid 2 I Shelf 2 ...

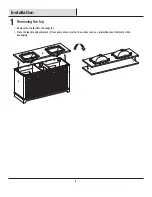
Page 6: ...lation 1 Removing the top Remove the top B from the vanity A Place the top B and backsplash C face down onto a scratch free surface such as a protection sheet that came in the packaging Back Back 2 1 1 A B 3 3 ...

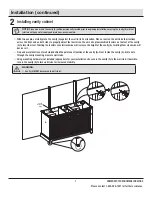
Page 7: ...oth sides to properly adjust the levelers on the unit Use preassembled levelers on the feet of the vanity A to level the item Twisting the levelers counterclockwise will increase the height of the vanity A twisting them clockwise will decrease it Find and mark locations of wall studs behind the permanent location of the vanity A From inside the vanity A drill a hole through the vanity mounting are...

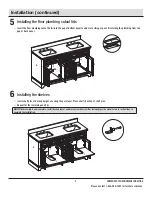
Page 8: ... overhang is equal on both sides over the wood cabinet left and right side walls Remove any excess caulk before allowing to dry NOTE It may be easier to install the faucet and or drain assembly not included before securing the stone top to the wood cabinet 1 2 2 B A 4 Installing the backsplash Apply silicone caulk not included to the unpolished side and bottom of the backsplash C Position the back...

Page 9: ... panel to add more storage space if installing the plumbing from the gap of back panel H H A 6 Installing the shelves Insert shelf pins at desired height ensuring they are level Place shelf I on top of shelf pins Repeat for the remaining shelf I NOTICE Assembly is now complete Install desired faucet and drain assemblies neither included per the manufacturers instructions to complete the installati...

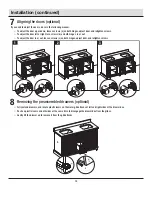
Page 10: ...h hinges in or out To adjust the door in or out loosen screws c on both hinges adjust door and retighten screws 1 2 2 2 2 2 2 3 1 2 3 1 1 3 1 8 Removing the preassembled drawers optional Fully extend drawers and locate plastic levers on the metal glide tracks at left and right sides of the drawer box Push on plastic levers on both sides at the same time to disengage the drawer box from the glides ...

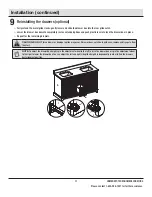
Page 11: ...nd push plastic levers to lock the drawer box in place Repeat for the remaining drawers CAUTION DO NOT force drawer or damage to glide may occur If drawer does not slide in with ease remove and try again from the start NOTE To adjust the drawer box height spin the adjustment wheel to the left to raise the drawer box or spin the adjustment wheel to the right to lower the drawer box You can adjust t...

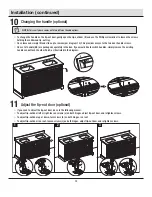
Page 12: ...dle BB are packaged separately in the box If you would like to switch handles simply remove the existing handles and attach the other finish as illustrated in the diagram 2 E 1 3 BB 11 Adjust the tip out door optional If you need to adjust the tip out door do so in the following manner To adjust tip out door left or right loosen screws a on both hinges adjust tip out door and retighten screws To a...

Page 13: ...ray back inside of the top tip out door E 1 E 2 13 Changing the knobs optional NOTE This vanity base comes with two different knobs options One set of knobs CC are packaged separately in the box If you would like to switch knobs simply remove the existing knobs and attach the other finish as illustrated in the diagram Repeat the same step for the drawers CC 1 2 F G ...

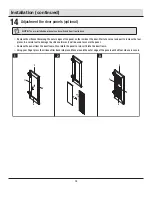
Page 14: ... inside of the door Start at a corner and pull to remove the four pieces Be careful not to damage the silicone trim as it will be used to secure the panel Remove the panel from the door frame then rotate the panel to reinsert it into the door frame Using your finger press the silicone trim back into place Move around the outer edge of the panels until all four sides are secure 4 1 2 3 4 1 2 3 1 2 ...

Page 15: ...ct Use caution placing items such as soap or any fragranced material on the stone surface Use a soap dish coaster or similar item to protect the surface if placing any soap or fragranced products on the stone If soap or fragranced products come in contact with the stone top rinse the surface with water and dry using a soft non abrasive cloth DO NOT use products to clean the stone top that contain ...

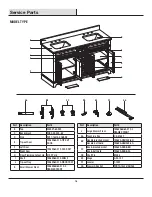
Page 16: ...utout Lid 312 FP Lid I Shelf 1906VA60 312 SHELF J Tip out Tray 1906VA60 312 WOOD TRAY K Small Drawer Front 1906VA48 60 312 S DRAWER FRONT Part Description Part L Large Drawer Front 1906VA48 60 312 L DRAWER FRONT AA Touch Up Pen OX 0180Y BB Handle brushed nickel 1906VA HANDLE BN Handle Soft Gold 1906VA HANDLE SG CC Knob brushed nickel 1906VA KNOB BN Knob Soft Gold 1906VA KNOB SG DD Shelf Pin B1044 ...

Page 17: ...ssing parts Before returning to the store call Home Decorators Collection Customer Service 8 a m 7 p m EST Monday Friday 9 a m 6 p m EST Saturday 1 800 998 7021 HOMEDEPOT COM HOMEDECORATORS Retain this manual for future use ...

Reviews: