background image


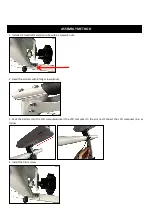
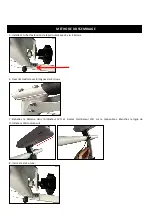
ASSEMBLY METHOD 

1.


Installed 2 treadmill extension tube with 4 4 nuts . 


2.


Fixed the armrest with 8 long 4nuts. 


3.


Pack the battery into the LCD computer&insert the LCD computer to the arm rest.Connect the LCD computer line. as 

follow. 


4.


Install the Plum screw. 


Summary of Contents for A90-136

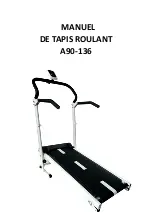
Page 1: ...MANUAL TREADMILL A90 136 ...

Page 2: ... top condition examine it regularly for signs of damage or wear and tear 6 If any defective parts are found replace them immediately Do not use the unit again until it is perfect working order 7 If you hear any unusual noises from the unit during use stop using immediately Do not use the unit again until the problem has been rectified 8 Wear suitable clothing while using the unit Avoid loose flaps...

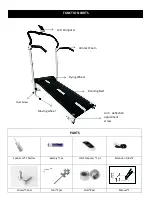
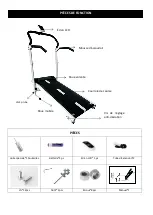
Page 3: ... Special oil 1 bottles Battery 1 pc LCD Computer 1 pc Extension Tube 2 Screws 12pcs Tool 2pcs Nuts 8pcs Manual 1 LCD Computer Armrest Foam Flying Wheel Running Belt Anti deflection adjustment screw Moving wheel Plum Screw ...

Page 4: ...eadmill extension tube with 4 screws 4 nuts 2 Fixed the armrest with 8 long screws 4nuts 3 Pack the battery into the LCD computer insert the LCD computer to the arm rest Connect the LCD computer line as follow 4 Install the Plum screw ...

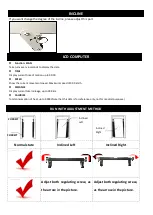
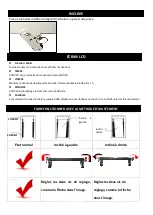
Page 5: ...ent speed Maximum speed of 99 9 km h DISTANCE Display current total mileage up to 99 9km CALORIES Total consumption of heat up to 9999 Note that this data is for reference only not for medical purposes RUN WITH ADJUSTMENT METHOD Normal state Inclined Left Inclined Right Adjust both regulating screw as the arrow in the picture Adjust both regulating screw as the arrow in the picture CORRECT CORRECT...

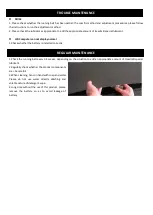
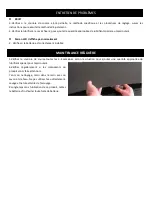
Page 6: ...not display normal 1 Check whether the battery is installed correctly REGULAR MAINTENANCE 1 Check the running belt every 3 4 weeks depending on the situation to add an appropriate amount of treadmill special lubricant 2 Regularly check whether the product components are be careful 3 When cleaning hand in hand with soap and water Please do not use water directly Washing and volatile nature of deter...

Page 7: ...MANUEL DE TAPIS ROULANT A90 136 ...

Page 8: ...fectueuses sont trouvées remplacez les immédiatement Ne pas utiliser l appareil à nouveau jusqu à ce qu il soit parfait 17 Si vous entendez des bruits inhabituels de l appareil pendant l utilisation arrêtez d utiliser immédiatement Ne pas utiliser l appareil à nouveau tant que le problème n a pas été corrigé 18 Portez un vêtement approprié lors de l utilisation de l appareil Évitez les rabats lâch...

Page 9: ...ile spéciale 1 bouteilles Batterie 1 pc Écran LCD 1 pc Tube d Extension 2 Vis 12pcs Outil 2pcs Écrous 8pcs Manuel 1 Écran LCD Mousse d accoudoir Roue volante Courroie de course Vis de réglage anti déviation Roue mobile Vis à prune ...

Page 10: ...n de tapis roulant avec 4 vis 4 écrous 6 Fixez l accoudoir avec 8 longues vis 4écrous 7 Emballez la batterie dans l ordinateur LCD et insérez l ordinateur LCD sur le repose bras Branchez la ligne de l ordinateur LCD comme suit 8 Insérez la vis à prune ...

Page 11: ...se maximale de 99 9 km h DISTANCE Afficher le kilométrage total actuel jusqu à 99 9 km CALORIES Consommation totale de chaleur jusqu à 9999 Notez que ces données ne sont à titre indicatif qu à des fins médicales FAIRE FONCTIONNER AVEC LA METHODE D AJUSTEMENT État normal Incliné à gauche Incliné à droite Réglez les deux vis de réglage comme la flèche dans l image Réglez les deux vis de réglage comm...

Page 12: ...t 2 Vérifiez si la batterie est correctement installée MAINTENANCE RÉGULIÈRE 5 Vérifiez la courroie de course toutes les 3 4 semaines selon la situation pour ajouter une quantité appropriée de lubrifiant spécial pour tapis roulant 6 Vérifiez régulièrement si les composants du produit sont faire attention 7 Lors du nettoyage main dans la main avec du savon et de l eau Ne pas utiliser l eau directem...

Reviews: