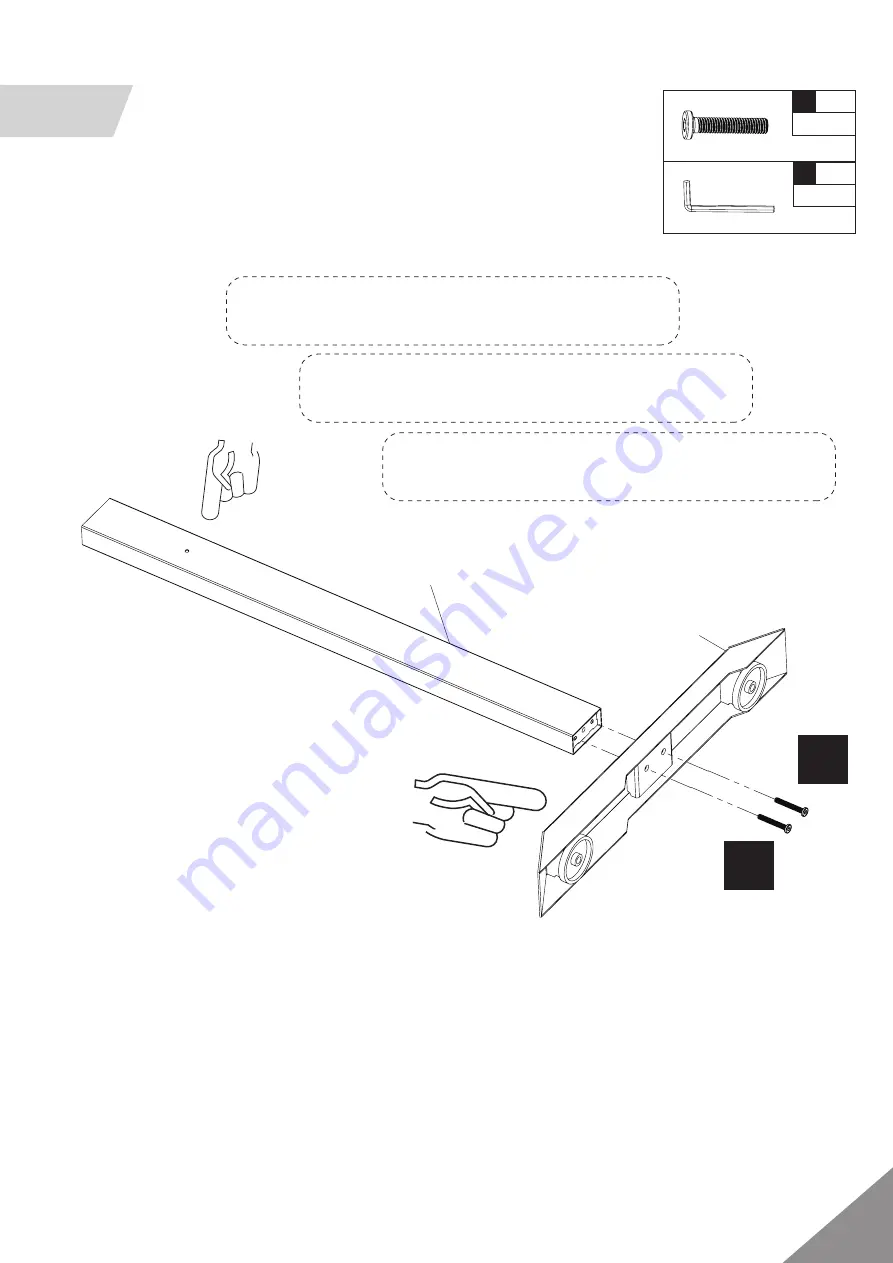
HOMCOM 836-501 Assembly & Instruction Manual Download Page 5

M4

X1

 E

X2

M6x40

10

11

B

B

3

Pay attention to the position of parts

Achten Sie auf die Lage der Teile

Die Montage ist in der Abbildung dargestellt.

Prestare attenzione alla posizione delle parti.

Seguire l’installazione mostrata in figura

The installation is shown in the figure.

4

Summary of Contents for 836-501

Page 1: ...ASSEMBLY INSTRUCTION MANUAL INcfb043_UK_DE_IT 836 501 IMPORTANT RETAIN FOR FUTURE REFERENCE READ CAREFULLY ...

Page 2: ...1 4 4 4 12 13 5 1 2 3 8 7 6 9 10 15 11 11 14 E EXPLOSIONSZEICHNUNG VISTA ESPLOSA XPLODED DRAWING ...

Page 3: ...X30 X16 B X6 C A X4 E X1 G X3 H I M6x12 M6x40 M6x50 X6 D 6x40 F X4 F 1 X1 M4 2 10 9 F F F F X3 P TEILE PARTI ARTS ...

Page 4: ...ire l installazione mostrata in figura 3 Stringere tutte le viti Part 11 and 14 towards hole up 2 The installation is shown in the figure 3 Tighten all screws 14 11 B B B B 9 Pay attention to the position of parts The installation is shown in the figure Achten Sie auf die Lage der Teile Die Montage ist in der Abbildung dargestellt Prestare attenzione alla posizione delle parti Seguire l installazi...

Page 5: ...ntion to the position of parts Achten Sie auf die Lage der Teile Die Montage ist in der Abbildung dargestellt Prestare attenzione alla posizione delle parti Seguire l installazione mostrata in figura The installation is shown in the figure 4 ...

Page 6: ... 6x40 Pay attention to the position of parts PAchten Sie auf die Lage der Teile Die Montage ist in der Abbildung dargestellt Prestare attenzione alla posizione delle parti Seguire l installazione mostrata in figura The installation is shown in the figure 5 ...

Page 7: ...6 7 M4 X1 E X4 A M6x12 M4 X1 E X4 A M6x12 A A 14 11 3 9 6 6 4 6 ...

Page 8: ...ndig an BEMERKUNG Si prega di stringere completamente tutte le viti installate in precedenza NOTA Prestare attenzione alla direzione di installazione assicurarsi di installare come mostrato in figura Achten Sie auf die Montagerichtung stellen Sie sicher dass Sie wie in der Abbildung gezeigt montieren 7 Pay attention to the installation direction be sure to install as shown in the figure ...

Page 9: ...11 A 14 3 9 7 Please fully tighten all the screws installed before REMARK Bitte ziehen Sie alle zuvor montierten Schrauben vollständig an BEMERKUNG Si prega di stringere completamente tutte le viti installate in precedenza NOTA 8 ...

Page 10: ... Sie die Schrauben an nachdem der Tisch ausgerichtet ist 2 Legen Sie eine Decke unter die Platte um Kratzer oder Schäden zu vermeiden NOTA 1 Stringere le viti dopo aver allineato il tavolo 2 Mettere un telo sotto il tavolo per evitare graffi o danni 2 Put a blanket under the board to avoid scratch or damage ...

Page 11: ...40 B 10 1 2 REMARK Please fully tighten all the screws before installed BEMERKUNG Bitte ziehen Sie alle zuvor montierten Schrauben vollständig an NOTA Si prega di stringere completamente tutte le viti installate in precedenza ...

Page 12: ...5 X4 A M4 X1 E M6x12 X2 A M6x12 M4 X1 E 15 8 Parts 15 and 8 can be replaced as needed Die Teile 15 und 8 können bei Bedarf ausgetauscht werden Le parti 15 e 8 possono essere sostituite come necessario 5 11 ...

Page 13: ... A M6x12 M4 X1 E 12 13 Need two people to flip the desk carefully REMARK Man braucht zwei Personen um den Tisch vorsichtig zu wenden BEMERKUNG Per capovolgere il tavolo in sicurezza sono necessarie due persone NOTA 12 ...

Page 14: ...rflächen 2 Entfernen Sie das Körperpapier vorsichtig wenn Sie es verwenden Bringen Sie das Produkt schnell in die richtige Position und drücken Sie es fest an um den vollständigen Kontakt aufrechtzuerhalten 3 Das geklebte Produkt wird durch die Größe des Bodenbereichs die Temperatur und die Druckhaltezeit beeinflusst 4 Die normale Klebetemperatur beträgt 8 C 32 C Verwenden sie es nicht bei einer nie...

Page 15: ...a stabilita del prodotto è influenzata dalle dimensioni dell area sottostante dalla temperatu ra e dal tempo di mantenimento della pressione 4 La temperatura normale dell adesivo e 8 32 cercare di non usarlo ad una tempera tura inferiore per evitare che la pasta si bagni troppo 5 Dopo averlo incollato non utilizzarlo immediatamente Quando il prodotto viene riposto per 5 10 ore l effetto sarà migli...

Page 16: ......

Reviews: