background image

5

EN: AIR FRYER | 

Instruction Manual

Wipe the inside and outside with a damp cloth.

WARNING!

Never pour oil or fat into the pan. This appliance uses hot air to fry!

PREPARING FOR USE

1. 

 Place the appliance on a stable, horizontal and level surface.

2. 

Do not place the appliance on non-heat-resistant surfaces.

3. 

Ensure the baking tray is correctly inserted into the pan.

4. 

Plug the included power cord into the back of the appliance. 

Do not put anything on top of the appliance as this can disrupt the airflow, reducing performance and potentially 

damaging the unit.

USING THE APPLIANCE

  The air fryer can prepare a large range of ingredients.

1. 

Insert the power plug into an earthed wall socket.

2. 

Carefully pull the pan out of the air fryer.

3. 

Put your ingredients in the pan. 


CAUTION:  

Never use the pan without the baking tray installed.

4. 

Slide the pan back into the air fryer. 

CAUTION:  


HOT SURFACE! 

Do not touch the pan or tray during and for some time after use, as they get very hot. Only hold the pan by the handle. 

5. 

Turn the temperature control knob to the required temperature. See the settings guide included to determine the right 

temperature.

6. 

Determine the required preparation time for the ingredient. Again, see the settings guide.

7. 

To switch on the appliance, turn the timer knob to the required time Add 3 minutes to the time when the appliance is cold.

8. 

 The heating light comes on until the required temperature is achieved. 

During the hot air frying process, the heating light comes on and goes out periodically. This indicates that the heating 

element is turning on and off to maintain the set temperature. 

-Excess oil from the ingredients is collected on the bottom of the pan.

9. 

 Some ingredients require shaking halfway through the preparation time. To shake the ingredients, pull the pan out of the 

appliance by the handle and - without removing the tray from the pan-shake the contents using the handle. 

10. 

Slide the pan back into the air fryer to resume. 


Caution:  

Do not press the basket release button during shaking. 

Tip: To reduce the weight, you can remove the basket from the pan and shake the basket only. To do so, pull the pan out of 

the appliance, place it on a heat-resistant surface and press the basket release button. 

Tip: If you set the timer to half the preparation time, you will hear the timer bell when you have to shake the ingredients. 

However, this means that you have to set the timer again to the remaining preparation time after shaking.

11. 

When you hear the bell, the set time has elapsed. Pull the pan out of the appliance and place it on a heat-resistant surface. 

Note: You can also switch off the appliance manually. To do this, turn the temperature control knob to “0”.

12. 

Check if the ingredients are ready. If the ingredients are not ready yet, simply slide the pan back into the appliance and 

Summary of Contents for HF-351M

Page 1: ... time and save it for future reference BG Моля прочетете инструкцията за употреба преди да използвате уреда за пръв път и я запазете за бъдещи справки RO Vă rugăm să citiți instrucțiunile de utilizare înainte de a folosi aparatul pentru prima dată și păstrați le pentru referințe viitoare GR Παρακαλώ διαβάστε το εγχειρίδιο οδηγιών πριν χρησιµοποιήσετε τ η συσκευή για πρώτη φορά και φυλάξτε το για μ...

Page 2: ...ade by children without supervision 10 Keep the appliance and its power cable out of the reach of children younger than 8 when it is switched on or is cooling down 11 Keep the power cord away from hot surfaces such as gas appliances ovens and other fuel sources 11 Do not allow the cable to touch a hot surface lie on a corner of a table or other sharp edge or reach children 11 Do not plug in the ap...

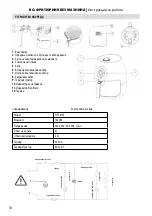
Page 3: ...Model HF 351M Power 1450W Currency 220 240V 50 60Hz Class I Pan volume 5L Basket volume 3 5L Timer 30 min Temperature control 80 200 C BEFORE FIRST USE Remove all packaging material Remove any stickers or labels from the appliance Thoroughly clean the frying pan and tray with hot water detergent and non abrasive sponge Micro switch Timer Temperature fuse Power indicator Motor Temperature controlle...

Page 4: ...3 minutes to the time when the appliance is cold 8 The heating light comes on until the required temperature is achieved During the hot air frying process the heating light comes on and goes out periodically This indicates that the heating element is turning on and off to maintain the set temperature Excess oil from the ingredients is collected on the bottom of the pan 9 Some ingredients require s...

Page 5: ...r for at least 30 minutes take them out and sit them on kitchen paper to dry 3 Pour 1 2 tablespoon of olive oil into a bowl put the sticks on top and mix until they are coated with oil 4 Remove the sticks from the bowl with your fingers or a kitchen utensil so that excess oil stays behind in the bowl Put the sticks on the baking tray in the pan Note Do not tilt the bowl to put all the sticks into ...

Page 6: ...0 200 Use oven ready Frozen breadcrumbed cheese snacks 100 300 8 10 180 Use oven ready Stuffed vegetables 100 300 10 160 CLEANING AND MINTENANCE Clean the appliance after every use to avoid oil and remnants building up The pan has a non stick coating Do not use metal utensils or abrasive cleaning materials to clean them as this may damage the coating 1 Remove the mains plug from the wall socket an...

Page 7: ... of the appliance You are preparing greasy ingredients When frying greasy ingredients there will be a larger amount of oil in the pan which produces white smoke This will not affect the appliance or end result Home made chips are not crispy when they comes out of the appliance The chips have not been soaked properly before frying Soak the potatoes in a bowl for at least 30 minutes take them out an...

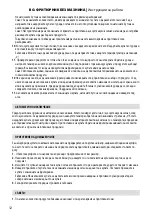
Page 8: ...с уреда Почистването и поддръжката на уреда не трябва да се извършва от деца без надзор 10 Дръжте уреда и захранващия кабел далеч от достъпа на деца под 8 години когато е включен или се охлажда 11 Дръжте захранващия кабел далеч от горещи повърхности като газови уреди фурни и други източници на топлина 12 Не позволявайте кабелът да се докосва до гореща повърхност да лежи на ъгъл на маса и други ост...

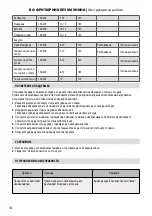
Page 9: ...ден вентилационен отвор 8 Захранващ кабел 9 Терморегулатор 10 Индикатор за нагряване 11 Индикатор Вкл Изкл 12 Таймер Спецификация Електрическа схема Модел HF 351M Мощност 1450W Напрежение 220 240V 50 60Hz Class I Обем на купата 5L Обем на кошницата 3 5L Таймер 30 min Терморегулатор 80 200 C микропревключвател таймер Термоизключвател индикатор on off мотор терморегулатор предпазител нагревател пред...

Page 10: ...те купата без в нея да е поставена кошницата 4 Плъзнете купата обратно във фритюрника ВНИМАНИЕ ГОРЕЩА ПОВЪРХНОСТ Не докосвайте купата или кошницата по време и известно време след употреба тъй като те се нагряват много Дръжте купата само за ръкохватката 5 Завъртете терморегулатора до желаната температура Вижте ръководството за готвене за да определите точната температура 6 Определете необходимото в...

Page 11: ...искате да премахнете преди да продължите да пържите В такъв случай изчакайте уреда да се охлади и следвайте стъпките описана в раздела Поддръжка и Почистване 11 Ако искате да свалите ръкохватката от кошницата и купата натиснете бутона за освобождаване и извадете под ъгъл АВТОМАТИЧНО ИЗКЛЮЧВАНЕ Уредът разполага с функция за автоматично изключване Когато таймерът достигне 0 ще чуете звуков сигнал сл...

Page 12: ...д размер форма и марка не можем да гарантираме най добрите настройки за вашите конкретни продукти Тъй като технологията Rapid Air незабавно затопля въздуха в уреда издърпването на купата за кратко от уреда по време на пържене почти не нарушава процеса на пържене Забележка Когато извадите купата уредът ще спре да работи но таймерът ще продължи да отброява Добавянето на малко количество мазнина дока...

Page 13: ... щепсела от контакта и оставете уреда да се охлади Забележка Извадете купата и кошницата за да оставите фритюрникът да се охлади по бързо 2 Избършете външната страна на уреда с влажна кърпа Забележка Трябва да използвате суха кърпа за почистване на светлата зона 3 Почистете купата и кошницата с гореща вода препарат за миене и неабразивна гъба Можете да използвате обезмаслител за да отстраните оста...

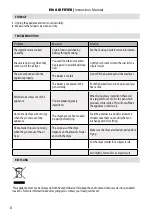
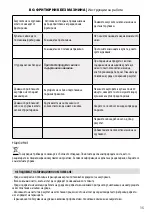
Page 14: ...ржене Домашно приготвеният чипс не е хрупкав когато излезе от фритюрника Хрупкавостта на чипса зависи от количеството вода и масло в чипса Уверете се че чипсът е изцеден преди да пържите Нарежете чипса дребно за по добър резултат Добавете малко количество мазнина за хрупкавост РЕЦИКЛИРАНЕ Този уред не трябва да се изхвърля с битовите отпадъци Помогнете да опазим природата чиста като го рециклирате...

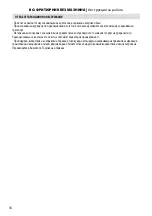
Page 15: ...съхраняване и транспорт На гаранция не подлежат консумативи на уредите всички отделящи се от основният корпус на уреда части и бързоизносващи се възли както и части които имат характер на принадлежност При повреди вследствие на неправилно боравене токов удар нестандартни захранващи напрежения замръзване гръмотевици наводнения пожари форсмажорни обстоятелства или други външни въздействия извън конт...

Page 16: ...i aparatul și cablul de alimentare la îndemâna copiilor în timp ce acesta este pornit sau lăsat să se răcească 11 Țineți cablul de alimentare la distanță de suprafețe fierbinți precum aparate de încălzire pe gaz cuptoare sau alte surse de căldură 12 Aveți grijă cablul de alimentare să nu atigă suprafețe fierbinți să treacă peste colțul mesei sau muchii ascuție nici să fie atins de copii 13 Nu cone...

Page 17: ...Orificiu de eșire a aerului 8 Cablu de alimentare 9 Regulator termic 10 Indicator de încălzire 11 Indicator Pornit Oprit 12 Temporizator Specificații Schema electrică Model HF 351M Putere 1450W Tensiune 220 240V 50 60Hz Class I Capacitate vas 5L Capacitate coș 3 5L Temporizator 30 min Regulator termic 80 200 C microîntrerupător Timer Comutator termic indicator on off Motor Regulator termic siguran...

Page 18: ...pul funcționării și imediat după utilizare deoarece acestea sunt foarte fierbinți Apucați vasul doar de mâner 5 Rotiți regulatorul termic până la temperatura dorită Vezi Ghidul de gătire pentru a seta temperatura de gătit necesară 6 Setați timpul necesar de găti 7 Pentru a porni aparatul rotiți temporizatorul la ora dorită Adaugați 3 minute la timpul de preparare dacă porniți prăjirea cu friteuză ...

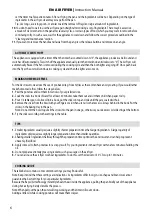
Page 19: ...atului rotiți butonul temporizatorului în sens antiorar până la valoarea 0 La scoaterea vasului de prăjire din friteuza procesul de gătire se va opri La reîntroducerea vasului de prăjire în friteuză procesul de prăjire va continua PREGĂTIRE CHIPSURI DE CASĂ Pentru a vă bucura la cele mai bune rezultate de gătit vă recomandăm să folosiți cartofi prăjiți pre pregătiți de exemplu cartofi congelați de...

Page 20: ...ratul oprește funcționarea dar temporizatorul va continua să numere timpul setat Adăugarea a unei cantități mici de grăsime în timpul preparării va face cartofii mai crocanți Cantitate Min Max g Durata min Temperatură 0 C Agitare Informații suplimentare Пържени картофи Cartofi congelați groși 200 400 12 16 200 Agitare Cartofi congelați subțiri 200 400 12 20 200 Agitare Chips de casă 8x8mm 200 350 ...

Page 21: ...i vasul și coșul de prăjire cu apă caldă un detergent de spălat vase și un burete non abraziv Pentru a elimina depunerile rămase puteți utiliza un degresant 4 Curățați interiorul aparatului cu apă caldă și un burete neabraziv 5 Curățați rezistența de încălzire cu o perie de curățat ca să îndepărtați resturile de alimente rămase 6 Așteptați până uscarea completă a aparatului înainte de reutilizare ...

Page 22: ...rmații despre reciclarea deșeurilor post consum contactați administrația locală SERVICIILE DE GARANȚIE NU POT FI OFERITE PENTRU Aparate cu certificat de garanție completat incorect sau aparate fără document de achiziție Toate piesele externe deteriorate în mod accidental de către client Aparate cu defecte care nu afectează funcționarea aparatului sau cu defecte de transport nerespectarea instrucți...

Page 23: ...α παιδιά θα πρέπει να επιβλέπονται για να μην παίζουν με τη συσκευή Ο καθαρισμός και η συντήρηση της συσκευής δεν πρέπει να πραγματοποιούνται από παιδιά χωρίς επιτήρηση 10 Κρατήστε τη συσκευή και το καλώδιο τροφοδοσίας μακριά από παιδιά κάτω των 8 ετών όταν είναι ενεργοποιημένη ή ψύχεται 11 Κρατήστε το καλώδιο τροφοδοσίας μακριά από θερμές επιφάνειες όπως συσκευές αερίου φούρνους και άλλες πηγές θ...

Page 24: ...σης καλαθιού 4 Καλάθι τηγανίσματος 5 Κάδος 6 Άνοιγμα εισόδου αέρα 7 Άνοιγμα εξόδου αέρα 8 Καλώδιο τροφοδοσίας 9 Θερμορυθμιστής 10 Ενδεικτική λυχνία θερμότητας 11 Ενδεικτική λυχνία ενεργοποίησης απενεργοποίησης 12 Χρονοδιακόπτης Προδιαγραφή Ηλεκτρολογικό σχέδιο Μοντέλο HF 351M Ισχύς 1450W Τάση 220 240V 50 60Hz Class I Χωρητικότητα κάδου 5L Χωρητικότητα καλαθιού 3 5L Χρονοδιακόπτης 30 min Θερμορυθμι...

Page 25: ...ζα ΠΡΟΣΟΧΗ ΖΕΣΤΗ ΕΠΙΦΑΝΕΙΑ Μην αγγίζετε τον κάδο ή το καλάθι κατά τη διάρκεια και για λίγο μετά τη χρήση καθώς θερμαίνονται πολύ Πιάνετε τον κάδο μόνο από τη χειρολαβή 5 Γυρίστε το θερμορυθμιστή στην επιθυμητή θερμοκρασία Ανατρέξτε στον οδηγό μαγειρέματος για να προσδιορίσετε την ακριβή θερμοκρασία 6 Προσδιορίστε το χρόνο που απαιτείται για την προετοιμασία του φαγητού 7 Για να ενεργοποιήσετε τη σ...

Page 26: ...τον κάδο πατήστε το κουμπί απελευθέρωσης και αφαιρέστε υπό γωνία ΑΥΤΟΜΑΤΗ ΑΠΕΝΕΡΓΟΠΟΙΗΣΗ Η συσκευή διαθέτει αυτόματη λειτουργία απενεργοποίησης Όταν ο χρονοδιακόπτης φτάσει στο 0 θα ακούσετε ένα ηχητικό σήμα και μετά το οποίο θα ενεργοποιηθεί Για να απενεργοποιήσετε τη συσκευή χειροκίνητα γυρίστε το χρονόμετρο αριστερόστροφα στο 0 Όταν βγάζετε τον κάδο η συσκευή θα σταματήσει τη διαδικασία μαγειρέ...

Page 27: ...ίνει αμέσως τον αέρα στη συσκευή η απομάκρυνση του κάδου για λίγο κατά τη διάρκεια του τηγανίσματος δε διακόπτει σχεδόν τη διαδικασία τηγανίσματος Σημείωση Όταν αφαιρέσετε τον κάδο η συσκευή θα σταματήσει να λειτουργεί αλλά ο χρονοδιακόπτης θα συνεχίσει να μετράει αντίστροφα Η προσθήκη μικρής ποσότητας λίπους κατά το μαγείρεμα των πατατών θα τις κάνει πιο τραγανές Min Max ποσότητα g Διάρκεια min Θ...

Page 28: ...ό της συσκευής με ένα υγρό πανί Σημείωση Πρέπει να χρησιμοποιήσετε ένα στεγνό πανί για να καθαρίσετε τη φωτεινή περιοχή 3 Καθαρίστε τον κάδο και το καλάθι με ζεστό νερό απορρυπαντικό και μη λειαντικό σφουγγάρι Μπορείτε να χρησιμοποιήσετε ένα απολιπαντικό για να αφαιρέσετε τις υπόλοιπες εναποθέσεις 4 Καθαρίστε το εσωτερικό της συσκευής με ζεστό νερό και ένα μη λειαντικό σφουγγάρι 5 Καθαρίστε το θερ...

Page 29: ...λύτερα αποτελέσματα Προσθέστε μια μικρή ποσότητα λίπους για τραγανότητα ΑΝΑΚΥΚΛΩΣΗ Αυτή η συσκευή δεν πρέπει να απορρίπτεται με οικιακά απορρίμματα Βοηθήστε στη διατήρηση της φύσης καθαρή ανακυκλώνοντάς τη σε εξειδικευμένα σημεία ανακύκλωσης Για περισσότερες πληροφορίες σχετικά με τους χώρους ανακύκλωσης επικοινωνήστε με την τοπική αυτοδιοίκηση Η ΥΠΗΡΕΣΙΑ ΕΓΓΥΗΣΗΣ ΔΕΝ ΚΑΛΥΠΤΕΙ Συσκευές με κάρτα εγ...

Page 30: ...οσπαστούν από το κύριο σώμα της συσκευής και κόμβοι ταχείας φθοράς καθώς και ανταλλακτικά που είναι προσαρτημένα Σε περίπτωση ζημιάς που οφείλεται σε ακατάλληλο χειρισμό ηλεκτροπληξία μη τυπικές τάσεις τροφοδοσίας κατάψυξη βροντές πλημμύρες πυρκαγιές ανωτέρα βία ή άλλες εξωτερικές επιρροές πέραν του ελέγχου του Κατασκευαστή του Εισαγωγέα του Εμπόρου και του Σέρβις ...

Page 31: ...ces BG Този символ означава че продукта не трябва да се изхвърля заедно с останалите битови отпадъци за да се избегне замърсяване на околната среда и нараняване на хора Отнесете уреда в специализиран пункт за рециклиране на електроуреди RO Acest simbol indică faptul că produsul nu trebuie aruncat împreună cu deșeuriile menajere pentru a fi evitată poluarea mediului și afectarea sănătății umane Duc...

Reviews: