


6
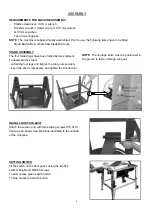
ASSEMBLY
NOTE:
If necessary, crank the saw blade fully up using
The handwheel to check the alignment.
-
The saw blade must be aligned exactly parallel with
the side edges of the table top.
-
It must not touch the table insert extrusion (neither
in 90 position nor in the 45 bevel position.
To correct the alignment:
-
Loosen the six hexagonal self-locking nuts holding the fastening brackets under the saw table by approx. one
turn.
-
Move the fastening brackets, with the motor unit/chipcase assembly attached to it, as required, until the
alignment is correct.
INSTALL RIP FENCE W/GUIDE EXTRUSION
Description
Q’ty
Fence extrusion
Rip fence carrier
Knurled nut M6
Carriage bolt M6X20
1
1
2
2
1. For use as rip fence the long fence extrusion
must be installed. It is mounted on the guide
extrusion at the front of the table.
2. Slide the head of the carriage bolts into the
guide extrusion.
3. After loosening the two knurled nuts the
fence extrusion can be removed and shifted:
Wide edge:
-for cutting thick stock
Small edge:
-for cutting thin stock
-when the saw blade is tilted.