background image

SAFETY 

HOLZMANN MASCHINEN GmbH   www.holzmann-maschinen.at 

 24


D 460FXL


12


SAFETY 

12.1


Intended Use 

The machine must only be used for its intended purpose! Any other use is deemed to be a case of 

misuse.  
To use the machine properly you must also observe and follow all safety regulations, the assembly 

instructions, operating and maintenance instructions lay down in this manual. 
All people who use and service the machine have to be acquainted with this manual and must be 

informed about the machine's potential hazards. 
It is also imperative to observe the accident prevention regulations in force in your area. 
The same applies for the general rules of occupational health and safety. 
The machine is used for: 
Turning wood. 

Any  manipulation  of  the  machine  or  its  parts  is  a  misuse,  in  this  case 

HOLZMANN-

MASCHINEN 

and  its  sales  partners  cannot  be  made  liable  for  ANY  direct  or  indirect 

damage. 

Even when the machine is used as prescribed it is still impossible to eliminate certain residual risk 

factors. 


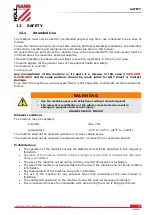
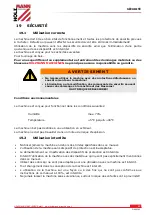
W A R N I N G  


Use the machine never with defective or without mounted guard! 


The removal or modification of the safety components may result in 

damage to equipment and serious injury! 

HIGHEST RISK OF INJURY!


Ambient conditions 

The machine may be operated: 

humidity 

max. 70% 

temperature 

+5°С to +40°С (+41°F to +104°F) 

The machine shall not be operated outdoors or in wet or damp areas. 
The machine shall not be operated in areas exposed to increased fire or explosion hazard. 
 

Prohibited use 


The operation of the machine outside the stated technical limits described in this manual is 
forbidden. 


Operation of the machine function without emergency stop button or impeller box with open 
doors is prohibited.


The use of the machine not according with the required dimensions is forbidden.  


The use of the machine not being suitable for the use of the machine and not being certified 
is forbidden. 


Any manipulation of the machine and parts is forbidden. 


The  use  of  the  machine  for  any  purposes  other  than  described  in  this  user-manual  is 
forbidden. 


The unattended operation on the machine during the working process is forbidden! 


It is not allowed to leave the immediate work area during the work is being performed.  


Summary of Contents for D 460FXL

Page 1: ... NL Originalfassung DE BETRIEBSANLEITUNG DRECHSELBANK Übersetzung Translation EN USER MANUAL WOOD TURNING LATHE FR MODE D EMPLOI TOUR À BOIS CZ NÁVOD K POUŽITÍ SOUSTRUHU NA DŘEVO IT ISTRUZIONI PER L USO TORNIO NL GEBRUIKSAANWIJZING DRAAIBANK D 460FXL ...

Page 2: ...ferumfang 15 6 2 Vorbereitende Tätigkeiten 15 6 2 1 Der Arbeitsplatz 15 6 2 2 Vorbereitung der Oberflächen 15 6 3 Zusammenbau 15 6 3 1 Verriegelungshebel 15 6 3 2 Planscheibe 15 6 3 3 Mitnehmer 16 7 BETRIEB 16 7 1 Betriebshinweise 16 7 2 Bedienung 17 7 2 1 Reitstock einstellen 17 7 2 2 Handauflage einstellen 17 7 2 3 Ein Aus schalten 17 7 2 4 Geschwindigkeit einstellen 17 8 WARTUNG 18 8 1 Instandh...

Page 3: ...27 13 1 3 Preparation of the surface 27 13 2 Assembly 27 13 2 1 Lock lever 27 13 2 2 Face plate 28 13 2 3 Spur center 28 14 OPERATION 29 14 1 Operation instructions 29 14 2 Operation 30 14 2 1 Tailstock adjustment 30 14 2 2 Tool rest adjustment 30 14 2 3 On Off switch 30 14 3 Speed adjustment 30 15 MAINTENANCE 31 15 1 Maintenance plan 31 15 2 Changing the drive belt 32 15 3 Cleaning 34 15 4 Dispos...

Page 4: ...rontal 40 20 2 3 Réteneur 40 21 FONCTIONNEMENT 41 21 1 Instructions d utilisation 41 21 2 Fonctionnement 42 21 2 1 Réglage du contrepoint 42 21 2 2 Réglage du support d outils 42 21 2 3 Démarrage arrêt de la machine 42 21 2 4 Réglage de la vitesse 42 22 ENTRETIEN 44 22 1 Plan de maintenance 44 22 2 Changement de la courroie 45 22 3 Nettoyage 47 22 4 Disposition 47 23 DÉPANNAGE 47 24 PŘEDMLUVA CZ 4...

Page 5: ...ry nástroje 55 28 2 3 Zapnutí vypnutí 55 28 2 4 Volba rychlosti otáčení 55 29 ÚDRŽBA 56 29 1 Předepsané práce 56 29 2 Čištění 56 29 3 Likvidace 57 30 ODSTRANĚNÍ ZÁVAD 57 31 PREFAZIONE IT 58 32 COMPONENTI 59 32 1 Tecniche 59 32 2 Dati tecnici 59 33 SICUREZZA 60 33 1 Uso conforme previsto 60 33 2 Avvertenze per la sicurezza 61 33 3 Rischi Residui 62 34 MONTAGGIO 63 34 1 Dotazione di fornitura 63 34 ...

Page 6: ...37 RIMEDI IN CASO DI ANOMALIE 70 38 VOORWOORD NL 71 39 TECHNIEK 72 39 1 Componenten 72 39 2 Technische gegevens 72 40 VEILIGHEID 73 40 1 Reglementaire toepassing 73 40 2 Veiligheidsaanwijzingen 74 40 3 Restrisico s 75 41 MONTAGE 76 41 1 Leveringsomvang 76 41 2 Voorbereidende werkzaamheden 76 41 2 1 De werkplaats 76 41 2 2 Voorbereiding van de oppervlakten 76 41 3 Montage 76 41 3 1 Vergrendelingshe...

Page 7: ... Reiniging 83 43 4 Verwijdering 83 44 VERHELPEN VAN FOUTEN 83 45 ERSATZTEILE SPARE PARTS 84 45 1 Ersatzteilbestellung spare parts order 84 45 2 Explosionszeichnung explosion drawing 86 46 EG KONFORMITÄTSERKLÄRUNG CE CERTIFICATE OF CONFORMITY 88 47 GARANTIEERKLÄRUNG 89 48 GUARANTEE TERMS 90 49 GARANTIE 91 50 ZÁRUČNÍ PODMÍNKY 92 51 DICHIARAZIONE DI GARANZIA 93 52 GARANTIEVERKLARING 94 53 PRODUKTBEOB...

Page 8: ...bsluhován a předešlo se ke škodám na stroji a zraněním osob IT LEGGERE LE ISTRUZIONI Leggere attentamente le istruzioni d uso e di manutenzione della vostra macchina e familiarizzare con gli elementi di comando della macchina per utilizzarla correttamente e per evitare di danneggiare le persone e la macchina stessa NL HANDLEIDING LEZEN Lees de gebruiks en onderhoudsaanwijzingen van uw machine zorg...

Page 9: ...nere la macchina prima della manutenzione e delle pause e scollegare la spina di rete NL Machine vóór onderhoud en pauzes uitschakelen en stekker uittrekken DE Bedienung mit Handschuhen verboten EN Operation with gloves forbidden FR Utilisation avec port de gants interdit CZ Nepoužívejte při práci rukavice IT Vietato l uso con i guanti NL Bediening met handschoenen verboden DE Warnung vor wegschle...

Page 10: ...nweise Missachtung kann zu ernsten Verletzungen führen Durch die ständige Weiterentwicklung unserer Produkte können Abbildungen und Inhalte geringfügig abweichen Sollten Sie Fehler feststellen informieren Sie uns bitte Technische Änderungen vorbehalten Kontrollieren Sie die Ware nach Erhalt unverzüglich und vermerken Sie etwaige Beanstandungen bei der Übernahme durch den Zusteller auf dem Frachtbr...

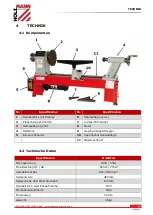
Page 11: ...ck Mitnehmer 3 Handauflage groß 8 Motor 4 Reitstock 9 Geschwindigkeitsregler 5 Ein Aus Schalter 10 Spannhebel Handauflage 11 Maschinenbett 4 2 Technische Daten Spezifikation D 460FXL Nennspannung 230V 50Hz Motorleistung S1 S6 500W 770W Spindeldrehzahl 650 3800min 1 Spitzenweite 460mm Spitzenhöhe über Maschinenbett 153mm Spindelstock Gewindeaufnahme M33 Morsekonusaufnahme MK2 Pinolenweg 55mm Gewich...

Page 12: ...TE VERLETZUNGSGEFAHR Arbeitsbedingungen Die Maschine ist für die Arbeit unter folgenden Bedingungen bestimmt Feuchtigkeit max 70 Temperatur von 5 С bis 40 С Die Maschine ist nicht für den Betrieb im Freien bestimmt Die Maschine ist nicht für den Betrieb unter explosionsgefährlichen Bedingungen bestimmt Unzulässige Verwendung Der Betrieb der Maschine unter Bedingungen außerhalb der in dieser Anleit...

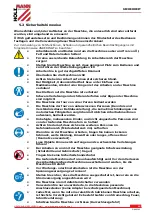
Page 13: ...nis und Verständnis dieser Betriebsanleitung die keine Einschränkungen von motorischen Fähigkeiten verglichen mit üblichen ArbeitnehmerInnen aufweisen bedient werden Unbefugte insbesondere Kinder und nicht eingeschulte Personen sind von der laufenden Maschine fern zu halten Achten Sie darauf dass sich keine weiteren Personen im Gefahrenbereich Mindestabstand 2m aufhalten Wenn Sie an der Maschine a...

Page 14: ...rößte Vorsicht geboten Ein sicheres Arbeiten hängt von Ihnen ab Auch bei Einhaltung aller Sicherheitsbestimmungen und bei bestimmungsgemäßer Verwendung sind folgende Restrisiken zu beachten Verletzungsgefahr für die Hände Finger durch das frei rotierende Werkstück während dem Betrieb Verletzungsgefahr durch scharfe Kanten des Werkstückes vor allem bei nicht mit entsprechendem Werkzeug Vorrichtung ...

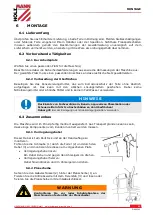
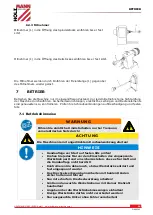
Page 15: ...geschehen Dabei keine Nitrolösungsmittel oder ähnliche Mittel und in keinem Fall Wasser verwenden HINWEIS Der Einsatz von Farbverdünnern Benzin aggressiven Chemikalien oder Scheuermitteln führt zu Sachschäden an den Oberflächen Daher gilt Bei der Reinigung nur milde Reinigungsmittel verwenden 6 3 Zusammenbau Die Maschine wird im Prinzip fertig montiert ausgeliefert Aus Transportgründen kann es sei...

Page 16: ...nd festen Sitz 7 1 Betriebshinweise WARNUNG Führen Sie sämtliche Umrüstarbeiten nur bei Trennung vom elektrischen Netz durch ACHTUNG Die Maschine nie mit angedrücktem Drechselwerkzeug starten HINWEIS Handauflage vor Start auf festen Sitz prüfen Drehen Sie jedes Mal vor dem Einschalten das eingespannte Werkstück per Hand um sicherzustellen dass es frei läuft und die Handauflage nicht berührt Kontro...

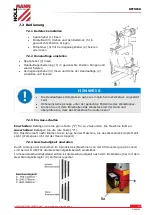
Page 17: ...pp unter der gedachten Mittellinie des Werkstückes Drehen Sie vor dem Einschalten das Werkstück mit der Hand und überprüfen Sie dass das Werkstück frei laufen kann 7 2 3 Ein Aus schalten Einschalten Betätigen Sie die grüne Taste I für ca 2 Sekunden Die Maschine läuft an Ausschalten Betätigen Sie die rote Taste 0 Die Maschine läuft nach Bleiben Sie so lange bei der Maschine bis das Werkstück komple...

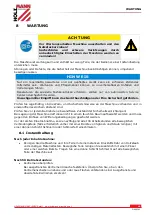
Page 18: ...inweise an der Maschine vorhanden und in einwandfrei leserlichem Zustand sind Prüfen Sie vor jedem Betrieb den einwandfreien Zustand der Sicherheitseinrichtungen Bei Lagerung der Maschine darf diese nicht in einem feuchten Raum aufbewahrt werden und muss gegen den Einfluss von Witterungsbedingungen geschützt werden Vor der ersten Inbetriebnahme sowie nachfolgend alle 100 Arbeitsstunden alle bewegl...

Page 19: ...tift oder Inbusschlüssel sichern und das Handrad abschrauben ACHTUNG Linksgewinde Distanzhülse rechts abziehen und Inbusschraube bei Riemenscheibe herausschrauben Mit Schonhammer die Antriebswelle vorsichtig aus dem Lagersitz links herausklopfen ACHTUNG Achten Sie darauf an welcher Seite der Impulsscheibe der Sicherungsring eingelegt ist Kann sowohl links als auch rechts sein Der Sicherungsring di...

Page 20: ...lopfen ACHTUNG Impulsscheibe sollte ohne Streifgeräusche in Leseeinheit drehbar sein Falls doch den Sitz der Ausgleichscheibe wechseln Links rechts von Impulsscheibe Distanzhülse aufsetzen und Handrad aufschrauben ACHTUNG Linksgewinde 1 Motor mit Riemenscheibe nach unten drücken spannen 2 Inbusschraube festziehen Lagersitz Impulsscheibe vorsichtig in Leseeinheit einlegen Sicherungsring nur als Aus...

Page 21: ...SORGUNG Fehler Mögliche Ursache Behebung Motor startet nicht Schalter defekt Schalter reparieren Stromversorgung ausgeschaltet Stromversorgung kontrollieren Sicherung defekt Sicherung wechseln Überlastsicherung hat angesprochen Überlastsicherung hineindrücken Starke Vibration Verzogenes Werkstück Austausch des Materials Werkstück schlecht zentriert Mittelpunkt genauer ausmessen Lockere Riemenschei...

Page 22: ...nt advancements in product design construction pictures and content may diverse slightly However if you discover any errors inform us please Technical specifications are subject to changes Please check the product contents immediately after receipt for any eventual transport damage or missing parts Claims from transport damage or missing parts must be placed immediately after initial product recei...

Page 23: ...5mm 7 Spur center 3 Tool rest wide 8 Motor 4 Tailstock 9 Speed controller 5 On Off switch 10 Excentric axis 11 Machine bed 11 2 Technical details Spezifikation D 460FXL Voltage 230V 50Hz Motor power S1 S6 500W 770W Spindle speed 650 3800min 1 Distance between centers 460mm Center height above machine bed 153mm Head stock norm spindle M33 Morse taper MK2 Tail spindle travel 55mm Weight 38kg ...

Page 24: ...tors WARNING Use the machine never with defective or without mounted guard The removal or modification of the safety components may result in damage to equipment and serious injury HIGHEST RISK OF INJURY Ambient conditions The machine may be operated humidity max 70 temperature 5 С to 40 С 41 F to 104 F The machine shall not be operated outdoors or in wet or damp areas The machine shall not be ope...

Page 25: ...ple particularly children to touch the machine or the cable Keep them away from your work area Make your workshop childproof Make sure there is nobody present in the dangerous area The minimum safety distance is 2m Wear suitable work clothes Do not wear loose clothing or jewelry as they might get caught in moving parts and cause severe accidents Wear a hair net if you have long hair Loose objects ...

Page 26: ...ine is used as required it is still impossible to eliminate certain residual risk factors totally The following hazards may arise in connection with the machine s construction and design Risk of injury to the hands fingers by the rotating workpioece during operation Risk of injury due to sharp edges of the workpiece especially in non fixed with a suitable tool device workpiece Risk of injury hair ...

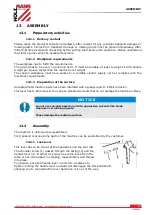
Page 27: ...he machines requirements 13 1 3 Preparation of the surface Uncoated metal machine parts have been insulated with a greasy layer to inhibit corrosion This layer has to be removed You can use standard solvents that do not damage the machine surface NOTICE Do not use solvents based on nitrite aggressive solvents like break cleaners or scrubbing agents These damage the machine surface 13 2 Assembly Th...

Page 28: ...d and wrench If the faceplate is being removed continue turning it until it comes off the spindle threads WARNING Do not operate the lathe until it is completely assembled and adjusted according to the instructions 13 2 3 Spur center Insert the tailstock cup center 1 into the hollow center of the headstock spindle Insert the shaft 1 of the tailstock center into the hollow center of the tailstock s...

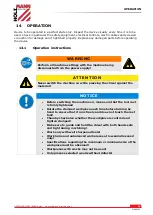
Page 29: ...ever switch the machine on while pressing the chisel against the material NOTICE Before switching the machine on make sure that the tool rest is firmly tightened Rotate the clamped workpiece each time before turning by hand to ensure that it runs freely and does not touch the rest tool Thereby check also whether the workpiece is centred and tighten clamped Make sure to guide and hold the chisel wi...

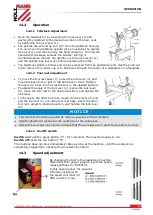
Page 30: ...nt Tighten the lever 4 when the tool rest base is in the desired position To adjust the angle of the tool rest 2 loosen the lock lever 3 move the tool rest to the desired position and tighten the lock lever To change to the other tool rest loosen the lock lever 3 and pull the tool rest 2 out of the tool rest base insert the other tool rest adjust to desired position and tighten the lock lever 3 NO...

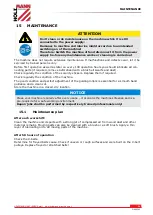
Page 31: ...of the security stickers Replace them if required Check regularly the condition of the machine The good condition and perfect adjustment of the guiding rollers is essential for a smooth band guidance and a clean cut Store the machine in a closed dry location NOTICE Clean your machine regularly after every usage it prolongs the machines lifespan and is a pre requisite for a safe working environment...

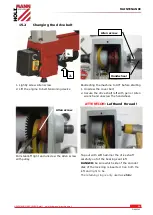
Page 32: ...r belt 2 Secure the drive shaft left with pen or Allen wrench and unscrew the handwheel ATTENTION Lefthand thread Pull standoff right and unscrew the Allen screw with pulley Tap out with soft hammer the drive shaft carefully out of the bearing seat left DANGER be sure which side of the encoder disk of the lock ring is inserted Can both the left and right to be The retaining ring is only used as sh...

Page 33: ...t gently on the bearing seat WARNING Pulse disk should be rotated in reading unit without noise If it does change the seat of the shim Left Right on the pulse disc Put distance sleeve and screw on handwheel ATTENTION Lefthand thread 1 Push down engine 2 Tighten Allen screw bearing seat Pulse disc carefully place in reader Circlip only as shim Pulse disc speed Tighten Allen screws after tightening ...

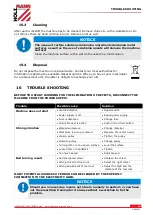
Page 34: ...ECTS DISCONNECT THE MACHINE FROM THE POWER SUPPLY Trouble Possible cause Solution Machine does not start Switch defective Repair switch Power supply is off Repair power supply Fuse is defective Change fuse Circuit breaker is active Push in the circuit button Strong vibration Warped workpiece Change material Workpiece is wrong centered Measure the center newly Loosen pulley Tighten the pulley Outwo...

Page 35: ...llustrations et le contenu peuvent être un peu différente Cependant si vous découvrez des erreurs s il vous plaît nous informer en utilisant le formulaire de commentaires S il vous plaît vérifier le contenu du produit immédiatement après réception pour quelque éventuelle dommages de transport ou de pièces manquantes Les réclamations pour dommages de transport ou de pièces manquantes doivent être f...

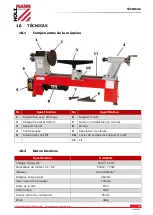
Page 36: ...fe d entraînement à 4 dents 3 Support d outil 8 Moteur 4 Contrepoupée 9 Régulateur de vitesse 5 Interrupteur On Off 10 Levier de serrage de support d outil 11 Lit 18 2 Datos técnicos Spezifikation D 460FXL Voltage fréquence 230V 50Hz Puiossance du moteur S1 S6 500W 770W Vitesses 650 3800min 1 Distance entre points 460mm max rayon de braquage 153mm Arbre de la tête M33 Cône morse MK2 Course arbre d...

Page 37: ... machine et des blessures HAUT RISQUE DE BLESSURES Conditions environnementales La machine est conçue pour fonctionner dans les conditions suivantes Humidité max 70 Température 5 С jusqu à 40 С La machine n est pas destinée à une utilisation en extérieur La machine ne doit pas travailler dans un milieu de risque d explosion 19 2 Utilisation interdite N utiliser jamais la machine en dehors des limi...

Page 38: ...imale 2m Lorsque vous travaillez avec la machine ne porte pas de vêtements amples cheveux longs ou des bijoux tels que colliers etc Les éléments individuels peuvent être couplés à des pièces mobiles de la machine et provoquer de graves dommages Porter un équipement de sécurité approprié lorsque vous travaillez avec des machines des lunettes de sécurité chaussures de sécurité Lorsque vous travaille...

Page 39: ...ême avec des lunettes de sécurité Risque de blessure de rebond Le rebond est une réaction soudaine dans lequel l outil touche la partie tournante et est jeté vers l opérateur Ces risques peuvent être minimisés si toutes les normes de sécurité sont appliquées la machine dispose des services et le bon entretien et l équipement destiné à être et est utilisé par personnel qualifié Malgré tous les disp...

Page 40: ... le levier de blocage Tirer sur le levier et tournez à gauche Placez le levier Poussez le levier et tournez à droite 20 2 2 Plateau frontal Placez la clé ouverte 2 derrière le plateau frontal 1 Fixer l arbre du moteur avec la barre de blocage 3 et desserrer ou fixer le plateau frontal avec la clé AVERTISSEMENT Vérifier avant chaque démarrage la fixation du plateau frontal 20 2 3 Réteneur Installez...

Page 41: ...imentation ATTENTION Ne jamais démarrer la machine avec l outil de tournage inséré NOTE Vérifiez que le support d outil est bien fixé avant de commencer Avant d allumer la machine tournez avec la main la pièce afin d assurer qu elle tourne librement et ne touche pas support d outil Vérifiez si la pièce est centrée et bien fixée Tenir et guidez avec les deux mains l outil de tournage en toute sécur...

Page 42: ... de la pièce Régler la hauteur juste en dessous de la ligne centrale de la pièce à usiner Tourner la pièce à la main avant de faire le tournage pour vérifier que la pièce peut se déplacer librement 21 2 3 Démarrage arrêt de la machine Démarrage Appuyez sur le bouton vert I pendant environ 2 secondes La machine est démarrée Observez l interrupteur de protection contre les surcharges 2 Arrêt Appuyez...

Page 43: ...Une fois la gamme de vitesse choisi la vitesse est alors réglable en continue par le potentiomètre fixé sur la poupée fixe cela en toute simplicité via une molette de réglage de la vitesse Une vitesse lente est utilisé pour Une ébauche grossière de la pièce amener la pièce à être centrer une pièce déséquilibré pour minimiser ainsi la vibration pour éviter aux grosses pièces une force centrifuges é...

Page 44: ... poussière lubrifiez avec une fine couche d huile ou de graisse toutes les pièces mobiles 22 1 Plan de maintenance Après chaque opération Nettoyer la machine et de ses parties avec un puissant jet d air comprimé de la poussière de bois et autres déchets Les pièces mobiles nettoyez les avec une brosse ou une brosse douce Appliquez une fine couche d huile de lubrification à toutes les parties mobile...

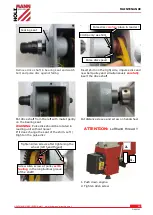
Page 45: ... avant de commencer 1 Dévisser le carter courroie 2 Bloquer l arbre d entraînement avec une clé Allen pour dévisser le volant ATTENTION Filetage gauche Dévisser la vis Allen de la poulie Frapper en douceur l arbre avec un maillet du côté du volant ATTENTION S assurer de quel côtés se trouve la bague de maintien à droite ou à gauche du disque La bague de maintien sert seulement de cale Vis Allen 1 ...

Page 46: ...tement sur l arbre côté gauche avec un maillet ATTENTION Le disque lecture vitesse doit pouvoir tourner librement et dans bruit Si ce n est pas le cas changer la bague de maintien gauche droite du disque Replacer la douille d écartement puis revisser le volant ATTENTION Filetage gauche 1 redescendre le levier 2 resserrer les vis Allen Logement de l arbre Faire attention en plaçant le disque Bague ...

Page 47: ...ble Solution La machine ne démarre pas Interrupteur défectueux Réparer Remplacer l interrupteur L alimentation est coupée Vérifiez l alimentation Fusible défectueux Remplacer le fusible La protection de surcharge a sauté Désactiver la protection contre les surcharges La machine vibre fortement Pièce de travail déformée Changement de matériel Pièce mal centrée Centrez avec précision Poulie libre Se...

Page 48: ...adným škodám Dodržujte bezpečnostní pokyny a dbejte výstrah Opomíjení bezpečnostních pokynů může vést k vážným škodám na zdraví apod Z důvodu neustálého vývoje našich produktů se mohou vyobrazení nebo obsah tohoto návodu mírně lišit od skutečnosti V případě zjištění nedostatků této dokumentace nás o těchto laskavě informujte Technické změny a tiskové chyby vyhrazeny Autorské právo 2017 Tato dokume...

Page 49: ...a Ø 145mm 7 4 zubý unašeč 3 Podpěra nástroje 8 Motor 4 Koník 9 Regulátor otáček 5 Vypínač 10 Upínací páka podpěry 11 Lože strojet 25 2 Technická data Specifikace D 460FXL Provozní napětí 230V 50Hz Výkon motoru S1 S6 500W 770W Otáčky vřetene 650 3800min 1 Vzdálenost mezi hroty 460mm Výška hrotu nad ložem 153mm Upínací závit vřetene M33 Morse kužel MK2 Vysunutí pinoly 55mm Hmotnost 38kg ...

Page 50: ...táž nebo změna bezpečnostních prvků může vést ke zranění NEJVYŠŠÍ NEBEZPEČÍ ZRANĚNÍ Pracovní podmínky Stroj je určen pro práci za následujících podmínek Vlhkost max 70 Teplota od 5 С do 40 С Stroj se nesmí provozovat venku Stroj není určen pro práci ve výbušném prostředí Nedovolené použití Provoz stroje mimo výše uvedené technické parametry je zakázán Provoz stroje bez k tomu určených bezpečnostní...

Page 51: ...ch vyvržení může vést k těžkým zraněním Při práci se strojem používejte vhodné ochranné vybavení a pomůcky rukavice brýle ochranu sluchu dýchací masku Nepoužívejte rukavice Před údržbou a seřizováním stroje ho odpojte od napájení Předtím stroj hlavním vypínačem vypněte poloha OFF Nikdy nepoužívejte přívodní kabel k transportu nebo manipulaci se strojem Pracující stroj nesmí být ponechán bez dozoru...

Page 52: ...ími částmi stroje a obrobku během provozu Nebezpečí úrazu elektrickým proudem při dotyku vodivých částí stroje Nebezpečí těžkého zranění zvláště řezných poranění nesprávným vedením nástroje vždy od těla Poškození sluchu pokud nebyly použity ochranné prostředky Nebezpečí zranění zpětným vrhem obrobku vymrštěním obrobku nebo jeho části Nebezpečí zranění oka odletujícími částmi i při použití ochranný...

Page 53: ...Použijte k tomu jemný čistící prostředek Nepoužívejte ředidla nebo vodu POKYN Použití ředidel benzínu agresivních chemikálií nebo abraziv vede k poškození povrchových ploch K tomu platí K čištění používejte pouze jemné čistící prostředky 27 3 Montáž stroje Stroj se dodává smontovaný Z transportních důvodů je nutné namontovat pouze několik dílů 27 3 1 Zajišťovací páka Tato páka je namontována na ko...

Page 54: ...ých spojů 28 1 Provozní pokyny VAROVÁNÍ Před zahájením údržby nebo nastavení stroje odpojte kabel elektrického napájení ACHTUNG Stroj nikdy nestartujte s nasazeným obráběcím nástrojem HINWEIS Před startem zkontrolujte pevné zajištění opěry nástroje Před každým zapnutím stroje rukou protočte upnutý obrobek abyste se ujistili že se volně otáčí a nedrhne o podpěru nástroje Přitom zkontrolujte že je o...

Page 55: ...vypnutí Zapnutí Stlačte zelené tlačítko I asi na 2 s Stroj se rozběhne Pozor na tlačítko přetížení stroje Vypnutí Stlačte červené tlačítko 0 Stroj se zastaví Zůstaňte u stroje dokud se obrobek úplně nezastaví Obrobek nikdy nezastavujte rukou 28 2 4 Volba rychlosti otáčení Volba rychlosti otáčení vřeteníku stroje D460FXL se provádí pomocí klínového řemene jeho založením podle schematického vyobraze...

Page 56: ...ředpokladem bezpečnosti Svévolný nekvalifikovaný zásah může stroj poškodit a ohrozit vaši bezpečnost Pravidelně kontrolujte přítomnost a stav varovných štítků na stroji Před každým provozem zkontrolujte stav bezpečnostních prvků stroje Stroj skladujte v suchých větraných prostorech chráněný před vlivem počasí Před prvním použitím a poté každých 100 provozních hodinách očistěte šroubové spoje a nam...

Page 57: ...ntrolujte napájení Vadná pojistka Vyměňte pojistky Ochrana proti přetížení stroj vypnula Stlačte ochranu proti přetížení Silné vibrace Deformovaný obrobek Vyměňte obrobek Špatně vycentrovaný obrobek Přesněji zaměřte těžiště Uvolněná řemenice Dotáhněte Opotřebovaný řemen Vyměňte hnací řemen Stroj na nerovné ploše Vyrovnejte podlahu pod strojem Uvolněný vřeteník či koník Zajistěte Příliš vysoké otáč...

Page 58: ... La violazione può causare gravi lesioni A causa del costante sviluppo dei nostri prodotti è possibile che le immagini e i contenuti siano leggermente differenti Se doveste riscontrare errori siete pregati di informarci Con riserva di modifiche tecniche Al ricevimento della merce controllatela immediatamente e fate annotare eventuali contestazioni al momento della consegna all addetto al recapito ...

Page 59: ... Motore 4 Contropunta 9 Regolatore della velocità 5 Interruttore on off 10 Leva di serraggio poggiamani 11 Piastra della macchina 32 2 Dati tecnici Specifica D 460FXL Tensione nominale 230V 50Hz Potenza motore S1 S6 500W 770W numero di giri mandrino 650 3800min 1 Distanza tra le punte 460mm Diametro massimo eseguibile con la piastra macchina 153mm Supporto del mandrino attacco filettato M33 Attacc...

Page 60: ... può causare danni all apparecchio e gravi lesioni ALTISSIMO RISCHIO DI LESIONI Condizioni di lavoro La macchina è progettata per lavorare alle seguenti condizioni Umidità max 70 Temperatura da 5 С a 40 С La macchina non è progettata per l uso all aperto La macchina non è progettata per l uso in condizioni a rischio di esplosione Uso improprio non ammesso Non è consentito l uso della macchina in c...

Page 61: ...ssare gioielli allentati indumenti ampi cravatte o capelli lunghi e sciolti usare una retina per capelli Gli oggetti liberi possono essere catturati causando lesioni gravissime Quando si lavora sulla macchina indossare adeguati dispositivi di protezione maschera anti polvere occhiali di protezione e protezioni per l udito Non indossare guanti di sicurezza Non è mai consentito lasciare la macchina ...

Page 62: ...ota liberamente Pericolo di lesioni dovute a spigoli vivi del pezzo in lavorazione soprattutto in caso di pezzo da lavorare non fissato con utensili dispositivi adeguati Pericolo di lesioni I capelli sciolti e gli indumenti larghi ecc possono essere catturati e avviluppati Pericolo di lesioni gravi Osservare tassativamente le norme di sicurezza riguardanti gli indumenti da lavoro Pericolo di lesio...

Page 63: ...4 2 2 Preparazione delle superfici Eliminare il conservante che viene applicato come protezione anti corrosiva alle parti non verniciate Questa operazione può essere fatta con i comuni solventi Non utilizzare solventi nitro o sostanze simili e non usare in nessun caso l acqua NOTA L uso di diluenti per vernici benzina prodotti chimici aggressivi o prodotti abrasivi causa danni materiali alle super...

Page 64: ...sare il disco portapezzo con la chiave fissa AVVERTENZA Prima di ogni messa in funzione della macchina controllare che il portapezzo sia bene in sede 34 3 3 Brida Introdurre la brida 1 nell apertura del supporto del mandrino finché alloggia bene in sede Introdurre la brida 1 nell apertura della contropunta finché alloggia bene in sede Le bride si allentano di nuovo inserendo la barra di fissaggio ...

Page 65: ...a ATTENZIONE Non avviare mai la macchina con l utensile per tornire premuto NOTA Prima di avviare controllare che il poggiamani sia bene in sede Ogni volta prima di accendere ruotare manualmente il pezzo da lavorare serrato per garantire che giri liberamente e non tocchi il poggiamani Controllare inoltre che il pezzo sia centrato e ben serrato Tenere e guidare saldamente l utensile di tornitura co...

Page 66: ...bile al pezzo Regolazione in altezza appena sotto l asse immaginaria del pezzo Prima di accendere girare il pezzo a mano e controllare che possa ruotare liberamente 35 2 2 Accensione spegnimento Accensione Azionare il tasto verde I per ca 2 secondi La macchina si avvia Spegnimento Azionare il tasto rosso 0 La macchina si ferma Restare accanto alla macchina finché il pezzo in lavorazione si arresta...

Page 67: ...ono presenti gli avvertimenti e le avvertenze per la sicurezza e se sono perfettamente leggibili Prima di ogni utilizzo controllare che i dispositivi di sicurezza siano in condizioni perfette In caso di stoccaggio della macchina questa non deve essere conservata in un locale umido e deve essere protetta dall influsso degli agenti atmosferici Prima della prima messa in servizio e successivamente og...

Page 68: ...a sinistra con il perno o la chiave a brugola e svitare il volantino ATTENZIONE Filettatura sinistrorsa Sfilare a destra la bussola distanziatrice e svitare la vite a esagono cavo per la puleggia Con la mazzuola a teste intercambiabili colpire con cautela l albero motore verso sinistra per estrarlo dalla sede ATTENZIONE Fare attenzione su quale lato del disco a impulsi è inserito l anello di sicur...

Page 69: ...sco a impulsi si dovrebbe rotare senza sfregatura nell unità di lettura Al contrario sostituire la sede dello spessore Sinistra Destra del disco a impulsi Posizionare la bussola distanziatrice e avvitare il volantino ATTENZIONE Filettatura sinistrorsa 1 Motore con puleggia premer serrare verso il basso 2 Stringere la vite a esagono cavo Sede del cuscinetto Inserire il disco a impulsicon cautela ne...

Page 70: ...non si avvia Interruttore difettoso Riparare l interruttore Alimentazione elettrica spenta Controllare l alimentazione elettrica Fusibile difettoso Sostituire il fusibile Protezione da sovraccarico scattata Far rientrare la protezione da sovraccarico Forti vibrazioni Pezzo da lavorare deformato Sostituire il materiale Pezzo da lavorare mal centrato Misurare il punto centrale più accuratamente Pule...

Page 71: ...cties Misvatting kan tot ernstige letsels leiden Door de permanente verdere ontwikkeling van onze producten kunnen afbeeldingen en inhoud minimaal verschillen Als u fouten vaststelt gelieve ons te informeren Technische wijzigingen voorbehouden Controleer de goederen onmiddellijk bij ontvangst en noteer eventuele afkeuringen op de vervoersdocumenten bij de overname door de leverancier Transportscha...

Page 72: ...nemer Z4 3 Leunspaan groot 8 Motor 4 Losse kop 9 Snelheidsregelaar 5 Aan Uit schakelaar 10 Spanhendel leunspaan 11 Machinebed 39 2 Technische gegevens Specificatie D 460FXL Nominale spanning 230V 50Hz Motorvermogen S1 S6 500W 770W Spindeltoerental 650 3800min 1 Draailengte 460mm Draaihoogte boven machinebed 153mm Vaste kop schroefdraadopname M33 Morseconusopname MK2 Rijweg pinole 55mm Gewicht 38kg...

Page 73: ... HOOGSTE RISICO VAN LETSELS Arbeidsvoorwaarden De machine is voor werk onder de volgende voorwaarden bestemd Vochtigheid max 70 Temperatuur van 5 С t m 40 С De machine is niet voor buitenwerk bestemd De machine is niet bestemd voor de werking in explosieve omstandigheden Niet doelmatige toepassing Het bedrijf van de machine in omstandigheden buiten de in deze handleiding vermelde grenzen is niet t...

Page 74: ...den wijde kleding dassen of lang open haar haarnet gebruiken als u aan de machine werkt Losse voorwerpen kunnen zich vervangen en ernstige letsels teweeg brengen Draag een geschikte veiligheidsuitrusting tijdens het werken aan de machine veiligheidsschoenen veiligheidsbril en gehoorbescherming Draag geen veiligheidshandschoenen De lopende machine mag nooit zonder toezicht zijn Schakel de machine u...

Page 75: ... bij een niet met desbetreffende gereedschappen voorziening gefixeerd werkstuk Risico op lichamelijke letsels Haren en losse kleding etc kunnen gepakt en opgewikkeld worden Ernstig risico voor lichamelijke letsels Let beslist op de veiligheidsvoorwaarden m b t werkkleding Risico op lichamelijke letsels door contact met spanningleidende componenten Risico op lichamelijke letsels door het kantelen v...

Page 76: ...veringsmiddel dat ter bescherming van onderdelen zonder verflaag werd opgebracht Dat kan met de gebruikelijke oplosmiddelen gebeuren Gebruik hiervoor geen oplosmiddelen op nitro basis of dergelijke middelen en in geen geval water INDICATIE Het gebruik van verfverdunners benzine agressieve chemische middelen of schuurmiddelen leidt tot materiële schade van de oppervlakken Vandaar geldt Voor de rein...

Page 77: ...plaat los of fixeer ze met de vorksleutel WAARSCHUW ING Controleer vóór elke ingebruikname van de machine dat de stelplaat goed vast zit 41 3 3 Meenemer Meenemer 1 in de opening van de vaste kop inschuiven tot hij vast zit Meenemer 1 in de opening van de losse kop inschuiven tot hij vast zit De meenemers worden d m v het inschuiven van de fixeerstang 1 tegenover de meenemer weer losgemaakt ...

Page 78: ...sche net is gescheiden OPGELET Start de machine nooit met aangedrukt draaigereedschap INDICATIE Controleer de leunspaan op vaste zitting alvorens te beginnen Draai iedere keer vóór het inschakelen het ingespannen werkstuk per hand om te garanderen dat het vrij loopt en de leunspaan niet aanraakt Controleer hierbij ook of het werkstuk gecentreerd is en goed werd ingespannen Houd het draaigereedscha...

Page 79: ...rkstuk ingesteld te zijn Hoogte nauw onder de denkbeeldige middellijn van het werkstuk instellen Draai vóór het inschakelen het werkstuk met de hand en controleer of het werkstuk vrij kan lopen 42 2 3 In Uit schakelen Inschakelen Druk de groene toets I in voor ca 2 seconden De machine start op Uitschakelen Druk de rode toets 0 in De machine loopt nog iets langer Blijf zo lang bij de machine tot he...

Page 80: ...voor uw veiligheid Controleer regelmatig of de waarschuwings en veiligheidsindicaties aan de machine voorhanden en in een perfect leesbare toestand zijn Controleer de perfecte toestand van de veiligheidsvoorzieningen vóór elk bedrijf De machine mag niet in een vochtige ruimte worden opgeslagen en moet tegen de invloed van weersomstandigheden worden beschermd Vóór de eerste ingebruikname alsook na ...

Page 81: ...fas links met stift of inbussleutel beveiligen en het handwiel losschroeven OPGELET Linkse draad Afstandshuls rechts aftrekken en inbusschroef bij de riemschijf afschroeven Met rubberen hamer de aandrijfas voorzichtig van de lagerzitting eruit hameren OPGELET Let erop op welke zijde de impulsschijf van de borgring geïnstalleerd is Kan zowel links als ook rechts zijn De borgring dient slechts als o...

Page 82: ...hamer OPGELET De impulsschijf dient zonder krassende geluiden in de leeseenheid draaibaar te zijn Indien toch zitting van de ontlastingsschijf vervangen Links rechts van de impulsschijf Afstandshuls plaatsen en handwiel vastschroeven OPGELET Linkse draad 1 Motor met riemschijf omlaag drukken spannen 2 Inbusschroef aanhalen Lagerzitting Impulsschijf voorzichtig in leeseenheid installeren Borgring e...

Page 83: ...GINT SCHEID DE MACHINE VAN DE STROOMVOEDING Fout Mogelijke oorzaak Verhelpen Motor start niet Schakelaar defect Schakelaar repareren Stroomvoeding uitgeschakeld Stroomvoeding controleren Zekering defect Zekering wisselen Overbelastingsbeveiliging geactiveerd Overbelastingsbeveiliging indrukken Sterke trilling Kromgetrokken werkstuk Vervangen van materiaal Werkstuk slecht gecentreerd Middelpunt nau...

Page 84: ...im Vorwort dieser Dokumentation With original HOLZMANN spare parts you use parts that are attuned to each other shorten the installation time and elongate your products lifespan IMPORTANT The installation of other than original spare parts voids the warranty So you always have to use original spare parts When you place a spare parts order please use the service formular you can find in the last ch...

Page 85: ...re il tipo di macchina il numero di parte di ricambio e la denominazione Per evitare incomprensioni si raccomanda di allegare agli ordini di parti di ricambio una copia del disegno delle parti di ricambio su cui sono evidenziate in modo chiaro le parti di ricambio richieste L indirizzo per gli ordini si trova sotto gli indirizzi dei centri di assistenza clienti nella prefazione di questa documenta...

Page 86: ...ERSATZTEILE SPARE PARTS HOLZMANN MASCHINEN GmbH www holzmann maschinen at 86 D 460FXL 45 2 Explosionszeichnung explosion drawing ...

Page 87: ...Handle For Tool Rest Base 1 58 Hinge 2 18 Retaining Ring 10 3 59 Semi circle Head Screw M4 8 2 19 Tool Rest Bushing 1 60 Switch box Plate 2 20 Tool Rest 150mm 300mm 1 61 Pin Hinge 1 21 Tool Rest Base 1 62 Power Cord 1 22 Tool Rest Cam Follower 1 63 Overload Protector 1 23 Flat Head Screw 2 64 Line Board 1 24 Spring 2 65 Semi circle Head Screw M4 6 4 25 Handle 2 66 Switch box 1 26 Lock Bolt 2 67 Kn...

Page 88: ...not being explicitly authorized by us in advance renders this document null and void Nous déclarons que la machine mentionnée sur ce document est aux normes de sécurité de la directive de la CE La modification des paramètres de la machine sans notre autorisation aura comme résultat la résiliation de ce contrat Tímto prohlašujeme že výše uvedený typ stroje splňuje bezpečnostní a zdravotní požadavky...

Page 89: ...bgedeckt E Garantieausschluss bei Mängeln an Maschinenteilen welche gebrauchsbedingten oder sonstigen natürlichen Verschleiß unterliegen sowie Mängeln an der Maschine die auf einen gebrauchsbedingten oder sonstigen natürlichen Verschleiß zurückzuführen sind die auf unsachgemäße oder fahrlässige Montage Inbetriebnahme bzw Anschluss an das elektrische Netz zurückzuführen sind die auf Nichtbeachtung ...

Page 90: ...llment is principally the HOLZMANN Service Center in Haslach Austria Transport charges for sending to and from our Service Center are not covered in this guarantee E The Guarantee does not cover Wear and tear parts like belts provided tools etc except to initial damage which has to be claimed immediately after receipt and initial check of the product Defects in the tool caused by non compliance wi...

Page 91: ...ditions vers et à partir de notre centre de service ne sont pas inclus dans cette garantie E La garantie ne comprend pas les éléments suivants Pièces d utilisation d usure comme les courroies les outils fournis etc sauf que un dommage initial que doit être réclamé immédiatement après réception et vérification de la machine Défauts dans l outil machine causé par la violation des instructions un mon...

Page 92: ...lamace je sídlo společnosti HOLZMANN MASCHINEN na adrese 4170 Haslach Österreich Tato záruka výrobce nekryje případné náklady na přepravu zboží do sídla firmy E Výluky ze záruky Na díly které vykazují známky opotřebení a při vadách stroje které jsou následkem běžného opotřebení Při nevhodné nebo nedbalé montáži stroje chybného uvedení do provozu příp nevhodného připojení k elektrické síti Při nedo...

Page 93: ...n sono contemplati nella presente garanzia del produttore E Esclusione di garanzia in caso di difetti sulle componenti meccaniche che sono soggette a usura legata all uso o altra usura naturale e difetti alla macchina riconducibili a usura legata all uso o altra usura naturale che sono riconducibili a montaggio messa in servizio o allacciamento alla rete elettrica impropri o negligenti che sono ri...

Page 94: ...er deze garantie van de fabrikant E Garantie uitsluiting bij gebreken aan onderdelen van de machine welke onderworpen zijn aan gebruik of andere natuurlijke slijtage alsook gebreken aan de machine welke terug te voeren zijn op gebruik of andere natuurlijke slijtage welke terug te voeren zijn op ondeskundige of nalatige montage ingebruikname resp aansluiting aan het elektrische net welke terug te v...

Page 95: ...ucts in the frame of a Quality Management policy Um einen ständigen Verbesserungsprozess gewährleisten zu können sind wir von Ihnen und Ihren Eindrücken beim Umgang mit unseren Produkten abhängig Your opinion is essential for further product development and product choice Please let us know about your Probleme die beim Gebrauch des Produktes auftreten Impressions and suggestions for improvement Fe...

Page 96: ......
Reviews: