background image

HOLUX 

GVR-2100 G1 


16 

Menu Operation 

Enter Menu mode 

1.  Press the Right key (►) during recording or preview mode to enter 

Menu mode. 

2.  Using the Down key (▼) or Up key (▲) to select Menu item and 

press the OK key (●) to confirm. 

3.  Press the Rec key (

) to save and exit this setting. 


Summary of Contents for GVR-2100 G1

Page 1: ...HOLUX GVR 2100 G1 GVR 2100 G1 User Manual Version V1 1 ...

Page 2: ...ontact with water and dry hands before using 3 Use the device with care Avoid pressing hard on the device body 4 For your own safety avoid using the device when there is a storm or lightning 5 Use only the accessories supplied by the manufacturer 6 Keep the device out of the reach of infants 7 When you get off the car do not leave the device on the dashboard that is subject to direct sunlight 8 Fo...

Page 3: ...pment generates uses and can radiate radio frequency energy and if not installed and used in accordance with the instructions may cause harmful interference to radio communications However there is no guarantee that interference will not occur in a particular installation If this equipment does cause interference to radio or television equipment reception which can be determined by turning the equ...

Page 4: ...possible Batteries and rechargeable batteries are not to be disposed in your domestic waste Please recycle them at your local recycling point Together we can help to protect the environment Copyright Information No part of this manual including the products and software described in it may be reproduced transmitted transcribed stored in a retrieval system or translated into any language in any for...

Page 5: ...4 Installation suggestions 5 Setting Clock 6 Using the memory card 7 Recording 9 Normal recording 9 Emergency Recording 10 Emergency Recording operation 11 Playback 12 Playback on a TV 12 Playback on built in LCD 13 Playback on a PC 14 Deleting 15 Menu Operation 16 Enter Menu mode 16 Specifications 21 ...

Page 6: ...HOLUX GVR 2100 G1 1 Product Overview ...

Page 7: ...tton stop start 2 LCD display 9 AV out port 3 HDMI out 10 Date time indicator 4 Power connector 11 Serial number location 5 Power ON OFF switch Emergency button 12 LED RED REC Green STAND BY 6 SD card slot 13 Speaker 7 Joystick control 14 Microphone ...

Page 8: ...G1 3 Package Content Car Recorder Cigar Car Charger Bracket Quick Guide AC adapter optional HDMI cable optional AV cable optional All parts shown in the illustration can be purchased separately from local distributor ...

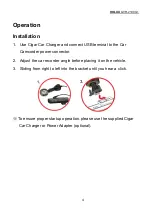
Page 9: ... terminal to the Car Camcorder power connector 2 Adjust the car recorder angle before placing it on the vehicle 3 Sliding from right to left into the bracket until you hear a click To ensure proper startup o peration please use the supplied Cigar Car Charger or Power Adapter optional ...

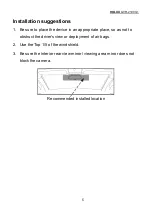
Page 10: ...place the device in an appropriate place so as not to obstruct the driver s view or deployment of air bags 2 Use the Top 1 5 of the windshield 3 Be sure the interior rear view mirror viewing area mirror does not block the camera Recommended installed location ...

Page 11: ...ress the Right key and the Menu setting display will appear 4 Using the Down key to select Clock and press the button 5 Set the value by using Up Down key 6 To shift between year month date hour minute second short press the Left Right key 7 When date and time done press the OK key to save and exit this setting 4 6 ...

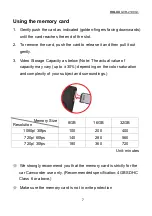
Page 12: ...as below Note The actual value of capacity may vary up to 30 depending on the color saturation and complexity of your subject and surroundings Memory Size Resolution 8GB 16GB 32GB 1080p 30fps 100 200 400 720p 60fps 140 280 560 720p 30fps 180 360 720 Unit minutes We strongly recommend you that the memory card is strictly for the car Camcorder use only Recommended specification 4GB SDHC Class 6 or a...

Page 13: ...ver remove the memory card during the recording process fatal memory card damage could result Certain types of memory cards may not be recognized take out the card and inset again or just change to another card if this occurs Be sure to backup your data before overwriting the memory card ...

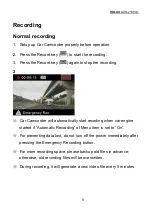
Page 14: ...Camcorder will automatically start recoding when car engine started if Automatic Recording of Menu item is set to On For preventing data lost do not turn off the power immediately after pressing the Emergency Recording button For more recording space please backup old files in advance otherwise old recording files will be overwritten During recording it will generate a new video file every 5 minut...

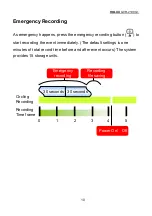
Page 15: ...ton to start recording the event immediately The default settings is one minutes of total record time before and after event occurs The system provides 15 storage units 0 1 2 3 4 5 Power On Off 30 seconds 30 seconds Emergency recording Recording file saving Circling Recording Recording Time frame ...

Page 16: ... seconds the length of each file is 1 minute 1 When in recording or preview mode please press the emergency recording button to start emergency recording 2 Press the REC key again to stop the emergency recording 3 When the panel shows icon the system is automatically saving the file It takes around 3 4 minutes to complete the file saving Icon will disappear while file saving is completed During th...

Page 17: ...I optional signal line on the TV 2 The Recorded images will be displayed on the TV as thumbnails 3 Select the normal recording file you wanted by right or left key and then press the OK key to start displaying 4 The Car Camcorder will play the all the movies continuously from the chosen thumbnail image to the last one 1 3 ...

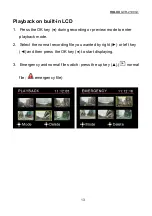
Page 18: ...he OK key during recording or preview mode to enter playback mode 2 Select the normal recording file you wanted by right or left key and then press the OK key to start displaying 3 Emergency and normal file switch press the up key normal file emergency file ...

Page 19: ... your PC playback software for the H 264 avi file type For example Media Player Classic Quick Time Splash Lite VLC Media Player etc 3 Depending on your PC s effectiveness video card characteristics memory size or Memory card transfer speed your images may not play smooth and or sound may cut in and out 4 If you rename a file in your PC it will not be recognized by Car Camcorder ...

Page 20: ...lete All Yes No Delete all files stored in the memory Lock Yes No The current file can be locked Select Yes to lock the file and choose No to unlock the file Delete function can not delete the locked file Format function can delete all locked and unlocked file Cancel Return to Playback Mode ...

Page 21: ...eration Enter Menu mode 1 Press the Right key during recording or preview mode to enter Menu mode 2 Using the Down key or Up key to select Menu item and press the OK key to confirm 3 Press the Rec key to save and exit this setting ...

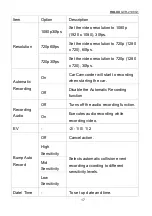
Page 22: ... Camcorder will start to recording when starting the car Automatic Recording Off Disable the Automatic Recording function Off Turns off the audio recording function Recording Audio On Executes audio recording while recording video EV 2 1 0 1 2 Off Cancel action High Sensitivity Mid Sensitivity Bump Auto Record Low Sensitivity Selects automatic collision event recording according to different sensi...

Page 23: ...e recoding scene stays the same for 53 sec after recording begins If the scene changes recording speed would revert to 30fps and save this recording as a new file When this function is selected the movement detection and emergency recording functions are not operational Off Turn off Motion Detection Motion Detection On Motion Detection would switch to power saver mode and stop recording when the r...

Page 24: ...vity for 2 minutes the screen will automatically turn off and go into the sleep mode It will recover again if any button is pressed Off indicates muting the playback video Volume Control Off 100 100 indicates increasing volume of the playback video to max Language Select the OSD language used for Car Camcorder NTSC This option is suitable for America Taiwan Japan and Korea areas TV System PAL This...

Page 25: ...0 files stored in the memory card will be gone No Cancel action Reset Factory Settings Yes Restore factory defaults Note that your current settings will be overridden Firmware Version Displays the current software version ...

Page 26: ...ternal memory Memory card SDHC up to 32 GB File size ea 5 minute file LCD display 2 4 inch color LCD Lens angle Diagonal 120 degree Horizontal 110 degree Vertical 80 degree Lens F2 0 fixed focus Operation Temperature range 0 C 65 C Storage Temperature range 20 C 70 C Power supply Cigar car charge Working voltage DC 10V 30V 5V 1A adaptor input AC 100 240V 50 60Hz optional White balance Auto Exposur...

Page 27: ...l automatically turn off Yes The image flips Yes Time Stamp keeping time At least 7 5 days LED indicator Green power on Red REC in process Red flashing SD card not inserted recognized can t recording Interface USB 2 0 HDMI AV output SD slot Dimensions 101 x 66 5 x 23 7 mm L x W x H Weight Approx 100 grams Note Specifications are subject to change without notice ...

Reviews: