background image

FunTrek 130 Pro Quick Guide 
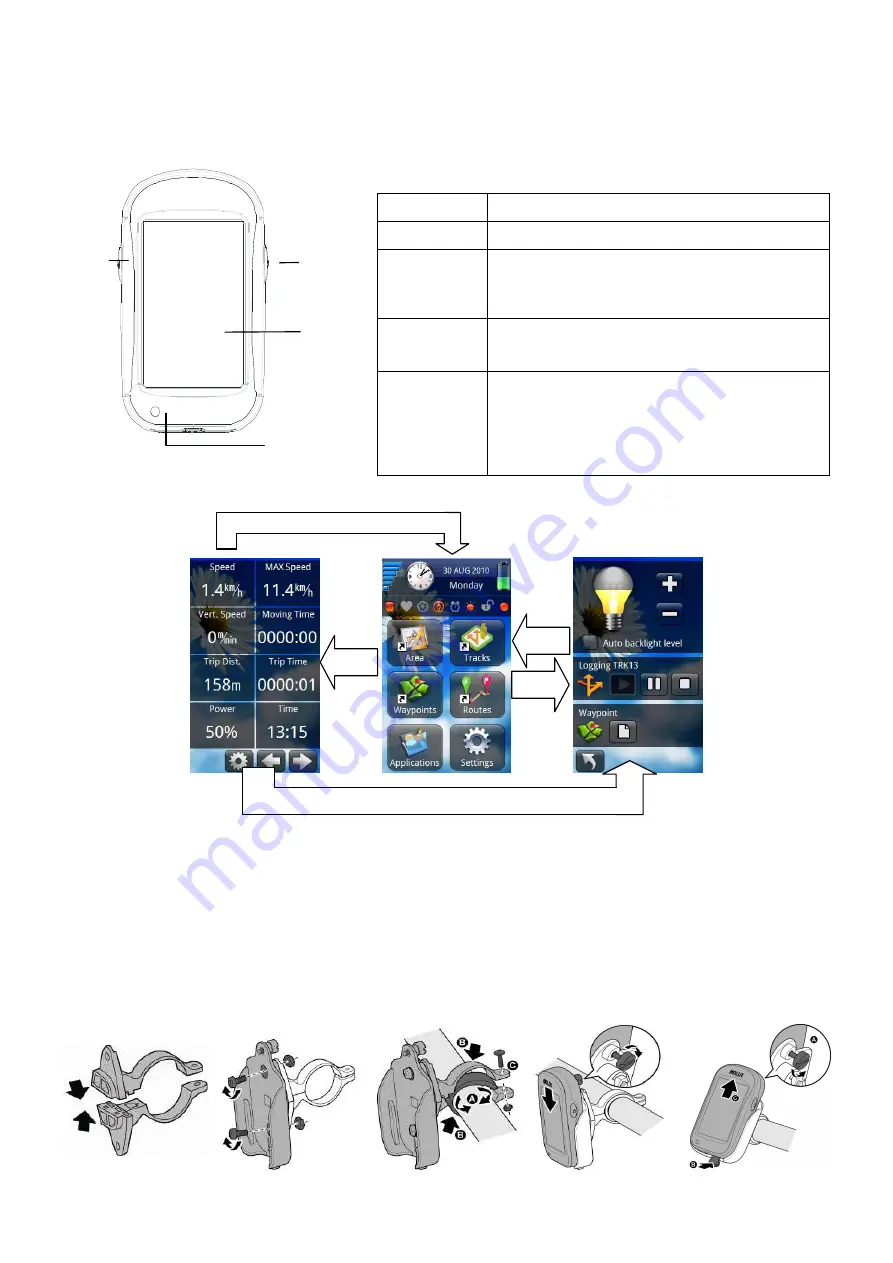
 

1. Appearance 

FunTrek 130

HO L UX


Button Functions 

Name


Function


Touch Screen  The device uses touch screen controls 

Right /   

Power Button 

When the device is powered off, press the right 
button for 3 seconds to turn on this device.   
When powered on, press this button for 3 
seconds to turn off. 

Left Button 

When the device is powered on, press the left 
button to switch to the Main Menu, Trip Computer 
page and Navigation. 

LED 

  The LED flashes red when charging. 

  The LED stop flashing but lights on when 

charging is complete. 

  The LED dims when the USB is unplugged. 

  The LED will first light on a second, and the 

opening screen appears on the screen. 


2. Screen Operations 


3. Mount Installation 

(1)  Please combine the brackets and make sure that the two ends are clipped together. 
(2)  Screw holder firmly to the bracket. 
(3)  Open the other end of the bracket and clip it to the handlebar. Place rubber padding underneath the holder. 

Adjust the thickness of the rubber padding to match the actual thickness of the handlebar then tighten screws to 
install the bicycle mount firmly. 

(4)  Insert GPS into holder. When it clicks into place, tighten the screw on the back of the holder. 
(5)  To remove the GPS, loosen the screw on the back of the holder, press lightly on the pressure tab protruding 

from the bottom of the holder then remove GPS. 

 
(1)   


(2)   


    (3)  


(4)   


(5) 


Touch 
Screen 

Left 

Button


LED  Status 
Light 

Right/ 
Power 
Button 

Left 

Right 

Right 

Left Button 

Right Button 

Summary of Contents for FUN TREK 130 PRO -

Page 1: ...he opening screen appears on the screen 2 Screen Operations 3 Mount Installation 1 Please combine the brackets and make sure that the two ends are clipped together 2 Screw holder firmly to the bracket...

Page 2: ...res calibration Alarm Icon Description Alarm is turned on Alarm is turned off Backlight Icon Description Backlight is on Backlight is off Screen Lock Icon Description Screen is locked The screen is un...

Page 3: ...de auf dann erscheint der Er ffnungsbildschirm auf dem Display 2 Bildschirm opertions 3 Montageinstallation 1 Bitte verbinden Sie die Halterungen stellen Sie sicher dass die beiden Enden aneinander be...

Page 4: ...dbeleuchtung Symbol Beschreibung Die Hintergrundbeleuchtung ist aktiv Die Hintergrundbeleuchtung ist inaktiv Bildschirmsperre Symbol Beschreibung Der Bildschirm ist gesperrt Der Bildschirm ist freigeg...

Page 5: ...se iluminar primero durante un segundo y la pantalla de inicio se mostrar en la pantalla 2 Pantalla de Operaciones 3 Instalaci n del soporte 1 Combine los soportes y aseg rese de que los dos extremos...

Page 6: ...Descripci n La alarma est activada La alarma est desactivada Luz de fondo Icon Descripci n La luz de fondo est activada La luz de fondo est desactivada Bloqueo de pantalla Icon Descripci n La pantall...

Page 7: ...ranch Le voyant DEL s allumera en premier pendant une seconde puis l cran de bienvenu s affichera sur l cran 2 cran des op rations 3 Installation du support 1 Veuillez attacher les brackets et assurez...

Page 8: ...scription L alarme est allum e L alarme est teinte R tro clairage Ic ne Description Le r tro clairage est allum Le r tro clairage est teint Verrouillage de l cran Ic ne Description L cran est verrouil...

Page 9: ...FunTrek 130 Pro 1 FunTrek 130 HOLUX 3 3 LED USB LED LOGO 2 3 1 2 3 4 GPS GPS 5 GPS GPS 1 2 3 4 5 LED...

Page 10: ...4 45 30 SD PC Notebook USB...

Page 11: ...FunTrek 130 Pro 1 FunTrek 130 HOLUX 3 3 LED USB LED LOGO 2 3 1 2 3 4 GPS GPS 5 GPS GPS 1 2 3 4 5 LED...

Page 12: ...4 45 30 SD PC Notebook USB 80212 50N...

Reviews: