background image


USER SERVICING INSTRUCTIONS


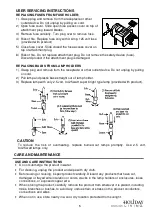
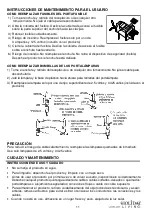
REPLACING FUSES FROM FUSE HOLDER: 

1)  Grasp plug and remove from the receptacle or other            

outlet device. Do not unplug by pulling on cord. 

2)  Open fuse cover. Slide open fuse access cover on top of  

attachment plug toward blades.  

3)  Remove fuse carefully. Turn plug over to remove fuse.  
4)  Risk of fire. Replace fuse only with 3 Amp, 125 volt fuse 

(provided with product).                                                                                                          

5)  Close fuse cover. Slide closed the fuse access cover on    

top of attachment plug. 

6)  Risk of fire. Do not replace attachment plug. Do not remove the safety device (fuse).  

Discard product if the attachment plug is damaged. 


REPLACING BULBS FROM LAMP HOLDERS 

1)  Grasp plug and remove from the receptacle or other outlet device. Do not unplug by pulling 

on cord. 

2)  Pull lamp and plastic base straight out of lamp holder. 
3)  Replace lamp with only 2.5 volt, 0.425 watt super bright type lamp (provided with product). 


CAUTION 

To  reduce  the  risk  of  overheating,  replace  burned-out  lamps  promptly.  Use  2.5  volt,         

0.425 watt lamps only. 


CARE AND MAINTENANCE 

USE AND CARE INSTRUCTIONS 

  Do not submerge the product in water.  

  For cleaning, unplug the product and wipe with dry cloth. 

  Before using or reusing, inspect product carefully. Discard any products that have cut, 

damaged or frayed wire insulation or cords, cracks in the lamp holders or enclosures, loose 

connections, or exposed copper wire.  

  When storing the product, carefully remove the product from wherever it is placed, including 

trees, branches or bushes, to avoid any undue strain or stress on the product conductors, 

connections and wires. 

  When not in use, store neatly in a cool, dry location protected from sunlight.  


Summary of Contents for 001-162142150-0

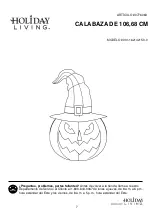
Page 1: ...UMPKIN MODEL 001 162142150 0 Questions problems missing parts Before returning to your retailer call our customer service department at 1 800 643 0067 8 a m 6 p m EST Monday Thursday 8 a m 5 p m EST Friday Español p 7 AB1691 ...

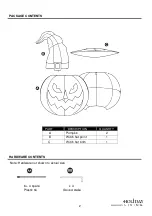
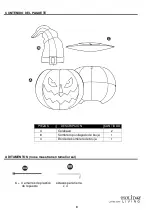
Page 2: ...2 PACKAGE CONTENTS HARDWARE CONTENTS Note Hardware not shown to actual size PART DESCRIPTION QUANTITY A Pumpkin 2 B Witch hat point 1 C Witch hat brim 1 6 4 spare x 4 Plastic tie Ground stake ...

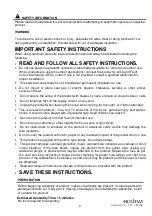
Page 3: ...oy To avoid risk of fire burns personal injury and electric shock it should not be played with or placed where small children can reach it Do not use this product for other than its intended use Do not hang ornaments or other objects from cord wire or light string Do not close doors or windows on the product or extension cords as this may damage the wire insulation Do not cover the product with cl...

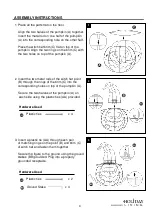
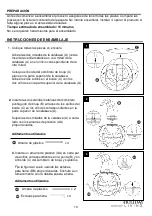
Page 4: ...Insert the two metal rods of the witch hat point B through the rings of the brim C into the corresponding holes on top of the pumpkin A Secure the two halves of the pumpkin A on each side using the plastic ties AA provided Hardware Used Plastic ties x 4 3 Insert a plastic tie AA through each pair of matching rings on the point B and brim C of witch hat and fasten them together Secure the figure to...

Page 5: ...nplug by pulling on cord 2 Pull lamp and plastic base straight out of lamp holder 3 Replace lamp with only 2 5 volt 0 425 watt super bright type lamp provided with product CAUTION To reduce the risk of overheating replace burned out lamps promptly Use 2 5 volt 0 425 watt lamps only CARE AND MAINTENANCE USE AND CARE INSTRUCTIONS Do not submerge the product in water For cleaning unplug the product a...

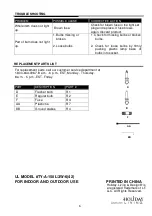
Page 6: ...ved TROUBLESHOOTING PROBLEM POSSIBLE CAUSE CORRECTIVE ACTION Whole item does not light up Blown fuse Check for blown fuse in the light set plug and replace If fuse blows again discard product Part of item does not light up 1 Bulbs missing or broken 2 Loose bulbs 1 Check for missing bulbs or broken bulbs 2 Check for loose bulbs by firmly pushing plastic lamp base of bulbs into socket PART DESCRIPTI...

Page 7: ...142150 0 Preguntas problemas partes faltantes Antes de volver a la tienda llame a nuestro Departamento de Servicio al Cliente al 1 800 643 0067 de lunes a jueves de 8 a m a 6 p m hora estándar del Este y los viernes de 8 a m a 5 p m hora estándar del Este 7 ...

Page 8: ... PAQUETE ADITAMENTOS no se muestran en tamaño real PIEZAS DESCRIPCIÓN CANTIDAD A Calabaza 2 B Sombrero puntiagudo de bruja 1 C Borde de sombrero de bruja 1 6 4 amarres de plástico estacas para tierra de repuesto x 4 8 ...

Page 9: ...able de alimentación o cualquier otro cable Desenchufe el producto cuando salga de la casa cuando se vaya a dormir o cuando esté sin supervisión Este es un producto eléctrico no un juguete Para evitar el riesgo de incendios quemaduras lesiones personales y descargas eléctricas no se debe jugar con este producto ni dejarlo al alcance de niños pequeños No use este producto para otro fin que no sea e...

Page 10: ... en la parte superior de la calabaza Alinee los dos anillos en el borde C con los dos orificios en la parte superior de la calabaza A 2 Inserte las dos varillas metálicas del sombrero puntiagudo de bruja B a través de los anillos del borde C en los orificios correspondientes en la parte superior de la calabaza A Sujete las dos mitades de la calabaza A a cada lado con los amarres de plástico AA pro...

Page 11: ...ara desenchufarlo 2 Jale la lámpara y la base de plástico hacia afuera para retirarlas del portalámpara 3 Reemplace la lámpara solo por una de tipo superbrillante de 2 5 voltios y 0 425 vatios incluida con el producto PRECAUCIÓN Para reducir el riesgo de sobrecalentamiento reemplace las lámparas quemadas de inmediato Use solo lámparas de 2 5 voltios y 0 425 vatios CUIDADO Y MANTENIMIENTO INSTRUCCI...

Page 12: ...TIVA El artículo no se enciende por completo El fusible está fundido Revise si hay algún fusible fundido en el enchufe del juego de luces y reemplácelo Deseche el producto si el fusible vuelve a fundirse Parte del artículo no se enciende 1 Faltan bombillas o están rotas 2 Bombillas sueltas 1 Verifique si alguna bombilla falta o si está rota 2 Verifique si hay bombillas sueltas empujando firmemente...

Reviews: