background image

3


INSTALLATION INSTRUCTIONS

Step #1:  Remove the seat and both wires (+ and -) from the battery.

Step #2:    Remove the outer fairing/headlamp assembly and set it aside. Refer to 

a service manual if you need help with this. NOTE: A towel on the front 
fender can help prevent scratches or “dings” from dropped tools or 
fasteners etc. Expletives will also be kept to a minimum! 

Step #3:   On the brake side, inside of the of the inner fairing, there is a wire 

“strap” that secures a 3-wire harness (black, blue and brown) to the 
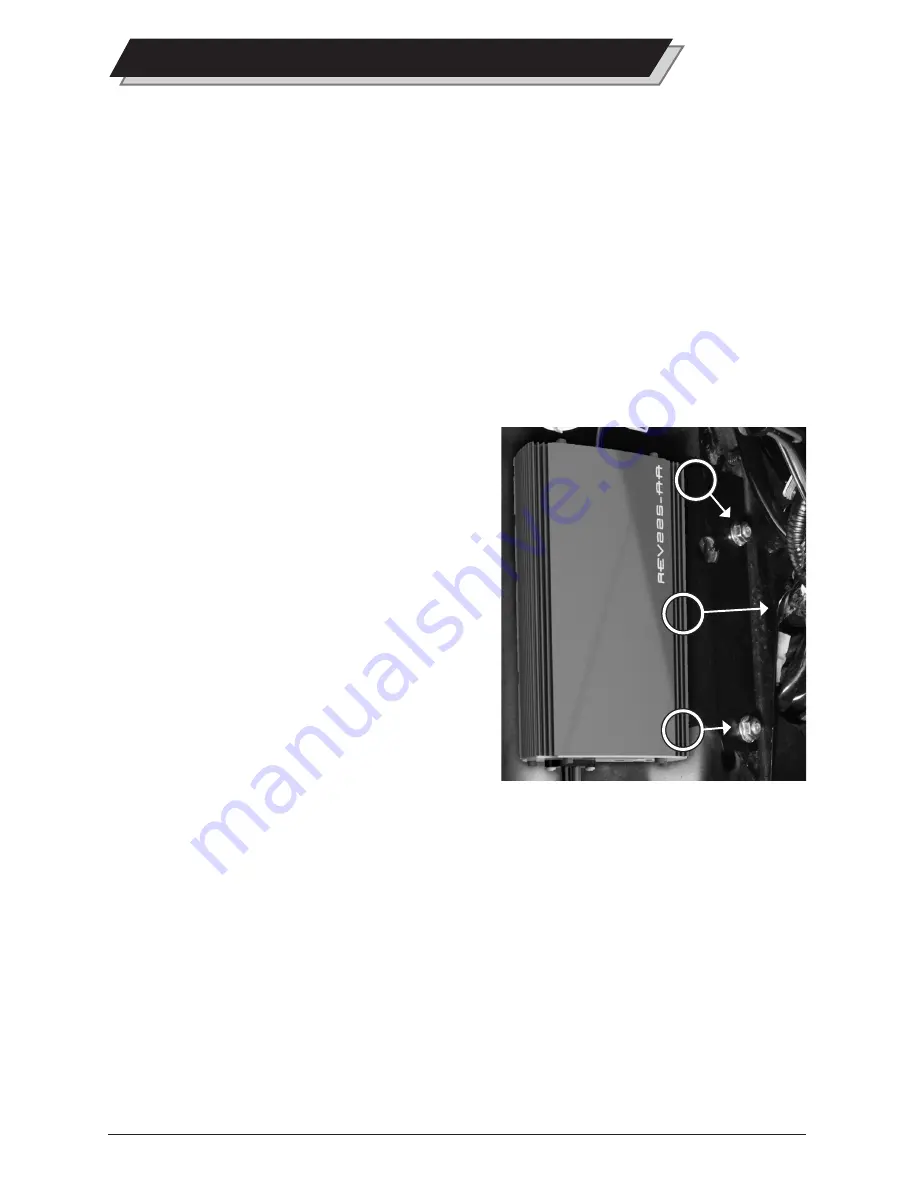
bike. Take the wire out of this strap and let it hang. The “A” arrow in 
Figure 1.1 is where a larger factory “Molex” plug is secured to the 
bike (if present). Pull down on this Molex to unclip it from the frame and 
let it hang for now. NOTE: Newer model bikes have this Molex located 
elsewhere.


 The “B” and “C” arrows in  
Figure 1.1 show the nuts that 
need to be removed on the 
brake side of the bike so the 
steel plate and amp can be 
mounted using these 2 main 
studs. There is a triangular 
“notch” on the plate which will 
be at the bottom when correctly 
installed. Once the plate is on, 
re-install these nuts to factory 
torque specifications. The Molex 
that was removed from the 
frame (arrow “A”) can be  
re-secured to other wire  
harnesses using supplied zip 
ties (if Molex is present). There is “hook and loop” adhesive in the box. 
One half will be applied to the plate, and one side will be applied to 
the back of the amp. To make sure the fairing will go back on, attach 
the amp on the plate high enough up but not quite touching the gauge 
just above the amp. The outside edge of the amp (closest to brake side 
speaker) should be close to flush to the outside edge of the plate. 

Step #4:   Unplug the factory wires at each front speaker. Locate and remove the  

3 torx head screws and single speed nut that holds each speaker grill 
to the bike. The speakers and grills will come away from the inner 
fairing as one unit. 

Figure 1.1 - Amplifier correctly  

positioned on bike.

A

B

C

Summary of Contents for 225RG KIT-AA

Page 1: ...fier Kit For Use On 1998 2013 Road glide model bikes with factory radios installation Manual READ ENTIRE MANUAL BEFORE STARTING INSTALLATION Damage To Inner Fairing WILL Occur If Factory Screws Are Us...

Page 2: ...ers or 4 ohm car speakers are used there will still be a noticeable improvement in volume and sound quality Hogtunes Contact Information Email tech hogtunes com USA 608 554 7631 Canada 705 719 6361 A...

Page 3: ...ide of the bike so the steel plate and amp can be mounted using these 2 main studs There is a triangular notch on the plate which will be at the bottom when correctly installed Once the plate is on re...

Page 4: ...ers Locate the 4 pin black plug wire harness with brown black and blue black wires Plug it into the amplified output plug The blue black wires will plug directly to the speaker on the brake side of th...

Page 5: ...g zip ties Step 5 Attach the red wire to the positive battery terminal and the black wire to the negative battery terminal The factory battery wires are also re installed at this point Secure the ampl...

Page 6: ...s into CLUTCH SIDE factory speaker wires Power and ground DIRECT to battery Amplifier Wire Color Codes Yellow Black Clutch Side Amplifier Input From Factory Radio Brown Black Clutch Side Radio Output...

Page 7: ...ess set up for quick detach Tour Paks that will plug right into the expansion port on the amp Important Since the RADIO power will be used to power the rear speakers you must use rear speakers specifi...

Page 8: ...speakers while the second amp will bolt in and can be used to power Hogtunes 6 x9 saddle bag speaker lids or fairing lower woofers NOTE To mount the 2nd REV 225 AA the Hogtunes RG 40 4 Adaptor plate...

Page 9: ...out of the 4 channel sends music to the REV 225 AA which then powers 6 x9 saddlebag speaker lids or 7 fairing lower woofers If the bike doesn t have a Tour Pak you can also do a similar system with f...

Page 10: ...tions will work fine Please remember that car radios are designed to work in an environment with little or no exhaust or wind noise Many car radios have features such as equalizers loudness contours s...

Page 11: ...chase date Proof of purchase is required for all warranty claims The warranty applies to the original retail customer and is not transferable Please contact Hogtunes for all warranty claims Products f...

Page 12: ...pment which can be a distraction to the rider and or passenger Please use caution when adjusting or playing your stereo at high volume especially in traffic You are a valued customer so please Ride Al...

Reviews: