4
Adres producenta/ Adresse des Herstellers/ Manufacturer’s Address/ Адрес производителя
GTV Poland Sp. z o.o. Sp. k., ul. Przejazdowa 21, 05-800 Pruszków
OPERATING THE DEVICE
Filling the gas container
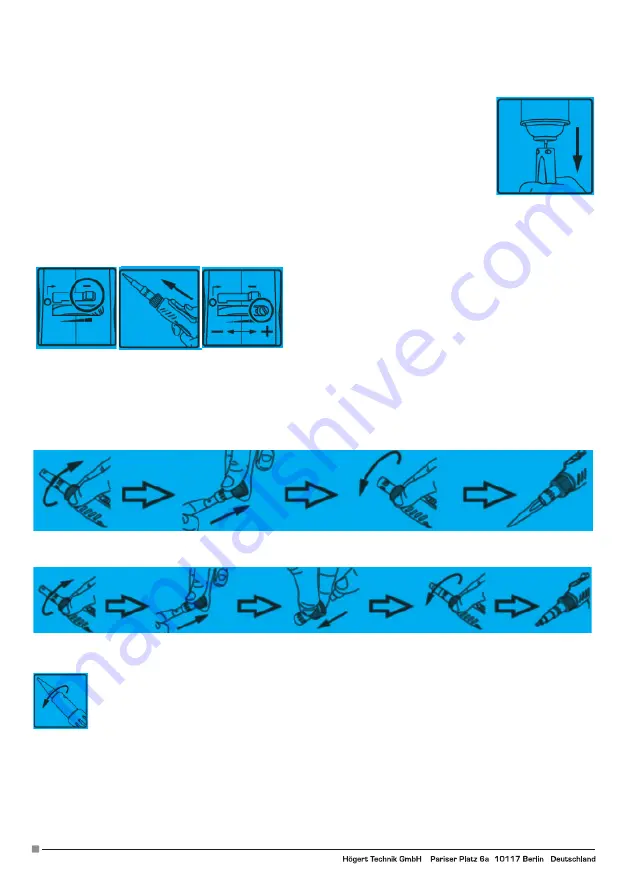
Filling the container with gas should carried out outdoors or in well-ventilated rooms. Keep away from so-
urces of fire or heat and bystanders. First, close the gas valve by moving the lock button to the „0” position
and moving the gas adjustment button to „min” position. Make sure that the soldering iron container or valve
is not damaged. In the event of any signs of wear or damage of these elements, it is forbidden to fill the gas
container. The gas container should be equipped with an appropriate adapter that matches the container
valve. Hold the soldering iron with the valve (located at the bottom of the container) up. Apply the outlet of
the gas container to the matching adapter on the valve. Keep the soldering iron and the gas container in the
same axis, avoiding deviations from each other that could cause gas leak during filling. Press the gas conta-
iner against the soldering iron valve. When the container is full, gas begins to overflow from the connection
between the adapter and the valve. Then stop filling, invert the soldering iron and let it stand for a few minutes to stabilize the gas
pressure in the container.
Note! Make sure that there are no gas leaks, preferably with water and soap. It is forbidden to work with a soldering iron with a
gas leakage detected.
Work with a soldering iron
Make sure that there are no gas leaks before starting. In order to start the
soldering iron, set the gas regulation button in the middle of the scale and
move the lock button to the right towards the „-” symbol (fig. 1). Then
ignite gas by moving the piezo ignition button forward (fig. 2). The flame
should be set by means of gas adjustment button (fig. 3). After igniting
gas, it is recommended to wait about one minute until the soldering iron
heats up, which should be in a horizontal position. At that time, watch the
gas flame. A slight flickering phenomenon may occur in the initial phase.
If it does not resolve spontaneously, extinguish the flame and contact the manufacturer. If the colour of the flame changes from blue to
orange, also take the soldering iron to an authorized service centre
Note! A lit soldering iron should not be put down or warmed.
Features of a gas soldering iron operation
3-in-1 soldering iron can be used as a torch, soldering iron or heat gun.
When working as a torch, unscrew the plastic ring, remove the torch cover and the base of the soldering iron tip. Then reinstall the
torch cover itself and screw it with a plastic ring.
When working as a heat gun, unscrew the plastic ring, remove the torch cover, insert the base of the tip into it, reinstall it and screw it
with a plastic ring.
When working as a soldering iron, the tip should be screwed into the tip base.
Extinguishing the soldering iron
To extinguish the soldering iron, move the lock button in the direction marked “0” to the left and down until it stops. Then
the gas valve will be closed and the flame will extinguish by itself. Leave the soldering iron to cool down completely.
If you try to restart the soldering iron before it cools down completely, after moving the lock button towards „-„ and
unlocking the gas valve, the gas stream may be ignited by the hot elements spontaneously.
Note! It is forbidden to immerse or pour a stream of water over the soldering iron to cool it down.
Device maintenance
Clean the device with a damp cloth. Heavy dirt should be cleaned with water and soap. Do not use abrasive cleaners. In the event of
any defects or contamination of the nozzle, stop using the soldering iron and contact the manufacturer’s service point. It is forbidden to
modify the soldering iron and to clean the nozzle on your own, especially with sharp objects.
Storage
Store the device in a vertical position in a dry and well-ventilated place, out of the reach of bystanders, especially children.


