HODEDAH
www.Hodedah.com
17
| Page
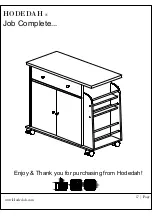
Job Complete...
Enjoy & Thank you for purchasing from Hodedah!
3
1
2
S
O
E
N
G3
N
E
4
5
6
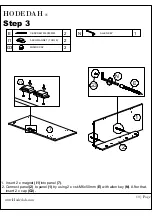
1. Connect panel
(6)
to panel
(5)
by using 1 x csk M6x50mm
(E)
with allen key
(N)
.
After that,
insert 1 x cap
(G3)
.
2. Connect panel
(6)
to panel
(1)
by using 3 x csk M6x50mm
(E)
with allen key
(N)
.
After that,
insert 1 x cap
(G3)
.
3. Connect panel
(7)
to panel
(5 & 1)
by using 6 x csk M6x50mm
(E)
with allen key
(N)
.
HODEDAH
www.Hodedah.com
Step 5
ALLEN KEY
1
12
| Page
CSK CAP WOOD M6X50MM
7
MINIFIX CAP
2
E
G3
N
N
E
N
E
5
6
1
7
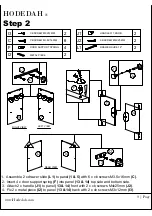
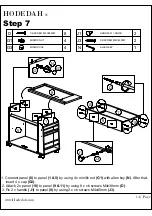
1. Connect panel
(8)
to panel
(1 & 5)
by using 4 x minifix nut
(G1)
with allen key
(N)
. After that,
insert 4 x cap
(G3)
.
2. Attach 2 x panel
(10)
to panel
(9 & 11)
by using 8 x cb screws M4x38mm
(D)
.
3. Fix 2 x handle
(J1)
to panel
(9)
by using 2 x cb screws M4x45mm
(J3)
.
HODEDAH
www.Hodedah.com
Step 7
14
| Page
D
G1
N
J1
J3
8
5
1
9
11
10
10
1. Press the door support spring
(F)
at the panel
(13 & 14)
top side. After that, inside to the hole
at panel
(6)
.
2. Press the door support spring
(F)
at the panel
(13 & 14)
bottom side. After that, inside to the
hole at panel
(7)
.
HODEDAH
www.Hodedah.com
Step 9
16
| Page
CB SCREW M4X38MM
8
HANDLE 311 KNOB
2
MINIFIX NUT
4
MINIFIX CAP
4
D
G1
G3
CB SCREW M4X45MM
2
J1
J3
ALLEN KEY
1
N
Final step...
CB SCREW M3.5X16MM
6
DRAWER SLIDE 14''
2
NAIL 5/8
40
C
K
L2
1. Fix 2 x drawer slide
(L2)
into panel
(10)
by using cb screws M3.5x16mm
(C)
.
2. Slide 1 x panel
(12)
into panel
(10)
groove. After that, use 15 x power nails
(K)
for fix it.
3. Place 2 x panel
(16)
at back side by using 25 x power nails
(K)
for fix it.
4. Slide the drawer box
(9)
into the drawer slide at the panel
(1 & 5)
.
5. Slide the panel
(15)
between panel
(1 & 5)
.
HODEDAH
www.Hodedah.com
Step 8
15
| Page
K
C
C
L2
L2
K
RIGHT VIEW
12
10
16
15
13
14
13
14
&
F
F
6
13
14
&
17
HODEDAH
www.Hodedah.com
Step 4
11
| Page
CB SCREW M6X50MM
6
1
MINIFIX CAP
6
E
G3
CB SCREW M4X25MM
4
N
O
1. Connect panel
(3 & 17)
to panel
(2)
by using 2 x csk M6x50mm
(E)
with allen key
(N)
. After
that, insert 2 x cap
(H)
.
2. Slot 4 x chrome pipe
(O)
into panel
(2)
.
3. Connect panel
(4)
to panel
(3 & 17)
by using 2 x csk M6x50mm
(E)
with allen key
(N)
. After
that, insert 2 x cap
(G3)
.
4. Connect panel
(1)
to panel
(4)
by using 2 x csk M6x50mm
(E)
with allen key
(N)
. After that,
insert 2 x cap
(G3)
.
17
3
1
ALLEN KEY
1. Fix 4 x caster
(M1)
& caster
(M2)
onto panel
(7
) base by using 16 x cb screws
M3.5x16mm
(C)
.
HODEDAH
www.Hodedah.com
Step 6
CB SCREW M3.5X16MM
16
13
| Page
C
CASTER W/OUT STOPPER
2
M1
7
CASTER WITH STOPPER
2
M2
C
M1
M2
C
N
E
LEFT VIEW
9
5
1
7
HODEDAH
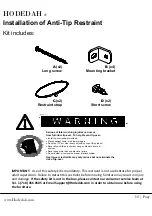
Installation of Anti-Tip Restraint
Kit includes:
Long screw
A
(x2)
Mounting bracket
B
(x4)
Restraint strap
C
(x2)
Short screw
D
(x2)
Serious of fatal crushing injuries can occur
from furniture tip-over. To help Prevent tip-over:
Install tip-over restraint provided
Place heaviest items in the lower drawers
Do not set TV's or other heavy objectS on top of this product
Never allow children to climb or hang on drawers, doors or
shelves
Never open more than one drawer at a time
Do not defeat or remove the drawer interlock system
Use tip-over restraints may only reduce but not eliminate the
risk of tip-over.
www.Hodedah.com
18
| Page
I
MPORTANT: Use of this safety kit is mandatory. This restraint is not a substitute for proper
adult supervision. Failure to detach this restraint before moving furniture may result in injury
and damage. If the safety kit is not in the box, please contact our consumer service team at
Tel. 1 (718) 456 0505 or Email [email protected] in order to obtain one before using
the furniture.
HODEDAH
FITTING OF ANTI-TIP SAFETY STRAP
STEP 1:
Attach the mounting bracket to the furniture in the
solid part below the top panel a few inches away from the
side of the unit.
b
Screw through the smallest hole of .
d
b
www.Hodedah.com
19
| Page
BACK SIDE OF
TOP PANEL
FURNITURE
b
d
a
b
c
STEP 2:
Locate a stud in
behind the
have to
Place the other mounting
bracket on the wall
stud 2 inches below the
mounting bracket
secured to the back of
your unit.
Attach to the wall stud
using through the
smaller hole of
.
b
c
b
STEP 3:
Repeat the same step a few inches away from
the other side of the unit.
Place the furniture into position so both mounting
brackets are vertically in line.
Lace the end of the restraint strap through the
larger holes in each mounting bracket.
Secure the straps and lock into place.
b
d
a
c
Mounting bracket
4 Pcs.
TP 6#x5/8'' Screw
2 Pcs.
2 Pcs.
Restraint strap
2 Pcs.
TP 8#x2'' Screw
WALL
5
1
G3
G3
G3
G3

