Pe mezzo del HOBBY Ceramic Socket Set potete montare
in modo sicuro nel terrario delle lampadine con i filetti
standard E27. Il prodotto è completamente premontato per il
funzionamento delle lampadine fino a 250 Watt.
Per il montaggio avete bisogno di un trapano o di un di un
trapano a batteria, con punta metallica da 4,5 a 8 mm, una
sega a balestra con una lama metallica, una lima metallica e
un giravite
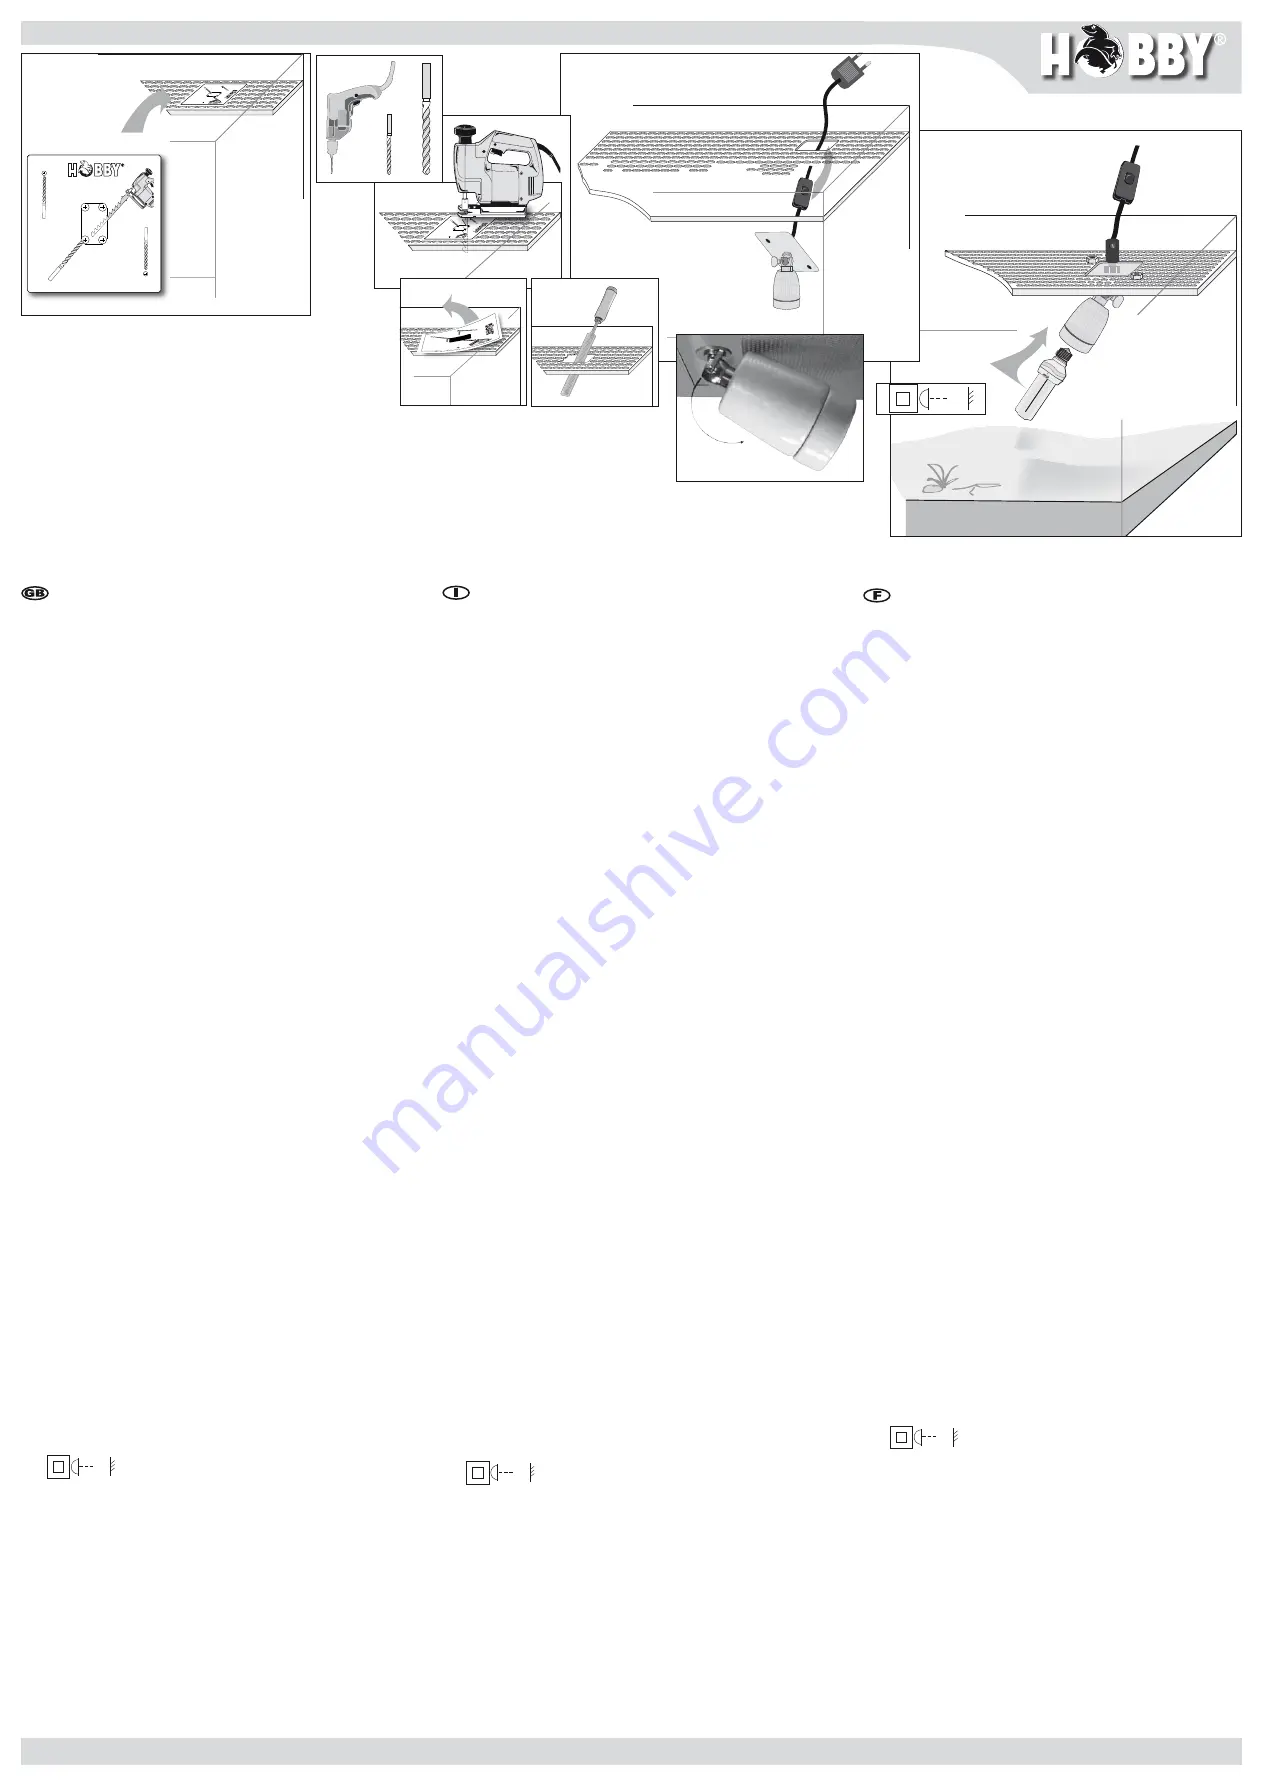
1. Incollate la sagoma in dotazione nella posizione desiderata
ponendola dall’esterno sul foro della lamiera del terrario.
2. Forate 4 fori da 8 mm, che servono a far appoggiare la
sega a balestra per il taglio e anche due fori da 4,5 mm,
che servono per il fissaggio del prodotto.
3. Rimuovete la sagoma e sbavate gli spigoli di taglio con una
lima.
4. Conducete il cavo e l’interruttore dell’apparecchio
dall’interno verso l’esterno attraverso l’apertura segata.
Fissate la piastra metallica montata sul supporto di
ceramica con le viti in dotazione e i dadi attraverso i fori
forati.
5. Avvitate la vostra lampadina nel supporto di ceramica.
Disponete il perno sferico della vostra lampadina nella
posizione desiderata (ved. Fig. 5a). Mettete la spina nella
presa.
Misure di sicurezza
• solo per ambienti interni
• spazio minimo di 20 cm dagli oggetti illuminati
• solo ammesso per lampadine fino a 250 Watt
• il prodotto non è omologato per il funzionamento con
mezzi riscaldanti, che non emettono luce, come i radiatori
termici in ceramica Elstein
• in caso di danni alle prese, non mettete il prodotto in
funzionamento
• le prese danneggiate dovranno essere sostituite dal
personale specializzato, dovranno essere utilizzate solo le
linee elettriche del tipo H03VVH2-F 2 x 0,75 mm²
• prima di sostituire le lampadine togliere dapprima la spina
e far raffreddare il prodotto e il supporto
Avec le HOBBY Ceramic Socket Set, vous pourrez installer vos
agents lumineux E27 à filetage standard en toute sécurité
dans votre terrarium. Le produit est adapté aux agents
lumineux de 250 Watt et déjà complètement prémontés.
Pour le montage, il vous faut une foreuse ou une perceuse
à percussion sans fil, des forets en métal à 4,5 et 8 mm, une
scie sauteuse avec lame de scie pour métaux, une lime à métal
et un tournevis.
1 Collez le pochoir ci-joint sur le côté extérieur de la surface
de la tôle perforée du terrarium à la position souhaitée.
2. Perforez quatre trous de 8 mm qui serviront comme point
de départ pour la découpe à la scie sauteuse ainsi que
deux trous à 4,5 mm pour la fixation du produit.
3. Retirez le pochoir et polissez les bords de coupe avec la lime.
4. Faites passez les câbles et interrupteurs de l’appareil de
l’intérieur vers l’extérieur par l’ouverture sciée. Fixez la
plaque métallique montée au-dessus de la monture en
céramique par les trous perforés à l’aide des vis et écrous
fournis.
5. Vissez votre agent lumineux dans la monture en
céramique. Orientez votre luminaire dans la position
souhaitée à l’aide de la rotule (voir fig. 5a). Branchez la
fiche secteur dans la prise.
Mesures de sécurité
• en intérieur uniquement
• distance minimum aux objets éclairés 20 cm
• seulement agréé pour des luminaires de 250 Watt
• le produit n’est pas agréé en combinaison avec une source
de chauffage sans lumière, comme les émetteurs en
céramique Elstein
• lors de dégâts au niveau des transmissions, ne pas mettre
en service le produit
• toutes transmissions endommagées doivent être
remplacées par une main-d’oeuvre qualifiée, uniquement
les conduites de type H03VVH2-F 2 x 0,75 mm² peuvent
être utilisées
• lors de rechange d’agents lumineux, toujours débrancher
les prises secteurs et laisser refroidir le produit ainsi que la
monture
Safely attach illuminants with an E27 standard thread inside
the terrarium using the HOBBY Ceramic Socket Set. The
product is completely pre-installed to operate illuminants up to
250 watt.
You require a drilling machine or a cordless drilling screwdriver,
metal drills of 4.5 and 8 mm, a jig saw with a metal saw
blade, a metal file and a screwdriver for the assembly.
1. Glue the enclosed stencil to the top of the perforated plate
of the terrarium from the outside in the desired position.
2. Drill four holes of 8 mm intended for positioning the jig
saw for the cut-out, as well as two holes of 4.5 mm for
attaching the product.
3. Remove the stencil and debarr the cutting edge with a file.
4. Lead the device cable and switch through the sawn
opening outwards from the inside. Attach the metal plate
installed above the ceramic fitting to the screws and nuts
included in the delivery via the drilled holes.
5. Screw your illuminant into the ceramic fitting. Position it
with the ball joint (see picture 5a). Insert the power plug
into the socket.
Safety guidelines
• only for interiors
• minimum distance to illuminated objects 20 cm
• only approved for illuminants up to 250 watt
• the product is not approved for operation with heating
means which are not light-emitting, such as Elstein
Ceramic Spots
• do not operate the product, if the feed lines are damaged
• damaged feed lines may only be replaced by specialised
personnel, only H03VVH2-F 2 x 0.75 mm²-typed lines may
be used
• always pull the power plug and let the product and the
fitting cool down before exchanging illuminants
Istruzioni d’uso
Ceramic Socket Set
Mode d’emploi
Ceramic Socket Set
Using instruction
Ceramic Socket Set
0,2m
Otto-Hahn-Str. 9
D-53501 Grafschaft-Gelsdorf
Telefon: +49 (0)2225-9415-0
Eine Marke der Dohse Aquaristik KG
Ceramic
Socket Set
ø
4,5
mm
ø
8 m
m
ø
4,5 mm
ø
8 mm
ø
4,5 mm
ø
4,5 mm
ø
8 mm
ø
4,5 mm
ø
8 mm
0,2m
3
4
1
2
5
a
5
0,2m
0,2m


