


If your airplane turns to the right (E) during glide tests,
cut the rudder top and bottom and bend the rudder to
the left.
If your airplane turns to the left (D) during glide tests, cut
the rudder top and bottom and bend the rudder to
the right.
❏
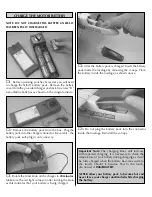
1. Range check your radio before each flight. Switch
on the transmitter and plug the battery pack into the SKY
SCREAMER. Have a helper hold the airplane. With the
antenna collapsed, walk 50 feet away from the airplane.
Move both control sticks, checking that the motors run
and turn off following the control stick movement. If you
still have control over the airplane, it is safe to extend
the antenna and fly the airplane. If you do not have
control of the plane, make sure the batteries in the
transmitter are fresh and the battery in the plane is
charged. Also, make sure the wire antenna is extending
out the back of the plane.
Do not cut the antenna wire
on the plane.
If you have never flown an R/C airplane before, we
recommend that you get help from an experienced R/C
pilot. Most R/C clubs have training programs that will
help you learn to fly quickly. If you cannot find an
experienced pilot to help you learn, the following will
help you get your airplane into the air.
1. First, turn your transmitter power switch “ON.” This
immediately puts you in control. Be sure to extend your
antenna completely.
2. Plug the freshly charged battery pack into the plug in
the fuselage. Reinstall the canopy and move the switch
to the on position.
Caution: Stay clear of the propellers.
3. Have an assistant help with the launch. Move the
throttle stick forward so that both motors are running.
Have your assistant launch the plane into the wind.
4. Allow the airplane to climb at a 20° angle for a few
seconds before turning it. This will allow the plane to
gain altitude and air speed.
5. To turn the SKY SCREAMER, move the right stick, left
or right until the plane has turned. When the SKY
SCREAMER is moving away from you, moving the right
stick to the left will make your plane turn to the left.
Moving the right stick to the right will make the plane
turn to the right.
6. When the plane is coming toward you, moving the
right stick left still causes the plane to turn left, but it
appears to turn to
your right
. In short, you have to
reverse the way you control the right stick. A good way
to familiarize yourself with the controls is when the
plane is coming toward you, turn your body so that you
are facing the same direction the plane is going, looking
over your shoulder at the plane. Now when you move
the right stick left the plane will go to your left.
7. Don’t let the airplane get too far away from you. The
farther away it is, the harder it is to see what the plane
is doing.
8. When learning to fly, it is best to keep the plane high
so that if you make a mistake, you have enough altitude
to correct the mistake.
It’s a known fact among fellow R/C pilots that your
airplane
will
land. It is up to you as to where and how
it lands.
1. The SKY SCREAMER will get approximately 5 to 7
minutes of flight, at full throttle, on a fully charged
battery before the motors stop. For your first couple of
flights we recommend that you attempt to land before
the motors stop. This will allow enough power to abort
the landing and try again if you miss your landing area.
LANDING
FLYING THE SKY SCREAMER
RANGE CHECK
11


