Hobbico ElectriStar EP Select Instruction Manual Download Page 6

The following items are required to complete assembly:

#2 Phillips screwdriver (HCAR1024)

Long-nose pliers (HCAR0625)

Hobby knife (HCAR0109)

3mm Hex wrench (for prop)

Carefully remove the various components from the package.
Be sure to inspect all pieces to verify that there is no damage.

Refer to your charger’s manual for proper charging
information for the motor batteries.

You will need to refer to the radio system manual for proper
charging information for the receiver and transmitter.
Generally transmitter and receiver batteries are shipped
with a partial or “residual” charge. This will probably be
enough of a charge to set-up your airplane, but you will need
to give them a full charge before attempting to fly (usually an
overnight charge).

This would be a good time to charge the motor batteries as
well as the NiCd battery packs that power your transmitter
and receiver (the radio system).

While the batteries are charging, feel free to continue to
Assemble the Fuse.

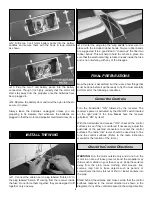
1. Insert the main landing gear wires into the holes in the

landing gear blocks in the bottom of the fuse as shown.
Secure the gear with the two supplied nylon straps and four
2.5 x 10mm screws.

2. Locate the 8mm x 109mm and 8mm x 103mm dowel

rods. Insert them through the fuselage as shown with the
longer of the two toward the front of the plane. When
satisfied with their fit and placement, use CA to secure them
in place.

3. Locate the four plastic dowel rod caps and place them

on the ends of the dowel rods that you just installed. Secure
each of them with a 2.3mm x 10mm self-tapping washer
head screw.

Assemble the Fuse

Charge the Batteries

ASSEMBLY

BUILDING EQUIPMENT

6

Summary of Contents for ElectriStar EP Select

Page 1: ...mbled product the user accepts all resulting liability If for any reason you think that this model is not for you return it to your local dealer immediately PLEASE NOTE Your hobby dealer cannot accept...

Page 2: ...nd that you join the AMA Academy of Model Aeronautics and a local R C club The AMA is the governing body of model aviation and membership is required to fly at AMA clubs Joining the AMA provides many...

Page 3: ...acceptable quality or if you need assistance with assembly contact Hobbico Product Support Phone 217 398 8970 Ext 5 Fax 217 398 7721 E Mail airsupport hobbico com Remember Take your time and follow t...

Page 4: ...Be certain to specify the order number exactly as listed in the Replacement Parts List and indicate quantity of each item Payment accepted by credit card or personal check only no C O D If additional...

Page 5: ...ort When reporting defective or missing parts use the part names exactly as they are written in the Kit Contents list on this page Hobbico Product Support Phone 217 398 8970 Ext 5 Fax 217 398 7721 E M...

Page 6: ...an overnight charge This would be a good time to charge the motor batteries as well as the NiCd battery packs that power your transmitter and receiver the radio system While the batteries are chargin...

Page 7: ...ket head cap screw and propeller washer from the shaft of the motor 3 Place the propeller onto the shaft so that the blades are perpendicular to the spinner screw receptacles on the backplate as shown...

Page 8: ...rn via the clevis and slide the silicone clevis retainer in place as shown You may use epoxy to permanently join the wing halves together if you wish If you do permanently join the wing halves make su...

Page 9: ...ow the plane is assembled but there are a few things that must be done before it will be ready to fly You must carefully perform all of the following procedures Turn the transmitter ON followed by the...

Page 10: ...ttle stick must be in the down or OFF position When the plane s power is switched ON you will hear a beep Move the throttle stick to full power and you will hear another beep Move the throttle back to...

Page 11: ...ff the system always turn the receiver OFF first followed by the transmitter Once the motor is armed always remain behind the arc of the propellers until the batteries are disconnected No matter if yo...

Page 12: ...umber on or in the model Note This does not apply to models while being flown indoors 9 I will not operate models with pyrotechnics any device that explodes burns or propels a projectile of any kind 1...

Page 13: ...ell you what the control surfaces are doing Repeat this test with the motor running at various speeds If the control surfaces are not always responding correctly do not fly Find and correct the proble...

Page 14: ...become familiar with the model before landing With electric planes it s best to land with some battery power remaining This will allow you to abort the landing and go around again if needed To initiat...

Page 15: ...access compartment below the deep drawer holds most 12V maintenance free hobby batteries and features a vented faceplate that allows heat to escape and cooler air to enter GPMP1006 Great Planes C G Pr...

Page 16: ...____________ Where Purchased _________________________ Date Construction Started __________________ Date Construction Finished _________________ Finished Weight __________________________ Date of Firs...

Reviews: