background image

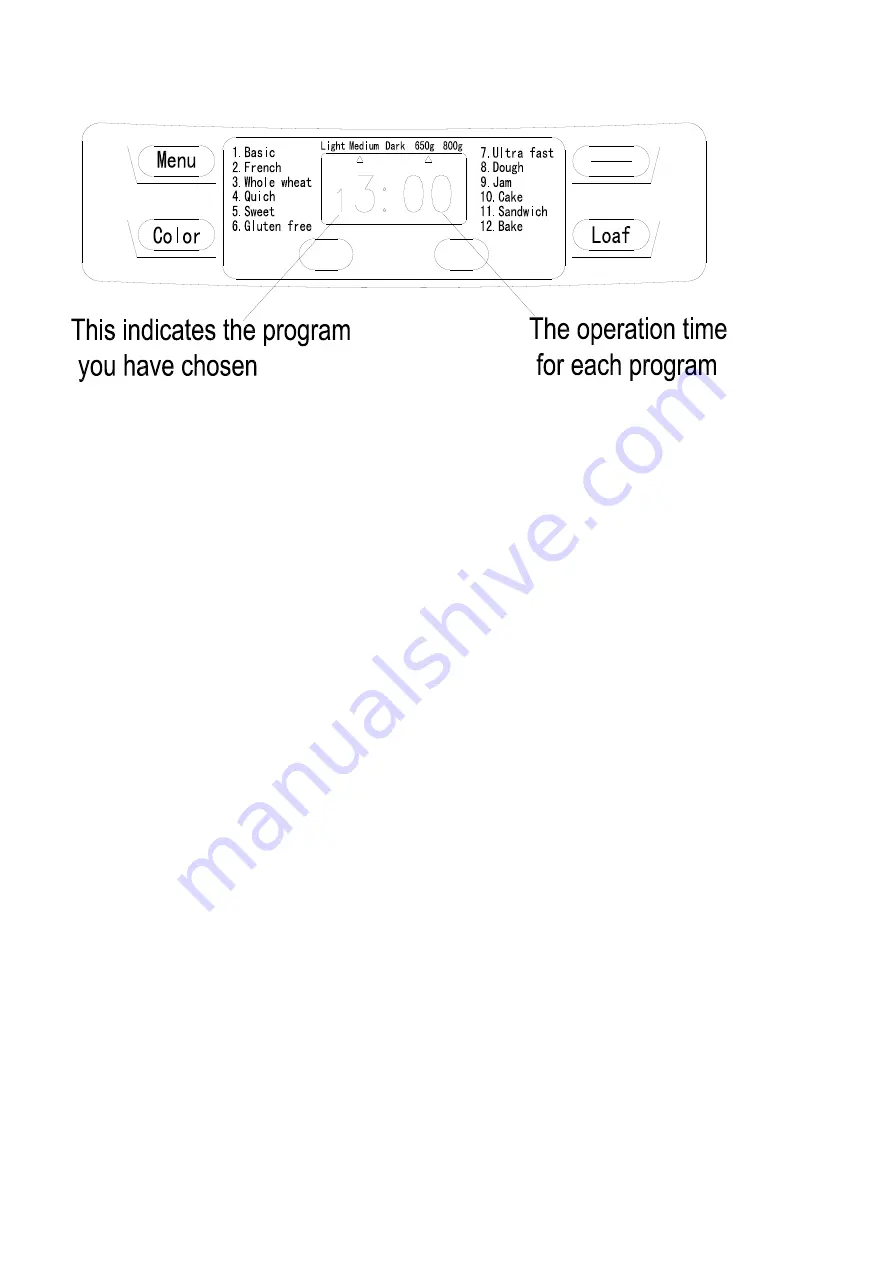
INTRODUCTION OF CONTROL PANEL


AFTER POWER-UP  

As  soon  as  the  bread  maker  is  plugged  into  the  power  supply,  a  beep  will  be  heard  and  “3:00” 
appears  in  the  display  after  a  short  time.  But  the  two  dots  between  the  “3”  and  “00”  don’t  flash 
constantly. The arrow points to 800g


and 

MEDIUM

. It is the default setting.  

START/STOP      

The button is used for starting and stopping the selected baking program.  
To start a program, press the 

START/STOP

 button once. A short beep will be heard and the two 

dots in the LCD begin to flash, the working light illuminates and the program starts. Any other button 
is inactivated except the

 START/STOP

 button after a program has begun. This feature will help to 

prevent any unintentional disruption to the operation of program.  
To stop the program, press the 

START/STOP

 button for approx. 2 seconds, then a beep will be 

heard, the working light will be extinguished, it means that the program has been switched off.  

PAUSE function  

After  procedure  starts  up,  you  can  press 

START/STOP

  button  once  to  interrupt  at  any  time,  the 

operation will be paused but the setting will be memorized, the working time will be flashed on the 
LCD. Touch 

START/STOP

 button again or within 10 min without touching any button, the program 

will continue.  
 

MENU 


It  is  used  to  set  different  programs.  Each  time  it  is  pressed  (accompanied  by  a  short  beep)  the 
program will vary. Press the button continuously, the 12 menus will be cycled to show on the LCD 
display. Select your desired program. The functions of 12 menus will be explained as below.  
 
1.


Basic

: kneading, rise and baking normal bread. You may also add ingredients to increase flavor.  

2.


French: kneading, rise and baking within a longer rise time. The bread baked in this menu usually 

will have a crisper crust and light texture.     
3.


Whole whe

at: kneading, rise and baking of whole wheat bread. It is not advised to use the delay 

function as this can produce poor results.  
4.


Quick

: kneading, rise and baking loaf within the time less than Basic bread. But the bread baked 

on this setting is usually smaller with a dense texture.  
5.


Sweet

: kneading, rise and baking sweet bread. You may also add ingredients to add flavor.  

6.


Gluten free

: kneading, rise and baking gluten free bread. You may also add ingredients to add 

flavor.   
7.


Ultra fast

: kneading, rise and baking in a shortest time. Usually the bread


made is smaller and 

rougher than that made with 

Quick

 program. 

8.


Dough

: kneading and rise, but without baking. Remove the dough and use for making bread rolls, 

pizza, steamed bread, etc. 

Start

Stop

Summary of Contents for BAKE320

Page 1: ...struction manual Manuel d utilisation Bedienungsanleitung Handboek Manual de Utilización Manuale d uso BAKE320 Bread Maker Machine à Pain Brotbackautomat Broodmaker Máquina de hacer pan Macchina del Pane ...

Page 2: ...es 5 To protect against electric shock do not immerse cord plugs or housing in water or other liquid 6 Unplug from outlet when not in use before putting on or taking off parts and before cleaning 7 Do not let cord hang over edge of table or hot surface 8 The use of accessory attachments not recommended by the appliance manufacturer may cause injuries 9 Do not place on or near a hot gas or electric...

Page 3: ...ly A fire can be caused if it is covered by or comes into contact with combustible material 17 Do not operate the appliance for other than its intended use 18 Always use the appliance on a secure dry level surface 19 Do not use outdoors 20 This appliance has been incorporated with a grounded plug Please ensure the wall outlet in your house is well earthed 21 This appliance is intended to be used i...

Page 4: ...using the appliance safely and are fully aware of the dangers involved 25 Cleaning and maintenance should not be carried out by children unless they are at least 8 years of age and are supervised by an adult 26 The device must not be used if it has been dropped it obvious signs of damage are visible or if it has leaks KNOW YOUR BREAD MAKER ...

Page 5: ... button again or within 10 min without touching any button the program will continue MENU It is used to set different programs Each time it is pressed accompanied by a short beep the program will vary Press the button continuously the 12 menus will be cycled to show on the LCD display Select your desired program The functions of 12 menus will be explained as below 1 Basic kneading rise and baking ...

Page 6: ...f you would like your bread to be ready in the next morning at 7 o clock i e in 10 hours and 30 minutes Select your menu color loaf size then press the or to add the time until 10 30 appears on the LCD Then press the STOP START button to activate this delay program You can see the dot flashed and LCD will count down to show the remaining time You will get fresh bread at 7 00 in the morning if you ...

Page 7: ...lacing the kneaders this avoids the dough to stick below the kneaders and the kneaders could be removed from bread easily 2 Place ingredients into the bread pan Please keep to the order mentioned in the recipe Usually the water or liquid substance should be put firstly then add sugar salt and flour always add yeast or baking powder as the last ingredient Note the maximum quantities of the flour an...

Page 8: ...isture and heat For perfect quick breads it is suggested that all liquids be placed in the bottom of the bread pan dry ingredients on top During the initial mixing of quick bread batters and dry ingredients may collect in the corners of the pan it may be necessary to help machine mix to avoid flour clumps If so use a rubber spatula 2 About Ultra fast program The bread maker can bake loaf within 1 ...

Page 9: ...heat flour is ground from grain It contains wheat skin and gluten Whole wheat flour is heavier and more nutrient than common flour The bread made by whole wheat flour is usually small in size So many recipes usually combine the whole wheat flour or bread flour to achieve the best result 4 Black wheat flour Black wheat flour also named as rough flour it is a kind of high fiber flour and it is simil...

Page 10: ...other liquid Water is essential ingredient for making bread Generally speaking water temperature between 200C and 250C is the best The water may be replaced with fresh milk or water mixed with 2 milk powder which may enhance bread flavor and improve crust color Some recipes may call for juice for the purpose of enhancing bread flavor e g apple juice orange juice lemon juice and so on INGREDIENTS M...

Page 11: ...poons 36g 3 Salt 1 5teaspoons 10g 2 teaspoons 14g 5 Sugar 1 5 tablespoons 18g 2 tablespoons 24g 4 Flour 3 cups 420g 3 1 2 cups 490g 6 Yeast 0 5teaspoons 1 5g 0 5teaspoons 1 5g WHOLE WHEAT BREAD SIZE MATERIAL 650g 800g 1 Water 260ml 260g 340ml 340g 2 Oil 2 tablespoons 24g 3 tablespoons 36g 3 Salt 4teaspoons 7g 2 teaspoons 14g 4 Whole wheat 1 cup 110g 2 cups 220g 5 Flour 2 cups 280g 2 cups 280g 6 Br...

Page 12: ...tablespoons 14g 2 tablespoons 14g 7 Yeast 0 5 teaspoons 1 5g 0 5 teaspoons 1 5g GLUTEN FREE SIZE MATERIAL 650g 800g 1 WATER 280ml 340ml 2 OIL 2 tablespoons 3 tablespoons 3 SALT 1 1 1 2 4 GLUTEN FREE FLOUR 3 cups 4 cups 5 SUGAR 2 tablespoons 2 tablespoons 6 YEAST 2 teaspoons 1 5 teaspoon ULTRA FAST BREAD SIZE MATERIAL 650g 1 Water 40 50 270ml 270g 2 Oil 2 tablespoons 24g 3 Salt 1 teaspoon 7g 4 Suga...

Page 13: ...elf raising flour 250 g 5 Flavouring essence 1 teaspoon 2g 6 Lemon juice 1 3 tablespoons 10g 7 Yeast 1 teaspoon 3g SANDWICH BREAD SIZE MATERIAL 650g 800g Water 270 ml 270g 360 ml 360g Butter or margarine 1 5 tablespoons 2 tablespoons Salt 1 5 teaspoons 10g 2 teaspoons 14g Sugar 1 5 tablespoons 18g 2 tablespoons 24g Dry milk 1 5 tablespoons 10g 2 tablespoons 14g Bread flour 3 cups 420g 4 cups 560g ...

Page 14: ...dients are not mixed or the bread is not baked correctly Incorrect program setting Check the selected menu and the other settings The START STOP button was touched while the machine was working Do not use the ingredients and start over again The lid opened several times while the machine was working Never open the lid frequently otherwise it is necessary such as add ingredients And make sure that ...

Page 15: ...bread goes down a f The fermentation is too short or too fast owing to the excessive temperature of the water or the baking chamber or to the excessive moistness c h i Heavy lumpy structure too much flour or not enough liquid a b g not enough yeast or sugar a b too much fruit wholemeal or of one of the other ingredients B old or stale flour warm liquids make the dough rise too quickly and loaf fal...

Page 16: ... the dose of the liquid to be added must be duly reduced g In case of every humid weather remove 1 2 tablespoons of water h In case of warm weather do not use the timing function Use cold liquids i Take the bread out of the pan immediately after baking and leave it on the grid to cool for at least 15 minutes before cutting it j Reduce the amount of yeast or of all the ingredient doses by 1 4 k Nev...

Page 17: ...n réglage électrique ou mécanique 4 Ne touchez pas les surfaces chaudes 5 Pour vous protéger contre les chocs électriques ne plongez pas le cordon les prises ou l appareil dans l eau ou dans un autre liquide 6 Débranchez la prise lorsque l appareil n est pas utilisé avant de mettre ou de retirer des accessoires et avant de le nettoyer 7 Ne laissez pas le cordon pendre au dessus du bord de la table...

Page 18: ...oivent pas être effectués par des enfants sauf s ils ont plus de 8 ans et sont surveillés 15 Gardez l appareil et son cordon hors de portée des enfants de moins de 8 ans 16 Ne couvrez jamais la machine à pain avec une serviette ou autre chose la chaleur et la vapeur doivent pouvoir s échapper librement Un incendie peut être provoqué si elle est recouverte par un matériau combustible ou si elle ent...

Page 19: ...uve pour éviter d endommager l appareil 24 Cet appareil peut être utilisé par des enfants âgés d au moins 8 ans à condition qu ils soient surveillés qu ils aient reçu des instructions sur l utilisation sans danger de l appareil et qu ils soient pleinement conscients des dangers encourus 25 Le nettoyage et l entretien ne doivent être effectués par des enfants que s ils ont au moins 8 ans et sont su...

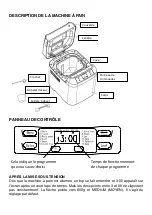
Page 20: ...ran après un court laps de temps Mais les deux points entre 3 et 00 ne clignotent pas constamment La flèche pointe vers 800g et MEDIUM MOYEN Il s agit du réglage par défaut Start Stop 十 一 Couvercle Fenêtre Cuve Panneau de commandes Corps Crochet Gobelet doseur Cuillère à doser Cela indique le programme que vous avez choisi Temps de fonctionnement de chaque programme ...

Page 21: ...s s affichent successivement sur l écran Sélectionnez le programme souhaité Les fonctions des 12 menus sont expliquées comme suit 1 Basic De base pétrissage levée et cuisson du pain normal Vous pouvez ajouter des ingrédients pour renforcer la saveur 2 French Français pétrissage levée et cuisson dans un temps de levée plus long Le pain cuit dans ce menu aura généralement une croûte plus croustillan...

Page 22: ... touches ou Veuillez noter que le temps d attente doit inclure le temps de cuisson du programme C est à dire qu à la fin du temps il est possible de servir du pain chaud Il faut d abord sélectionner le programme et le degré de brunissage puis appuyer sur ou pour augmenter ou diminuer le temps par périodes de 10 minutes Le temps maximum est de 13 heures Exemple Il est maintenant 20h30 si vous souha...

Page 23: ...iche LLL après avoir appuyé sur la touche START STOP sauf le programme CUISSON cela signifie que la température de l appareil est trop basse 5 bips retentissent Arrêtez l alarme en appuyant sur le bouton START STOP ouvrez le couvercle et laissez la machine se reposer pendant 10 à 20 minutes pour revenir à la température ambiante 3 Si l écran affiche EE0 après que vous avez appuyé sur le bouton STA...

Page 24: ...si vous souhaitez que la machine à pain commence à fonctionner immédiatement 9 Appuyez sur la touche START STOP pour commencer la fabrication du pain Pour les programmes De base Français Blé complet Rapide Sucré Ultra rapide Gâteau et Sandwich 10 bips se font entendre pendant le fonctionnement Ceci vous signale d ajouter des ingrédients Ouvrez le couvercle et faites le Il est possible que de la va...

Page 25: ... secs peuvent s accumuler dans les coins de la cuve il peut être alors nécessaire d aider la machine pour éviter les grumeaux de farine Si c est le cas utilisez une spatule en caoutchouc 2 À propos du programme ultra rapide La machine à pain peut cuire le pain en 1 heure avec un programme ultra rapide Ce réglage permet de cuire le pain en 58 minutes il a alors une texture un peu plus dense Veuille...

Page 26: ...mez bien le couvercle Présentation des ingrédients 1 Farine à pain La farine à pain a une teneur élevée en gluten elle peut donc être également appelée farine à haute teneur en gluten qui contient beaucoup de protéines elle a une bonne élasticité et peut empêcher le pain de s affaisser après la levée Comme la teneur en gluten est plus élevée que celle de la farine ordinaire elle peut être utilisée...

Page 27: ...un ingrédient très important pour augmenter le goût sucré et la couleur du pain Il est également considéré comme un élément nutritif dans le pain à la levure Le sucre blanc est largement utilisé Le sucre brun ou le sucre en poudre peut être utilisé selon les besoins 8 Levure Pendant la levée la levure produit du gaz carbonique qui permet de faire gonfler le pain et de ramollir les fibres Cependant...

Page 28: ...iformément 11 Graisse beurre et huile végétale La graisse peut faire ramollir le pain et retarder sa durée de conservation Le beurre doit être fondu ou haché en petits morceaux avant d être utilisé 12 Poudre à lever La levure est utilisée pour faire lever le pain et les gâteaux ultra rapides Comme elle n a pas besoin de temps de levée et qu elle produit du gaz carbonique celui ci va former des bul...

Page 29: ...ur mesurer de petites quantités d ingrédients solides il faut utiliser la cuillère doseuse Les mesures doivent être faites sans tasser car cette petite différence pourrait compromettre l équilibre de la recette 3 Ordre des ingrédients Les ingrédients doivent être ajoutés selon l ordre suivant liquides œufs sel et lait en poudre etc Lors de l ajout de l ingrédient la farine ne doit pas être complèt...

Page 30: ... 2 tasses 280g 2 tasses 280g 6 Sucre brun 2 c à soupe 18g 2 5 c à soupe 23g 7 Lait en poudre 2 c à soupe 14g 3 c à soupe 21g 8 Levure 0 5 c à café 1 5g 0 5 c à café 1 5g PAIN RAPIDE Quantité des ingrédients 800g 1 Eau 40 50 C 320ml 320g 2 Huile 2 c à soupe 24g 3 Sel 1 5 c à café 10g 4 Sucre 2 c à soupe 24g 5 Farine 3 5 tasses 490g 6 Levure 2 c à café 6g PAIN SUCRÉ Quantité des ingrédients 650g 800...

Page 31: ...ingrédients 650g 1 Eau 40 50 C 270ml 270g 2 Huile 2 c à soupe 24g 3 Sel 1 c à café 7g 4 Sucre 3 c à soupe 36g 5 Farine 3 tasses 420g 6 Levure 2 c à café 6g PÂTE Quantité des ingrédients 1 Eau 40 50 C 360ml 360g 2 Huile 2 c à soupe 24g 3 Sel 1 5 c à café 10g 4 Farine raffinée 4 tasses 560g 5 Sucre 2 c à soupe 24g 6 Levure 0 5 c à café 1 5g CONFITURE Quantité des ingrédients 1 Fraises écrasées 4 tas...

Page 32: ...u à l extérieur de la cuve Débranchez la prise et nettoyez l extérieur de la cuve ou du compartiment de cuisson Le pain s affaisse au milieu et est humide sur le fond Le pain est laissé trop longtemps dans la cuve après avoir été cuit et réchauffé Retirez le pain de la cuve avant que le réchauffement ne soit terminé Il est difficile de retirer le pain de la cuve Le fond du pain est collé au pétrin...

Page 33: ...ut ou pas assez pas de levure du tout ou trop peu a b levure vieille ou périmée e liquide trop chaud c la levure est entrée en contact avec le liquide d mauvais type de farine ou farine périmée e trop ou pas assez de liquide a b g pas assez de sucre a b La pâte lève trop et se répand sur la cuve Si l eau est trop sucrée la levure fermente davantage f une trop grande quantité de lait gêne la fermen...

Page 34: ...lisez un autre liquide ou laissez le refroidir à température ambiante Ajoutez les ingrédients indiqués dans la recette et dans le bon ordre faites une petite entaille au milieu de la farine et mettez la levure émiettée ou la levure sèche en évitant que la levure et le liquide n entrent en contact direct d N utilisez que des ingrédients frais et correctement stockés e Réduisez la quantité totale de...

Page 35: ...es produits électriques et électroniques peuvent contenir des substances dangereuses qui ont des effets néfastes sur l environnement ou la santé humaine et doivent être recyclés Le symbole ci contre indique que les équipements électriques et électroniques font l objet d une collecte sélective il représente une poubelle sur roues barrée d une croix Adeva SAS H Koenig Europe 8 rue Marc Seguin 77290 ...

Page 36: ...k zu dem Hersteller oder nächstliegendem autorisierten Kundendienst für eine Inspektion Reparatur oder elektrische oder mechanische Anpassung 4 Berühren Sie keine heißen Flächen 5 Um sich vor einem Stromschlag zu schützen tauchen Sie das Gehäuse das Stromkabel oder den Stecker nicht in Wasser oder andere Flüssigkeiten 6 Trennen Sie das Gerät beim Nichtgebrauch bevor Sie die Teile montieren und abb...

Page 37: ...here Nutzung des Gerätes erhielten und können die damit verbundenen Gefahren vollständig nachvollziehen Kinder dürfen mit dem Gerät nicht spielen Die Reinigung und Wartung dürfen nicht von Kindern durchgeführt werden es sei denn sie sind über 8 Jahre alt und werden beaufsichtigt 16 Bedecken Sie den Brotbackautomaten niemals mit einem Handtuch oder anderen Stoffen Hitze und Dampf müssen frei entwei...

Page 38: ...u werden 23 Bedienen Sie das Gerät nicht ohne der eingesetzten Brotpfanne um Beschädigungen des Gerätes zu vermeiden 24 Dieses Gerät darf von Kindern ab 8 Jahre benutzt werden solange sie beaufsichtigt werden oder Anweisungen über eine sichere Nutzung des Gerätes erhielten und können die damit verbundenen Gefahren vollständig nachvollziehen 25 Die Reinigung und Wartung dürfen nicht von Kindern dur...

Page 39: ...n ist wird ein Piepton ertönen nach kurzer Zeit wird 3 00 auf dem Display erscheinen Die zwei Punkte zwischen 3 und 00 werden nicht ständig leuchten Der Pfeil zeigt auf 800g und MEDIUM Dies ist eine Voreinstellung START STOP Diese Taste wird benutzt um das gewählte Backprogramm zu starten oder zu stoppen ...

Page 40: ...n Aufgehzeit Das Brot das bei dieser Einstellung gebacken wurde hat in der Regel eine knusprigere Kruste und eine leichte Textur 15 Vollkorn Kneten Aufgehen und Backen des Vollkornbrotes Es wird nicht empfohlen die Wartefunktion bei dieser Einstellung zu verwernden da dies zu keinen guten Ergebnissen führen wird 16 Schnell Kneten Aufgehen und Backen eines Brotlaibes in kürzerer Zeit als beim Basic...

Page 41: ...ie die Wartefunktion verwenden benutzen Sie keine schnell verderblichen Zutaten wie z B Eier frische Milch Obst oder Zwiebel usw WARMHALTEN Das Brot kann automatisch für 60 Minuten nach dem Backen warmgehalten werden Wenn Sie das Brot entnehmen möchten schalten Sie das Programm mit der START STOP Taste aus SPEICHERFUNKTION Wenn die Stromversorgung während des Backvorgangs unterbrochen wurde wird d...

Page 42: ...er oder flüssige Zutaten zuerst hinzugefügt werden danach kommen Zucker Salz und Mehl Hefe oder Backpulver kommen immer als letztes dazu Hinweis für die maximale Menge von Mehl und Hefe beziehen Sie sich auf das Rezept HINWEIS Die maximale Menge von Mehl und Hefe separat ist 590g and 6g 3 Machen Sie mit Ihrem Finger eine kleine Kuhle im Mehl auf einer Seite Fügen Sie die Hefe in die Kuhle hinzu ve...

Page 43: ...Bevor Sie den Brotlaib schneiden bentzen Sie den Haken um die Knetklinge zu entfernen die unten in dem Laib verstekt ist Der Laib ist heiß entnehmen Sie die Knetklinge niemals mit Ihren Handen Besondere Einweisungen 1 Für das Schnellbrot Das Schnellbrot wird mit Backpulver und Natron gemacht die durch Feuchtigkeit und Hitze aktiviert werden Für ein perfektes Schnellbrot wird es empfohlen dass alle...

Page 44: ...entfernt werden Wischen Sie die Klinge auch vorsichtig mit einem feuchten Baumwolltuch ab Bitte beachten Sie dass beide die Brotpfanne und die Knetklinge spülmaschinenfest sind 3 Deckel und Fenster reinigen Sie den Deckel von innen und außen mit einem leicht feuchten Tuch 4 Gehäuse wischen Sie die Außenfläche des Gehäuses vorsichtig mit einem feuchten Tuch ab Benutzen Sie keine abrasiven Reinigung...

Page 45: ...warzes Weizenmehl auch grobes Mehl genannt ist eine Art von ballaststoffreichem Mehl ähnlich zu dem Weizenvollkornmehl Um eine bessere Größe nach dem Aufgehen zu erreichen muss es mit einem hohen Anteil des Brotmehls kombiniert werden 5 Selbsttreibendes Mehl Die Art von Mehl mit Backpulver wird besonderes zum Backen von Kuchen benutzt 6 Getreidemehl und Hafermehl Das Getreidemehl und Hafermehl wer...

Page 46: ...ür ca 10 Minuten Rühren Sie das Wasser nicht um 4 Der Schaum muss bis zu einem Becher hoch sein Ansonsten ist die Hefe tot oder nicht aktiv 9 Salz Salz ist notwendig um den Brotgeschmack und die Farbe der Kruste zu verbessern Aber Salz kann auch das Aufgehen von Hefe hemmen Benutzen Sie niemals zu viel Salz in dem Rezept Das Brot wird ohne Salz größer 10 Eier Eier können die Brottextur verbessern ...

Page 47: ...ohne jeglichen anderen Zutaten sorgfältig 2 Trockene Messungen Trockene Messungen sollten gemacht werden indem Sie die Zutaten vorsichtig in den Messbecher löffeln und sobald dieser befüllt ist diese mit einem Messer gerade streichen Überfüllen Sie die Tasse nicht oder klopfen Sie eine größere Menge von Zutaten als Sie eigentlich brauchen nicht ein Diese zusätzliche Menge kann die Zusammensetzung ...

Page 48: ...10g 2 TL 14g 5 Zucker 1 5 EL 18g 2 EL 24g 4 Mehl 3 Tassen 420g 3 1 2 Tassen 490g 6 Hefe 0 5TL 1 5g 0 5TL 1 5g WEIZEN VOLLKORNBROT MENGE MATERIAL 650g 800g 1 Wasser 260ml 260g 340ml 340g 2 Öl 2 EL 24g 3 EL 36g 3 Salz 4TL 7g 2 TL 14g 4 Vollkorn 1 Tasse 110g 2 Tassen 220g 5 Mehl 2 Tassen 280g 2 Tassen 280g 6 Braunzucker 2 EL 18g 2 5EL 23g 7 Milchpulver 2 EL 14g 3 EL 21g 8 Hefe 0 5TL 1 5g 0 5 TL 1 5g ...

Page 49: ...ml 2 ÖL 2 EL 3 EL 3 SALZ 1 1 1 2 4 GLITENFREIES MEHL 3 Tassen 4 Tassen 5 ZUCKER 2 EL 2 EL 6 HEFE 2 TL 1 5 TL ULTRASCHNELLES BROT MENGE MATERIAL 650g 1 Wasser 40 50 270ml 270g 2 Öl 2 EL 24g 3 Salz 1 TL 7g 4 Zucker 3 EL 36g 5 Mehl 3 Tassen 420g 6 Hefe 2 TL 6g TEIG MENGE MATERIAL 1 Wasser 360ml 360g 2 Öl 2 EL 24g 3 Salz 1 5 TL 10g 4 Raffiniertes Mehl 4 Tassen 560g 5 Zucker 2 EL 24g 6 Hefe 0 5TL 1 5g ...

Page 50: ...omastoff 1 TL 2g 6 Zitronensaft 1 3 EL 10g 7 Hefe 1 TL 3g SANDWICHBROT MENGE MATERIAL 650g 800g Wasser 270 ml 270g 360 ml 360g Butter oder margarine 1 5 EL 2 EL Salz 1 5 TL 10g 2 TL 14g Zucker 1 5 EL 18g 2 EL 24g Trockenmilch 1 5 EL 10g 2 EL 14g Brotmehl 3 Tassen 420g 4 Tassen 560g Trockenhefe 1 TL 3g 1 TL 3g ...

Page 51: ...ig gebacken Falsche Programmeinstellung Überprüfen Sie das gewählte Programm und andere Einstellungen Die START STOP Taste wurde gedrückt während die Maschine am Arbeiten war Benutzen Sie die Zutaten nicht und fangen Sie von vorne an Der Deckel wurde mehrmals während des Betriebs geöffnet Öffnen Sie den Deckel nicht öfter als notwendig Vergewissern Sie sich dass der Deckel nach dem Öffnen richtig ...

Page 52: ...ser in dem Backfach oder wegen der überschüssigen Feuchtigkeit zu kurz oder zu schnell c h i Ene schwere klumpige Struktur Zu viel Mehl oder nicht genug Flüssigkeit a b g Nicht genug Hefe oder Zucker a b Zu viel Obst Vollkorn oder andere Zutaten B Altes oder abgestandenes Mehl warme Flüssigkeiten lassen den Teig zu schnell steigen der Laib wird vor dem Backen senken e Kein Salz oder nicht genug Zu...

Page 53: ... sehr feuchten Wetterbedingungen reduzieren Sie die Wassermenge um 1 2 EL t Use cold liquids Im Falle des warmen Wetters benutzen Sie keine Wartefunktion Verwenden Sie kalte Flüssigkeiten u Entnehmen Sie das Brot aus der Brotpfanne unverzüglich nach dem Backen und lassen Sie es auf dem Gestell für mind 15 Minuten abkühlen bevor Sie es schneiden v Reduce the amount of Hefe or of all the ingredient ...

Page 54: ...ichtstbijzijnde servicemonteur voor onderzoek reparatie of elektrische of mechanische aanpassingen 4 Raak geen hete oppervlakken aan 5 Ter bescherming tegen een elektrische schok nooit de kabel stekker of behuizing onderdompelen in water of in een andere vloeistof 6 Haal de stekker uit het stopcontact als het apparaat niet in gebruik is voor het plaatsen of verwijderen van onderdelen en voor het s...

Page 55: ...en begrijpen Kinderen mogen niet met dit apparaat spelen Schoonmaken en gebruikersonderhoud mag niet worden uitgevoerd door kinderen tenzij ze ouder zijn dan 8 jaar en het onder toezicht gebeurt 15 Houd het apparaat en de stroomkabel uit de buurt van kinderen jonger dan 8 jaar 16 Nooit de broodmaker afdekken met een handdoek of ander materiaal de hitte en stoom moeten vrij kunnen ontsnappen Er kan...

Page 56: ...niet zonder de broodbak in de kamer om schade te voorkomen 24 Dit apparaat mag gebruikt worden door kinderen van minimaal 8 jaar als er toezicht wordt gehouden en ze instructies hebben gehad over hoe ze het apparaat moeten gebruiken en ze de gevaren begrijpen 25 Het schoonmaken en onderhoud mag niet worden uitgevoerd door kinderen tenzij ze 8 jaar of ouder zijn en er toezicht is 26 Het apparaat ma...

Page 57: ... brandt niet continu De pijl wijst naar 800g en MEDIUM Dit is de standaard instelling START STOP Deze knop wordt gebruikt voor het starten en stoppen van een bakprogramma Om een programma te starten dient u eenmaal op START STOP te drukken Er zal een korte piep klinken en de dubbele punt van het LCD begint te knipperen het werklicht gaat branden en het programma begint Alle andere knoppen zijn bui...

Page 58: ...functie te gebruiken omdat dit slechte resultaten levert 28 Snel kneden rijzen en bakken in minder tijd dan met Basic Maar het brood gebakken met dit programma is vaker kleiner met een dichtere textuur 29 Zoet kneden rijzen en bakken van zoet brood U kunt ook ingrediënten toevoegen voor extra smaak 30 Glutenvrij kneden rijzen en bakken van glutenvrij brood U kunt ook ingrediënten toevoegen voor ex...

Page 59: ...tisch worden hervat binnen 10 minuten zelfs zonder op de Start stop knop te drukken Als de onderbreking langer duurt dan 10 minuten wordt het geheugen gewist en moet de broodmaker opnieuw worden opgestart maar als het deeg nog niet voorbij de kneedfase is toen de stroom uitviel kunt u op de START STOP knop drukken om het programma opnieuw te laten beginnen OMGEVING Het apparaat kan werken in een g...

Page 60: ...oren Snel Zoet Ultrasnel Cake en Sandwich zullen er 10 piepjes klinken tijdens de bereiding Dit is om u erop te wijzen ingrediënten toe te voegen Open de deksel en voeg wat ingrediënten toe Het is mogelijk dat stoom ontsnapt door de ventilatieopeningen in de deksel tijdens het bakken Dit is normaal 11 Als het proces is voltooid zullen er 10 piepjes klinken en zal de werkverlichting uitgaan U kunt ...

Page 61: ...laag is rijst het brood niet tot de juiste verwachte hoogte als de watertemperatuur te hoog is wordt de gist gedood voor het rijzen wat ook grote invloed heeft op het bakken Schoonmaak en onderhoud Haal de stekker uit het stopcontact en laat het apparaat afkoelen voor het schoonmaken 1 Broodbak Schrob de binnen en buitenkant schoon met een vochtige doek Gebruik geen schurende of bijtende middelen ...

Page 62: ...granen gemaakt Het bevat tarwekiemen en gluten Volkoren meel is zwaarder en voedzamer dan gewoon meel Het brood dat van volkoren meel wordt gemaakt is meestal kleiner Veel recepten combineren volkoren meel met broodmeel voor het beste resultaat 4 Boekweitmeel Boekweitmeel is een soort meel met veel voedingsstoffen en is gelijkwaardig aan volkoren meel Om het volume te behouden na het rijzen moet h...

Page 63: ... 2 eetlepels gist over het water 3 Plaats de maatbeker op een warme plek gedurende 10 minuten Roer het water niet 4 Het schuim zou moeten reiken tot 1 kopje Anders is de gist dood of inactief 9 Zout Zout is nodig om de smaak van het brood en de korstkleur te verbeteren Maar zout kan ook gist weerhouden van het rijzen Gebruik nooit te veel zout in een recept Maar brood zou groter worden zonder zout...

Page 64: ...ngrediënten afmeet dient u de maatbeker zorgvuldig schoon te maken zonder andere ingrediënten 2 Droge metingen Droge metingen dienen te worden gedaan door voorzichtig met een lepel ingrediënten toe te voegen aan de maatbeker en daarna af te strijken met een mes Schep eruit wat er te veel is Deze extra hoeveelheid kan de balans van het recept verstoren Bij het meten van kleine hoeveelheden van drog...

Page 65: ...st 0 5 theelepel 1 5g 0 5 theelepel 1 5g VOLKOREN BROOD HOEVEELHEDEN 650g 800g 1 Water 260ml 260g 340ml 340g 2 Olie 2 eetlepels 24g 3 eetlepels 36g 3 Zout 4 theelepels 7g 2 theelepel 14g 4 Volkoren 1 kop 110g 2 kopjes 220g 5 Meel 2 kopjes 280g 2 kopjes 280g 6 Bruine suiker 2 eetlepels 18g 2 5 eetlepels 23g 7 Melkpoeder 2 eetlepels 14g 3 eetlepels 21g 8 Gist 0 5 theelepel 1 5g 0 5 theelepel 1 5g SN...

Page 66: ...l ULTRASNEL BROOD HOEVEELHEDEN 650g 1 Water 40 50 270ml 270g 2 Olie 2 eetlepels 24g 3 Zout 1 theelepel 7g 4 Suiker 3 eetlepels 36g 5 Meel 3 kopjes 420g 6 Gist 2 theelepels 6g DEEG HOEVEELHEDEN 1 Water 360ml 360g 2 Olie 2 eetlepels 24g 3 Zout 1 5 theelepel 10g 4 Gezeefde meel 4 kopjes 560g 5 Suiker 2 eetlepels 24g 6 Gist 0 5 theelepel 1 5g JAM HOEVEELHEDEN 1 Geprakte aardbei 4 kopjes 2 Suiker 1 kop...

Page 67: ... bak gezeten na het bakken en warmhouden Haal het brood eruit voordat de warmhoudfunctie is afgelopen Het is lastig om het brood uit de broodbak te halen De onderkant van het brood zit vast aan het kneedmes Maak het kneedmes en de as schoon na het bakken Indien nodig vul de broodbak met warm water gedurende 30 minuten daarna kan het kneedmes gemakkelijk worden verwijderd en worden schoongemaakt De...

Page 68: ...ng gekomen met de vloeistof d Verkeerde meel of oude gist e Te veel of te weinig vloeistof a b g Niet genoeg suiker a b Het deeg rijst te hard en gaat over de broodbak heen Als het water te zacht is fermenteert het gist meer f Te veel melk beïnvloedt de fermentatie van de gist c Het brood zakt in het midden in elkaar Het deegvolume is groter dan de bak en het brood zakt a f De fermentatie is te ko...

Page 69: ...en hoeveelheid meel Verminder alle ingrediënten met1 3 dd Corrigeer de hoeveelheid vloeistof Als er ingrediënten die water bevatten worden gebruikt moet de toegevoegde hoeveelheid water wordt verminderd ee Bij erg vochtig weer verwijdert u 1 2 eetlepels water ff Gebruik bij warm weer niet de timerfunctie Gebruik koude vloeistoffen gg Haal het brood meteen uit de bak na het bakken en laat het op he...

Page 70: ...haberse caído o con algún desperfecto En estos casos lleve el aparato al fabricante o su agente de servicios técnicos más cercano para que sea revisado y reparado si es necesario 4 No toque las superficies calientes 5 Para protegerse contra descargas eléctricas no sumerja el cable de alimentación enchufe o la carcasa de la máquina en agua ni en cualquier otro líquido 6 Desenchufe la máquina de la ...

Page 71: ... más años de edad personas con discapacidad física sensorial mental o motora o con falta de experiencia y conocimiento siempre que sean supervisados hayan recibido instrucciones sobre el uso seguro de la máquina y estén conscientes de los peligros involucrados Los niños no deben jugar con la máquina de hacer pan Los niños no deben realizar la limpieza ni darle mantenimiento a esta máquina a menos ...

Page 72: ...ción de clientes en hoteles moteles y otros tipos de residencia en posadas pensiones y otros tipos de alojamiento 22 La máquina de hacer pan no está diseñada para ser operada por medio de un temporizador o sistema de control remoto externos 23 No opere la máquina sin haber colocado el molde en su cámara interior para evitar el mal funcionamiento del aparato 24 Esta máquina puede ser utilizada por ...

Page 73: ...parente Bandeja de ingredientes Molde de hornear Gancho Taza medidora Panel de control Cuchara medidora Carcasa Menú Color 1 Básico 2 Francés 3 Integral 4 Rápido 5 Dulce 6 Sin gluten 7 Ultrarrápido 8 Amasar 9 Mermelada 10 Pastel 11 Sándwich 12 Hornear Claro Medio Oscuro 650g 800g Inicio Detener Tamaño Este número indica el programa de horneado seleccionado Este es el tiempo de operación para el pr...

Page 74: ...cionar uno de los 12 programas de horneado predeterminados El programa en pantalla cambiará cada vez que presione el botón acompañado de un pitido corto Para escoger uno presione el botón continuamente hasta que aparezca en la pantalla A continuación de explican las operaciones incluidas en cada programa 1 Básico amasar fermentar y hornear pan normal receta básica También puede agregarle ingredien...

Page 75: ...horas Ejemplo Suponga que son las 8 30 pm y desea que su pan esté listo para la mañana siguiente a las 7 en punto es decir en 10 horas y 30 minutos Seleccione el programa deseado color tamaño de la barra y luego presione para aumentar el tiempo hasta que aparezca 10 30 en la pantalla Luego presione el botón INICIO DETENER para activar este programa Puede ver los dos puntos parpadeando en la pantal...

Page 76: ...a máquina siguiendo las orientaciones en la sección de LIMPIEZA Y MANTENIMIENTO del manual 3 Encienda la máquina con el programa Hornear y déjela funcionar con el molde vacío durante 10 minutos Después espere que se enfríe por completo y límpiela una vez más 4 Seque bien todas las piezas y móntelas en la máquina que ahora estará lista para el uso ELABORACIÓN DEL PAN 1 Coloque el molde de hornear e...

Page 77: ...que el pan con mucho cuidado y déjelo enfriar durante unos 20 minutos antes de cortarlo 15 Si está fuera de la habitación o todavía no ha presionado el botón INICIO DETENER el pan se mantendrá caliente automáticamente durante 1 hora si desea sacar el pan antes de ese tiempo detenga el programa definitivamente presionando INICIO DETENER 16 Desenchufe el cable de alimentación de la corriente cuando ...

Page 78: ...ar la amasadora fácilmente para limpiarla También limpie la cuchilla con cuidado usando un paño de algodón húmedo Tenga en cuenta que tanto el molde como la cuchilla de amasar se pueden lavar en el lavavajillas 3 Tapa y visor limpie la tapa con el visor transparente por dentro y por fuera usando un paño ligeramente húmedo 4 Carcasa limpie suavemente la superficie exterior de la carcasa con un paño...

Page 79: ...gredientes aditivos para hacer panes toscos con texturas rugosas y también para resaltar el sabor y la textura del pan 7 Azúcar El azúcar es un ingrediente importante para aumentar la dulzura y el color del pan También es un aditivo que sirve de alimento para las levaduras del pan La azúcar blanca se utiliza bastante ya la azúcar parda en polvo o azúcar de algodón se consideran especiales 8 Levadu...

Page 80: ...lo jugos de manzana naranja limón etc MEDICIÓN DE INGREDIENTES Uno de los pasos importantes para hacer un buen pan es usar la cantidad correcta de ingredientes Se recomienda encarecidamente que utilice una taza medidora y una cuchara medidora de lo contrario la calidad del pan puede verse afectada 1 Medición de ingredientes líquidos El agua la leche fresca o la solución de leche en polvo deben med...

Page 81: ...charadas 24 g 4 Harina común 3 tazas 420 g 3 5 tazas 490 g 6 Levadura 0 5 cucharaditas 1 5 g 0 5 cucharaditas 1 5 g Pan integral de trigo Ingrediente Tamaño 650 g 800 g 1 Agua 260 ml 260 g 340 ml 340 g 2 Aceite 2 cucharadas 24 g 3 cucharadas 36 g 3 Sal 4 cucharaditas 7 g 2 cucharaditas 14 g 4 Harina común 1 taza 110 g 2 tazas 220 g 5 Harina 2 tazas 280 g 2 tazas 280 g 6 Azúcar parda 2 cucharadas 1...

Page 82: ... cucharadas 3 Sal 1 cucharadita 1 5 cucharaditas 4 Harina sin gluten 3 tazas 4 tazas 5 Azúcar 2 cucharadas 2 cucharadas 6 Levadura 2 cucharaditas 1 5 cucharaditas Pan ultrarrápido Ingrediente Tamaño 650 g 1 Agua 40 50 C 270 ml 270 g 2 Aceite 2 cucharadas 24 g 3 Sal 1 cucharadita 7 g 4 Azúcar 3 cucharadas 36 g 5 Harina común 3 tazas 420 g 6 Levadura 2 cucharaditas 6 g Masa Ingrediente Tamaño 1 Agua...

Page 83: ...ay ingredientes adheridos en la cámara interior o por fuera del molde de hornear Desenchufe el cable de alimentación y limpie la cámara de hornear y el molde de hacer pan El pan se consumió de tamaño por el medio y está húmedo por la parte de abajo Dejó el pan demasiado tiempo dentro del molde después de estar listo y terminar de calentar Saque el pan del molde antes de que se acabe el tiempo de m...

Page 84: ...la máquina saque el molde y déjelo enfriar hasta temperatura ambiente luego encienda la máquina y empiece de nuevo Errores relacionados con las recetas La masa del pan crece demasiado rápido Demasiada levadura en la masa mucha harina poca sal o varias causas juntas a b El pan no creció nada o no creció lo suficiente No hay levadura en la masa o es muy poca a b Levadura vencida o inactiva E El agua...

Page 85: ...dad de masa no cabe en el molde a f Demasiada harina especialmente para pan blanco F Demasiada levadura o muy poca sal a b Demasiada azúcar a b Demasiado dulce uso de ingredientes dulces además de azúcar B Rebanadas disparejas o con grumos en el medio El pan no se enfrió lo suficiente el vapor no ha escapado de la barra J Sedimentos o residuos de harina en la corteza del pan La harina no se mezcló...

Page 86: ...IO AMBIENTE ATENCIÓN No se deshaga de este producto como lo hace con otros productos del hogar Existe un sistema selectivo de colecta de este producto puesto en marcha por las comunidades debe de informarse en su ayuntamiento acerca de los lugares en los que puede depositar este producto De hecho los productos eléctricos y electrónicos pueden contener substancias peligrosas que tienen efectos nefa...

Page 87: ...a autorizzato più vicino per un esame per la riparazione o la regolazione elettrica o meccanica 4 Non toccare le superfici calde 5 Per proteggersi da scosse elettriche non immergere il cavo la spina in acqua o altri liquidi 6 Scollegare dalla presa quando non è in uso prima di inserire o rimuovere accessori e prima della pulizia 7 Non lasciare che il cavo penda dal bordo del tavolo o da una superf...

Page 88: ...e la manutenzione non devono essere eseguite da bambini a meno che non abbiano più di 8 anni e siano supervisionati 15 Tenere l apparecchio e il suo cavo fuori dalla portata dei bambini di età inferiore a 8 anni 16 Non coprire mai la macchina per il pane con un asciugamano o altro materiale il calore e il vapore devono poter fuoriuscire liberamente Se l apparecchio viene coperto o viene a contatto...

Page 89: ... l unità senza il vassoio del pane posizionato correttamente 24 Questo apparecchio può essere utilizzato da bambini di almeno 8 anni di età purché siano sorvegliati e siano stati istruiti sull utilizzo dell apparecchio in sicurezza e siano pienamente consapevoli dei pericoli connessi 25 La pulizia e la manutenzione non devono essere eseguite da bambini a meno che non abbiano almeno 8 anni di età e...

Page 90: ... breve tempo sul display apparirà 3 00 Ma i due punti tra 3 e 00 non lampeggiano costantemente La freccia indica 800g e MEDIUM Si tratta dell impostazione predefinita Coperchio Oblò di visualizzazion e Vaschetta pane Pannello di controllo Alloggiamento Cucchiaio misurino Ganci o Misurino Start Stop 十 一 QUESTO INDICA IL PROGRAMMA SELEZIONATO DURATA DEL PROGRAMMA SELEZIONATO ...

Page 91: ... 38 Francese impastare lievitare e cuocere con un tempo di lievitazione più lungo Il pane cotto in questo modo si avrà una crosta più croccante e una consistenza leggera 39 Pane integrale impastare lievitare e cuocere il pane integrale Non è consigliabile utilizzare la funzione di ritardo in quanto ciò può produrre risultati scadenti 40 Veloce impastare lievitare e cuocere la pagnotta in un tempo ...

Page 92: ...ata non utilizzare ingredienti facilmente deperibili come uova latte fresco frutta cipolle ecc TENERE CALDO Il pane può essere mantenuto caldo automaticamente per 60 minuti dopo la cottura Se vuoi togliere il pane annulla il programma con il Pulsante START STOP MEMORIA Se l alimentazione è stata interrotta durante la preparazione del pane il processo di preparazione del pane continuerà automaticam...

Page 93: ...mere il pulsante COLOR per selezionare il colore della crosta desiderato 7 Premere il pulsante LOAF per selezionare la dimensione desiderata 650 go 800 g 8 Impostare il tempo di ritardo premendo o pulsante Questo passaggio può essere saltato se desideri che la macchina per il pane inizi a funzionare immediatamente 9 Premere il pulsante START STOP pulsante per avviare il funzionamento 10 Per il pro...

Page 94: ...azione può cuocere il pane in 58 minuti in questo caso il pane ha una consistenza un pò più densa Si prega di notare che l acqua utilizzata dovrebbe essere acqua calda tra i 48 50 è necessario utilizzare un termometro da cucina per misurare la temperatura La temperatura dell acqua è molto importante per le prestazioni della cottura Se la temperatura dell acqua è troppo bassa il pane non raggiunger...

Page 95: ...ata per fare il pane normale 3 Farina integrale La farina integrale è macinata dal grano Contiene buccia di grano e glutine La farina integrale è più pesante e più nutriente della farina comune Il pane fatto con farina integrale è solitamente di piccole dimensioni Tante ricette di solito combinano la farina integrale o la farina di pane per ottenere i migliori risultati 4 Farina di grano nero La f...

Page 96: ...o uniforme 11 Grasso burro e olio vegetale Il grasso può ammorbidire il pane e ritardare la conservazione Il burro deve essere sciolto o tagliato in piccolo tocchetti prima dell uso 12 Lievito in polvere Il lievito in polvere viene utilizzato per far lievitare il pane e la torta Ultra Fast Poiché non necessita di tempi di lievitazione e può produrre aria l aria formerà bolle per ammorbidire la con...

Page 97: ...ienti di frutta RICETTARIO MACCHINA DEL PANE PANE BASE QUANTITA INGREDIENTI 650g 800g 1 Acqua 280 ml 280g 340 ml 340g 2 Olio 2 cucchiai 24g 3 cucchiai 36g 3 Sale 1 cucchiaino 7g 1 5 cucchiaini 10g 4 Zucchero 2 cucchiai 24g 3 cucchiai 36g 5 Farina 3 tazze 420g 3 1 2 tazze 490 g 6 Lievito 0 5 cucchiaini 1 5 g 0 5 cucchiaini 1 5 g PANE FRANCESE QUANTITA INGREDIENTI 650g 800g 1 Acqua 280 ml 280g 340 m...

Page 98: ...iai 36g 4 cucchiai 48g 5 Farina 3 tazze 420g 3 1 2 tazze 490 g 6 Latte in polvere 2 cucchiai 14g 2 cucchiai 14g 7 Lievito 0 5 cucchiaini 1 5 g 0 5 cucchiaini 1 5 g SENZA GLUTINE QUANTITA INGREDIENTI 650g 800g 1 Acqua 280ml 340ml 2 Olio 2 cucchiai 3 cucchiai 3 Sale 1 1 1 2 4 Farina senza glutine 3 tazze 4 tazze 5 Zucchero 2 cucchiai 2 cucchiai 6 Lievito 2 cucchiaini 1 5 cucchiaini PANE ULTRA VELOCE...

Page 99: ...1 Olio per dolci 2 cucchiai 24g 2 Zucchero 8 cucchiai 96g 3 Uova 6 270 g 4 Farina lievitante 250 gr 5 Essenza aromatica 1 cucchiaino 2g 6 Succo di limone 1 3 cucchiai 10g 7 Lievito 1 cucchiaino 3g PANE SANDWICH QUANTITA INGREDIENTI 650g 800g Acqua 270 ml 270 g 360 ml 360g Burro o margarina 1 5 cucchiai 2 cucchiaio Sale 1 5 cucchiaino 10g 2 cucchiaino 14g Zucchero 1 5 cucchiai 18g 2 cucchiai 24g La...

Page 100: ...toccato mentre la macchina era in funzione Non utilizzare gli ingredienti e ricomincia da capo Il coperchio è stato aperto più volte mentre la macchina era in funzione Non aprire il coperchio frequentemente tranne in caso di necessità come aggiungere gli ingredienti Assicurarsi che il coperchio sia ben chiuso dopo essere stato aperto Lungo blackout durante il funzionamento della macchina Non riuti...

Page 101: ...tri ingredienti B farina vecchia o rafferma liquidi caldi fanno lievitare troppo velocemente l impasto e Poco sale o zucchero insufficiente troppo liquido Il pane non è cotto al centro troppo o non abbastanza liquido a b g troppa umidità h ricette con ingredienti umidi ad es yogurt g Struttura aperta o grossolana o con troppi buchi troppa acqua g niente sale b Eccesiva umidità acqua troppo calda h...

Page 102: ...ione di temporizzazione Usare liquidi freddi ss Togliere il pane dalla teglia subito dopo la cottura e lasciarlo raffreddare sulla griglia per almeno 15 minuti prima di tagliarlo tt Ridurre di 1 4 la quantità di lievito o di tutte le dosi degli ingredienti uu Non ungere mai la teglia vv Aggiungere un cucchiaio di glutine di frumento all impasto AMBIENTE ATTENZIONE Non gettare quest apparecchio tra...

Reviews: