background image

Getting Started (Controls) 


20

REC/IRT  To begin recording. 

F.FWD  Controls the videotape's forward motion. 

REW  Controls the videotape's rewind motion. 

VIDEO IN  Receives video signal from a video camera or another VCR. 

AUDIO IN  Receives audio signal from a video camera, stereo system or another VCR. 
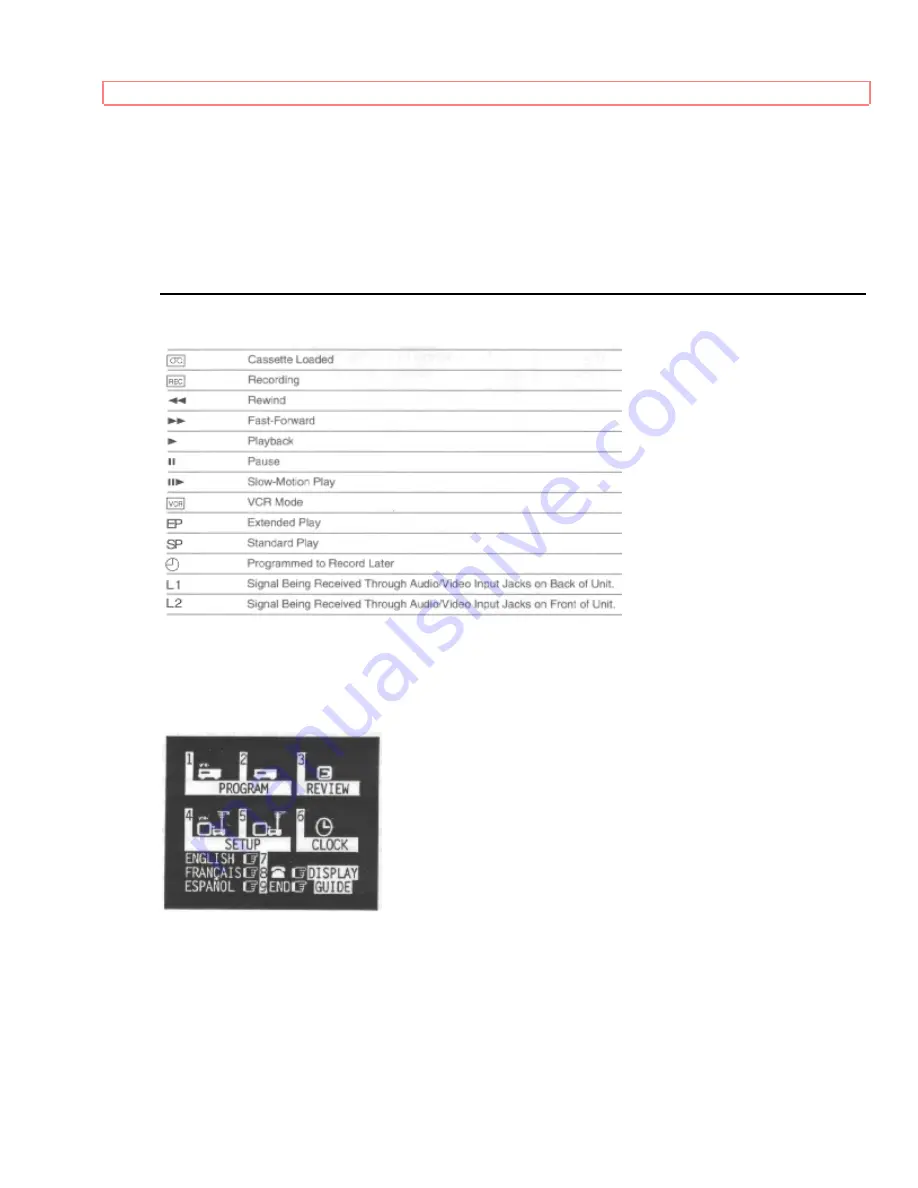
Display Indicators 


Meet Your On-Screen Guide 

Your Hitachi VCR has a special feature called the Easy Graphic Menu. This feature guides you 
through simple setup and programming tasks right on the TV screen. 
With the TV and VCR turned on, press GUIDE on the remote control. You will see this screen: 


You may view all the on-screen instructions in English, French, or Spanish. When you first set 
up your VCR, it will be set to English. Press numbers 8 or 9 for the other language options. 

You will do most of your programming and setup by pressing numbers on the remote control 
which correspond to options presented in this and other on-screen menus. Instructions are easy to 
follow, and blinking spaces on the screen will show you where your input is needed. 

• When you want to leave the Easy Graphic Menu, simply press GUIDE several times. This will 
back you out to the normal TV viewing screen. 

Summary of Contents for VT-M282A

Page 1: ...en graphic programming guide Front Audio and Video Jacks Automatic Head Cleaning VCR Plus for easy timed recording VCR Plus and Plus Code are trademarks of Gemstar Development Corp VCR Plus system is manufactured under license from Gemstar Development Corporation HITACHI HOME HITACHI SALES HITACHI HSC ELECTRONICS CORPORATION CANADA INC AMERICA INC OF HAWAII INC 3300 Trans Canada Hwy 3890 Steve Rey...

Page 2: ...ol Buttons 18 When the Remote Doesn t Work Right 19 VCR Controls 19 Display Indicators 20 Meet Your On Screen Guide 20 Getting Started Initial Setup 22 Setup for First Time Operation 22 Initial Setup Options 22 Setting the Clock 23 More About Channel Selections 24 Getting Started Videotapes 26 About Videocassette Tapes 26 Types 26 Safety Tabs Prevent Erasure 26 Loading and Ejecting 27 Tape Storage...

Page 3: ... 45 Controlling the TV 46 Advanced Operations Cable Box Hookups 47 Hooking Up to a Cable Box 47 A Step by Step Approach 47 Remote Control of the Cable Converter 49 Advanced Operations Second VCR 51 Integrating a Second VCR 51 Hookup 51 To Control Both VCRs with the Remote Control 51 Copying from One VCR to Another Dubbing 51 Copying Tapes From A Camcorder 52 VCR Care and Servicing 53 Routine Clean...

Page 4: ...erning the operation and maintenance of this unit has been included Therefore it should be read carefully in order to avoid any problems CAUTION TO REDUCE THE RISK OF ELECTRIC SHOCK DO NOT REMOVE COVER OR BACK NO USER SERVICEABLE PARTS INSIDE REFER SERVICING TO QUALIFIED SERVICE PERSONNEL WARNING Many television programs and films are copyrighted In certain circumstances copyright law may apply to...

Page 5: ...to operate the equipment Note to CATV system installer This reminder is provided to call the CATV system installer s attention to Article 820 40 of the NEC that provides guidelines for proper grounding and in particular specifies that the cable ground shall be connected to the grounding system of the building as close to the point of cable entry as practical ...

Page 6: ...formation on the advanced features of your Hitachi VCR We hope you ll take time to learn about these functions since we ve designed them for you But you can use the VCR without reading these sections We want this manual to be a tool for you so we provide two ways to find the information you need A quick index to the basic functions of the VCR which you will use often this page A detailed table of ...

Page 7: ...e read before the video product is operated Follow all operating and use instructions 2 Retain Instructions The safety and operating instructions should be retained for future reference 3 Heed Warnings Comply with all warnings on the video product and in the operating instructions 4 Polarized Plug This video product is equipped with a polarized alternating current line plug a plug having one blade...

Page 8: ...ever be blocked by placing the video product on a bed sofa rug or other similar surface This video product should never be placed near or over a radiator or heat register This video product should not be placed in a built in installation such as a bookcase or rack unless proper ventilation is provided or the video product manufacturer s instructions have been followed 9 Attachments Do not use atta...

Page 9: ...tem should not be located in the vicinity of overhead power lines or other electric light or power circuits or where it can fall into such power lines or circuits When installing an outside antenna system extreme care should be taken to keep from touching or approaching such power lines or circuits as contact with them might be fatal Installing an outdoor antenna can be hazardous and should be lef...

Page 10: ...by the operating instructions Improper adjustment of other controls may result in damage and will often require extensive work by a qualified technician to restore the video product to its normal operation e If the video product has been dropped or the cabinet has been damaged f When the video product exhibits a distinct change in performance this indicates a need for service 19 Replacement Parts ...

Page 11: ...ew a prerecorded videotape on the VCR this two line hookup is the only one you need 2 The radio frequency RF signal from a cable or antenna Make this hookup if you also want to record programs or if you have no audio video connectors on your TV We will show you the simplest hookups first and then present several variations to suit specific needs Be aware that you may need to purchase additional co...

Page 12: ...n a picture in picture feature if your TV has it Then connect the white AUDIO OUT jack on the VCR to the AUDIO IN jack on the TV This audio hookup will give you better sound than the RF signal hookup because the electronic signal won t have to go through a conversion process Capabilities The audio and video signal connections are all you need to paly back a prerecorded tape If you do not intend to...

Page 13: ...ke the wire that comes in from the wall 2 Screw this round wire into the IN FROM ANT lower jack on the back of your VCR 3 Using the 75 ohm cable supplied with your VCR slide on either end to the OUT TO TV upper jack on the back of the VCR 4 Connect the other end of the same cable onto the 75 ohm antenna input on your TV where you first disconnected the TV in step 1 5 Connect accordingly when you a...

Page 14: ...e UHF and VHF antenna antenna wires both 300 ohm flat wire 300 ohm flat UHF and 75 ohm round VHF If you have rabbit ears an antenna on top of your TV you will need an additional adapter and 75 ohm extension to make your leads reach from the antenna to the VCR This connection will work only if you have a strong clear picture on the TV indicating a strong signal Connect the antenna to the adapter an...

Page 15: ...ortant Safeguards for further precautions page 6 6 Install Batteries in the Remote Control The remote control requires two fresh AA batteries On the back of the remote a plastic cover pushes off in the direction shown by the arrow Remove this cover and install the batteries matching the plus end of each battery with the plus mark on the remote 7 Set the RF or Video Channel Switch When the VCR is o...

Page 16: ...Getting Started Hookups 16 ...

Page 17: ... remote control but there are some controls on the VCR that will come in handy too When you re familiar with these basic controls proceed to Initial Setup page 19 We ll show you how to program your local channels and set the clock to make your VCR fully functional How the Remote Control Works Pressing a button the remote control transmits an invisible beam of light Infrared to a receiver at the ri...

Page 18: ...the Easy Graphic Menu TAPE SPEED Switches between standard play SP and extended play EP AVX Used for recording from an auxiliary input such as a stereo system INDEX Used for marking and searching for specific tape locations LAST CHANNEL TO CONTROL TV Switches to the channel you watched previously during the current viewing session CHANNEL Top button switches to the next higher channel bottom butto...

Page 19: ... in the way Set to Wrong Device It may be set to VCR2 when you re trying to control VCR1 To confirm that this is the case try pressing VCR2 and a function button like channel up or down If the remote works now you know that it s set to VCR2 To reset it to VCR1 refer to the on screen Initial Setup options If You Just Want to Watch TV For normal TV viewing you do not need to disconnect the VCR When ...

Page 20: ...e TV screen With the TV and VCR turned on press GUIDE on the remote control You will see this screen You may view all the on screen instructions in English French or Spanish When you first set up your VCR it will be set to English Press numbers 8 or 9 for the other language options You will do most of your programming and setup by pressing numbers on the remote control which correspond to options ...

Page 21: ...Getting Started Controls 21 If you don t press any button for a while the VCR will switch you back to an earlier screen or to regular TV viewing ...

Page 22: ...ones that are preset at the factory They come up on the VCR every time the power goes out for more than 30 minutes for example during a storm or when you unplug the VCR Look at each item to see if it matches your own setup To change a setting press the button that has the same number as that item This will cycle you through several options When everything is set up as you want press GUIDE again to...

Page 23: ...t hooking up your VCR and any time the power goes out more than 30 minutes When you first plug in the VCR or after a power interruption the clock display will read To set the clock press GUIDE then press 6 to bring up the Clock Set screen Press the number buttons on the remote control to set the current time two digits for the hour and two for the minutes Then press 1 or 2 for AM or PM respectivel...

Page 24: ...ch the VCR Once channels are preset you can use the up and down CHANNEL buttons to move through the active channels or you can press the number buttons to move quickly between channels that are far apart Removing Channels You may not want to keep all the stations the auto programmer selects since you may prefer to have only a few favorite channels in the tuner s memory or you may want to delete fr...

Page 25: ...Getting Started Initial Setup 25 CHANNEL SETTING found in the INITIAL SET UP menu ...

Page 26: ...acities at Different Speeds TYPES RECORDING TIME SP EP T 120 120 min 360 min T 160 160 min 480 min You may have noticed that there is also an LP speed Your Hitachi VCR does not record at this speed but it can play cassettes that were recorded in LP mode No special setting is required for playback Safety Tabs Prevent Erasure A safety tab is located on the front left edge of every videotape next to ...

Page 27: ... removed To remove the cassette simply press the STOP EJECT button on the VCR If the tape is playing press STOP EJECT on the VCR once to stop the tape and a second time to eject it Now you can take the cassette out and put it away Tape Storage Store your videocassettes in their jackets and in an upright position like books in a bookshelf away from any magnetic sources Resist the temptation to leav...

Page 28: ... If the safety tab has been removed the tape automatically begins to play when you insert it Direct Video Input to the TV Normally you would select channel 3 or 4 on the TV to receive a signal from the VCR You can get an even better picture if your TV has an auxiliary video input feature and if the TV and VCR have a direct video to video hookup If this is the case do not select channel 3 or 4 Inst...

Page 29: ...cally rewind the videocassette eject it and turn off the power when it reaches the end of the tape or a blank section of tape which lasts for more than 30 seconds This function works only in PLAYBACK mode not in RECORDING mode Special Playback Effects Part of the fun of video watching is being able to stop the action and take a closer look or repeat a favorite scene You can view the tape in variet...

Page 30: ...ns on the VCR Press PLAY and REW to search in reverse Press PLAY and then F FWD to search ahead Press PLAY again to return to to normal playback Searching with the Time Counter During playback and recording a counter keeps track of how many hours minutes and seconds the tape has run When you first start playback the counter shows briefly in the TV screen s upper right corner When you want to check...

Page 31: ...ou can search for a spot a certain number of minutes before or after your current position on the tape Press STOP if tape is playing and press INDEX to bring up the Set Go To Time screen Select minutes by pressing buttons 0 to 9 one digit for hours then two digits for minutes Then press F FWD if you want to move that many minutes ahead or REW if you want to move that many minutes backward For exam...

Page 32: ... this period the words SCAN AND PLAY will be displayed on the bottom of your screen If this is the program you were looking for press INDEX and the VCR will stop searching Or press PLAY resume normal playback If this is not the program you want don t press anything After 15 seconds the VCR will move to the next mark and play a part of that program The VCR will continue searching until you press IN...

Page 33: ... inserted 2 Turn the TV to channel 3 or 4 the one you set the switch to on the back of your VCR Or if you are hooked up with a direct audio video cable set the TV to AUX or VIDEO 3 Press TAPE SPEED on the remote control to select SP standard play for the best picture quality or EP extended play for longest recording time on a single tape An indicator on the VCR s display shows which speed is activ...

Page 34: ...cording one program and you remember that something else is on that you would rather record You can change the channel while in the recording mode Press PAUSE to stop the recording temporarily This is necessary because the CHANNEL buttons won t work while you are in recording mode to keep you from accidentally switching the station while recording Change the channel to the one you prefer Press PAU...

Page 35: ... delayed recording feature you can set this VCR so that it automatically comes on and records programs whenever you like without your being around You can record a program one time only or you can automatically record a show every weekday or every week at the same time You can preset as many as 8 timed recordings at once Recording is even easier when you have set up your channels for VCR Plus begi...

Page 36: ...AR button repeatedly until the digit to be corrected flashes on the screen Illogical times and dates won t be accepted When everything is set as you want even though some items may still be flashing press GUIDE to program your settings into memory To preset additional recordings repeat these steps Otherwise press GUIDE to return to the regular TV screen Don t forget to load a videocassette to reco...

Page 37: ...ly settings must be cleared out manually Press GUIDE then press 3 for the PROGRAM REVIEW option This brings up the screen settings for Program 1 Keep pressing 3 to cycle through all the programs you have preset To remove a program press CLEAR The screen will display the next program if there are more or it will switch back to the main menu Programming Priorities When you have set up several timed ...

Page 38: ...tart at different times the VCR records the show scheduled to start earliest records the entire show then moves on to the show with the next earliest starting time To avoid recording only bits and pieces of different overalpping shows review your programming and delete those shows that are not essential ...

Page 39: ... in your VCR s memory This is called channel setup and you do it using the on screen Easy Guide System The procedure depends on what kind of hookup you have We ll give you step by step instructions Then you will be ready to begin VCR Plus recording also using the on screen Easy Guide System VCR Plus and PlusCodeTM are trademarks of Gemstar Development Corp Channel Setup Before You Begin Channel se...

Page 40: ...VCR Plus channels in the VCR s memory The way you do this depends on how your VCR is hooked up to the incoming RF signal Decide which hookup you have from the diagrams below and follow the setup instructions for your type of hookup Hint Try several practice recordings after doing your channel setup You should get the same channels as you usually watch at home Home antenna or Cable no cable box Cab...

Page 41: ...DE then press 4 to select VCR PLUS SETUP For Home Antenna Setup You will see the screen as shown below For Cable No Cable Box Setup First the question Is a cable box being used with the VCR for all channels will appear when you press 1 to answer NO you will then see this screen as shown below 2 A small arrow points to a blank in the CHANNEL column If your broadcast channel number is the same as th...

Page 42: ...with VCR Plus When you set up a delayed recording you will need to select the desired channel using the channel selector on your cable box Cable with a Cable Box and Switchbox Setup This is the right setup if you used Option 3 in the cable box hookups covered in Advanced Operations With that hookup you have an A or B switchbox because you receive Some of your cable channels through a cable box scr...

Page 43: ... can take advantage of this quick and easy method of delayed recording You will use the on screen Easy Graphic Menu following the basic procedure for delayed recording outlined on page 33 See the section on Recording a Program for recording tips and programming priorities You set up the delayed recording using the on screen Easy Graphic Menu 1 Press GUIDE then press 1 to select VCR PLUS RECORDING ...

Page 44: ... additional programs When you have set up all the timed recordings you want Don t forget to load a videocassette with the safety tab still attached to record on If you have a cable box hookup with an A or B switchbox set the switchbox to the proper connection for the programs you are recording through the cable box for scrambled premium channels direct cable for all other channels Important Your t...

Page 45: ...le with the fifteen makers of TV s listed below but don t be alarmed if yours is not on our list You may still be able to program the remote for your TV Every TV that comes with a remote control is set up to detect certain infrared signals You need to program the VCR s remote control to send signals that your TV will recognize and respond to Here s what to do Programming the Remote Control Turn th...

Page 46: ...asonic CHANNEL up arrow Mitsubishi CHANNEL down arrow JVC 100 ENT Sharp 1 LAST CH Sharp 2 DISPLAY Controlling the TV Once programmed the VCR s remote control is ready to control the TV First press TV to change to the TV function mode then press the button of the TV function that you want For example press TV and the CHANNEL up arrow and the TV station will change to the next higher station Press V...

Page 47: ...l you more about this After each hookup power up the VCR and the TV Use the Initial Setup screen page 19 to select option CATV1 or CATV2 Then check out the system using these questions as a guide Does the TV receive the same number of channels as before the installation Does the VCR record all channels Do the VCR and TV remote control functions work Can I record on one pay channel while watching a...

Page 48: ...all the functions you want proceed with Option 2 Option 2 All Channels Unscrambled 1 Remove the cable company s line from the back of the cable box that goes to your TV Connect it to the IN FROM ANT lower jack on the back of the VCR 2 Using the 75 ohm coaxial cable supplied with the VCR connect either end to the VCR s OUT TO TV upper jack 3 Connect the other end of the 75 ohm cable to the TV in th...

Page 49: ...is setup lets you switch between the two configurations in Options 1 and 2 Check all the TV and VCR functions If you still don t get the functions you want proceed with Option 4 Option 4 If none of the preceding hookups work check with your cable company You may need to purchase a video switching system from your local electronics or video retailer This will easily handle most hookup problems Remo...

Page 50: ... Jerrold 3 3 Hamlin 4 Zenith 5 Scientific Atlanta 6 Pioneer 7 Philips 8 To operate the cable box once the remote is programmed for it Press CATV and then the button of the function you want Press VCR to operate your VCR with the remote again ...

Page 51: ...jack on VCR1 Second VCR Hookup Illustration To Control Both VCRs with the Remote Control If the second VCR that you ve hooked up is also a Hitachi you can set your remote to operate both VCRs Press GUIDE then press 5 to bring up the Setup screen The default setting on the Setup Screen is VCR1 for when you have only one VCR running Press 4 to set VCR CODE to VCR2 Press the VCR2 button on the remote...

Page 52: ... Camcorder If you would like to copy a video tape shot in your camcorder onto your VCR here s how to do it Connect the camcorder s AV output cable to your VCR See diagram below Copying Tapes From A Camcorder Hookup Illustration Press the AVX button on the VCRs remote control so that the L Line indicator appears in the VCR display L2 Front A V IN L1 Rear A V IN Press REC IRT on the VCR to start rec...

Page 53: ...picture is blurry during playback or is occasionally interrupted or blanks out try playing different cassettes to see whether you get the same picture problems If the picture problems persist the heads may need to be cleaned professionally Consult your VCR dealer for the name of trained service technician near you Periodic Maintenance Your Hitachi VCR is a precision electromechanical device which ...

Page 54: ...nd endanger your safety The exposed uninsulated voltage in this unit may be high enough to cause electrical shock It is dangerous to make contact with any inside part and none of these parts are intended to be serviced by an untrained user To be safe refer service problems to qualified service personnel ...

Page 55: ...se a videocassette with the safety tab intact TV programs cannot be viewed or recorded Loose or inappropriate connections between TV VCR Review hookup directions and make correct firm connections Poor picture quality noise during playback TV channel selector on the proper channel Set TV to channel 3 or 4 as correct for your area Set TV to AUX or VIDEO if you have a direct video hookup Is TV correc...

Page 56: ... Mechanical sounds during the stop mode viewing Has a loaded cassette been stopped more than 5 minutes Nothing is wrong The tape protection mechanism is working Eject the cassette if you are done viewing Otherwise no action is necessary Hitachi Service Hotline Authorized Hitachi service facilities are available throughout the US and Canada For the location nearest you call the Hitachi Service Hotl...

Page 57: ...Care and Servicing Problems 57 You must state your zip code when calling In Canada QUEBEC 418 527 5853 MONTREAL 514 697 9150 TORONTO 416 821 4545 VANCOUVER 604 526 8566 ...

Page 58: ...ideo Input 1 2 Vp p 75ohm unbalanced Video Output 1 Vp p 75ohm unbalanced Audio Input 316mV rms 7 8dB 50 kohm Audio Output 316mV rms 7 8dB 1 5 kohm Video Recording S N Better than 45dB SP better than 40dB EP Horizontal Resolution 240 lines SP 220 lines LP playback only 230 lines EP Audio Response 50Hz 10kHZ SP 100Hz 6kHZ EP Audio S N Better than 43dB SP better than 40dB EP Power Input AC120V 60Hz ...

Page 59: ...Specifications 59 Hitachi Regional office Design and specifications subject to change without notice ...

Reviews: