background image

Getting Started (Videotapes) 


27

Loading and Ejecting 

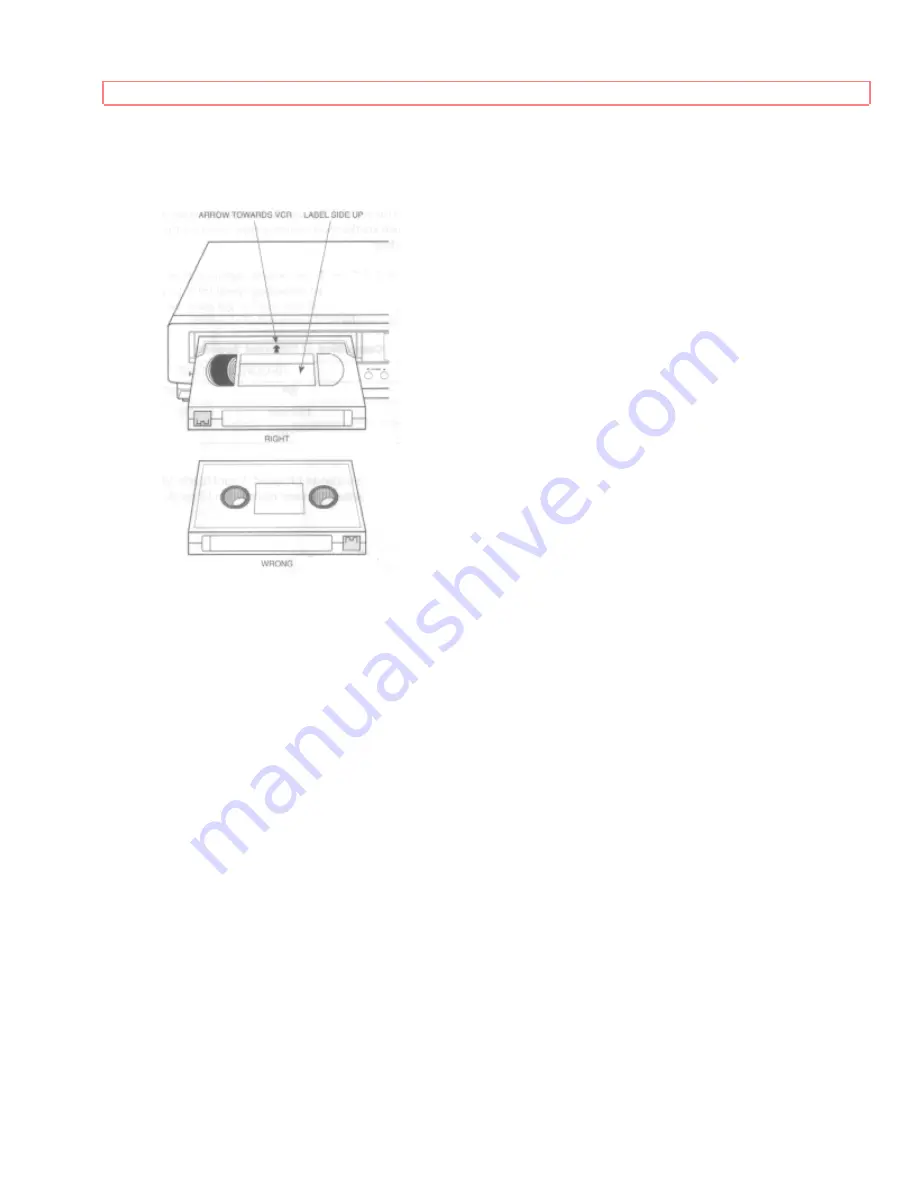
When you load a videocassette into the VCR, there is only one right way! Most tapes 
show you the way with a little arrow on the top side which should go in first. 


Push the videocassette gently into the slot on the front of the VCR. You will feel the 
VCR take it in. 
When the cassette is all the way in, the VCR powers up automatically and a TAPE-IN 
indicator shows on the LCD display. It may also start playing immediately if the safety 
tab has been removed. 
To remove the cassette, simply press the STOP/EJECT button on the VCR. (If the tape 
is playing, press STOP/EJECT on the VCR once to stop the tape and a second time to 
eject it. 
Now you can take the cassette out and put it away. 

Tape Storage 

Store your videocassettes in their jackets and in an upright position (like books in a 
bookshelf) away from any magnetic sources. Resist the temptation to leave them lying 
flat on top of the VCR. Tapes will last longer - and so will your VCR - if you store them 
properly. Remember, dust, dirt, and liquids are enemies of your tapes and VCR. 

To avoid aggravation later, apply the labels that come with new tape. On them, write 
notes to yourself about what you recorded. 

Summary of Contents for VT-M273A

Page 1: ...ns on the VCR On screen graphic programming guide VCR Plus for easy timed recording VCR Plus and Plus Code are trademarks of Gemstar Development Corp VCR Plus system is manufactured under license from Gemstar Development Corporation HITACHI HOME HITACHI SALES HITACHI HSC ELECTRONICS CORPORATION CANADA INC AMERICA INC OF HAWAII INC 3300 Trans Canada Hwy 3890 Steve Reynolds Blvd 3219 Koapaka Street ...

Page 2: ...trols 17 Remote Control Buttons 18 When the Remote Doesn t Work Right 19 VCR Controls 20 Display Indicators 21 Meet Your On Screen Guide 21 Getting Started Initial Setup 22 Setup for First Time Operation 22 Initial Setup Options 22 Setting the Clock 23 More About Channel Selections 24 Getting Started Videotapes 26 About Videocassette Tapes 26 Types 26 Safety Tabs Prevent Erasure 26 Loading and Eje...

Page 3: ...emote 46 Programming the Remote Control 46 Controlling the TV 47 Advanced Operations Cable Box Hookups 48 Hooking Up to a Cable Box 48 A Step by Step Approach 48 Remote Control of the Cable Converter 50 Advanced Operations Second VCR 52 Integrating a Second VCR 52 Hookup 52 To Control Both VCRs with the Remote Control 52 Copying from One VCR to Another Dubbing 52 Copying Tapes From A Camcorder 53 ...

Page 4: ...rous to make any kind of contact with any inside part of this unit This symbol alerts the user that important literature concerning the operation and maintenance of this unit has been included Therefore it should be read carefully in order to avoid any problems CAUTION TO REDUCE THE RISK OF ELECTRIC SHOCK DO NOT REMOVE COVER OR BACK NO USER SERVICEABLE PARTS INSIDE REFER SERVICING TO QUALIFIED SER...

Page 5: ... out in the Radio Interference regulations of the Canadian Department of Communications Note to CATV system installer This reminder is provided to call the CATV system installer s attention to Article 820 40 of the NEC that provides guidelines for proper grounding and in particular specifies that the cable ground shall be connected to the grounding system of the building as close to the point of c...

Page 6: ...VCR These sections are highlighted like this in the table of contents Information on the advanced features of your Hitachi VCR We hope you ll take time to learn about these functions since we ve designed them for you But you can use the VCR without reading these sections We want this manual to be a tool for you so we provide two ways to find the information you need A quick index to the basic func...

Page 7: ...will fit into the power outlet only one way This is safety feature If you are unable to insert the plug fully into the outlet try reversing the plug If the plug should still fail to fit contact your electrician to replace your obsolete outlet To prevent electric shock do not use this polarized plug with an extension cord receptacle or other outlet unless the blades can be fully inserted without bl...

Page 8: ...cause hazards Caution Maintain electrical safety Powerline operated equipment or accessories connected to this unit should bear the UL listing mark or CSA certification mark on the accessory itself and should not have been modified so as to defeat the safety features This will help avoid any potential hazard from electric shock or fire If in doubt contact qualified service personnel 10 Water and M...

Page 9: ...ling an outside antenna system extreme care should be taken to keep from touching or approaching such power lines or circuits as contact with them might be fatal Installing an outdoor antenna can be hazardous and should be left to a professional antenna installer USE 14 Cleaning Unplug this video product from the wall outlet before cleaning Do not use liquid cleaners or aerosol cleaners Use a damp...

Page 10: ...ustment of other controls may result in damage and will often require extensive work by a qualified technician to restore the video product to its normal operation e If the video product has been dropped or the cabinet has been damaged f When the video product exhibits a distinct change in performance this indicates a need for service 19 Replacement Parts When replacement parts are required have t...

Page 11: ...s 1 The audio and video signal If all you want to do is view a prerecorded videotape on the VCR this two line hookup is the only one you need 2 The radio frequency RF signal from a cable or antenna Make this hookup if you also want to record programs or if you have no audio video connectors on your TV We will show you the simplest hookups first and then present several variations to suit specific ...

Page 12: ...e VCR bottom row of jacks to the VIDEO IN jack on TV This direct video input will give you the best picture It will also let you play videos in a picture in picture feature if your TV has it Then connect the white AUDIO OUT jack on the VCR to the AUDIO IN jack on the TV This audio hookup will give you better sound than the RF signal hookup because the electronic signal won t have to go through a c...

Page 13: ...member to call your local cable company to start the service 1 If you still hooked up to your TV unscrew the round wire from the 75 ohm connector on your television Otherwise take the wire that comes in from the wall 2 Screw this round wire into the IN FROM ANT lower jack on the back of your VCR 3 Using the 75 ohm cable supplied with your VCR slide on either end to the OUT TO TV upper jack on the ...

Page 14: ... ohm round wire connections shown below You may already have one on your TV 1 Remove the antenna line from the back of your TV if it is already connected there or take it from where it comes in on the wall 2 Considering the three pictures below determine which adapter you will need to hook into your VCR If you have Use this adapter Single 300 ohm flat wire Separate UHF and VHF antenna antenna wire...

Page 15: ...lied with your VCR connect either end to the OUT TO TV upper jack on the back of the VCR 3 Use a second adapter to attach the other end of the 75 ohm connector back into the TV where you first disconnected the antenna Capabilities With this hookup you should now be able to perform all basic functions provided by this equipment 5 Attach the TV and VCR to the Power Supply Plug in the TV and VCR powe...

Page 16: ...l Turn the power on to both the TV and the VCR and look for a switch on the back of the VCR Set the switch to 3 or 4 whichever is not a commercial channel in your area Your basic hookup is now complete When you re ready to try hooking up a second VCR or a video camera see Advanced Operations Now turn the TV and VCR back around facing you and begin your quick tour of the controls page 15 ...

Page 17: ... remote control but there are some controls on the VCR that will come in handy too When you re familiar with these basic controls proceed to Initial Setup page 20 We ll show you how to program your local channels and set the clock to make your VCR fully functional How the Remote Control Works Pressing a button the remote control transmits an invisible beam of light Infrared to a receiver at the ri...

Page 18: ...et the remote to control one of four devices MUTE Turns off the audio until you press Mute again VOLUME SLOW Increase or decrease the audio volume and plays back in adjustable slow motion REW Rewinds the videotape PLAY Starts playing a loaded videocassette STOP Stops a videocassette from playing recording pausing rewinding or anything it is doing ...

Page 19: ...the VCR is set to Press REC and PLAY at the same time F FWD Fast forwards the videotape PAUSE Temporarily stops the cassette from recording or playing Press PAUSE again or PLAY to resume F ADV Lets you advance the tape frame by frame DISPLAY Used in on screen programming and indexing CLEAR Used in on screen programming and indexing TRACKING Lets you fine tune the picture 0 to 9 Number buttons used...

Page 20: ...he on screen Initial Setup options If You Just Want to Watch TV For normal TV viewing you do not need to disconnect the VCR When the TV and VCR are already on press POWER on the remote control The VCR will shut off but the TV will stay on If you are recording on the VCR but want to watch a different channel on the TV press the VCR TV button to switch back and forth between the TV channel and the r...

Page 21: ... or Spanish When you first set up your VCR it will be set to English Press numbers 8 or 9 for the other language options Now you will do most of your programming and setup by pressing numbers on the remote control which correspond to options presented in this and other on screen menus Instructions are easy to follow and blinking spaces on the screen will show you where your input is needed When yo...

Page 22: ...Initial Setup screen At the right of the screen are the default settings on your VCR The default settings are the ones that are preset at the factory They come up on the VCR every time the power goes out for more than 5 seconds for example during a storm or when you unplug the VCR Look at each item to see if it matches your own setup To change a setting press the button that has the same number as...

Page 23: ...R2 5 MOVIE RETURN Press 5 to select whether you want prerecorded movies safety tab removed to automatically rewind eject and turn off the power when the movie is over and no prerecorded signals exist Options are ON and OFF Setting the Clock This is easy to do and important for your later timed recordings You ll need to set the clock when first hooking up your VCR and any time the power goes out mo...

Page 24: ... power goes out for more than 5 seconds do you need to preset the channels again In some areas channels cannot be switched when CATV1 is selected Then select CATV2 in your Initial Setup screen For convenience the TV channel numbers should match those programmed into the VCR If your TV has automatic channel programming set it on the same mode ANT CATV1 or CATV2 and let it reprogram to match the VCR...

Page 25: ...en Item 3 lets you add or delete channels Use the number buttons to enter the channel you want to change then press STOP to delete it or press PLAY to add it Caution After a Power Failure If a power failure lasting for more than 5 seconds occurs reset the clock and perform the AUTO CHANNEL SETTING found in the INITIAL SET UP menu ...

Page 26: ...acities at Different Speeds TYPES RECORDING TIME SP EP T 120 120 min 360 min T 160 160 min 480 min You may have noticed that there is also an LP speed Your Hitachi VCR does not record at this speed but it can play cassettes that were recorded in LP mode No special setting is required for playback Safety Tabs Prevent Erasure A safety tab is located on the front left edge of every videotape next to ...

Page 27: ... removed To remove the cassette simply press the STOP EJECT button on the VCR If the tape is playing press STOP EJECT on the VCR once to stop the tape and a second time to eject it Now you can take the cassette out and put it away Tape Storage Store your videocassettes in their jackets and in an upright position like books in a bookshelf away from any magnetic sources Resist the temptation to leav...

Page 28: ...TV s remote control 3 Press PLAY to start the tape 4 Press STOP to end play If the safety tab has been removed and if you have set the MOVIE RETURN function to ON the tape automatically begins to play when you insert it Direct Video Input to the TV Normally you would select channel 3 or 4 on the TV to receive a signal from the VCR You can get an even better picture if your TV has an auxiliary vide...

Page 29: ...vie Return If your videocassette has the safety tab removed and you set the MOVIE RETURN function to ON during initial setup the VCR will stop and automatically rewind the videocassette eject it and turn off the power when it reaches the end of the tape or a blank section of tape which lasts for more than 30 seconds This function works only in PLAYBACK mode not in RECORDING mode Special Playback E...

Page 30: ...in slow motion playback first set the VCR in still playback and press VCR1 or VCR2 then press either of the tracking buttons or to minimize vertical shaking Then set the VCR in slow playback and press VCR1 or VCR2 then press TRACKING buttons to minimize visual noise bands on the screen After 5 minutes in slow motion playback the VCR will stop the tape automatically to prevent damage to the tape an...

Page 31: ...t to check the counter during playback there are several ways to do it Pressing DISPLAY on the remote control will cycle you through the three options Press DISPLAY just once to see the counter mode time and date on the screen for 5 seconds Before the 5 seconds are up press DISPLAY a second time to see just the counter It will stay on the screen Press DISPLAY a third time to see the counter on the...

Page 32: ...he TV screen This indicates that the counter s memory function is engaged The counter also appears on the VCR s display Now when you rewind the tape it will automatically stop at the spot where you cleared the counter Notice it moves just past the marker and then back to it Press PLAY to watch the tape from that preselected spot Press DISPLAY to take the counter display off The spot is still in me...

Page 33: ... toward the VCR The power comes on automatically when the tape is fully inserted 2 Turn the TV to channel 3 or 4 the one you set the switch to on the back of your VCR Or if you are hooked up with a direct audio video cable set the TV to AUX or VIDEO 3 Press TAPE SPEED on the remote control to select SP standard play for the best picture quality or EP extended play for longest recording time on a s...

Page 34: ...an 5 minutes the VCR automatically switches to STOP mode to protect the tape To Change the Channel Being Recorded Suppose you are recording one program and you remember that something else is on that you would rather record You can change the channel while in the recording mode Press PAUSE to stop the recording temporarily This is necessary because the CHANNEL buttons won t work while you are in r...

Page 35: ...eginning on page 40 We suggest you try all the different ways of programming the VCR when you have some leisure time so you can learn how it works That way when an important show is going to be on that you really want to record you ll be confident that your timed recording setup will work Types of Delayed Recordings ONE TIME Records one show at a particular date and time DAILY Records a show at th...

Page 36: ...se steps Otherwise press GUIDE to return to the regular TV screen Don t forget to load a videocassette to record on Your delayed recording settings take effect when you turn off the power on the VCR When the power is off the delayed recording indicator will display on the VCR This tells you that the VCR will automatically record at the times and dates you have programmed To Stop a Delayed Recordin...

Page 37: ... the PROGRAM REVIEW option This brings up the screen settings for Program 1 Keep pressing 3 to cycle through all the programs you have preset To remove a program press CLEAR The screen will display the next program if there are more or it will switch back to the main menu Programming Priorities When you have set up several timed recordings it may occur that some of their times overlap For example ...

Page 38: ...VCR records the show scheduled to start earliest records the entire show then moves on to the show with the next earliest starting time To avoid recording only bits and pieces of different overalpping shows review your programming and delete those shows that are not essential ...

Page 39: ... in your VCR s memory This is called channel setup and you do it using the on screen Easy Guide System The procedure depends on what kind of hookup you have We ll give you step by step instructions Then you will be ready to begin VCR Plus recording also using the on screen Easy Guide System VCR Plus and PlusCodeTM are trademarks of Gemstar Development Corp Channel Setup Before You Begin Channel se...

Page 40: ...VCR Plus channels in the VCR s memory The way you do this depends on how your VCR is hooked up to the incoming RF signal Decide which hookup you have from the diagrams below and follow the setup instructions for your type of hookup Hint Try several practice recordings after doing your channel setup You should get the same channels as you usually watch at home Home antenna or Cable no cable box Cab...

Page 41: ...DE then press 4 to select VCR PLUS SETUP For Home Antenna Setup You will see the screen as shown below For Cable No Cable Box Setup First the question Is a cable box being used with the VCR for all channels will appear when you press 1 to answer NO you will then see this screen as shown below 2 A small arrow points to a blank in the CHANNEL column If your broadcast channel number is the same as th...

Page 42: ...edure You are ready to begin delayed recording with VCR Plus When you set up a delayed recording you will need to select the desired channel using the channel selector on your cable box Cable with a Cable Box and Switchbox Setup This is the right setup if you used Option 3 in the cable box hookups covered in Advanced Operations With that hookup you have an A or B switchbox because you receive Some...

Page 43: ...r scrambled channels Using VCR Plus to Record a Program Now that your channels are set up you can take advantage of this quick and easy method of delayed recording You will use the on screen Easy Guide System following the basic procedure for delayed recording outlined on page 37 See the section on Recording a Program for recording tips and programming priorities You set up the delayed recording u...

Page 44: ... your VCR Plus channel setup Remember if you are recording through a cable box the screen will show the channel as 03 or 04 You also need to manually select the channel you wish to record on 7 Review the screen to be sure everything is set as you want then press GUIDE to complete your programming or continue with additional programs When you have set up all the timed recordings you want Don t forg...

Page 45: ...ou to program the VCR for timer recording by simply entering a PlusCode number up to 8 digits To prevent erroneous channel and or time recording After entering a VCR Plus number check the information displayed with the PROGRAM REVIEW if there is are any unnecessary program s please cancel or correct it them ...

Page 46: ...l This feature comes in handy you don t have to juggle two remotes The remote control is compatible with the fifteen makers of TV s listed below but don t be alarmed if yours is not on our list You may still be able to program the remote for your TV Every TV that comes with a remote control is set up to detect certain infrared signals You need to program the VCR s remote control to send signals th...

Page 47: ... Number Hitachi 1 Zenith 2 Sony 3 Magnavox 4 Sanyo 5 Gold Star 1 6 Toshiba 7 Gold Star 2 8 NEC 9 RCA 0 Panasonic CHANNEL up arrow Mitsubishi CHANNEL down arrow JVC 100 ENT Sharp LAST CH Controlling the TV Once programmed the VCR s remote control is ready to control the TV First press TV to change to the TV function mode then press the button of the TV function that you want For example press TV an...

Page 48: ... Approach Try the hookups listed as Options 1 through 4 They are based on whether the cable channel signals are scrambled unscrambled or a combination Your cable company can tell you more about this After each hookup power up the VCR and the TV Use the Initial Setup screen page 20 to select option CATV1 or CATV2 Then check out the system using these questions as a guide Does the TV receive the sam...

Page 49: ...xial cable supplied with your VCR connect either end to the VCR s OUT TO TV upper jack 3 Connect the other end of the 75 ohm cable to the TV in the same place where you removed the cable line Check all the TV and VCR functions If you don t get all the functions you want proceed with Option 2 Option 2 All Channels Unscrambled 1 Remove the cable company s line from the back of the cable box that goe...

Page 50: ...IN FROM ANT lowerjack on the back of the VCR 6 Take the coaxial cable that is still connected to the television and hook it to the VCR s OUT TO TV upperjack Some channels scrambled hookup illustration This setup lets you switch between the two configurations in Options 1 and 2 Check all the TV and VCR functions If you still don t get the functions you want proceed with Option 4 Option 4 If none of...

Page 51: ...inations until you find the one that works best Cable Converters Press CATV and This Number Jerrold 1 1 Jerrold 2 2 Jerrold 3 3 Hamlin 4 Zenith 5 Scientific Atlanta 6 Pioneer 7 Philips 8 To operate the cable box once the remote is programmed for it Press CATV and then the button of the function you want Press VCR to operate your VCR with the remote again ...

Page 52: ... the yellow VIDEO IN on VCR1 Connect the AUDIO OUT jack on VCR2 to the AUDIO IN jack on VCR1 Second VCR Hookup Illustration To Control Both VCRs with the Remote Control If the second VCR that you ve hooked up is also a Hitachi you can set your remote to operate both VCRs Press GUIDE then press 5 to bring up the Setup screen The default setting on the Setup Screen is VCR1 for when you have only one...

Page 53: ...R TV button on the remote The VCR indicator will light on VCR1 s display and you can view the picture being recorded Copying Tapes From A Camcorder If you would like to copy a video tape shot in your camcorder onto your VCR here s how to do it Connect the camcorder s AV output cable to your VCR See diagram below Copying Tapes From A Camcorder Hookup Illustration Press the AVX button on the VCRs re...

Page 54: ... may need to be cleaned professionally Consult your VCR dealer for the name of trained service technician near you Periodic Maintenance Your Hitachi VCR is a precision electromechanical device which requires professional maintenance after a period of normal use Usually no maintenance other than head cleaning is required during the warranty period unless the VCR is used either heavily or infrequent...

Page 55: ...sulated voltage in this unit may be high enough to cause electrical shock It is dangerous to make contact with any inside part and none of these parts are intended to be serviced by an untrained user To be safe refer service problems to qualified service personnel ...

Page 56: ... connections between VCR and TV Review hookup directions and make correct firm connections Poor picture quality noise during playback TV channel selector on the proper channel Set TV to channel 3 or 4 as correct for your area Set TV or AUX or VIDEO have a direct video hookup Is TV correctly tuned Fine tune the TV Static lines through the picture Press 1 or 4 button to adjust tracking Noisy picture...

Page 57: ...ing Eject the cassette if you are done viewing Otherwise no action is necessary Hitachi Service Hotline Authorized Hitachi service facilities are available throughout the US and Canada For the location nearest you call the Hitachi Service Hotline at one of these numbers In the continental U S A DIAL TOLL FREE 7 days a week 24 hours a day 1 800 HITACHI 1 800 448 2244 You must state your zip code wh...

Page 58: ... CH 7 13 174MHz 216MHz VHF SUPER CH J W 216MHz 300MHz CATV VHF HYPER CH W 1 W 28 300MHz 468MHz CATV UHF CH 14 69 W 29 W 84 470MHz 806MHz Video Input 1 2 Vp p 75ohm unbalanced Video Output 1 Vp p 75ohm unbalanced Audio Input 316mV rms 7 8dB 50 kohm Audio Output 316mV rms 7 8dB 1 5 kohm Video Recording S N Better than 45dB SP better than 40dB EP Horizontal Resolution 240 lines SP 220 lines LP playba...

Page 59: ...itachi Authorized Parts Distributor in the continental United States For ALASKA and HAWAII please contact the nearest Hitachi Regional office Design and specifications subject to change without notice 1 Warranty information 90 days labor 2 years parts Product originally released in 1993 1994 product line Memory backup 5 seconds ...

Reviews: