Hitachi VT-M272A Owner'S Manual Download Page 21

Getting Started (Controls) 

21 


Remote Control Buttons 

Illustration of remote 

POWER 
Turns the VCR on and off. 

VCR1, TV, CATV, VCR2 
Device buttons let you set the remote to control one of four devices. 

MUTE (TO CONTROL TV) 
Turns off the audio until you press Mute again. 

VOLUME 
Increase or decrease the audio volume and plays back in adjustable slow motion. 

REW 
Rewinds the videotape. 

PLAY 
Starts playing a loaded videocassette. 

STOP 
Stops a videocassette from playing, recording, pausing, rewinding - or anything it is 
doing. 

Summary of Contents for VT-M272A

Page 1: ...ic programming guide Front Audio and Video Jacks Head Cleaning VCR Plus for easy timed recording VCR Plus and Plus Code are trademarks of Gemstar Development Corp VCR Plus system is manufactured under license from Gemstar Development Corporation HITACHI HOME HITACHI SALES HITACHI HSC ELECTRONICS CORPORATION CANADA INC AMERICA INC OF HAWAII INC 3300 Trans Canada Hwy 3890 Steve Reynolds Blvd 3219 Ko...

Page 2: ...Started Controls 20 Quick Tour of the Controls 20 Remote Control Buttons 21 When the Remote Doesn t Work Right 23 VCR Controls 23 Display Indicators 24 Meet Your On Screen Guide 24 Getting Started Initial Setup 26 Setup for First Time Operation 26 Initial Setup Options 26 Setting the Clock 27 More About Channel Selections 28 Getting Started Videotapes 30 About Videocassette Tapes 30 Types 30 Safet...

Page 3: ... Controlling Your TV with the VCR s Remote 52 Programming the Remote Control 52 Controlling the TV 53 Advanced Operations Cable Box Hookups 55 Hooking Up to a Cable Box 55 A Step by Step Approach 55 Remote Control of the Cable Converter 58 Advanced Operations Second VCR 59 Integrating a Second VCR 59 Hookup 59 To Control Both VCRs with the Remote Control 59 Copying from One VCR to Another Dubbing ...

Page 4: ...efore it is dangerous to make any kind of contact with any inside part of this unit This symbol alerts the user that important literature concerning the operation and maintenance of this unit has been included Therefore it should be read carefully in order to avoid any problems CAUTION TO REDUCE THE RISK OF ELECTRIC SHOCK DO NOT REMOVE COVER OR BACK NO USER SERVICEABLE PARTS INSIDE REFER SERVICING...

Page 5: ...ment of Communications Caution to the user Changes or modifications not expressly approved by the party responsible for compliance could void the user s authority to operate the equipment Note to CATV system installer This reminder is provided to call the CATV system installer s attention to Article 820 40 of the NEC that provides guidelines for proper grounding and in particular specifies that th...

Page 6: ...formation on the advanced features of your Hitachi VCR We hope you ll take time to learn about these functions since we ve designed them for you But you can use the VCR without reading these sections We want this manual to be a tool for you so we provide two ways to find the information you need A quick index to the basic functions of the VCR which you will use often this page A detailed table of ...

Page 7: ...nnel Switch 13 Quick Tour of the Controls 14 Remote Control Buttons 15 When the Remote Doesn t Work Right 16 VCR Controls 17 Display Indicators 17 Meet Your On Screen Guide 18 Setup for First Time Operation 19 Initial Setup Options 19 Setting the Clock 21 More About Channel Selections 22 About Videocassette Tapes 23 Types 23 Safety Tabs Prevent Erasure 23 Loading and Ejecting 24 Tape Storage 24 Ba...

Page 8: ...with the VCR s Remote 44 Programming the Remote Control 44 Controlling the TV 45 Hooking Up to a Cable Box 46 A Step by Step Approach 46 Remote Control of the Cable Converter 49 Integrating a Second VCR 50 Hookup 50 To Control Both VCRs with the Remote Control 51 Copying from One VCR to Another Dubbing 51 Copying Tapes from a Camcorder 52 VCR Care and Servicing 53 Routine Cleaning 53 Head Cleaning...

Page 9: ...he safety and operating instructions should be read before the video product is operated Follow all operating and use instructions 2 Retain Instructions The safety and operating instructions should be retained for future reference 3 Heed Warnings Comply with all warnings on the video product and in the operating instructions 4 Polarized Plug This video product is equipped with a polarized alternat...

Page 10: ...t likely to be walked on or pinched by items placed upon or against them paying particular attention to cords at plugs convenience receptacles and the point where they exit from the appliance 8 Ventilation Slots and openings in the cabinet are provided for ventilation to ensure reliable operation of the video product and to protect it from overheating These openings must not be blocked or covered ...

Page 11: ...es may cause the appliance and cart combination to overturn 12 Outdoor Antenna Grounding If an outside antenna or cable system is connected to the video product be sure the antenna or cable system is grounded so as to provide some protection against voltage surges and built up static charges Section 810 of the National Electrical Code ANSI NFPA No 70 1984 provides information with respect to prope...

Page 12: ...ified service personnel 18 Conditions Requiring service Unplug this video product from the wall outlet and refer servicing to qualified service personnel under the following conditions a When the power supply cord or plug is damaged b If liquid has been spilled or objects have fallen into the video product c If the video product has been exposed to rain or water d If the video product does not ope...

Page 13: ...or other hazards 20 Safety Checks Upon completion of any service or repairs to this video product ask the service technician to perform safety checks recommended by the manufacturer to determine that the video product is in safe operating condition ...

Page 14: ...c hookups 1 The audio and video signal If all you want to do is view a prerecorded videotape on the VCR this two line hookup is the only one you need 2 The radio frequency RF signal from a cable or antenna Make this hookup if you also want to record programs or if you have no audio video connectors on your TV We will show you the simplest hookups first and then present several variations to suit s...

Page 15: ...ack on TV This direct video input will give you the best picture It will also let you play videos in a picture in picture feature if your TV has it Then connect the white AUDIO OUT jack on the VCR to the AUDIO IN jack on the TV This audio hookup will give you better sound than the RF signal hookup because the electronic signal won t have to go through a conversion process Capabilities The audio an...

Page 16: ... you find this connection remember to call your local cable company to start the service 1 If you still hooked up to your TV unscrew the round wire from the 75 ohm connector on your television Otherwise take the wire that comes in from the wall 2 Screw this round wire into the IN FROM ANT lower jack on the back of your VCR 3 Using the 75 ohm cable supplied with your VCR slide on either end to the ...

Page 17: ...not provided with VCR to make the 75 ohm round wire connections shown below You may already have one on your TV 1 Remove the antenna line from the back of your TV if it is already connected there or take it from where it comes in on the wall 2 Considering the three pictures below determine which adapter you will need to hook into your VCR If you have Use this adapter Single 300 ohm flat wire Separ...

Page 18: ...the hookup 1 Using whichever adapter you have fit your antenna with attach that connector to the IN FROM ANT lower jack on the back of the VCR 2 Using the 75 ohm cable supplied with your VCR connect either end to the OUT TO TV upper jack on the back of the VCR 3 Use a second adapter to attach the other end of the 75 ohm connector back into the TV where you first disconnected the antenna Capabiliti...

Page 19: ...Video Channel Switch When the VCR is on its video signal can come into your TV an either channel 3 or channel 4 You need to select the appropriate channel Turn the power on to both the TV and the VCR and look for a switch on the back of the VCR Set the switch to 3 or 4 whichever is not a commercial channel in your area Your basic hookup is now complete When you re ready to try hooking up a second ...

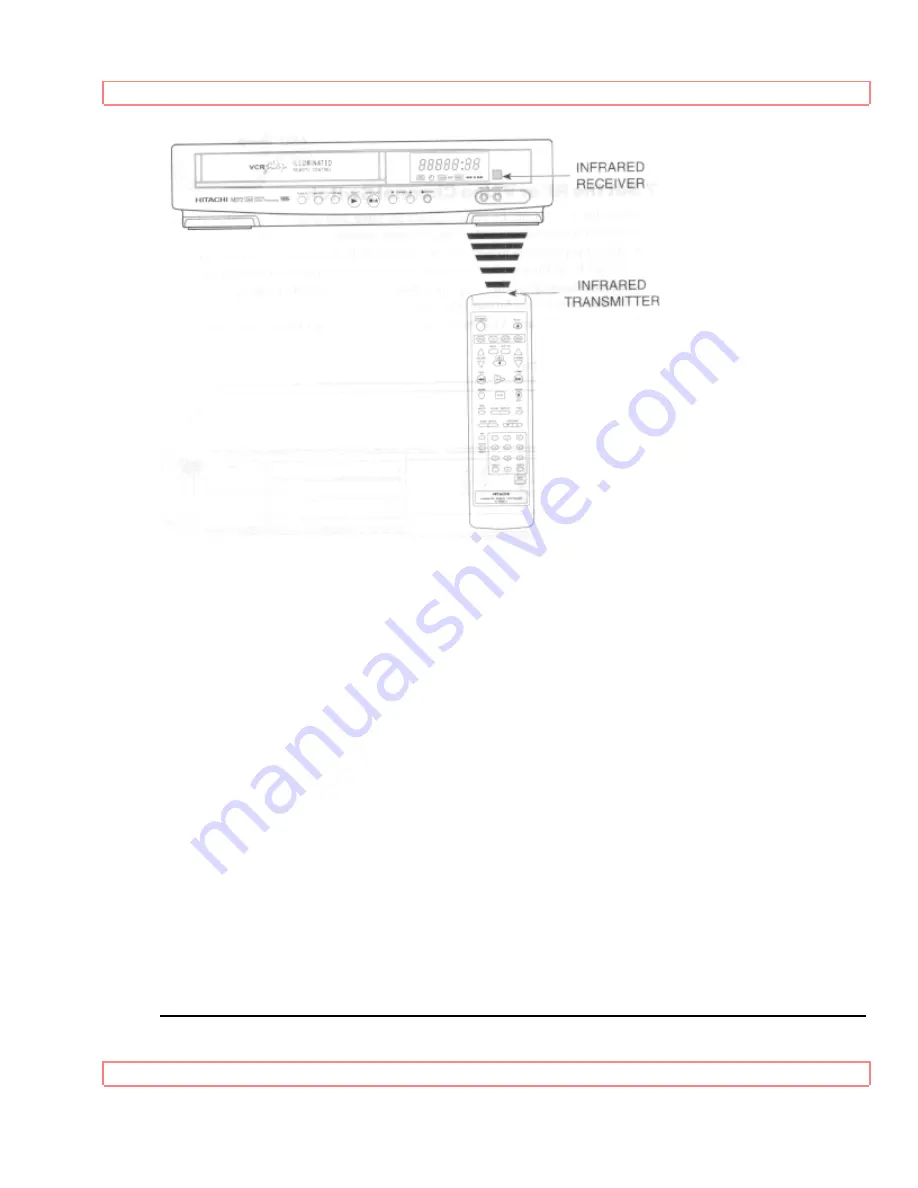
Page 20: ... remote control but there are some controls on the VCR that will come in handy too When you re familiar with these basic controls proceed to Initial Setup page 19 We ll show you how to program your local channels and set the clock to make your VCR fully functional How the Remote Control Works Pressing a button the remote control transmits an invisible beam of light Infrared to a receiver at the ri...

Page 21: ...he remote to control one of four devices MUTE TO CONTROL TV Turns off the audio until you press Mute again VOLUME Increase or decrease the audio volume and plays back in adjustable slow motion REW Rewinds the videotape PLAY Starts playing a loaded videocassette STOP Stops a videocassette from playing recording pausing rewinding or anything it is doing ...

Page 22: ...pe from the VCR LAST CHANNEL TO CONTROL TV Switches to the channel you watched previously during the current viewing session CHANNEL Top button switches to the next higher channel bottom button switches to the next lower channel For these to operate you must have preset your channels REC Starts recording on the station the VCR is set to Press REC and PLAY at the same time F FWD Fast forwards the v...

Page 23: ... table your 2 year old child or the dog Hold the remote so that it points at the VCR with nothing in the way Set to Wrong Device It may be set to VCR2 when you re trying to control VCR1 To confirm that this is the case try pressing VCR2 and a function button like channel up or down If the remote works now you know that it s set to VCR2 To reset it to VCR1 refer to the on screen Initial Setup optio...

Page 24: ...ols the videotape s forward motion REW Controls the videotape s rewind motion VIDEO IN Receives video signal from a video camera or another VCR AUDIO IN Receives audio signal from a video camera stereo system or another VCR Display Indicators Meet Your On Screen Guide Your Hitachi VCR has a special feature called the Easy Guide System This feature guides you through simple setup and programming ta...

Page 25: ...ssing numbers on the remote control which correspond to options presented in this and other on screen menus Instructions are easy to follow and blinking spaces on the screen will show you where your input is needed When you want to leave the Easy Guide System simply press GUIDE several times This will back you out to the normal TV viewing screen If you don t press any button for a while the VCR wi...

Page 26: ...Initial Setup screen At the right of the screen are the default settings on your VCR The default settings are the ones that are preset at the factory They come up on the VCR every time the power goes out for more than 30 minutes for example during a storm or when you unplug the VCR Look at each item to see if it matches your own setup To change a setting press the button that has the same number a...

Page 27: ...ones you most often watch 4 VCR CODING Press 4 to enable the remote control to control a second VCR Options are VCR1 and VCR2 5 MOVIE RETURN Press 5 to select whether you want prerecorded movies safety tab removed to automatically rewind eject and turn off the power when the movie is over and no prerecorded signals exist Options are ON and OFF Setting the Clock This is easy to do and important for...

Page 28: ...f you press the wrong digit exit the screen by pressing GUIDE and recall the screen to enter the correct setup The day of the week is set automatically More About Channel Selections Your VCR is capable of receiving 68 broadcast TV channels VHF 2 13 UHF 14 69 and 125 cable channels CATV 1 125 When you press 2 on the Initial Setup screen the tuner automatically cycles through all available channels ...

Page 29: ...an still be selected by using the numbered buttons 0 to 9 and 100 ENT Adding Channels Occasionally the auto programming may skip an active channel because the antenna was pointed in the wrong direction or the channel had a weak signal or was off the air at the time of programming or you may change your mind about a channel you removed from memory To Add or Erase Channels Press GUIDE then press 5 t...

Page 30: ...acities at Different Speeds TYPES RECORDING TIME SP EP T 120 120 min 360 min T 160 160 min 480 min You may have noticed that there is also an LP speed Your Hitachi VCR does not record at this speed but it can play cassettes that were recorded in LP mode No special setting is required for playback Safety Tabs Prevent Erasure A safety tab is located on the front left edge of every videotape next to ...

Page 31: ...n When the cassette is all the way in the VCR powers up automatically and a TAPE IN indicator shows on the LCD display It may also start playing immediately if the safety tab has been removed To remove the cassette simply press the STOP EJECT button on the VCR If the tape is playing press STOP EJECT on the VCR once to stop the tape and a second time to eject it Now you can take the cassette out an...

Page 32: ...eave them lying flat on top of the VCR Tapes will last longer and so will your VCR if you store them properly Remember dust dirt and liquids are enemies of your tapes and VCR To avoid aggravation later apply the labels that come with new tape On them write notes to yourself about what you recorded ...

Page 33: ...the number buttons on the TV s remote control 3 Press PLAY to start the tape 4 Press STOP to end play If the safety tab has been removed the tape automatically begins to play when you insert it Direct Video Input to the TV Normally you would select channel 3 or 4 on the TV to receive a signal from the VCR You can get an even better picture if your TV has an auxiliary video input feature and if the...

Page 34: ...pe all the way to the beginning then stops Press STOP EJECT on the VCR to release the tape Automatic Rewind MOVIE RETURN When the tape reaches the end during playback or normal recording it will automatically rewinds and comes to the beginning of the tape or memory stop position If your videocassette has the safety tab removed and you set the MOVIE RETURN function to ON during initial setup the VC...

Page 35: ... press VOLUME SLOW to speed up The more times you press the slower or faster the slow motion If you want to minimize noise in slow motion playback first set the VCR in still playback and press VCR1 or VCR2 then press either of the tracking buttons or to minimize vertical shaking Then set the VCR in slow playback and press VCR1 or VCR2 then press TRACKING buttons to minimize visual noise bands on t...

Page 36: ...want to return to you can set the time counter to memorize that spot Begin in either STOP or PLAY mode Press DISPLAY twice to show the counter on the TV screen Begin recording or playing back a tape Notice the counter remains on the screen At the point that you want to go back to press CLEAR on the remote control This resets the counter to 0 00 00 Press STOP when you are done recording or playing ...

Page 37: ...mark This function only works with recordings that have been set up with indexing You create an INDEX mark every time you press the REC and PLAY on the remote control at the same time or the REC IRT button on the VCR For more on how this gets recorded see the section on Recording a Program page 30 This VCR s indexing system is based on the VHS Standard Indexing System VISS The new system may not r...

Page 38: ...ogram The VCR will continue searching until you press INDEX again or PLAY reach the end of the tape When you find the program you want and press INDEX and the VCR returns to PLAY mode To stop the index search before an index mark is reached press STOP If there are no index marks on the tape the VCR will just rewind to beginning or fast forward to the end ...

Page 39: ... toward the VCR The power comes on automatically when the tape is fully inserted 2 Turn the TV to channel 3 or 4 the one you set the switch to on the back of your VCR Or if you are hooked up with a direct audio video cable set the TV to AUX or VIDEO 3 Press TAPE SPEED on the remote control to select SP standard play for the best picture quality or EP extended play for longest recording time on a s...

Page 40: ...ding Press PAUSE again to continue recording when you see the commercial is over If you stay in PAUSE mode for more than 5 minutes the VCR automatically switches to STOP mode to protect the tape To Change the Channel Being Recorded Suppose you are recording one program and you remember that something else is on that you would rather record You can change the channel while in the recording mode Pre...

Page 41: ...atically stop and the VCR will turn itself off To stop recording while in the IRT mode press the POWER button and then press STOP STOP EJECT button this can be done either on the VCR or with the remote control within 10 seconds Setting the VCR to Record Later With the delayed recording feature you can set this VCR so that it automatically comes on and records programs whenever you like without you...

Page 42: ...ss 0 before single digit channel numbers times and dates for example 0 and 6 for channel 6 After you enter the channel and time the VCR automatically shows the current date or the next date whichever is most logical Leave the date as it comes up or enter new digits for the month and day You can correct any item entered as you go by pressing the CLEAR button repeatedly until the digit to be correct...

Page 43: ...or PM Enter the end time half past six as 6 30 The VCR automatically selects PM for you The screen shows today s date so no changes are needed on that line Press TAPE SPEED to switch to SP because you want the best quality picture for this recording Everything is as you want it so press GUIDE to set the program in memory Insert a videocassette and power off the VCR Check for the delayed recording ...

Page 44: ...he darker portions are program segments that would be recorded Shows with Same Starting Time By Program number If the overlapping programs start at the same time the VCR records in order by program number 1 8 If the shows are all scheduled to start at 7 AM the VCR starts with program 1 at 7 AM switches to what remains of program 2 when program 1 is done recording and so on Shows with Different Sta...

Page 45: ... in your VCR s memory This is called channel setup and you do it using the on screen Easy Guide System The procedure depends on what kind of hookup you have We ll give you step by step instructions Then you will be ready to begin VCR Plus recording also using the on screen Easy Guide System VCR Plus and PlusCodeTM are trademarks of Gemstar Development Corp Channel Setup Before You Begin Channel se...

Page 46: ...tainment Network Channel 35 Turner Network Television Channel 36 ESPN 5 Now you re ready to assign your local channels to VCR Plus channels in the VCR s memory The way you do this depends on how your VCR is hooked up to the incoming RF signal Decide which hookup you have from the diagrams below and follow the setup instructions for your type of hookup Hint Try several practice recordings after doi...

Page 47: ...cable box Compare your local TV channel listing to your cable company s channel directory to find channels that need to be assigned to the VCR Plus codes For example In the example above none of the cable channels match all of them need to be assigned to VCR Plus channel codes Matching Broadcast CH Numbers to VCR Plus Channels 1 Press GUIDE then press 4 to select VCR PLUS SETUP For Home Antenna Se...

Page 48: ...ng with VCR Plus Cable with a Cable Box Setup Use this setup procedure if you receive all channels through a cable box CABLE BOX SET tells the VCR how to record or to view programs from the cable box Usually this is either 03 or 04 but it could be 02 05 or 06 Consult your cable company if you re not sure 1 Press GUIDE then press 4 to select VCR PLUS SETUP 2 Press 2 to answer YES to the question Is...

Page 49: ...ome to one of the channels that you receive through the cable box enter the cable box s output channel number 03 to 04 This will assigne the scrambled cable channels For example suppose you receive Home Box Office HBO through the cable box Its cable channel is 2 and its VCR Plus channel code is 33 Your cable box output channel is 4 You would assign HBO like this 3 Press GUIDE to end the setup proc...

Page 50: ...the screen in about 10 seconds 4 If you have entered the correct PlusCode press GUIDE to store the PlusCode in the VCR s memory This brings up another screen 5 Press number buttons 1 2 or 3 to select ONE TIME DAILY or WEEKLY RECORDING Important Programming does not take effect unless you select one of these options 6 When the next screen comes up choose between standard or extended tape speed by p...

Page 51: ... proper connection for the programs you are recording through the cable box for scrambled premium channels direct cable for all other channels Important Your timed recording settings take effect when you turn off the power on the VCR Caution on the VCR Plus recording The VCR Plus feature allows you to program the VCR for timer recording by simply entering a PlusCode number up to 8 digits To preven...

Page 52: ...l This feature comes in handy you don t have to juggle two remotes The remote control is compatible with the fifteen makers of TV s listed below but don t be alarmed if yours is not on our list You may still be able to program the remote for your TV Every TV that comes with a remote control is set up to detect certain infrared signals You need to program the VCR s remote control to send signals th...

Page 53: ...e to program this remote control for your TV TV Brands Press TV and This Number Hitachi 1 Zenith 2 Sony 3 Magnavox 4 Sanyo 5 Gold Star 1 6 Toshiba 7 Gold Star 2 8 NEC 9 RCA 0 Panasonic CHANNEL up arrow Mitsubishi CHANNEL down arrow JVC 100 ENT Sharp 1 LAST CH Sharp 2 DISPLAY Controlling the TV Once programmed the VCR s remote control is ready to control the TV First press TV to change to the TV fu...

Page 54: ...vanced Operations Remote Control of TV 54 Press VCR1 to operate your VCR with the remote again Be aware that not all of your TV s functions may work even though the remote control is correctly programmed ...

Page 55: ... Approach Try the hookups listed as Options 1 through 4 They are based on whether the cable channel signals are scrambled unscrambled or a combination Your cable company can tell you more about this After each hookup power up the VCR and the TV Use the Initial Setup screen page 19 to select option CATV1 or CATV2 Then check out the system using these questions as a guide Does the TV receive the sam...

Page 56: ...xial cable supplied with your VCR connect either end to the VCR s OUT TO TV upper jack 3 Connect the other end of the 75 ohm cable to the TV in the same place where you removed the cable line Check all the TV and VCR functions If you don t get all the functions you want proceed with Option 2 Option 2 All Channels Unscrambled 1 Remove the cable company s line from the back of the cable box that goe...

Page 57: ... the cable box s input that you just freed up 3 Using a second coaxial jumper connect the other splitter output to the A of the A or B switch 4 Using the cable box output line connect the cable box receptacle to the B of the A or B switch 5 Using a third coaxial jumper connect the output of the A or B switch to the IN FROM ANT lowerjack on the back of the VCR 6 Take the coaxial cable that is still...

Page 58: ...same as for programming the remote to operate your TV For additional details see page 44 Hold down the CATV button and press the number of your brand of cable box shown in the chart If that button combination does not work or if your brand is not on the chart just go through all the button combinations until you find the one that works best Cable Converters Press CATV and This Number Jerrold 1 1 J...

Page 59: ... the yellow VIDEO IN on VCR1 Connect the AUDIO OUT jack on VCR2 to the AUDIO IN jack on VCR1 Second VCR Hookup Illustration To Control Both VCRs with the Remote Control If the second VCR that you ve hooked up is also a Hitachi you can set your remote to operate both VCRs Press GUIDE then press 5 to bring up the Setup screen The default setting on the Setup Screen is VCR1 for when you have only one...

Page 60: ... VCR1 s display and you can view the picture being recorded Copying Tapes From A Camcorder If you would like to copy a video tape shot in your camcorder onto your VCR here s how to do it Connect the camcorder s AV output cable to your VCR See diagram below Copying Tapes From A Camcorder Hookup Illustration Press the AVX button on the VCRs remote control so that the L Line indicator appears in the ...

Page 61: ...ead cleaning Even with the auto head cleaning system dirt can build up on the heads If the picture is blurry during playback or is occasionally interrupted or blanks out try playing different cassettes to see whether you get the same picture problems If the picture problems persist the heads may need to be cleaned professionally Consult your VCR dealer for the name of trained service technician ne...

Page 62: ...airs Yourself Do not remove the cover or the back of the VCR this will void the warranty and endanger your safety The exposed uninsulated voltage in this unit may be high enough to cause electrical shock It is dangerous to make contact with any inside part and none of these parts are intended to be serviced by an untrained user To be safe refer service problems to qualified service personnel ...

Page 63: ...correct firm connections Poor picture quality noise during playback TV channel selector on the proper channel Set TV to channel 3 or 4 as correct for your area Set TV or AUX or VIDEO have a direct video hookup Is TV correctly tuned Fine tune the TV Static lines through the picture Press 1 or 4 button to adjust tracking Noisy picture despite all previous adjustments even when playing different cass...

Page 64: ...on is necessary Hitachi Service Hotline Authorized Hitachi service facilities are available throughout the US and Canada For the location nearest you call the Hitachi Service Hotline at one of these numbers In the continental U S A DIAL TOLL FREE 7 days a week 24 hours a day 800 HITACHI 1 800 448 2244 You must state your zip code when calling In Canada QUEBEC 418 527 5853 MONTREAL 514 697 9150 TOR...

Page 65: ...CH 7 13 174MHz 216MHz VHF SUPER CH J W 216MHz 300MHz CATV VHF HYPER CH W 1 W 28 300MHz 468MHz CATV UHF CH 14 69 W 29 W 84 470MHz 806MHz Video Input 1 2 Vp p 75ohm unbalanced Video Output 1 Vp p 75ohm unbalanced Audio Input 316mV rms 7 8dB 50 kohm Audio Output 316mV rms 7 8dB 1 5 kohm Video Recording S N Better than 45dB SP better than 40dB EP Horizontal Resolution 240 lines SP 220 lines LP playbac...

Page 66: ... to obtain these accessories please call TOLL FREE 1 800 448 2244 for your nearest Hitachi Authorized Parts Distributor in the continental United States For ALASKA and HAWAII please contact the nearest Hitachi Regional office Design and specifications subject to change without notice ice 1 ...

Reviews: