


– 3 –
EN
1
Disconnect the AC power cord of the TV from the
AC outlet.
2
Disconnect the antenna or cable from the TV.
3
Connect the antenna or cable to the ANT. IN jack of
the VCR.
4
Connect the VCR to the TV using the RF cable.
5
Plug the AC power cords of the VCR and TV into
the AC outlets.
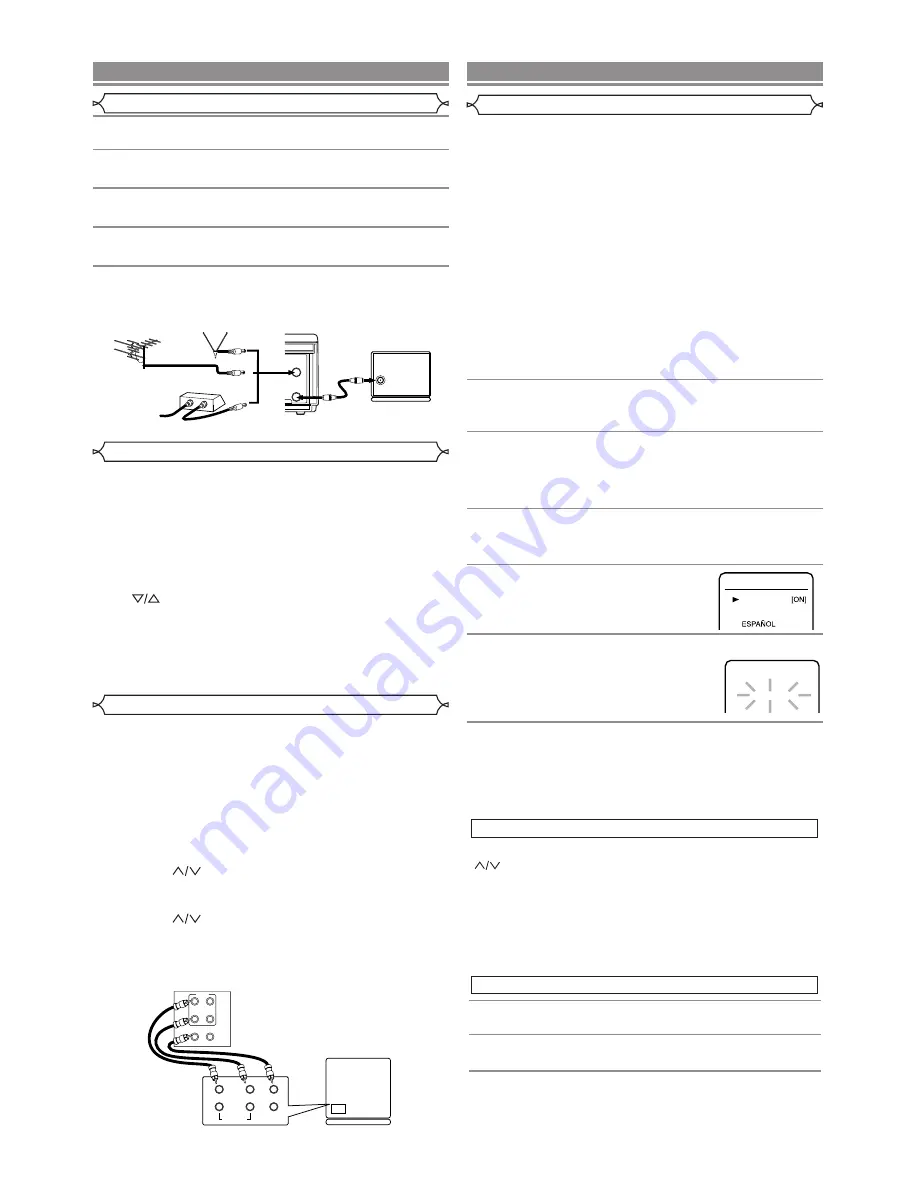
ANT
IN
OUT
[VHF/UHF
combination antenna]
[Back of the VCR]
IN
OUT
[Cable box or satellite box]
OR
[Indoor antenna]
[Back of the
UHF/VHF combination TV]
UHF/VHF
RF cable
(supplied)
From Cable or
Satellite Company
OR
If your TV does not have A/V terminals:
Press [PLAY] on the VCR for 3 seconds during playback.The
RF output channel will change to CH4 from CH3.
When you want to return to CH3 for RF output channel, press
[PLAY] on the VCR for 3 seconds during playback again.
(Default setting :CH3)
• There is case that the RF output channel does not change by
situation (For example, when you adjust tracking using [CHAN-
NEL
].
In this case, stop the playback, and start the playback again.
After that, press [PLAY] on the VCR for 3 seconds.
• If there is a power failure or the VCR is unplugged for more
than 30 seconds, the RF output channel setting will return to
CH3.
( )
You can automatically program the tuner to scan only the
channels you receive in your area.
• Channel memory programming is NOT needed when you
connect the VCR to a cable box or satellite box as in "Connect
VCR to TV Connection". In this case, select the VCR and TV
to channel 3 or 4 the same channel as the RF output channel
of the VCR. Then, the channel you want to record or view may
be selected at the cable box or satellite box.
• Follow the steps below once. Repeat it only if there is a
power failure or if the VCR is unplugged for more than 30
seconds. (In these cases, the programmed channels are
erased.)
• You must follow the steps below before attempting to play or
record a video tape. If you want to play or record a video tape
BEFORE programming the tuner, you can cancel it by press-
ing [COUNTER RESET/EXIT].
1
You need to connect the antenna or cable to the
VCR first. Then, connect the VCR power plug into a
standard AC outlet.
2
Turn on the TV and set the TV to channel 3.
If chan-
nel 3 is already occupied for broadcasting, change the
RF output to CH 4, and change the TV channel to CH4.
(See “RF Output Channel” on page 3 for the detail.)
3
Turn on the VCR
by pressing [POWER]. When the
POWER is on, both the POWER and VCR indicators
on the VCR will be on.
4
Select the On Screen Language
("ENGLISH" , "FRANCAIS" or
"ESPAÑOL")
by pressing [PLAY] or
[STOP]. Then, press [F.FWD].
5
Begin channel preset
by pressing [F.FWD] once. The
tuner scans and memorizes all active
channels in your area.
• The VCR distinguishes between standard
TV channels and cable channels.
6
After scanning, the tuner stops on the lowest mem-
orized channel. The TV screen returns to TV mode.
• If "AUTO SET UP" appears on the TV screen again, check
the cable connections. Press [F.FWD] once again and the
VCR will begin preset again.
Using Optional AUDIO/ VIDEO Output Jacks
With this connection, you can get better pictures and sounds
when playing back a tape if your TV has A/V Input jacks.
Please refer to your TV’s owner’s manual.
Using AUDIO/VIDEO Input Jacks
You can use the A/V input jacks on the front or the back of
the VCR.
• To use the input jacks on the back of the VCR, select "L1"
position by pressing [0], [0], [1] on the remote control or
[CHANNEL
].
• To use the input jacks on the front of the VCR, select "L2"
position by pressing [0], [0], [2] on the remote control or
[CHANNEL
].
•
“L1” or “L2” is found before the lowest memorized
channel.
(Example: CH2)
( )
( )
IN
AUDIO
L
R
VIDEO
VIDEO
L
R
OUT
IN
OUT
IN
AUDIO
[Playing VCR]
[TV A/V]
Audio/Video cables
(not supplied)
VCR to TV Connection
RF Output Channel
VCR to AV TV connection using AUDIO/VIDEO Cables
SETUP
Automatic Channel Set Up
PREPARATION FOR USE
You can select the desired channel by using [CHANNEL
] or directly pressing [Number] on the remote control.
Note for using the Number buttons:
• When selecting cable channels which are higher than 99,
enter channel numbers as a three-digit number.(For exam-
ple: 117, press 1,1,7)
• You must precede single-digit channel numbers with a zero
(For example: 02, 03, 04 and so on).
1
Press [MENU]
until the main menu appears
.
2
Select "CHANNEL SET UP"
by pressing [PLAY] or
[STOP]. Then, press [F.FWD].
3
Select "AUTO SET UP"
by pressing [PLAY] or
[STOP]. Then, press [F.FWD]. After scanning, the
tuner stops on the lowest memorized channel.
To Preset the Channel Again
( )
To Select a Desired Channel
ENGLISH
LANGUAGE SELECT
FRANCAIS
AUTO SET UP
CH 01