background image

PRESET FOR USE 

- 22 - 

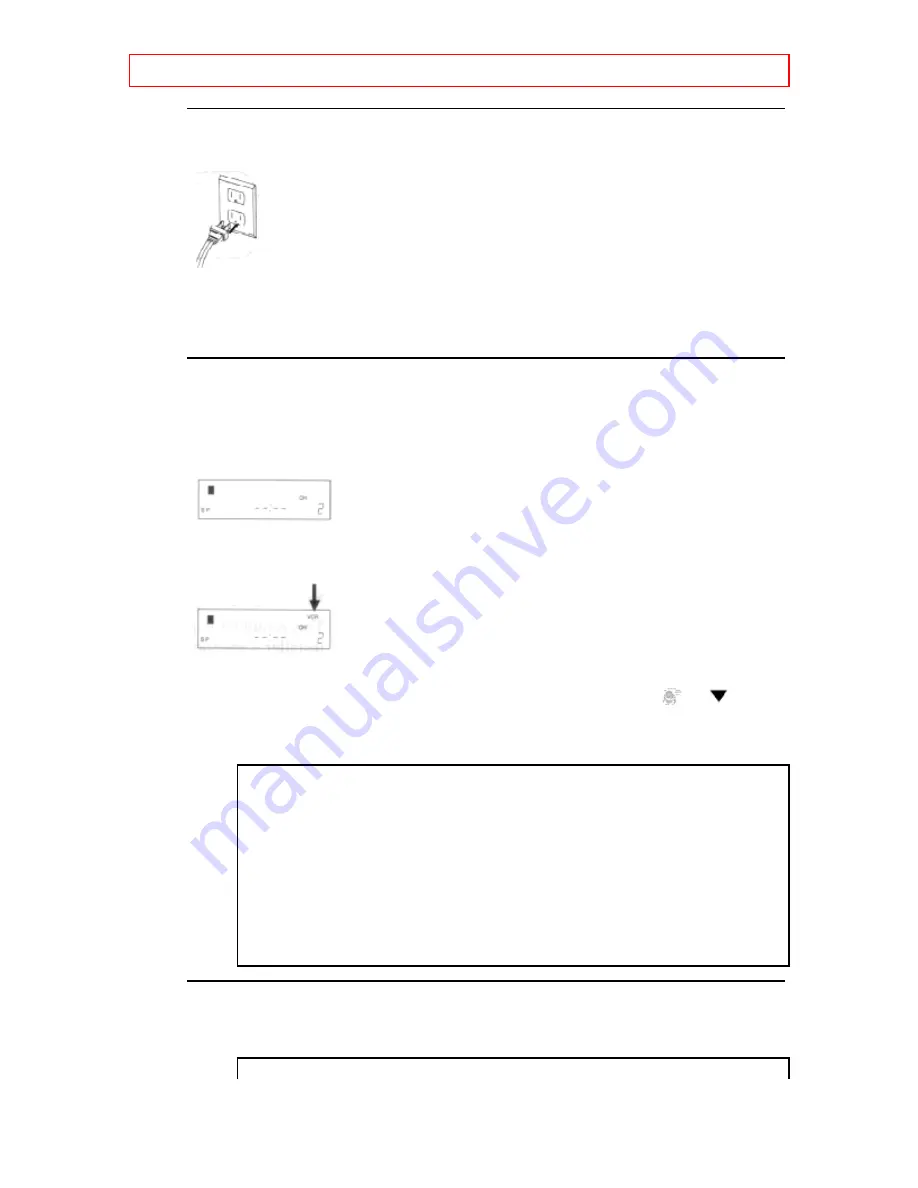
1 Plug in the VCR power cord 

Plug the VCR power cord into a standard AC outlet. "--:--" appears on the 
display. 


• Whenever the AC plug is connected, the VCR search the local PBS 
station for auto clock setting. If the VCR find the local PBS station, current 
time appears on the display. 

2 Select channel 3 or 4 on the TV 

Turn on the TV and set the TV channel to the same video output channel 
as located on the back of the VCR. (CH3 or 4) 

3 Turn on the VCR 

Press the POWER button to turn on the VCR. " " appears on the display. 


4 Select the VCR mode 

Press VCR/TV button so that "VCR" appears on the display 


5 Select "ENGLISH" or "ESPANOL" 

Select "ENGLISH" or "ESPANOL=Spanish" using CH/SET 

 or 


button. 
Then, press SELECT or MENU button. 

 
 LANGUAGE 

SELECT 


ENGLISH [ON] 

 ESPAÑOL 


6 Begin channel preset 

Press SELECT button once. The tuner scans and memorizes all the active 
channels in your area. (TV mode: from CH2/ CATV mode: from CH1) 


Summary of Contents for VT-FX602S

Page 1: ... direct station call Auto power on and off system Auto counter reset Auto rewind when the end of a tape is reached Direct Button Operation 2 Step Picture Search Operation Still Digital Auto Tracking DTR Auto Repeat Rental Play Mode Three different tape speeds SP LP SLP IRT Instant Recording Timer 1 Year 7 events including Daily and Weekly Timer Recording Auto Return Time Search Blank Search Index ...

Page 2: ...MODE 18 SELECTING THE MTS SYSTEM 18 PRESET FOR USE 21 AUTOMATIC CHANNEL PRESET Without a Cable Box 21 TO DELETE PRESET CHANNEL 24 CHANNEL PRESET AGAIN 26 DAYLIGHT SAVING TIME 28 SETTING THE CLOCK AUTO MANUAL 29 SELECTING THE LANGUAGE 36 ON SCREEN DISPLAY 37 PLAYBACK 38 NORMAL PLAYBACK 38 SPECIAL PLAY BACK 41 AUTO REPEAT PLAYBACK 41 RENTAL PLAY 42 SEARCH 43 COUNTER MEMORY 43 TIME SEARCH 44 INDEX SE...

Page 3: ...ECTRIC SHOCK DO NOT EXPOSE THIS APPLIANCE TO RAIN OR MOISTURE CAUTION TO REDUCE THE RISK OF ELECTRIC SHOCK DO NOT REMOVE COVER OR BACK NO USER SERVICEABLE PARTS INSIDE REFER SERVICING TO QUALIFIED SERVICE PERSONNEL The caution marking is located on the rear of the cabinet THIS SYMBOL INDICATES THAT DANGEROUS VOLTAGE CONSTITUTING A RISK OF ELECTRIC SHOCK IS PRESENT WITHIN THIS UNIT THIS SYMBOL INDI...

Page 4: ...pod bracket or table The video product may fall causing serious injury to a child or adult and serious damage to the appliance Use only with a cart stand tripod bracket or table recommended by the manufacturer or sold with the video product Any mounting of the appliance should follow the manufacturer s instructions and should use a mounting accessory recommended by the manufacturer An appliance an...

Page 5: ... and requirements for the grounding electrode Fig A 2 Antenna ground diagram 14 Lightning For added protection for this video product during a lightning storm or when it is left unattended and unused for long periods of time unplug it from the wall outlet and disconnect the antenna or cable system This will prevent damage to the video product due to lightning and power line surges 15 Power Lines A...

Page 6: ...s may result in fire electric shock or other hazards 21 Safety Check Upon completion of any service or repairs to this video product ask the service technician to perform safety checks to determine that the video product is in proper operating condition 22 Heat This video product should be situated away from heat sources such as radiators heat registers stoves or other products including amplifier...

Page 7: ...tions to this equipment may cause harmful interference unless the modifications are expressly approved in the instruction manual The user could lose the authority to operate this equipment if an unauthorized change or modification is made IMPORTANT COPYRIGHT INFORMATION Unauthorized recording or use of broadcast television programming video tape film or other copyrighted material may violate appli...

Page 8: ... tape Auto rewind when the end of a tape is reached not in the case of timer recording Direct Button Operation When a tape is in the VCR and the power is off just press PLAY REW or F FWD button on the main unit and it will automatically turn on the VCR and playback rewinding or fast forwarding will start immediately not in the case of timer recording 2 Step Picture Search Operation You can view a ...

Page 9: ...essing F FWD button faster or REW button slower Jog and Shuttle You can adjust the playback speed using the Shuttle Ring the outer ring or advance the frame one by one using the Jog Dial the inner ring Auto Clock Setting Allows you to use the clock function from the PBS broadcast VIDEO CASSETTE TAPE This VCR will operate with any cassette that has the VHS mark For best results we recommend the use...

Page 10: ...on the center back of the cassette until it is drawn into the VCR The VCR will automatically turn on REMOVING A CASSETTE 1 In the Stop mode press STOP EJECT button on the VCR The cassette will eject 2 Pull the cassette out of the cassette compartment 3 Store the cassette in its case as shown ERASE PREVENTION You can prevent accidental erasing of recording by breaking off the tab on the back edge o...

Page 11: ...om the VCR only on the VCR 7 REC button s Press to begin manual recording When you operate by remote control press both 2 buttons 1 is a safety button together IRT button Press to activate Instant Recording Timer only on the VCR 8 CHANNEL buttons Press to select desired channels for viewing or recording SET function Press to enter digits when setting program for example setting clock or timer prog...

Page 12: ...ent time on the TV screen 16 SLOW button Press to reduce the playback speed Slow speed can be controlled by pressing F FWD button faster or REW button slower 17 JOG SHUTTLE button Press to use the Jog Dial or the Shuttle Ring See page 21 18 Jog Shuttle indicator Lights on when JOG SHUTTLE button is pressed See page 21 19 Jog Dial Turn to advance one frame in the forward or backward direction at th...

Page 13: ...s Connect to an audio output jacks of your audio equipment or another VCR 31 ANT IN terminal Connect to an antenna or CATV 32 VIDEO OUT jack Connect to a video input jack of your video camera or another VCR 33 VIDEO IN jack Connect to a video output jack of your video camera or another VCR 34 CH3 CH4 selector switch Use to select a video output channel 3 or 4 for playback from the VCR 35 ANT OUT t...

Page 14: ...s SETTING A VIDEO CHANNEL If your TV does not have A V terminals When the VCR is in the Playback mode or when the VCR is in the VCR position your TV will receive the signals from the VCR on either channel 3 or 4 To use the VCR with your TV set the selector switch to CH3 or CH4 whichever is not used or least used for normal broadcasts in your area Then set your TV to that same channel ...

Page 15: ...INPUT SELECT To use the external input jacks select the AUX position Press the CHANNEL or button or enter 00 with number button on the remote control so that AUX appears on the screen Note AUX is found before the lowest memorized channel Example CH2 A V TERMINALS If your TV has A V input jacks you may connect your VCR s AUDIO VIDEO OUTPUT jacks to the audio video input jacks on back of your TV Dir...

Page 16: ... to CATV system installer This reminder is provided to call the CATV system installer s attention to Article 820 40 of the NEC that provides guidelines for proper grounding and in particular specifies that the cable ground shall be connected to the grounding system of the building as close to the poing of cable entry as practical MTS Multi Channel Television Sound SYSTEM You can record or listen t...

Page 17: ... in stereo can be received STEREO appears on the TV screen 2 When a program broadcast in second audio can be received SAP appears on the TV screen 3 When a program broadcast both in stereo and second audio can be received STEREO and SAP appear on the TV screen NOTE Although a program may be broadcast in both stereo and second audio you cannot record in both stereo and second audio at the same time...

Page 18: ...EM NOTE You must use the remote control for this procedure Make sure VCR power must be turned on Turn on the TV and set the TV channel to the same video output channel as located on the back of the VCR CH 3 or 4 Press VCR TV button on the remote control so that VCR appears on the display TO SELECT HIFI MODE 1 Select the main menu Press MENU button The main menu appears on the TV screen MENU TIMER ...

Page 19: ...TIMER PROGRAMMING VCR SET UP INITIALIZE 3 Select AUDIO OUT Press CH SET or button repeatedly to point to AUDIO OUT Then press SELECT button VCR SET UP TAPE SELECT T130 REPEAT PLAY RENTAL AUTO RETURN AUDIO OUT TV STEREO ON SAP 4 Select HIFI Press CH SET or button repeatedly to point to HIFI AUDIO OUT HIFI ON MONO 5 To return to TV mode Press MENU button ...

Page 20: ...ss CH SET or button repeatedly to point to VCR SET UP Then press SELECT button 3 Press CH SET or button repeatedly to point to AUDIO OUT Then press SELECT button 4 Press CH SET or button repeatedly to point to MONO 5 Press MENU button to return to original mode TO SELECT STEREO OR SAP MODE 1 Select the main menu Press MENU button The main menu appears on the TV screen MENU TIMER PROGRAMMING VCR SE...

Page 21: ...memory programming is NOT needed when connected to a cable box You can program the tuner to scan only the channels you receive in your area See page 38 for channel designations NOTE You must use the remote control for this procedure AUTOMATIC CHANNEL PRESET Without a Cable Box NOTES Follow the steps below once Repeat it only if there is a power failure or the VCR is unplugged for more than 30 seco...

Page 22: ...TV channel to the same video output channel as located on the back of the VCR CH3 or 4 3 Turn on the VCR Press the POWER button to turn on the VCR appears on the display 4 Select the VCR mode Press VCR TV button so that VCR appears on the display 5 Select ENGLISH or ESPANOL Select ENGLISH or ESPANOL Spanish using CH SET or button Then press SELECT or MENU button LANGUAGE SELECT ENGLISH ON ESPAÑOL ...

Page 23: ...nnels AUTO CLOCK flashes on the TV screen And the VCR search the local PBS station for auto clock setting again If current time does not appear follow SETTING THE CLOCK page 16 Note The VCR will search through all the available channels from the lowest channel It must scan each channel for one minute to determine if that channel is transmitting the EDS signal If the highest channel has EDS signal ...

Page 24: ...tch can be deleted from the memory Of course you can add the deleted channel into the memory again NOTE You must use the remote control for this procedure Make sure VCR power must be turned on Turn on the TV and set the TV channel to the same video output channel as located on the back of the VCR CH 3 or 4 Press VCR TV button on the remote control so that VCR appears on the display 1 Select the ma...

Page 25: ...NEL SET UP SETTING CLOCK LANGUAGE SELECT D S T 4 Select ADD DELETE CH Press CH SET or button repeatedly to point to ADD DELETE CH Press SELECT button CHANNEL SET UP TV ON CATV ADD DELETE CH 5 Enter the desired channel number Press the number buttons or CH SET or button repeatedly until your desired channel number appears Example CH02 ADD DELETE CH 02 TV ...

Page 26: ...peat steps 5 and 6 If you press ADD DELETE button again the channel is memorized again ADD DELETE CH 02 TV MEMORIZED 7 Exit the preset mode Press MENU button to return to TV mode NOTE To confirm that channel s has been deleted or added press CH SET or button CHANNEL PRESET AGAIN 1 Select the main menu Press MENU button The main menu appears on the TV screen MENU ...

Page 27: ...SELECT button MENU TIMER PROGRAMMING VCR SET UP INITIALIZE 3 Select CHANNEL SET UP Press CH SET or button repeatedly to point to CHANNEL SET UP Then press SELECT button INITIALIZE CHANNEL SET UP SETTING CLOCK LANGUAGE SELECT D S T 4 Select TV or CATV Press CH SET or button repeatedly to point to TV or CATV CHANNEL SET UP TV ON CATV ADD DELETE CH ...

Page 28: ...NOTES When programmed timer recordings start between 2 00AM 2 59AM on the First Sunday of April the VCR will start recording at 3 00AM When programmed timer recordings end between 2 00AM 2 59AM on the First Sunday of April the VCR will stop recording at 3 00AM Make sure You must use the remote control for the following procedure VCR power must be turned on Turn on the TV and set the TV channel to ...

Page 29: ...ic Broadcasting Station PBS is available in your area follow AUTO CLOCK SETTING If it is not follow MANUAL CLOCK SETTING Whenever the AC plug is connected the VCR search the local PBS station for auto clock setting You may not need to set the clock If you use DAYLIGHT SAVING TIME follow DAYLIGHT SAVING TIME on this page AUTO CLOCK SETTING You can have the VCR set the clock automatically by using t...

Page 30: ... the time will be changed to corresponding with Daylight Saving Time Selection when the VCR load the EDS signal The VCR will load the EDS signal whenever turning the VCR off at 12 00AM and 12 00PM If the VCR is connected directly to a cable converter box the local PBS station must be selected on the cable box itself and the VCR must be set to the output channel of the cable converter box usually c...

Page 31: ...n repeatedly to point to MANUAL Then press SELECT button Next press the number buttons or CH SET or button repeatedly until the channel number for your local PBS station appears If you do not know the PBS channel number leave it set to AUTO The VCR will search automatically all available channels for the local PBS station and will select that channel SET AUTO CLOCK CHANNEL AUTO ON MANUAL 6 Exit th...

Page 32: ... zone Or there is a possibility that no channel is broadcasting the EDS signal in your area as shown by no time being set even after an overnight search In these cases you must manually enter the correct local PBS station or set the clock manually turning off the Auto Clock Setting feature MANUAL CLOCK SETTING We suggest that you use a TV or radio station as your time source In the example below t...

Page 33: ...TTING CLOCK AUTO CLOCK MANUAL ON Make sure If you did not set your desired digit within 2 seconds after pressing CH SET or button during steps 5 to 9 the input mode will forward to next step When you press SELECT button after pressing CH SET or button during steps 5 to 9 you may forward to next step Press ADD DELETE button to go back one step from current step during steps 6 to 10 5 Select the mon...

Page 34: ... 1st 01 SETTING CLOCK MONTH DAY YEAR 03 01 HOUR MINUTE AM PM 7 Select the year Press CH SET or button repeatedly until your desired year appears Example 1996 SETTING CLOCK MONTH DAY YEAR 03 01 FRI 1996 HOUR MINUTE AM PM 8 Select the hour Press CH SET or button repeatedly until your desired hour appears Example 05 SETTING CLOCK MONTH DAY YEAR 03 01 FRI 1996 ...

Page 35: ... DAY YEAR 03 01 FRI 1996 HOUR MINUTE AM PM 05 40 PM AM PM 11 Start the clock Press MENU or SELECT button Although seconds are not displayed they begin counting from 00 when you press MENU or SELECT button Use this feature to synchronize the clock with the correct time NOTE When unplugging the AC cord or if there is a power failure for more than 30 seconds may flash on the display If this happen fo...

Page 36: ...button 6 Enter correct numbers using CH SET or button 7 Press MENU button to return to original mode SELECTING THE LANGUAGE If you want to change the language on the TV screen follow the steps below 1 Select the main menu Press MENU button 2 Select INITIALIZE Press CH SET or button repeatedly to point to INITIALIZE Then press SELECT button MENU TIMER PROGRAMMING VCR SET UP INITIALIZE 3 Select LANG...

Page 37: ... LANGUAGE SELECT ENGLISH ON ESPAÑOL 5 Exit the Language select Press MENU button to return to TV mode ON SCREEN DISPLAY To check the Remain Count Clock and Channel number on the TV screen and display press SELECT button Each time you press SELECT button TV screen and display will change as the illustration ...

Page 38: ...tion 2B Using button on the remote control Press POWER button to turn on and then press PLAY button on the remote control 3 To stop playback Press STOP button PICTURE SEARCH This feature is useful in finding or skipping over a particular scene on a tape In this mode the sound will be muted 1 You may view a video tape at a high speed in either a forward or reverse direction by pressing F FWD or REW...

Page 39: ...DTR function stop the tape once and start playback again You can reduce the noise lines by pressing CHANNEL or button in the slow mode too Slow tracking adjustment will not be set automatically Note In Still mode press SLOW button on the remote control and press CHANNEL or button until the streaks disappear To return to Still mode press PAUSE button again SLOW MOTION Press SLOW button on the remot...

Page 40: ...e in 30 seconds makes the Jog Shuttle indicator light turn off 2 To make the playback speed faster Hold and turn the Shuttle Ring the outer ring in either direction The further the ring is rotated the faster the playback speed in the forward FWD or reverse REV direction If you release the ring the ring will return to the original position and the picture will be in the Still mode 3 To advance the ...

Page 41: ...pears on the display You must use the remote control for the following procedure AUTO REPEAT PLAYBACK The VCR has the auto repeat function that allows you to repeat a tape indefinitely without touching the Play button Insert a prerecorded tape 1 Select the main menu Press MENU button 2 Select VCR SET UP Press CH SET or button repeatedly to point to VCR SET UP Then press SELECT button MENU TIMER PR...

Page 42: ...et ON the RENTAL PLAY display has priority TO STOP PLAYBACK Press STOP button TO EXIT THE AUTO REPEAT MODE Repeat steps 1 to 3 Then press SELECT button ON will then disappear from the menu Press MENU button to return to TV mode RENTAL PLAY This function enables you to improve the picture quality when playing back worn cassettes such as those rented from a video shop Insert rental tape into VCR and...

Page 43: ... ON or OFF must be done in the play mode only TO STOP PLAYBACK Press STOP button TO EXIT THE RENTAL PLAY MODE Repeat steps 1 to 3 Then press SELECT button so that RENTAL OFF appears on the TV screen SEARCH Make sure VCR power must be turned on Turn on the TV and set the TV channel to the same video output channel as located on the back of the VCR CH 3 or 4 Press VCR TV button on the remote control...

Page 44: ...n so that M appears on the TV screen M 0 12 30 4 Begin recording or playback Press REC or PLAY button Press STOP button when recording or playback is completed 5 To activate the Counter Memory Press REW or F FWD button The tape will automatically stop when the counter returns to 0 00 00 approx TO EXIT THE COUNTER MEMORY When the counter appears on the TV screen press COUNTER MEMORY button once and...

Page 45: ...tion will not operate in recording mode Procedures must be followed within 30 seconds from steps 1 to 2 Otherwise the Time Search mode will be cancelled Press STOP button to exit the Time Search mode INDEX SEARCH This feature provides a method of indexing the starting point so that it can be easily returned to in either fast forward or rewind mode The index mark will be made automatically when the...

Page 46: ...gins rewinding or fast forwarding to the beginning of desired program Note Every time an index signal is skipped the number in the program indicator decreases by one 4 After Index Search When the preset program is reached the VCR will start playback automatically NOTES Index Search can be set up to 20 This function will not operate in recording mode Procedures must be followed within 30 seconds fr...

Page 47: ...t channel as located on the back of the VCR CH 3 or 4 Press VCR TV button on the remote control so that VCR appears on the display Insert a cassette with its erase prevention tab in place If necessary rewind or fast forward the tape to the point at which you want to begin recording You must select the recording mode in TV STEREO or SAP when you record a broadcast Refer to TO SELECT STEREO OR SAP M...

Page 48: ... on the cable converter box 2 Select the tape speed Press TAPE SPEED button on the remote control to select the desired tape speed SP LP SLP SP 3 Begin recording Press REC button The red appears on the display REC SP 4 Stop recording Press STOP button when recording is completed SKIPPING SOME MATERIALS DURING RECORDING Press PAUSE button to temporarily stop recording ...

Page 49: ...gment If you rewind past the beginning of the unwanted segment press and hold F FWD button until you have reached it NOTE If you do not press PAUSE button again within five minutes VCR will automatically switch to the Stop mode 3 Press PAUSE or REC button to resume recording RECORDING ONE PROGRAM WHILE VIEWING ANOTHER You can record one program while viewing another To start recording follow steps...

Page 50: ...n on the VCR NOTE This function cannot be done by the remote control Make sure VCR Power must be turned on Turn on the TV and set the TV channel to the same video output channel as located on the back of the VCR CH3 or 4 Press VCR TV button on the remote control so that VCR appears on the display Insert a cassette tape with its erase prevention tab in place If necessary rewind or fast forward the ...

Page 51: ...ote control The recording length time remaining is indicated on the display as the recording is started Recording stops when 0 00 is reached Please note that in the SLP mode maximum recording time assuming the tape is started at the beginning is 8 hours using T 160 or 6 hours using T 120 The TV that is connected to your VCR may be turned on or off during IRT If the tape runs out before the end tim...

Page 52: ...t forward the tape to the point at which you want to begin recording Avoid overlap of programs There is a case that a program will not be performed When programs overlap The program that the start time is set earliest has priority When the earliest program has finished and the programs which should start still overlap the recording will start in order of the program number If you programmed as the...

Page 53: ...TE START TIME END TIME CHANNEL REC SPEED 4 Select once daily or weekly recording For once recording Press CH SET or button repeatedly to point to ONCE Then press SELECT button PROGRAM NUMBER 1 ONCE DAILY WEEKLY For daily recording To record a TV program at the same time on the same channel every day Example Monday through Sunday Press CH SET or button repeatedly to point to DAILY Then press SELECT...

Page 54: ...ter pressing CH SET or button during steps 5 to 8 the input mode will forward to next step When you press SELECT button after pressing CH SET or button during steps 5 to 8 you may forward to next step Press ADD DELETE button to go back one step from current step during steps 3 to 9 5 Set the date when you want to start First press CH SET or button repeatedly until your desired month appears Exampl...

Page 55: ...ime First press CH SET or button repeatedly until your desired hour appears Example 08 Next enter a minute Example 30 Then press CH SET or button to point to AM or PM Example PM ONE TIME PROGRAM DATE 05 06 MON START TIME 07 30 PM END TIME 08 30 PM CHANNEL REC SPEED AM PM 8 Set the channel number Press CH SET or button repeatedly until your desired channel number appears Example 16 ONE TIME PROGRAM...

Page 56: ... on the display The number of all programmed events are displayed with current time TO CORRECT AN AUTOMATIC TIMER PROGRAM If you want to correct an automatic timer after you finished setting program 1 Repeat steps 1 to 3 on previous page 2 Select a digit you want to change using SELECT button or ADD DELETE button 3 Enter correct numbers using CH SET or button 4 Press MENU button to return to origi...

Page 57: ...er recording cannot occur Insert a tape that allows recording The TV that is connected to your VCR may be turned ON or OFF when the VCR is in the timer record mode When you record a cable channel program with cable converter box first set the VCR s channel to 3 or 4 whichever is the output channel of your cable converter box Then set your converter box to the channel you want to record and leave o...

Page 58: ...ng The VCR calculates the remaining tape amount and then adjusts the tape speed from SP to SLP as needed If it is suspected that the end of the tape will be reached before the reserved program ends as long as SP mode is kept all the way set recording mode to AUTO This function is available only with Program No 1 Timer Recording The auto mode starts recording in SP mode The internal circuit compare...

Page 59: ...end of the reserved recording time several minutes after the end of the TV program SETTING THE REMAINING TIME You can set the remaining tape running time of your tape Follow the steps below to correct the tape remaining indication Make sure VCR power must be turned on Turn on the TV and set the TV channel to the same video output channel as located on the back of the VCR CH3 or 4 Press VCR TV butt...

Page 60: ...Y RENTAL AUTO RETURN AUDIO OUT TV STEREO ON SAP Selection Your cassette tape length T60 60 minutes or less T130 61 130 minutes T140 140 minutes or greater For example the popular T 120 cassette tape calls for the T130 selection 4 Exit the preset mode Press MENU button to return to TV mode 5 To check the remain time Press SELECT button until REMAIN appears on TV screen PLAY SP REMAIN T130 ...

Page 61: ...the Fast forward or Rewind Mode There will be a delay of up to 1 minute before the remain time appears on the TV display Note The use of the following tapes will result in difference between the displayed remaining time and actual time to the end of the tape Tape housed in a VHS C cassette adapter Shorter tape length such as a 10 minute cassette T 180 cassette In this case the display may read 2 H...

Page 62: ...rol might affect the playback VCR s operation Always use video quality shielded cables with RCA type connectors Standard audio cables are not recommended You can use a video disc player satellite receiver or other audio video component with A V outputs in place of the playback VCR TO MONITOR THE RECORDING 1 Turn on the TV and set it to the same output channel as the editing VCR channel 3 or 4 2 Pr...

Page 63: ...ogram the remote control Aim the VCR s remote control at your TV set Hold down the TV button not the VCR TV button while you press the number corresponding to your brand of television as shown in the chart For example If you have an RCA television press TV and 0 at the same time If this button combination sends a signal that matches with your TV the channel will change on the TV and you ll know th...

Page 64: ...ll change to the next higher station 2 Return to the VCR function mode Press VCR button to operate your VCR with the remote again REMOTE CONTROL OF THE CABLE CONVERTER If you have a cable converter you will probably want to program your VCR s remote control so you can easily change channels The process is the same as for programming the remote to operate your TV For additional details see the prev...

Page 65: ...er cord is not connected The VCR power is turned off Connect power cord to AC outlet Press POWER button to turn on the VCR Timer recording is not possible The timer recording is set incorrectly The VCR power is turned on VCR clock is not set correctly Set the timer recording correctly Press POWER button to turn off the VCR Set VCR clock correctly Recording mode cannot be engaged The erase preventi...

Page 66: ...ative do not try to correct the problem by yourself There are no user servicable parts inside Turn off unplug the power cord and take the unit to Authorized Service Center for servicing CABINET CLEANING Wipe the front panel and other exterior surfaces of the VCR with a soft cloth immersed in lukewarm water and wrung dry Never use a solvent or alcohol Do not spray insecticide liquid near the VCR Su...

Page 67: ...hannel tuning ability 125 cable channels Type Auto programming frequency synthesis Power Input AC120V 60Hz Power Consumption 20 W nominal Cabinet Size 14 1 4 W x 3 5 8 H x 10 D 36 0cm W x 9 2cm H x 25 2cm D Weight 7 5 lbs 3 4 kg approx Storage Temperature 4 F to 131 F Operating Temperature 41 F to 104 F Accessories 1 coaxial cable Part No 5857952 1 remote control unit Part No TS13061 2 AAA batteri...

Reviews: