Hitachi VT-F380A Owner'S Manual Download Page 17

Getting Started 


17

5 Attach the TV and VCR to the Power Supply 

Plug in the TV and VCR power cords to the wall outlet or an appropriate extension cord 
or surge protector.  See Important Safeguards for further precautions (page 6). 

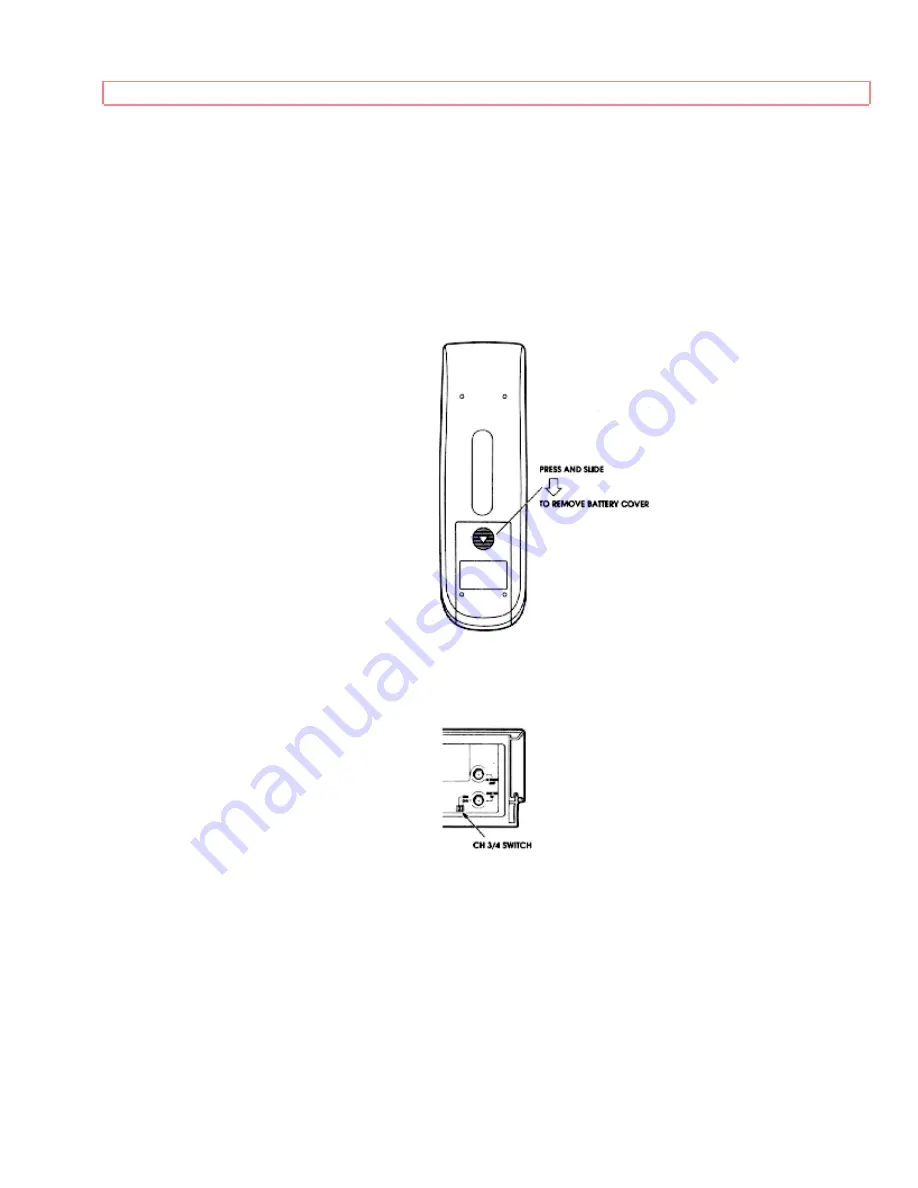
6 Install Batteries in the Remote Control  

The remote control requires two fresh "AA" batteries.  On the back of the remote, a 
plastic cover slides off in the direction shown by the arrow.  Remove this cover and 
install the batteries, matching the plus end of each battery with the plus mark on the 
remote. 


7 Set the RF or Video Channel Switch 

When the VCR is on, its video signal can come into your TV on either channel 3 or 
channel 4.  You need to select the appropriate channel.  


 Turn the power on to both the TV and the VCR, and look for a switch on the back of 

the VCR.  Set the switch to 3 or 4, whichever is not a commercial channel in your area. 

Your basic hookup is now complete.  When you're ready to try hooking up a second 
VCR or a video camera for a complete home entertainment system, see Advanced 
Operations. 

Now turn the TV and VCR back around facing you and begin your quick tour of the 
controls (page 15). 

Summary of Contents for VT-F380A

Page 1: ...Cable compatible frequency synthesizer quartz tuner Remote control for use with your VCR and TV and cable converter On screen programming guide Multi channel TV sound MTS HITACHI HOME HITACHI SALES HITACHI HSC ELECTRONICS CORPORATION CANADA INC AMERICA INC OF HAWAII INC 3300 Trans Canada Hwy 3890 Steve Reynolds Blvd 3219 Koapaka Street Pointe Claire Quebec Norcross GA 30093 Honolulu HI 96819 H9R1B...

Page 2: ...l Buttons 18 When the Remote Doesn t Work Right 19 VCR Controls 20 Display Indicators 20 Meet Your On Screen Guide 21 Getting Started Initial Setup 22 Setup for First Time Operation 22 Initial Setup Options 22 Setting the Clock 23 More About Channel Selections 24 Choosing a Mode for Audio Playback 24 Stereo vs Mono Sound 25 Hi Fi Sound 25 Getting Started Videotapes 26 About Videocassette Tapes 26 ...

Page 3: ...V 39 Advanced Operations Cable Box Hookups 40 Hooking Up to a Cable Box 40 A Step by Step Approach 40 Remote Control of the Cable Converter 42 Advanced Operations Stereo System 44 Integrating Your Stereo System 44 Hookup 44 Recording from Your Stereo System 44 Advanced Operations Second VCR 46 Integrating a Second VCR 46 Hookup 46 Copying from One VCR to Another Dubbing 46 Copying Tapes From A Cam...

Page 4: ...erous to make any kind of contact with any inside part of this unit This symbol alerts the user that important literature concerning the operation and maintenance of this unit has been included Therefore it should be read carefully in order to avoid any problems CAUTION TO REDUCE THE RISK OF ELECTRIC SHOCK DO NOT REMOVE COVER OR BACK NO USER SERVICEABLE PARTS INSIDE REFER SERVICING TO QUALIFIED SE...

Page 5: ...ompliance could void the user s authority to operate the equipment Note to CATV system installer This reminder is provided to call the CATV system installer s attention to Article 820 40 of the NEC that provides guidelines for proper grounding and in particular specifies that the cable ground shall be connected to the grounding system of the building as close to the point of cable entry as practic...

Page 6: ...VCR These sections are highlighted like this in the table of contents Information on the advanced features of your Hitachi VCR We hope you ll take time to learn about these functions since we ve designed them for you But you can use the VCR without reading these sections We want this manual to be a tool for you so we provide two ways to find the information you need A quick index to the basic func...

Page 7: ...ith all warnings on the video product and in the operating instructions 4 Polarized Plug This video product is equipped with a polarized alternating current line plug a plug having one blade wider than the other This plug will fit into the power outlet only one way This is a safety feature If you are unable to insert the plug fully into the outlet try reversing the plug If the plug should still fa...

Page 8: ...rug or other similar surface This video product should never be placed near or over a radiator or heat register This video product should not be placed in a built in installation such as a bookcase or rack unless proper ventilation is provided or the video product manufacturer s instructions have been followed 9 Attachments Do not use attachments unless recommended by the video product manufacture...

Page 9: ...OF ANTENNA GROUNDING 13 Power Lines An outside antenna system should not be located in the vicinity of overhead power lines or other electric light or power circuits or where it can fall into such power lines or circuits When installing an outside antenna system extreme care should be taken to keep from touching or approaching such power lines or circuits as contact with them might be fatal Instal...

Page 10: ...ly those controls that are covered by the operating instructions Improper adjustment of other controls may result in damage and will often require extensive work by a qualified technician to restore the video product to its normal operation e If the video product has been dropped or the cabinet has been damaged f When the video product exhibits a distinct change in performance this indicates a nee...

Page 11: ...IMPORTANT SAFEGUARDS 11 determine that the video product is in safe operating condition ...

Page 12: ...on place the VCR near the stereo receiver or have enough long audio cables to make the connections but keep in mind that the electronic signal weakens the further it has to travel 2 Decide Which Hookup Method to Use To make your VCR function you ll deal with two basic hookups 1 The audio and video signal If all you want to do is view a prerecorded videotape on the VCR this three line hookup is the...

Page 13: ...three line audio video cable with bell RCA connectors like this If you find a video jack and only one audio jack your TV is probably monaural You can purchase a two line audio video cable but the three line is handy in case you get a stereo TV later Connect the yellow VIDEO OUT jack on the VCR to the VIDEO IN jack on the TV This direct video input will give you the best picture It will also let yo...

Page 14: ...home before getting the VCR you will already have a round wire attached to your TV Otherwise look for a cable connection coming in through the wall from outside If you find this connection remember to call your local cable company to start the service 1 If still hooked up to your TV unscrew the round wire from the 75 ohm connector on your television Otherwise take the wire that comes in from the w...

Page 15: ...may have 300 ohm connectors like these In this case you will need special adapters to make the 75 ohm round wire connection shown below You may already have one on your TV 1 Remove the antenna line from the back of your TV if it is already connected there or take it from where it comes in on the wall 2 Considering the three pictures below determine which adapter you will need to hook it into your ...

Page 16: ...se the cable extension to go from the adapter to the VCR Use the supplied 75 ohm cable to connect the VCR to the TV Now continue with the hookup 1 Using whichever adapter you have fit your antenna with attach that connector to the IN FROM ANT jack on the back of the VCR 2 Using the 75 ohm cable supplied with your VCR connect either end to the OUT TO TV jack on the back of the VCR 3 Use a second ad...

Page 17: ...the plus end of each battery with the plus mark on the remote 7 Set the RF or Video Channel Switch When the VCR is on its video signal can come into your TV on either channel 3 or channel 4 You need to select the appropriate channel Turn the power on to both the TV and the VCR and look for a switch on the back of the VCR Set the switch to 3 or 4 whichever is not a commercial channel in your area Y...

Page 18: ...oo When you re familiar with these basic controls proceed to Initial Setup page 20 We ll show you how to program your local channels and set the clock to make your VCR fully functional How the Remote Control Works Pressing a button on the remote control transmits an invisible beam of light infrared to a receiver at the right front of the VCR When using the remote aim the front end toward the VCR a...

Page 19: ...ton switches to the next higher channel bottom button switches to the next lower channel For these to operate you must have preset your channels LAST CHANNEL Switches to the TV channel you watched previously during the current viewing session F FWD Fast forwards the videotape STOP Stops a videocassette from playing recording pausing rewinding or anything it is doing PAUSE Temporarily stops the cas...

Page 20: ...to switch back and forth between the TV channel and the recording channel VCR Controls POWER Turns VCR power on and off STOP EJECT Cancels any videotape action and when pressed a second time ejects tape PLAY Play the loaded videotape DISPLAY Shows time channel and status indicators CHANNEL Up and down arrows for selecting channels REC IRT To begin recording F FWD Fast forwards the videotape REW Re...

Page 21: ...r VCR it will be set to English Press number 6 or 7 for the other language options Now you will do most of your programming and setup by pressing numbers on the remote control which correspond to options presented in this and other on screen menus Instructions are easy to follow and blinking spaces on the screen will show you where your input is needed When you want to leave the Easy Guide System ...

Page 22: ...re than 1 hour for example during a storm or when you unplug the VCR Look at each item to see if it matches your own setup To change a setting press the button that has the same number as that item This will cycle you through several options When everything is set up as you want press GUIDE again to back out of the Easy Guide System You need to set items 1 and 7 the first time you set up your VCR ...

Page 23: ...er goes out more than 1 minute When you first plug in the VCR or after a power outage the clock display will read To set the clock press GUIDE then press 1 to bring up the Clock Set screen Press the number buttons on the remote control to set the current time two digits for the hour and two for the minutes Then press 1 or 2 for AM or PM respectively For example if it is now 2 15 PM press 0 2 1 and...

Page 24: ...ons to move quickly between channels that are far apart Removing Channels You may not want to keep all the stations the auto programmer selects since you may prefer to have only a few favorite channels in the tuner s memory Or you may want to delete from memory a weak or unused channel that the tuner picked up Erased channels cannot be selected by the up and down CHANNEL buttons but can still be s...

Page 25: ... recording a second audio program SAP When you select MONO sound is recorded as mono even when a channel broadcasts in stereo Use the MONO setting when the stereo signal is not strong enough for quality reception for example when there is signal drift or noise Hi Fi Sound Hi Fi sound is the same quality as that of a compact disc player Its dynamic range of over 90dB will record either stereo or mo...

Page 26: ...ape Capacities at Different Speeds TYPES RECORDING TIME SP EP T 120 120 min 360 min T 160 160 min 480 min You may have noticed that there is also an LP speed You Hitachi VCR does not record at this speed but it can play cassettes that were recorded in LP mode No special setting is required for playback Safety Tabs Prevent Erasure A safety tab is located on the front left edge of every videotape ne...

Page 27: ...een removed To remove the cassette simply press the STOP EJECT button on the VCR If the tape is playing press STOP EJECT once to stop the tape and a second time to eject it Now you can take the cassette out and put it away Tape Storage Store your videocassettes in their jackets and in an upright position like books in a bookshelf away from any magnetic sources Resist the temptation to leave them l...

Page 28: ...end play Direct Video Input to the TV Normally you would select channel 3 or 4 on the TV to receive a signal from the VCR You can get an even better picture if your TV has an auxiliary video input feature and if the TV and VCR have a direct video to video hookup If this is the case do not select channel 3 or 4 Instead Press the AUX or VIDEO button on the TV s remote control to select the proper in...

Page 29: ...Manual Rewind Press STOP and REW The VCR rewinds the tape all the way to the beginning then stops Press STOP EJECT on the VCR to release the tape Movie Return If your videocassette has the safety tab removed and you set the MOVIE function to ON during initial setup the VCR will stop and automatically rewind the videocassette eject it and turn off the power when it reaches the end of the tape or a ...

Page 30: ...search backward and forward through the videotape while viewing it Using the buttons on the VCR Press PLAY and then REW to search in reverse Press PLAY and then F FWD to search ahead Press PLAY again to return to to normal playback Searching with the Time Counter During playback and recording a counter keeps track of how many hours minutes and seconds the tape has run When you first start playback...

Page 31: ... for a spot a certain number of minutes before or after your current position on the tape Press STOP if tape is playing and press DISPLAY then press 8 button to bring up the Set Go To Time screen Select minutes by pressing buttons 0 to 9 one digit for hours then two digits for minutes If you enter a wrong digit press CLEAR and enter the correct one Then press F FWD if you want to move that many mi...

Page 32: ...ex mark it plays 15 seconds of the program that begins at that spot If this is the program you were looking for press PLAY to resume normal playback If this is not the program you want don t press anything After 15 seconds the VCR will move to the next mark and play a part of that program The VCR will continue searching until you press STOP or reach the end of the tape When you find the program yo...

Page 33: ... 3 or 4 Or if you are hooked up with a direct audio video cable set the TV to AUX or VIDEO 3 Press DISPLAY then press 5 when the SP EP message appears on the TV screen to select SP standard play for the best picture quality or EP extended play for longest recording time on a single tape An indicator on the VCR s display shows which speed is active 4 Set the VCR to the channel you want to record fr...

Page 34: ...se is on that you would rather record You can change the channel while in the recording mode Press PAUSE to stop the recording temporarily This is necessary because the CHANNEL buttons won t work while you are in recording mode to keep you from accidentally switching the station while recording Change the channel to the one you prefer Press PAUSE to continue recording To Leave Index Marks on the T...

Page 35: ...he STOP button this can be done either on the VCR or with the remote control within 10 seconds Setting the VCR to Record Later With the delayed recording feature you can set this VCR so that it automatically comes on and records programs whenever you like without your being around You can record a program one time only or you can automatically record a show every weekday or every week at the same ...

Page 36: ...om external equipment press AVX button to select LINE1 or LINE2 instead of the channel number When everything is set as you want even though some items may still be flashing press GUIDE to program your settings into memory To preset additional recordings repeat these steps Otherwise press GUIDE to return to the regular TV screen Don t forget to load a videocassette to record on Your delayed record...

Page 37: ... screen settings for the first program Keep pressing 3 to cycle through all the programs you have preset To remove a program press CLEAR The screen will display the next program if there are more or it will switch back to the main menu Programming Priorities When you have set up several timed recordings it may occur that some of their times overlap For example this can happen if you are set up to ...

Page 38: ...e to juggle two remotes The remote control is compatible with the fifteen makers of TV s listed below but don t be alarmed if yours is not on our list You may still be able to program the remote for your TV Every TV that comes with a remote control is set up to detect certain infrared signals You need to program the VCR s remote control to send signals that your TV will recognize and respond to He...

Page 39: ...5 Gold Star 1 6 Toshiba 7 Gold Star 2 8 NEC 9 RCA 0 Panasonic CHANNEL up arrow Mitsubishi CHANNEL down arrow JVC 100 ENT Sharp 1 LAST CH Sharp 2 DISPLAY Controlling the TV Once programmed the VCR s remote control is ready to control the TV First press TV to change to the TV function mode then press the button of the TV function that you want For example press TV and the CHANNEL up arrow and the TV...

Page 40: ...tial Setup screen page 20 to select option CATV1 or CATV2 Then check out the system using these questions as a guide Does the TV receive the same number of channels as before the installation Does the VCR record all channels Do the VCR and TV remote control functions work Can I record on one channel while watching another Do I receive my pay channels and do all special cable features work If any f...

Page 41: ... of the cable box that goes to your TV Connect it to the IN FROM ANT lower jack on the back of the VCR 2 Using the 75 ohm coaxial cable supplied with the VCR connect either end to the VCR s OUT TO TV upper jack 3 Connect the other end of the 75 ohm cable to the TV in the same place where you removed the cable line Note You will end up with an extra cable that originally went from the cable box to ...

Page 42: ... all the TV and VCR functions If you still don t get the functions you want proceed with Option 4 Option 4 If none of the preceding hookups work check with your cable company You may need to purchase a video switching system from your local electronics or video retailer This will easily handle most hookup problems Remote Control of the Cable Converter If you have a cable converter you will probabl...

Page 43: ...Operations Cable Box Hookups 43 Philips 8 To operate the cable box once the remote is programmed for it Press CATV and then the button of the function you want Press VCR to operate your VCR with the remote again ...

Page 44: ...ind with two color coded plugs on each end for left and right audio channels With the power off Connect the right red and left white AUDIO OUT on the VCR to the right and left AUDIO IN on the stereo system Connect the left and right AUDIO OUT on the stereo to the right and left AUDIO IN on the VCR The AUDIO IN left on the front of the VCR handles the left channel or monaural sound If you connect a...

Page 45: ...ou reasonable quality and a longer tape program Press AVX on the remote control to turn the LINE L1 indicator on Press REC IRT on the VCR and start the stereo playing To stop recording press STOP To play back the recording rewind the tape and press PLAY ...

Page 46: ...s left and right on VCR1 Be sure to match left to left white and right to right red Second VCR Hookup Illustration Copying from One VCR to Another Dubbing Consider VCR1 the recording VCR and VCR2 VT F380A the playback VCR You will play a tape on VCR2 and record it on VCR1 To begin copying Insert the videotape you wish to record in VCR2 Insert a blank or erasable tape with the safety tab intact int...

Page 47: ...ur VCR see diagram below Camcorder Hookup Illustration Press the AVX button on the VCRs remote control so that the L2 Line indicator appears in the VCR display Press REC IRT on the VCR to start recording Press PLAY on your camcorder to start copying your tape Information on Audio Hookup If your camcorder is only capable of monaural output one audio jack connect it to the AUDIO IN L input on the fr...

Page 48: ...uto head cleaning system dirt can build up on the heads If the picture is blurry during playback or is occasionally interrupted or blanks out try playing different cassettes to see whether you get the same picture problems If the picture problems persist the heads may need to be cleaned professionally Consult your VCR dealer for the name of trained service technician near you Periodic Maintenance ...

Page 49: ...25 cable channels Canada 178 channel tuning ability 122 cable channels Type Auto programming frequency synthesis Power Input AC120V 60Hz Power Consumption 22W nominal Cabinet Size 14 15 16 W x 3 11 16 H x 12 5 8 D 38 0cm W x 9 3cm H x 32 0cm D Weight 9 9 lbs 4 5kg Storage Temperature 4º F to 131º F Operating Temperature 41º F to 104º F Accessories 1 coaxial cable Part No 5857952 1 remote control u...

Page 50: ...he continental U S A DIAL TOLL FREE 7 days a week 24 hours a day 1 800 HITACHI 1 800 448 2244 You must state your zip code when calling In Canada QUEBEC 418 681 7719 MONTREAL 514 697 9150 TORONTO 416 821 4545 VANCOUVER 604 526 7881 ...

Reviews: