background image

4

heavily, its revolving speed drops, creating an
unevenly finished surface and causing motor seizure
from overload.

2.

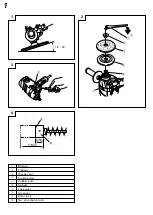
Rather than applying the entire disc surface to the
metal surface to be gorund, use the sander by inclining
it approximately 15° – 30° to grind with the disc
peripheral portion. (

Fig. 1

)

3. Switching on the sander

The switch is of the quick-break trigger system. When
the trigger is pulled, the switch turns on; and when it
is released, the switch turns off.
When it is desired to keep the power on for a
prolonged period in continuous use, the stopper can
be used to keep the switch on even after the trigger
has been released. (First pull the trigger, and then
press the stopper.) To turn the switch off, first pull
the trigger again to disengage the stopper.

4. Precaution after use

Do not lay the sander down immediately after using
on a place where there are many shavings, much dirt
and dust until it has completely stopped revolving.

CAUTION

When the disc sander is not in use, the pwer source
should be disconnected.

ATTACHMENT/REMOVAL OF SANDING DISC (Fig. 2)

CAUTION:

Be sure to switch power OFF and disconnect
the attachment plug from the receptacle to
avoid serious trouble.

(1) Attach wahser, rubber pad and sanding disc on the

spindle, in that order.

(2) While pushing the lock lever with one hand, lock the

spindle by turning the rubber pad slowly with the
other hand.
Tighten the wheel  washer by using the supplied
wrench.

Remove the sanding disc in the reverse order to
attachment.

CAUTION:

Confirm that the lock lever is disengaged by
pushing lock lever two or three times before
switching the disc sander on.

MAINTENANCE AND INSPECTION

1. Inspecting the mounting screws

Regularly inspect all mounting screws and ensure
that they are properly tightened. Should any of the
screws be loose, retighten them immediately. Failure
to do so could result in serious hazard.

2. Maintenance of the motor

The motor unit winding is the very “heart” of the
power tool. Exercise due care to ensure the winding
does not become damaged and/or wet with oil or
water.

3. Inspecting the carbon brushes (Fig. 4)

The motor employs carbon brushes which are
consumable parts. Since an excessively worn carbon
brush could result in motor trouble, replace the carbon
brushes with new ones which have the same carbon
brush No. shown in the figure when they become
worn to or near the “wear limit”. In addition, always
keep carbon brushes clean and ensure that they slide
freely within the brush holders.

4. Replacing carbon brushes

Disassemble the brush caps with a slotted-head
screwdriver. The carbon brushes can then be easily
removed.

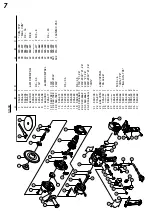
5. Service parts list

A: Item No.
B: Code No.
C: No. Used
D: Remarks

CAUTION

Repair, modification and inspection of Hitachi Power
Tools must be carried out by a Hitachi Authorized
Service Center.
This Parts List will be helpful if presented with the
tool to the Hitachi Authorized Service Center when
requesting repair or other maintenance.
In the operation and maintenance of power tools, the
safety regulations and standards prescribed in each
country must be observed.

MODIFICATION

Hitachi Power Tools are constantly being improved
and modified to incorporate the latest technological
advancements.
Accordingly, some parts (i.e. code numbers and/or
design) may be changed without prior notice.

NOTE

Due to HITACHI’s continuing program of research
and development, the specifications herein are subject
to change without prior notice.

Summary of Contents for S 15SB

Page 1: ...Disc Sander 日立牌圓形砂紙磨光機 S 18SB S 15SB HANDLING INSTRUCTIONS 使用說明書 Read through carefully and understand these instructions before use 使用前務請詳加閱讀 S18SB ...

Page 2: ...1 1 2 3 4 5 6 7 8 9 0 Wrench Tighten Washer nut Sanding disc Rubber pad Spindle Lock lever Air cover Wear limit No of carbon brush 1 2 3 4 17mm 6mm 43 5 8 9 0 7 6 4 3 1 2 15 30 ...

Page 3: ...dents d Remove any adjusting key or wrench before turning the power tool on A wrench or a key left attached to a rotating part of the power tool may result in personal injury e Do not overreach Keep proper footing and balance at all times This enables better control of the power tool in unexpected situations f Dress properly Do not wear loose clothing or jewellery Keep your hair clothing and glove...

Page 4: ... housing 6 Confirm the lock lever Confirm that the lock lever is disengaged by pushing lock lever two or three times before switching the power tool on See Fig 2 7 Install the air cover on the air vent on the side where the side handle is attached to divert the cooling air flow of the motor during operation as much as possible Hook tab of the air cover to the air vent and push in the tab when inst...

Page 5: ... on MAINTENANCE AND INSPECTION 1 Inspecting the mounting screws Regularly inspect all mounting screws and ensure that they are properly tightened Should any of the screws be loose retighten them immediately Failure to do so could result in serious hazard 2 Maintenance of the motor The motor unit winding is the very heart of the power tool Exercise due care to ensure the winding does not become dam...

Page 6: ...5 ...

Page 7: ...6 ...

Page 8: ...1 1 2 3 4 5 6 7 8 9 0 扳手 緊 墊片螺帽 砂盤 椽膠墊圈 主軸 鎖定桿 空氣保護罩 磨損極限 碳刷號 1 2 3 4 17mm 6mm 43 5 8 9 0 7 6 4 3 1 2 15 30 ...

Page 9: ...身傷害 b 使用安全設備 始終配戴安全眼鏡 在適用條件下 使用防塵面罩 防滑膠鞋 安 全帽或聽覺保護裝置等安全設備 都會減少人 身傷害 c 謹防誤開動 插接電源前 請先確認開關是否 已切斷 搬移電動工具時指頭接觸開關 或接通開關狀 態下插上電源插座 都容易導致事故 d 開動前務必把調整用鍵和扳手類拆除下來 扳手或鍵留在轉動部分上 可能會造成人身傷 害 e 要在力所能及的範圍內進行作業 作業時腳步 要站穩 身體姿勢要保持平衡 這樣在意外情況下可以更好地控制工具 f 工作時衣服穿戴要合適 不要穿著過於寬鬆的 衣服或佩帶首飾 頭髮 衣角和手套等應遠離 轉動部分 鬆散的衣角 首飾或長髮都可能會捲入轉動部 分 g 如果提供連接除塵和集塵的設備 請確認是否 已經連接好並且使用正常 使用這些設備可降低粉塵引起的危險 4 電動工具的使用和維護 a 不要使勁用力推壓 應正確使用電動工具 正確使用才能讓工具按...

Page 10: ...g 當須改變地區時應檢查產品上的銘牌 標 準 附 件 型式 S18SB S15SB 180 mm 砂盤 1 1 150 mm 砂盤 1 1 橡膠墊圈 1 扳手 1 側柄 1 1 粒度大小 P50 標準附件可能不預先通告而徑予更改 選購附件 分開銷售 用於 S18SB 機型 䡬 180 mm 砂盤 砂盤共有11種 粒度分別為P16 P20 P24 P30 P36 P40 P50 P60 P80 P100和 P120 定購時 請指明所需砂盤的粒度 用於 S15SB 機型 䡬 150 mm 砂盤 有十一種砂盤可供選購 其粒度大小分別為 P16 P20 P24 P30 P36 P40 P50 P60 P80 P100 及 P120 訂購砂盤時 請指定您所需要的 粒度大小 選購附件可能不預先通告而徑予更改 用 途 䡬 固定金屬表面 䡬 涂漆 除鏽前先固定金屬表面 除去舊漆後再重新 涂漆 䡬 完成木工...

Page 11: ...採用子快斷式扳機來開關圓形砂紙磨光 機 拉起扳機時 開關便被打開 而松開扳機時 開關便被關上 若想使開關長時間開著以便於連續 操作 可使用停止銷 使用停止銷的話 即使松開 扳機 開關也不會被關掉 先拉起扳機開關 然後按下停止銷 若想關掉 開關 請再一次拉起扳機 這樣停止銷便會被松 開 4 使用須知 使用本工具之後 在砂盤沒有完全停止之前 請勿 將其立即放在有許多細層 髒物和灰塵的地方 注意 圓形砂紙磨光機不用時 應將電源關掉 砂盤的安裝 拆卸 圖 2 注意 確認開關已斷開並且從電源插座中拔去附件 的電源插頭以避免嚴重事故 1 將墊片 橡膠墊圈及砂盤依次裝在主軸上 2 用一只手按鎖定桿 同時用另一只手慢慢轉動橡膠 墊圈鎖住主軸 用附帶的扳手旋緊輪狀墊片 䡬 請按與上述相反的順序來拆卸砂盤 注意 確認鎖定桿被解除鎖定 可在打開圓形砂 紙磨光機之前通過撳兩三下鎖定桿進行 檢查 維 護 和 檢 查...

Page 12: ...5 注意 日立電動工具的修理 維護和檢查必須由日立所認 可的維修中心進行 當尋求修理或其他維護時 將本部件目錄與工具一 起提交給日立所認可的維修中心會對您有所幫助 在操作和維護電動工具中 必須遵守各國的安全規 則和標准規定 改進 日立電動工具隨時都在進行改進以適應最新的技術 進步 因此 有些部件 如 代碼號碼和 或設計 可能 未預先通知而進行改進 注 為求改進 本手冊所載規格可能不預先通告而 徑予更改 ...

Page 13: ...20 1 340 656E 1 220V 230V 21 26 20 2 340 656F 1 240V 21 26 20 3 340 656G 1 220V 230V 21 26 EUROPE CHN 21 930 703 2 22 315 877 1 23 608 VVM 1 608VVC2PS2L 24 325 492 1 35 44 46 25 1 26 980 063 1 27 1 28 325 481 1 29 305 499 2 M3 5 6 30 980 063 1 EUROPE CHN 31 959 140 1 INA SIN 32 305 409 1 33 945 161 2 34 999 043 2 A B C D 35 958 900 2 37 980 063 1 38 930 039 1 EUROPE CHN 39 938 307 1 EUROPE MAL CHN...

Page 14: ...6 20 2 340 656E 1 220V 230V 21 26 20 3 340 656F 1 240V 21 26 20 4 340 656G 1 220V 230V 21 26 CHN 21 930 703 2 22 315 877 1 23 608 VVM 1 608VVC2PS2L 24 325 492 1 35 44 46 25 1 26 980 063 1 27 1 28 325 481 1 29 305 499 2 M3 5 6 30 980 063 1 CHN TPE 31 959 140 1 INA SIN TPE 32 305 409 1 33 945 161 2 34 999 043 2 35 958 900 2 37 980 063 1 S15SB A B C D 38 930 039 1 CHN TPE 39 938 307 1 MAL CHN 40 984 ...

Page 15: ...8 ...

Page 16: ...601 Code No C99143931 Printed in Malaysia Hitachi Koki Co Ltd ...

Reviews: