


--- 13 ---
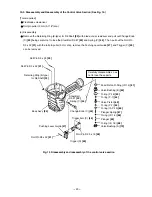
(4) Single actuation mechanism/contact actuation mechanism: (Fig. 8 and Fig. 9)
Single/contact actuation mechanism changeover is accomplished by turning the switching device
(Change Knob (C)
[45]
).
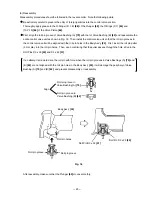
Single actuation mechanism (Switching device:
upward position):
1) Immediately after driving the first nail, the
control valve should be as shown in Fig. 7.
2) When only Pushing Lever (C)
[52]
is released
and Trigger (C)
[49]
is held as shown in Fig. 8,
the plate of Trigger (C)
[49]
contacts Change
Knob (C)
[45]
and the Plunger
[69]
returns
(lowers) only halfway.
Because of this, compressed air does not flow
into the valve piston lower chamber, and Valve
Piston
[65]
remains in the lowered position.
Accordingly, the Piston
[13]
remains in the
lowered position as shown in Fig. 6.
3) When Trigger (C)
[49]
is released, the Plunger
[69]
returns (lowers) completely as shown in
Fig. 5. Compressed air then flows into the valve
piston lower chamber, and the Valve Piston
[65]
is forced upward. The Piston
[13]
then returns
fully upward. Therefore, unless Trigger (C)
[49]
is released after each nailing operation, the
structural mechanism prevents the next nailing
operation.
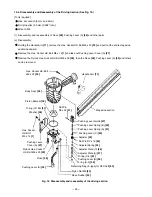
Contact actuation mechanism (Switching device:
downward position):
1) Immediately after the first nail is driven, the
control valve should be as shown in Fig. 7.
2) Even when only Pushing Lever (C)
[52]
is
released and Trigger (C)
[49]
is held, the
Plunger
[69]
returns (lowers) completely as
shown in Fig. 9. Thus the Piston
[13]
returns
(raises) fully. Accordingly, continuous nailing
can be accomplished by pushing only Pushing
Lever (C)
[52]
up and down while holding
Trigger (C)
[49]
depressed.
Plunger
[69]
Pushing Lever (C)
[52]
Valve piston
lower chamber
Trigger (C)
[49]
Valve Piston
[65]
Accumulator
Switching device (Change Knob (C)
[45]
)
(Upward position)
Fig. 8 Single actuation mechanism
Plunger
[69]
Pushing Lever (C)
[52]
Valve piston
lower chamber
Trigger (C)
[49]
Valve Piston
[65]
Accumulator
Switching device (Change Knob (C)
[45]
)
(Downward position)
Fig. 9 Contact actuation mechanism