background image

13

ENGLISH

WARNING


Ź,I\RXZLVKWRKDYHDEODQNVFUHHQZKLOHWKHOLJKWVRXUFHLVRQ

XVHWKH%/$1.IXQFWLRQ

(see the Operating Guide (


1

)).

Any other method of blocking the projection light, such as attaching something 
to the projection window or placing something in front of the projection window, 
may cause the damage to the projector.

%ORFNLQJWKHEHDPE\VRPHWKLQJFDXVHVKLJKWHPSHUDWXUHDQGFRXOGUHVXOWLQ
¿UHRUVPRNH

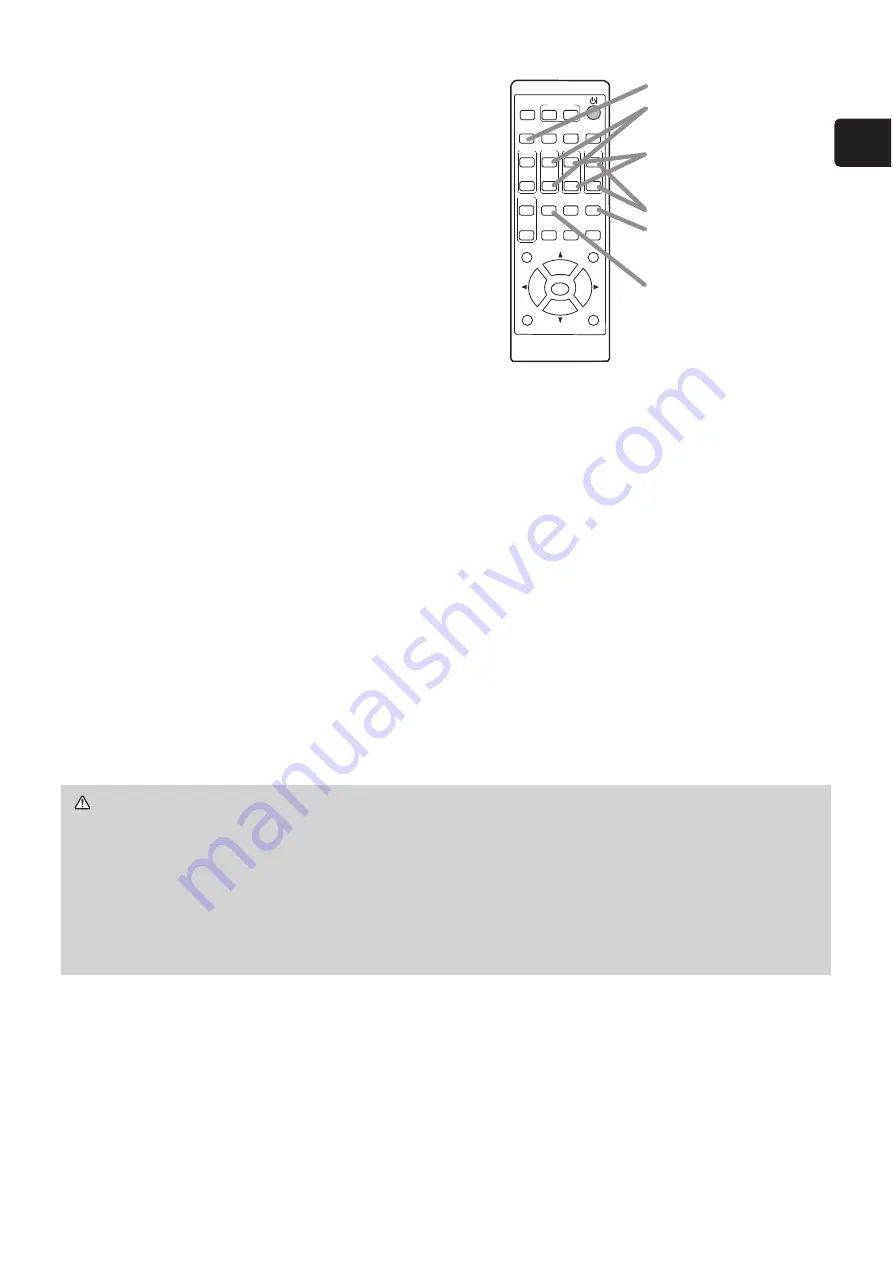
Focusing

Use the 

FOCUS +

 and 

FOCUS -

 buttons on  

the projector or remote control to adjust the  
screen focus. 

Selecting an aspect ratio

Each time you press the 

ASPECT

 button on  

the remote control, it switches the aspect  
ratio of the image in turn.

Zooming

Use the

 ZOOM +

 and 

ZOOM -

 buttons  

on the remote control to adjust the screen size.

Correcting distortion

Press the 

GEOMETRY

 button on the remote control. A dialog will appear on the 

screen to aid you in correcting the distortion. 

8VHWKHŸźFXUVRUEXWWRQVWRVHOHFW

 KEYSTONE or PE

5)(&7),7

 operation, 

DQGSUHVVWKHŹEXWWRQWRSHUIRUPWKHIROORZLQJ

KEYSTONE displays a dialog for keystone correction. 

3(5)(&7),7

 displays a dialog for adjusting the shape of the projected image in 

each of the corners and sides.

Use the cursor buttons according to the dialog, checking the image.  
Press the 

GEOMETRY

 button again to finish this operation.

Adjusting the volume

Use the 

-

 buttons to adjust the volume. To turn off the sound, press 

the 

MUTE

 button on the remote control.

ASPECT

BLANK

ESC

MENU

RESET

AUTO

PAGE

DOWN

ON

OFF

FREEZE

UP

ENTER

FOCUS

ZOOM

INPUT

INTERACTIVE

MYBUTTON

PbyP

MAGNIFY

VOLUME

GEOMETRY

PICTURE

MUTE

NETWORK

OSD MSG

ASPECT

 button

FOCUS +/-

 button

ZOOM +/-

 button

/-

 button

MUTE

 button

GEOMETRY 

button

(continued on next page)

Summary of Contents for MP-AW3001

Page 1: ...d graphical symbols explanation 2 Important safety instruction 2 Regulatory notices 3 About Electro Magnetic Interference 3 LVSRVDO RI 2OG TXLSPHQW DQG DWWHULHV Only for European Union and countries with recycling systems 5 Contents of package 5 Arrangement 6 Connecting with your devices 7 Connecting to a power supply 9 Preparing for the remote control 10 Turning on the power 11 Adjusting the proj...

Page 2: ... is not used for the time being ŹDo not open or remove any portion of the product unless the manuals direct LW RU LQWHUQDO PDLQWHQDQFH OHDYH LW WR RXU GHDOHU RU WKHLU VHUYLFH SHUVRQQHO Ź8VH RQO WKH DFFHVVRULHV VSHFL HG RU UHFRPPHQGHG E WKH PDQXIDFWXUHU ŹDo not modify the projector or accessories ŹDo not let any things or any liquids enter to the inside of the product ŹDo not wet the product ŹDo no...

Page 3: ... there is no guarantee that interference will not occur in a particular installation If this equipment does cause harmful interference to radio or television reception which can be determined by turning the equipment off and on the user is encouraged to try to correct the interference by one or more of the following measures Reorient or relocate the receiving antenna Increase the separation betwee...

Page 4: ...has a high power laser device inside It may cause serious injury Do not look into the beam while projecting an image Do not look into the lens WKURXJK RSWLFDO GHYLFHV VXFK DV PDJQL HUV RU WHOHVFRSHV W PD FDXVH YLVLRQ disorder Make sure that nobody is looking into the lens when you turn on the projector by remote control away from the projector Do not let children operate the projector If children ...

Page 5: ...ead the detailed manuals Operating Guide etc from our website 1 Disposal of Old Equipment and Batteries Only for European Union and countries with recycling systems The above mark is in compliance with the Waste Electrical and Electronic TXLSPHQW LUHFWLYH 8 7KH PDUN LQGLFDWHV WKH requirement NOT to dispose the equipment including any spent or discarded batteries as unsorted municipal waste but use...

Page 6: ... FHLOLQJ WKH VSHFL HG PRXQWLQJ DFFHVVRULHV 18 DQG VHUYLFH PD EH UHTXLUHG HIRUH LQVWDOOLQJ WKH projector consult your dealer about your installation The screen position may shift after installation if the projector is mounted on locations VXFK DV WKH ZDOO RU FHLOLQJ GXH WR WKH ÀH LELOLW RI WKH SODVWLF SURMHFWRU ERG I UHDGMXVWPHQW is necessary consult with your dealer or service personnel 7KH SURMHF...

Page 7: ...essory did not come with the product or the accessory is damaged It may be regulated under some standard RU D FDEOH ZLWK D FRUH DW RQO RQH HQG FRQQHFW WKH HQG ZLWK WKH FRUH WR WKH projector That may be required by EMI regulations Neither disassemble nor modify the projector and the accessories R QRW XVH WKH GDPDJHG DFFHVVRU H FDUHIXO QRW WR GDPDJH WKH accessories Route a cable so that it is neithe...

Page 8: ...ojector and the cover Then insert the screw removed from the projector into the hole and tighten the screw WARNING ŹKeep small parts away from children and pets Take care not to SXW LQ WKH PRXWK HDW PD EXLOG XS LQ WKH 86 ZLUHOHVV DGDSWHU VR GLVFRQQHFW the projector power cord for more than 10 minutes before touching it to avoid possible burns Tab 2 1 3 Ferrite core for MHL cable KHQ FRQQHFWLQJ D 0...

Page 9: ...th a wet hand Only use the power cord that came with the projector If it is damaged consult your dealer to get a new one Never modify the power cord Only plug the power cord into an outlet whose voltage is matched to the power cord The power outlet should be close to the projector and easily accessible Unplug the power cord for complete disconnection Do not distribute the power supply to multiple ...

Page 10: ...H EDWWHULHV VSHFL HG R QRW XVH EDWWHULHV RI GLIIHUHQW types at the same time Do not mix a new battery with used one Make sure the plus and minus terminals are correctly aligned when loading a battery Keep a battery away from children and pets Do not recharge short circuit solder or disassemble a battery R QRW SODFH D EDWWHU LQ D UH RU ZDWHU HHS EDWWHULHV LQ D GDUN FRRO DQG GU SODFH If you observe ...

Page 11: ...ertically on a table or desk be sure to use the designated optional accessories Ź7KH SURMHFWLRQ ZLQGRZ RI WKLV PDFKLQH LV PDGH RI JODVV W FDQ be damaged by excessive force or an impact Read the following important warnings carefully and follow them for your own safety Do not apply excessive force on or allow impact to the projection window Keep the projector out of the reach of children If the pro...

Page 12: ...o plus or minus 1 each of foot You can attach the spacers to set the projector back to the factory default after adjusting the foot If you install the projector in a different place in the future it is recommended to keep the spacers and reuse them WARNING Ź HHS WKH VSDFHUV DZD IURP FKLOGUHQ DQG SHWV H FDUHIXO QRW to let them swallow the spacers If swallowed consult a physician immediately for eme...

Page 13: ...Correcting distortion Press the GEOMETRY button on the remote control A dialog will appear on the screen to aid you in correcting the distortion 8VH WKH Ÿ ź FXUVRU EXWWRQV WR VHOHFW KEYSTONE or PE5 7 7 operation DQG SUHVV WKH Ź EXWWRQ WR SHUIRUP WKH IROORZLQJ KEYSTONE displays a dialog for keystone correction 3 5 7 7 displays a dialog for adjusting the shape of the projected image in each of the c...

Page 14: ...ZHU FRUG IRU FRPSOHWH GLVFRQQHFWLRQ 7KH SRZHU RXWOHW VKRXOG be close to the projector and easily accessible NOTE Please power off the projector after any connected devices are powered off 7KLV SURMHFWRU KDV WKH 872 32 5 2 IXQFWLRQ WKDW FDQ PDNH WKH SURMHFWRU WXUQ RII DXWRPDWLFDOO RU PRUH LQIRUPDWLRQ VHH WKH 2SHUDWLQJ XLGH 1 NOTE The ASPECT button does not work when no proper signal is input RU GHW...

Page 15: ...7 3XW WKH OWHU XQLW EDFN LQ DQ XSULJKW VWDWH LQWR WKH projector 8 3XW WKH OWHU FRYHU EDFN LQWR WKH SODFH 9 7XUQ WKH SURMHFWRU RQ DQG UHVHW WKH OWHU WLPH XVLQJ WKH 7 5 7 0 LWHP LQ WKH 6 0 18 1 Press the MENU button to display a menu 2 3RLQW DW WKH 7 5 7 0 XVLQJ WKH ź Ÿ EXWWRQ WKHQ SUHVV WKH Ź EXWWRQ GLDORJ ZLOO DSSHDU 3 3UHVV WKH Ź EXWWRQ WR VHOHFW 2 RQ WKH GLDORJ W SHUIRUPV UHVHWWLQJ WKH OWHU WLPH...

Page 16: ...I WKH VXUURXQGLQJ HQYLURQPHQW H VXUH WR XVH RQO WKH VSHFL HG EDWWHULHV Make sure the plus and minus terminals are correctly aligned when loading a battery Keep a battery away from children and pets If swallowed consult a physician immediately for emergency treatment Do not short circuit or solder a battery R QRW DOORZ D EDWWHU LQ D UH RU ZDWHU HHS EDWWHULHV LQ D GDUN FRRO DQG GU place If you obser...

Page 17: ...window before wiping Wipe softly the projection window with a commercially available damped soft cleaning cloth for lens being careful not to give any damage on the projection window Ź HIRUH FDULQJ IRU WKH projection window turn the projector off DQG XQSOXJ WKH SRZHU FRUG WKHQ FRRO WKH SURMHFWRU VXI FLHQWO Ź R QRW XVH D YDFXXP FOHDQHU WR FOHDQ WKH projection window since it might give some damage ...

Page 18: ...J SDUWV 5HIHU WR JXUH F 6 at the back of this manual Weight mass 03 03 approx 7 4 kg MP AW4001 approx 7 6 kg Ports Computer input port COMPUTER IN1 D sub 15 pin mini x1 Computer input output port 20387 5 1 021 725 287 D sub 15 pin mini x1 Video input port VIDEO RCA x1 HDMI input port 0 0 FRQQHFWRU î 0 0 0 0 FRQQHFWRU î Audio input output port AUDIO IN1 Stereo mini x1 AUDIO IN2 Stereo mini x1 AUDIO...

Page 19: ... WKH ODWHVW LQIRUPDWLRQ IRU WKLV SURGXFW NOTE The information in this manual is subject to change without notice The illustrations in this manual are for illustrative purposes They may differ slightly from your projector The manufacturer assumes no responsibility for any errors that may appear in this manual The reproduction transfer or copy of all or any part of this document is not permitted wit...

Page 20: ...agreements of each software on the web page for detail of the license conditions and so on The original in English is carried since the license agreement is established by third party other than us HFDXVH WKH SURJUDP WKH VRIWZDUH PRGXOH LV OLFHQVHG IUHH RI FKDUJH WKH program is provided as is without warranty of any kind either expressed or implied to the extent permitted by applicable law And we ...

Reviews: