background image

     6

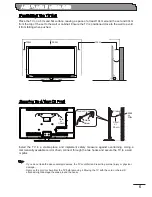
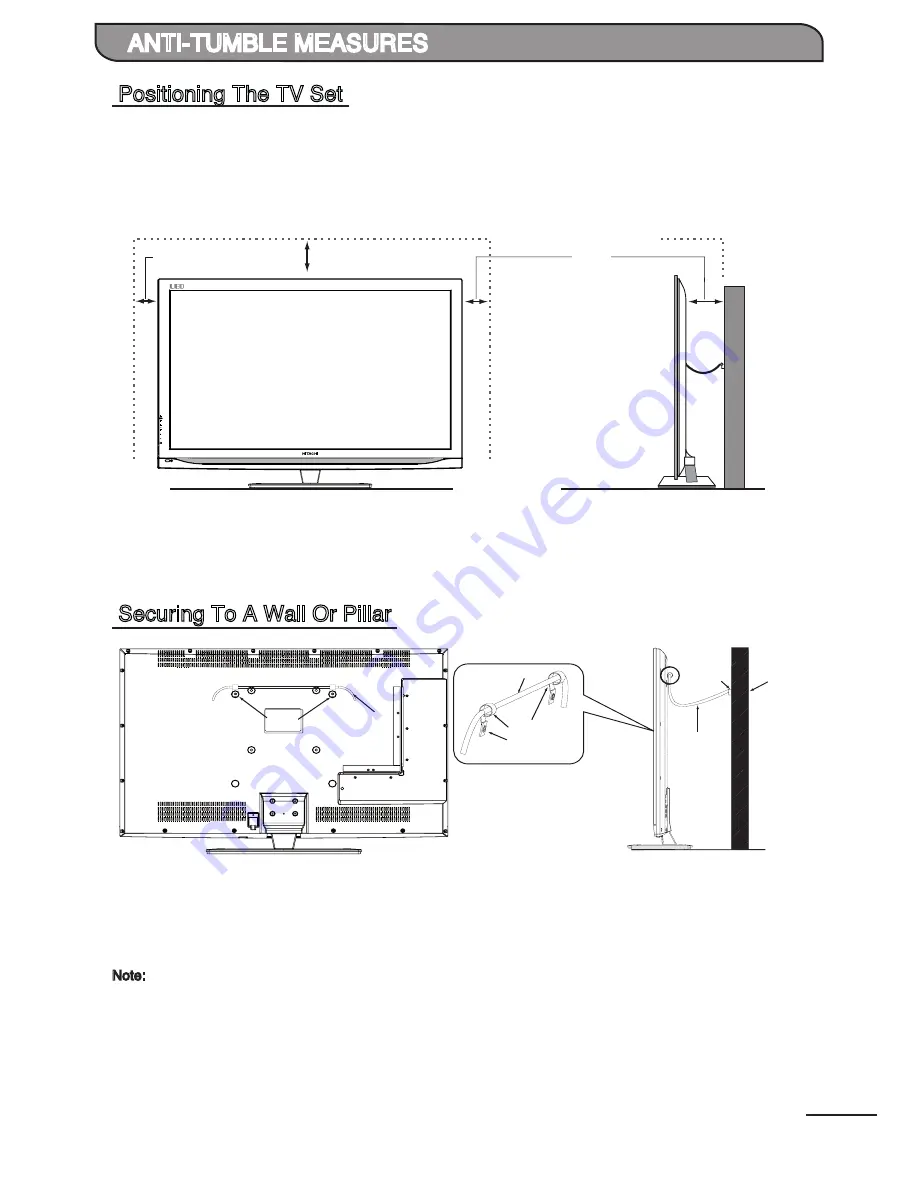
Install  the  TV  in  a  stable  place  and  implement  safety  measure  against  overturning.  Using  a 

commercially available cord or chain, connect through the two hooks and secure the TV to a wall 

or pillar. 

Place the TV on a firm and flat surface, leaving a space of at least 10cm around the set and 30cm 

from the top of the set to the wall or cabinet. Ensure the TV is positioned close to the wall to avoid 

it from falling when pushed.

30cm

10cm

10cm

 Securing To A Wall Or Pillar

Cord or Chain

Hook

Screw

Wall

or

Pillar

Clamp

Cord 

or 

Chain

Cord

or

Chain

Hook

Note:

          - If you do not take the above safety measures, the TV could fall and result in personal injury or physical   

            damage.

          - Remove the cord or chain from the TV before moving it. Moving the TV with the cord or chain still 

            attached might damage the area around the hooks.

 Positioning The TV Set

     ANTI-TUMBLE MEASURES

Summary of Contents for LE42EC04A

Page 1: ...purchasing this Hitachi product To obtain the best performance and safety please read this user manual carefully Please keep this manual for future reference SERIES LE42EC04A LE46EC04A Pictures for illustration purposes only Actual product may vary ...

Page 2: ... and 46 models only 10 Basic Operations Remote Control Keys For The TV Menu 11 Picture Size 12 Stereo Bilingual Sound Selection 13 Input Source Selection 13 Teletext Operations 14 Menu Operations Picture 15 Audio 15 Setup 16 Function 16 Lock 17 RGB Mode Setup 18 TV Screen Components 18 Media Player Main Menu Media Player Main Menu 19 Media File Playback Support 19 Gentle Reminder When Using The Me...

Page 3: ...nts 24 Text Control Bar 24 Listening To Music While Reading Text Documents 24 Recommended Signal List RGB Input Signal List 25 HDMI Input Signal List 25 Specifications Product Specification 26 Troubleshooting 27 28 Notes 29 30 CONTENTS HDMI the HDMI logo and High Definition Multimedia Interface are trademarks or registrated trademarks of HDMI Licensing LLC ...

Page 4: ...uilt in installation such as a bookcase or rack unless proper ventilation is provided or the manufacturer s instructions have been adhered to 9 Power Sources The product should be operated only from the type of power source indicated on the marking label If you are not sure of the type of power supply to your home consult your appliance dealer or local power company 10 Power Cord Protection Power ...

Page 5: ... the service technician to perform safety checks to determine that the product is in proper operating condition 20 Heat Do not install the product near any heat sources such as radiators heat registers stoves or other products including amplifiers that produce heat 21 Installation Location Place the product on a firm and flat surface Avoid placing the product in areas of direct sunlight heating ra...

Page 6: ...age will disappear on its own The Usage under Low Temperature Environment Due to the structural characteristics of the LCD panel the response speed of the the LCD panel becomes slower when the ambient temperature around the panel becomes too low In some cases it may cause the residual image The residual image will disappear on its own as the temperature goes up and back to normal The following are...

Page 7: ...wall or cabinet Ensure the TV is positioned close to the wall to avoid it from falling when pushed 30cm 10cm 10cm Securing To A Wall Or Pillar Cord or Chain Hook Screw Wall or Pillar Clamp Cord or Chain Cord or Chain Hook Note If you do not take the above safety measures the TV could fall and result in personal injury or physical damage Remove the cord or chain from the TV before moving it Moving ...

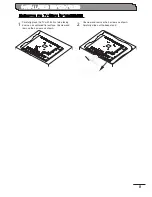
Page 8: ...secure with 4 screws as shown 2 INSTALLATION INSTRUCTIONS TV Stand Installation for 46 model 1 Carefully place the TV with its front side facing down on a cushioned flat surface Carefully insert the base stand to the TV Be careful of your fingers while sliding the base stand into the slot 2 3 Secure the base stand to the TV and secure with 4 screws as shown ...

Page 9: ...Mount INSTALLATION INSTRUCTIONS 1 Unscrew and remove the 4 screws as shown Carefully slide out the base stand 2 Carefully place the TV with its front side facing down on a cushioned flat surface Unscrew and remove the 4 screws as shown ...

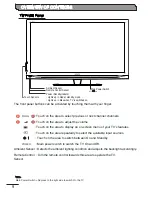
Page 10: ... Touch on the area to adjust the volume Touch on the area to display an on screen menu of your TV s features Touch on the area repeatedly to select the available input sources Touch on the area to switch between On and Standby Main power switch to switch the TV On and Off Ambient Sensor Detects the ambient lighting condition and adjusts the backlight accordingly Remote Control Aim the remote contr...

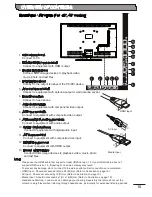
Page 11: ...MI1 Input terminal Connect to equipment with HDMI output 13 Media1 Input terminal Connect USB storage devices to playback video music photo and text files HDMI Input AV Input Media Input 10 Rear Panel AV Inputs For 42 46 models H W D OVERVIEW OF CONTROLS 1 2 3 4 8 9 13 7 6 5 12 11 10 Note Please use the HDMI cable that support at least HDMI version 1 3 If your HDMI cable does not support HDMI vers...

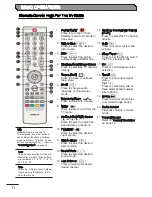
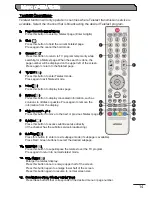
Page 12: ...enu 10 TV VIDEO Press to select the desired input source 11 Picture Mode Press to select the desired picture mode 12 Sound Mode Press to select the desired sound mode 13 Last Channel Press to return to previously viewed channel 14 Program Select Page Select P P Press to select the TV channel directly 15 Mute Press to mute or restore the volume 16 Sleep Timer Press to set the time to switch the TV ...

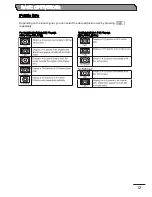
Page 13: ...he input signal you can select the desired picture size by pressing repeatedly 12 Picture Size For Standard Definition SD Pictures 480i 480p 576i 576p For High Definition HD Pictures 720p 1080i 1080p BASIC OPERATIONS ...

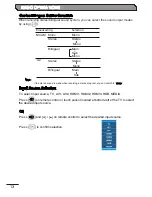
Page 14: ...ed input source Press to confirm selection When receiving stereo bilingual sound system you can select the sound output modes by using 13 Input Source Selection Stereo Bilingual Sound Selection Broadcasting Selection NICAM Mono Mono Stereo Stereo Mono Bilingual Main Sub Mono Note If the stereo sound is weak when receiving a stereo program you can switch to Mono Stereo Stereo Mono Bilingual Main Su...

Page 15: ...ailable Press Red Green buttons to select the desired subpage Index Press this button to display index page Reveal Press this button to display concealed information such as solutions to riddles or puzzles Press again to remove the information from the display UNL Size Enlarge the teletext display Press this button once to enlarge upper half of the screen Press this button again to enlarge lower h...

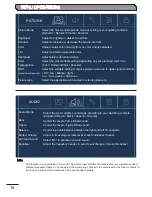
Page 16: ...g depending on your preferred color tone Cool Normal Warm Favorite Select the suitable setting to reduce picture noise due to weak signal condition Off Low Middle High Note Not available in RGB mode Select the appropriate picture size for viewing pleasure Picture Mode Brightness Contrast Color Tint Sharpness Color Temperature DNR Digital Noise Reduction Picture Size PICTURE AUDIO Select the most s...

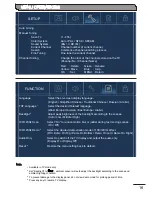
Page 17: ... Chinese Russian Arabic Select the desired Teletext language West Europe Russian East Europe Arabic Adjust peak brightness of the backlight according to the scenes Auto Low Middle High Select On to reduce motion blur or judder during fast moving scenes On Off Select the desired demostration mode of 100 120Hz effect Off Demo On Top Demo On Bottom Demo On Left Demo On Right Select to switch off the ...

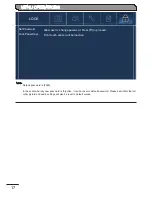
Page 18: ...ront touch sensor will be inactive Set Password Lock Panel Keys Note Default password is 0000 In the event whereby new password is forgotten it can be reset to default password Please be mindful that all other picture and audio settings will also be reset to default values ...

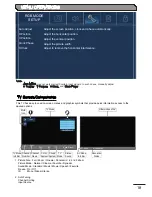
Page 19: ... Components This TV has easy to read on screen menus and graphics symbols that provide quick information access to the desired options 12 CH05 PAL BG TV Nicam Stereo HDMI 1080i 60Hz 2 Auto Tuning 3 55 45 MHz TV TV 0 CH s Color System Sound System TV Mode Stereo Sound Channel Number Channel Name Mute Icon AV Mode Info Bar TV Mode Info Bar Resolution Status 1 DYNAMIC 2 TV Mode Other modes of AV 1 Pi...

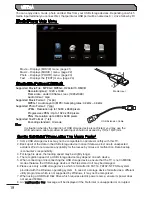
Page 20: ...ed 500mA 8 An Unsupported File message will be displayed if the file format is unsupported or corrupted Note In situation whereby the insertion of USB storage device is restricted you may use the USB extension cable provided Media Input should not exceed by 7 H x 18 W mm Supported Movie File MPEG2 MPEG4 H264 AVC RMVB Resolution max 1920 x 1080 Frame rate under 30 frames sec 1920x1080 Audio format ...

Page 21: ... file ends A B Repeat Option available only during normal playback To repeat a specific section of a video or music file Press the A B REPEAT button at the point where you want repeat play to start Set A Press the A B REPEAT button at the point where you want the repeat play to stop Set B To return to normal play press the A B REPEAT again until the display shows Off Mute Press to temporarily swit...

Page 22: ... Press the A B REPEAT button at the point where you want repeat play to start Set A 4 If the Control Bar disappeared press to display it again 5 Press the A B REPEAT button at the point where you want the repeat play to stop Set B 6 To return to normal play press the A B REPEAT again until the display shows Off Movie Control Bar Pause Play Fast Reverse Fast Forward Previous Next Stop Repeat Play M...

Page 23: ... Time Search option 3 Enter the time Hour Minute Second to jump to 4 Press to begin the time search Music Menu 1 Press to select MUSIC Press to enter 2 Press to select the desired drive and press to enter Music Screen Components 00 01 31 00 04 59 Filename Album 1920 X 1080 Title Track 08 Bit Rate 112K Artist Size 6057 KB Close 00 01 31 00 04 59 Filename Album 1920 X 1080 Title Track 08 Bit Rate 11...

Page 24: ...esired folder and press to open the folder or select the desired photo file and press to start playing 4 Press to display Photo Control Bar select Music option to start playing the music files selected previously Photo Menu Fireworks 1 jpg Fireworks 2 jpg Fireworks 3 jpg Fireworks 4 jpg Fireworks 5 jpg Fireworks 6 jpg Fireworks 7 jpg Fireworks 8 jpg Fireworks 9 jpg Fireworks 10 jpg 1 4 Cancel Retu...

Page 25: ...ring unmatched viewing pleasure to your home Hitachi LED Ultra Slim Design Beautiful designed the new Hitachi LED TV goes perfectly well with every modern space Significantly lighter and slimmer than CCFL TVs its sleek Crystal Cutting Edge design is a welcome addition to any room Intelligent Sensor A smart light sensor it can automatically adjust it its s sl slee eek k Cr Crys ysta tal l Cu Cutt t...

Page 26: ...e a mode listed in the chart Sometimes the image may be disrupted due to the frequency standard from the VGA card This is not an error You may improve this situation by pressing the button or adjusting the position clock and phase settings in the RGB Setup menu manually If you switch off the TV interference lines may occur on the TV screen This is normal HDMI Input Signal Chart RGB Input Signal Ch...

Page 27: ...AL SECAM NTSC3 58 PAL60 NTSC4 43 AV2 1 Component 480i p 576i p 720p 50 60 1080i 50 60 1080p 50 60 HDMI1 2 3 480i p 576i p 720p 50 60 1080i 50 60 1080p 24 50 60 RGB Analog 640x480 60 800x600 60 1024x768 60 1280x1024 60 MEDIA1 MEDIA2 USB Port Terminals Output Signals AV Out Monitor CVBS Video and audio output are available only when the TV input source is set to TV or AV1 mode Headphone Diameter 3 5...

Page 28: ...d system Broadcasting failure may happen Check the connection of the external equipment Snowy picture Poor Sound Check the antenna connection and direction The TV station may have broadcast difficulties Try changing to another channel Intermittent Interference Check if the source of interference is shield well Remove those kinds of electrical devices away from the TV No Signal appears on the scree...

Page 29: ...nnected to an HDMI terminal and any recorder player is connected to another HDMI terminal Media Player USB devices are not recognized Check if it contain the supported files No USB hub is supported When using a home network connect directly to the devices s USB port Check if the speed of the device is sufficient poor device speed may result in interrupted or delayed display of images due to a bit ...

Page 30: ...29 NOTES ...

Page 31: ...30 NOTES ...

Page 32: ......

Reviews: