background image

3

Moving and Carrying Notice

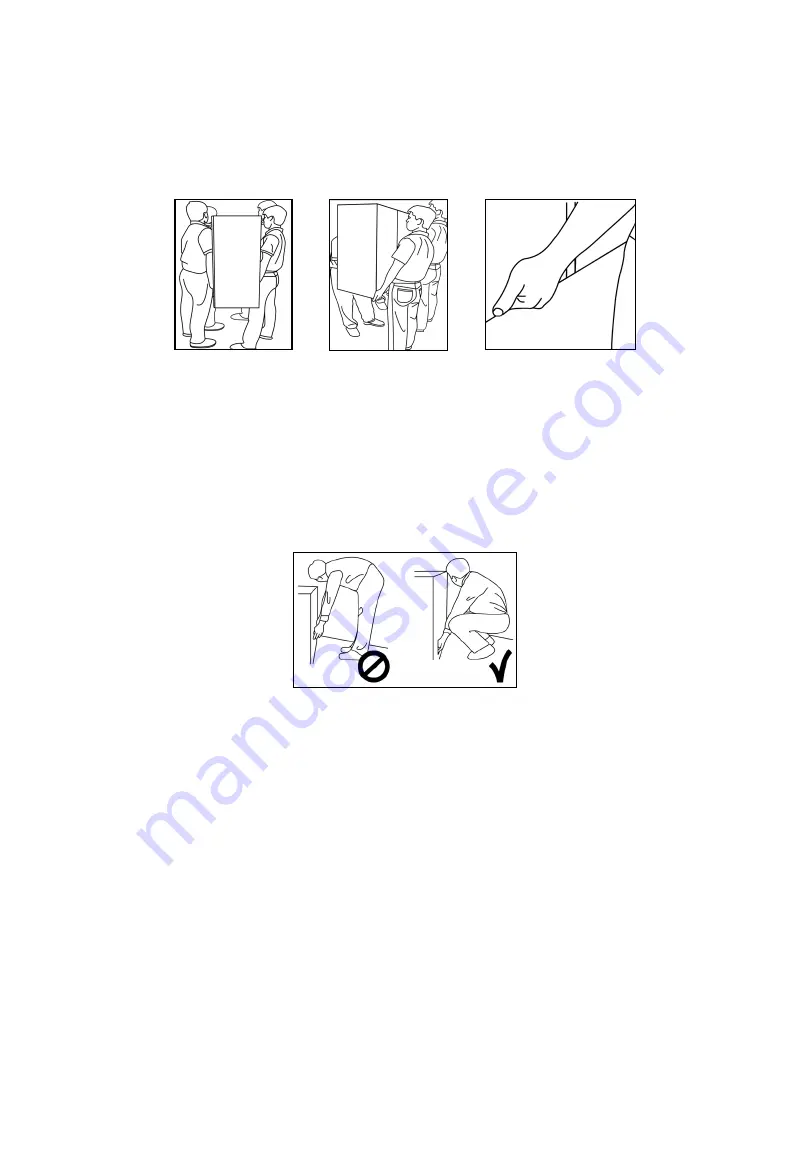
Moving Notice:

Moving the monitor requires at least four people. If not, it may drop and a serious 
injury may result.

Carrying Notice:

This monitor is heavy; please follow the instructions below when you are ready to 
carry the monitor. Failure to do, it may cause injury.

Summary of Contents for HILS65204

Page 1: ...Installation Manual Model HILS65204 HILU65203 Interactive Flat Panel Display 65 64 53 ...

Page 2: ...onnel Safety Precautions If smoke or a peculiar smell comes from the monitor remove the power plug from the socket immediately Failure to do above it may result in an electric shock Contact your dealer for inspection If the monitor has been turned on but there isn t a picture remove the power plug from the socket immediately Failure to do above it may result in an electric shock Contact your deale...

Page 3: ...ving the monitor requires at least four people If not it may drop and a serious injury may result Carrying Notice This monitor is heavy please follow the instructions below when you are ready to carry the monitor Failure to do it may cause injury ...

Page 4: ...g plug as it may cause an electric shock Do not place monitors on unstable shelves or surfaces They could collapse and cause damage Only install the unit on vertical stable and level surfaces Don t place objects on the touch monitor If the touch monitor is covered or the vents are blocked the monitor could overheat and cause a fire If metal or liquid gets into the monitor it may cause an electric ...

Page 5: ...embling please don t pull or shake violently Please don t install the bracket in direct sunlight or areas of humidity high temperature for fear that the quality is affected Install the bracket at a minimum distance of 10 cm from other objects walls on either side Only attach to vertical walls ...

Page 6: ...er cord 2 Remote controller 2x AAA batteries included 3 USB cable 4 HDMI cable 5 Pen x2 6 CD Note The following features are considered with the requirements The equipment is intended to be installed on wall but any mounting means are not provided with the equipment For the installation the following statement and caution described in user manual Ensure that an authorized installation company inst...

Page 7: ...ally Touch sensor s priority is as below Internal OPS External Desk top Front Notebook HDMI Input connected to HDMI 2 Important Notice The USB cable 3 m that Hitachi provides in this accessory box is for use of connection to Touch USB at the back Therefore in case of connecting USB cable to Touch USB in front separate USB cable is required and the length of cable is strongly recommended to be less...

Page 8: ...splay the main screen menu 3 VGA OPS EXTERNAL HDMI 1 HDMI 2 HDMI 3 DP 4 Volume Up Right 5 Volume Down Left 6 Move Up 7 Move Down 1 HDMI 3 Input 2 HDMI 2 Input 3 HDMI 1 Input 4 Display Port 5 HDMI Output 6 USB For Touch 7 RJ45 LAN 8 Note HDMI 1 has separate USB for Touch located on ...

Page 9: ...USB 2 0 Supports USB cam or camera function 6 USB 3 0 Supports USB cam or camera function 7 LAN OUT 8 LAN IN 9 PC RGB IN 10 PC AUDIO IN 11 SPDIF 12 LINE OUT 9 9 VGA IN L 8Ω RS232C RS232C RJ45 USB FOR TOUCH HDMI 1 ONLY SPEAKER OUT R 8Ω USB 2 0 USB 3 0 PC AUDIO IN SPDIF LINE OUT LAN IN LAN OUT AETSTI005200 10 11 12 ...

Page 10: ...tall OPS PC There is a slot on for OPS PC When you need to install OPS remove screws and existing cover first and screw up again after mounting OPS PC in the slot Power 1 2 1 Power Switch ON OFF 2 AC IN 100V 240 50 60hz 10 ...

Page 11: ... how much the remote control is used Replace batteries when the remote operation becomes erratic Use only the size and type of batteries specified Be sure to follow the correct polarity when installing the batteries as indicated in the battery compartment Reversed batteries may cause damage to the device Do not mix different types together e g Alkaline Carbon zinc or Rechargeable or old batteries ...

Page 12: ... button on the remote or control keypad to place the monitor backside in a standby mode To turn off power completely disconnect the AC power cord or turn power switch off Selecting the input source 1 Using the remote press SOURCE on the monitor backside keypad and toggle the source button until you have reached the desired source and press ENTER VGA OPS HDMI 2 HDMI 1 DP 2 If the monitor cannot fin...

Page 13: ...g Windows 7 8 10 and Mac OSX Calibration Procedure 1 Install and run the Touch Win Setup configuration program on the computer 2 Press Calibration 3 A black screen with one green and eight white calibration points appears 4 Tap the green calibration point with your finger or Ergonomic Stylus shortly 5 The cursor will move to the next calibration point Repeat action 4 and move on to the next indica...

Page 14: ...ze 400 W x 200 H mm Separate wall mount screw and pipe from Monitor As shown below wall mount bracket is assembled with screw and pipe Pipe only use the upper left and right and fixing screw is assembled attention to the screw length ...

Page 15: ...Display Ensure the power plug is installed correctly at both ends Make sure the signal cable is installed correctly at both ends Check that source equipment is operating correctly Check if the input signal is compatible with this display The image is not centered Check if the input signal is compatible with this display The image is not locked correctly Check if the input signal is compatible with...

Page 16: ...de and user manual may cause harmful interference to radio communications Operation of this equipment in a residential area is likely to cause harmful interference in which case the user will be required to correct the interference at their own expense Warning This is a Class A product In a domestic environment this product may cause radio interference in which case the user may be required to tak...

Page 17: ...Rev 001 HAUL ...

Reviews: