


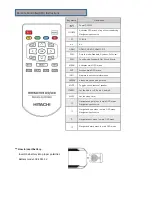


Turning the monitor on
1. Correctly insert the power cord into the monitor and into the power socket.
2. Press the power button on the bottom of monitor or front control panel.
Turning the monitor off
With the power on, press the power button on the remote or control keypad to place the monitor backside in a
standby mode. To turn off power completely, disconnect the AC power cord or turn power switch off.
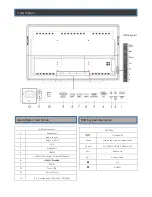
Selecting the input source
1. Using the remote, press the desired source button or press SOURCE on the monitor backside keypad and
toggle the source button until you have reached the desired source, and press ENTER
(PC, HDMI 1, HDMI 2, HDMI 3, DP)
2. If the monitor cannot find a source, a “No signal” message will be appeared.
No calibration is required first-time use. However, the touch system might need calibration over time or when for
instance a different resolution is used. Please find calibration instructions below for the different operating
systems:
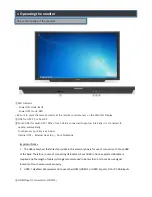
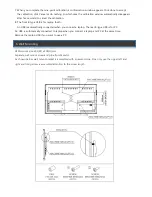
Installation
1. Connect the signal cable to the monitor and then turn on the monitor.
2. Connect one side of the USB cable (type-B USB connector) on the monitor side. (See “chapter 3, Signal Source
Input” for exact location)
3. Connect the other side of the USB cable (type-A USB connector) to the computer.
4. Turn the computer on.
Windows 7 & 8 and Mac OSX(Version 10.7 ~ 10.10)
Window System: No need to install the driver and calibration, but if need to detail calibration or improve
performance, please install the driver.
MAC System: (Should be install the driver, if not, touch function is not working)
Windows 7 & 8 and Mac OSX Calibration Procedure
1. Install and run the “Touch Win Setup” configuration program on the computer.
2. Press “Calibration”.
3. A black screen with one green and eight white calibration points appears.
4. Tap the green calibration point with your finger or Ergonomic Stylus shortly.
5. The cursor will move to the next calibration point. Repeat action 4 and move on to the next indicated
calibration point.
6. Repeat action 4 until you get to the last calibration point in the lower right-hand corner.
Display Mode
5. Touch Operation