background image


Installation 


I.


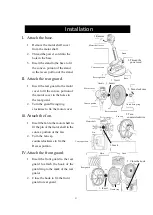
Attach the base. 

1.


Remove the motor shaft cover 

from the motor shaft. 

2.


Thread the power cord into the 

hole in the base. 

3.


Insert the stand to the base to fit 

the convex portion of the stand 

in the recess portion of the stand.   

II.


Attach the rear guard.


1.


Insert the rear guard to the motor 

cover to fit the convex portion of 

the motor cover in the holes in 

the rear guard.


2.


Turn the guard fixing ring 

clockwise to fix the motor cover. 


III.


A

ttach the fan.


1.


Insert the fan to the motor shaft to 

fit the pin of the motor shaft in the 

convex portion of the fan. 

2.


Turn the fan cap 

counterclockwise to fix the 

Recess portion.


IV.


Attach the front guard. 

1.


Insert the  front  guard to  the rear 

guard  to  attach  the  hook  of  the 

guard ring to the mark of the rear 

guard. 

2.


Close the hook to fix the front 

guard to rear guard.   


1.


Remove


Motor shaft cover 

Stand   

Convex portion 

Recess portion 

3. Insert 

Base 

2. Thread the 

power cord 

Motor cover 

Handle 

1.


Insert


Convex portion 

Recess portion 

Guard fixing ring 

2.


Turn clockwise


Motor shaft 

Pin 

Convex portion 

1.


Insert


Fan cap   

2.


Turn 

  counterclockwise 

Mark 

Hook 

Rear guard 

1.


Insert

    Guard ring   

2.


Close the hook 

Summary of Contents for HEF-110M

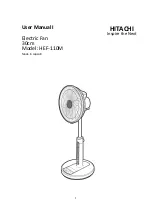
Page 1: ...1 User ManualI Electric Fan 30cm Model HEF 110M Made in Japan8 HITACHI Inspire the Next ...

Page 2: ... been installed before operating the electric fan Pull the plug out of a socket to assemble or dismantle the electric fan Hold the plug to pull it out of a socket Avoid bending the power cord Operation in the single phase AC 100V has been required Remove dust on the plug to prevent fire Immediately turn off the electric fan if some nose or vibration occur More than 1m range between human and the e...

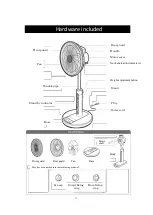
Page 3: ...er Neck angle adjustment lever Stand by indicator Tunable pipe Fan Base Height adjustment button Stand Plug Power cord Front guard Rear guard Fan Base Motor shaft Body They has been packed into the cushioning material Fan cap Guard fixing ring Base fixing ring ...

Page 4: ...rt the fan to the motor shaft to fit the pin of the motor shaft in the convex portion of the fan 2 Turn the fan cap counterclockwise to fix the Recess portion IV Attach the front guard 1 Insert the front guard to the rear guard to attach the hook of the guard ring to the mark of the rear guard 2 Close the hook to fix the front guard to rear guard 1 Remove Motor shaft cover Stand Convex portion Rec...

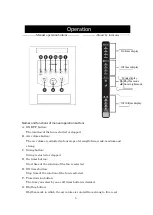
Page 5: ...m and strong C Swing button Swing is started or stopped D On timer button Start time of the rotation of the fan is selected E Off timer button Stop time of the rotation of the fan is selected F Time decision button The time you select by on or off timer button is decided G Rhythm button Rhythm mode in which the air volume is rotated from strong to fine is set On timer display Off timer display Mod...

Page 6: ...e guard and fan in reverse order to the assembling order 3 Wipe them soft cloth dampened with water or neutral detergent Caution Motor shaft is very hot immediately after stopping so wait a minutes Trouble shooting The fan dose not rotate 1 Check the plug is stuck to the wall outlet 2 Check a fuse or circuit breaker is turned on Running sound is very large 1 Check the fan is fixed 2 Check the guar...

Reviews: