background image

 English   

- 6 -

Remote Control

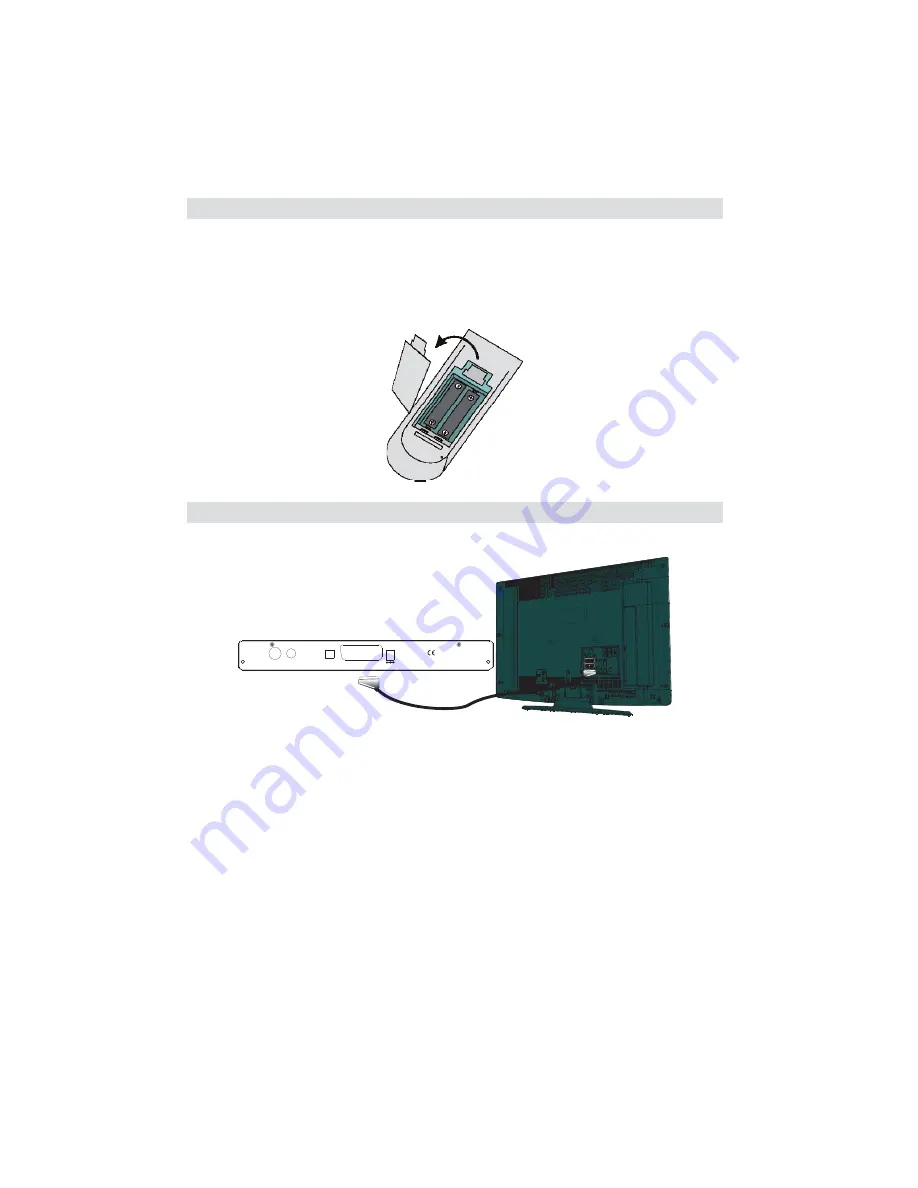
First open the battery cover on the underside of the remote control. Put in both batteries 1.5Volt (RO3/AAA) 
referring to the imprinted symbols (+/-) in the battery case and put on the battery cover again. While using 
the remote control, direct it towards the front side of the receiver. If the remote control does not work or the 
chosen function does not work, the batteries are most probably exhausted and they should be replaced as 
soon as possible. Please use only the leak proof batteries. It is best to remove the batteries from the remote 
unit if you will not be using the remote control unit for long time.

Connection to the TV

35026858

SCART (TV)

ANTENNA

IN

ANTENNA

OUT

DC IN

OPTICAL

AUDIO OUT

Connect your set-top box with a scart cable using the TV scart connector on the rear panel to your television’s 
scart connector. The set-top box gives RGB or CVBS output. If you want to get the picture via scart connector 
and your TV’s scart connector has an RGB input, then you can switch your digital set-top box to RGB mode, by 
toggling TV out menu to RGB mode, in confi guration menu. So, you will be able to achieve high performance 
from your digital set-top box.

Summary of Contents for HDR325

Page 1: ...Model HDR505 Digital TV Recorder Instruction manual To obtain the best performance and ensure years of trouble free use please read this instruction manual completely ...

Page 2: ...www hitachidigitalmedia com ...

Page 3: ...st Time Installation 19 Message 19 Specific Functions of Remote Control 19 Time Shifting Pause Live Recording 20 TEXT 20 WIDE 20 Notes 21 General troubleshooting 22 Features DVB 200 Channels DVB 7 days event information 7 days EPG TV scart with RGB and CVBS support Record timer via 7 day EPG Automatic search for all channels Timer can be used either for recording or as a sleep timer Timer function...

Page 4: ...oles on the bottom A location should not be selected such as a room with high humidity as the condensation arising in the kitchen for example may cause malfunction or damage the set Heating or other thermal radiation under the set also may cause malfunction or damage the set The hot air which arises during the operation should be ventilated with sufficient air circulation Please do not put the set...

Page 5: ...filled with liquids such as vases to be placed on the equipment DON T place hot objects or naked flame sources such as lighted candles or nightlights on or close to equipment High temperatures can melt plastic and lead to fires DON T use makeshift stands and NEVER fix legs with wood screws to ensure complete safety always fit the manufacturer s approved stand or legs with the fixings provided acco...

Page 6: ...English 4 Overview of the Remote Control Used in Media Browser optional Used in Media Browser optional Teletext Used in Media Browser optional Teletext ...

Page 7: ...AL OUT Connect to your TV 2 ANTENNA IN Aerial input 3 OPTICAL AUDIO Optical Digital Audio Output 4 TV SCART TV SCART connection 5 POWER SUPPLY DC IN 12V DIGITAL TELEVISION RECORDER HDR505 ONLY USE ADAPTOR SUPPLIED 12 V DC 1 5A Hitachi Europe Ltd CAUTION DO NOT OPEN REFER SERVICING TO QUALIFIED SERVICE PERSONNEL Rating label ...

Page 8: ...leak proof batteries It is best to remove the batteries from the remote unit if you will not be using the remote control unit for long time Connection to the TV 35026858 SCART TV ANTENNA IN ANTENNA OUT DC IN OPTICAL AUDIO OUT Connect your set top box with a scart cable using the TV scart connector on the rear panel to your television s scart connector The set top box gives RGB or CVBS output If yo...

Page 9: ...ode it may take a minute until product is initialised However if you press standby button before low power mode is activated unit will be initialized in a couple of seconds Active standby mode Although it is not recommended for enviromental reasons you may disable low power mode in your product at setup configuration menu Auto Power Down This box will automatically switched from active mode into s...

Page 10: ... be restarted to save changes Please press OK and after 3 5 seconds the box will restart You can watch saved broadcasts after the restart process Menu System Main menu is accessed by pressing the MENU key on the remote control Navigate with keys among the menus and press OK to activate menus In some sub menus press the BACK button to return to the previous menu otherwise use it to exit from the me...

Page 11: ...by one as the button is pressed Pressing MENU cancels the editing and OK saves the new name Adding Locks to Channels Channel Locking provides a password protected access to channels selected by parents In order to lock a channel you should know the parental Lock password set to 0000 in the factory and can only be changed from the Configuration Menu then highlight the channel to be locked and selec...

Page 12: ...elected a programme press the OK button and select the Record option in the menu which appears and press the OK button again So a recording is set to the selected programme This option operates like the RECORD button To cancel an already set recording highlight that programme and press the OK button and select the option Delete Timer The recording will be cancelled Record Series Delete Series Numb...

Page 13: ...events at the same time interval If you set more than two recordings reminders at the same time you will see an error message INFO Pressing this button gives you detailed information about the selected programme Record Cancel Sets recordings for the selected programme If you pres it again the recording will be cancelled OK Pressing this button will save the latest changings and you will leave this...

Page 14: ...e TV or Radio list Date By using either or 0 1 2 9 keys start date is entered Start By using either or 0 1 2 9 keys start time is entered End By using either or 0 1 2 9 keys end time is entered Duration Displays the duration of the recording This is automatically worked out after the start and end times have been entered Playback permit or block playback for other users use parental settings is de...

Page 15: ...tton during playback and enter the Chapter Options menu and begin with playback from the selected chapter Create archive Archive management Using this option you will be able to archive your recordings to an external device like a DVD player Press the LIB Button and come to the Recordings Library In this library the saved recordings are listed To select a recording which should be archieved highli...

Page 16: ...ing no other button will function Chapter Options During playback of a recording if you press the MENU button you will get to the Chapter Options menu The chapter options menu includes following options This menu includes the options below Create New Chapter Mark Using the buttons select this option and press the OK button to create a chapter mark You could set a chapter mark anywhere you want For...

Page 17: ... number If you have not changed the pin number the factory default is 0000 After you enter it a pop up menu appears on the screen to ensure that the hard disk should be formated select YES and press OK to format the Hard Disk Select NO and press OK to cancel Ensure you dub important recordings onto Video or DVD before you format the HDD Hard Disk Info To view the details about the Hard disc highli...

Page 18: ...ce it will operate regarding one of these options and delete the recordings Even if you delete a programme the remaining amount may not increase by the amount of deleted time When recording new video record with an extra margin in the amount of remaining space Unrecordable Material In the unlikely event that there is some problem like loss of recorded video or audio content due to an HDD malfuncti...

Page 19: ...y radio channels if you navigate Text Only you navigate through only Text channels with the PR PR buttons If you choose Show All all channels can be navigated with the PR PR buttons To save the recent changes and exit press the MENU button Scan Encrypted Use buttons to go to the Scan Encrypted Channels option Use buttons to toggle YES or NO the searching for encrypted channels Auto Power Down This...

Page 20: ...e four digits long and the same the pin will be changed The factory default pin number is 0000 if you change the pin number make sure you write it down and keep it safe Language In this menu the user can adjust the preferred language Language is changed by pressing OK key Menu shows the language of the system Preferred These settings will be used if available Otherwise the current settings will be...

Page 21: ...subtitle ON OFF message is displayed INFO KEY When INFO key pressed and when changing channels the information window is displayed on the lower part of the screen The small bar indicates the program duration On the channel info window there are Current event name next event name and their start and end times Program duration bar Program mode TV or Radio Channel number Name of the channel PR PR CHA...

Page 22: ...You can exit any digital teletext channel by changing channel in any of the normal ways You can leave the digital teletext function of a combined digital teletext programme channel to return to normal television viewing of that channel by pressing the TEXT key Calling for the information banner or any menu on screen stops the receiver from displaying the digital teletext pages and they are tempora...

Page 23: ...lightly dampened cloth only Do not use liquid or aerosol cleaners HEAT AND FLAMES The receiver should not be placed near to naked flames or sources of intense heat such as an electric fire Ensure that no naked flames sources such as lighted candles are placed on top of the Receiver LIGHTNING Unplug your receiver from the wall socket if there is a storm or lightning or if it is to be unused for a l...

Page 24: ...l Check the Aerial and scart connections The remote control is not working The digital set top box was unplugged without first going to stand by Remote control is incorrectly aimed Battery exhausted Press the standby key Check if anything is obstructing the front panel Change the batteries Password forgotten Take contact with the nearest service center Record does not start No or weak Aerial input...

Page 25: ...PEG2 DEMODULATION COFDM with 2K 8K FFT mode FEC for all DVB Modes Automatically found VIDEO ALL MPEG 2 MP ML Video Decoder Aspect Ratio 4 3 16 9 with pan vector RGB analogue outputs BW 5MHz at 0 5 to 5 MHz sweep signal CVBS analogue output AUDIO MPEG1 Layer 1 and 2 Sampling frequencies supported 32 kHz 44 1 kHz or 48 kHz Output can be programmed as STEREO LEFT only or RIGHT only on both outputs Th...

Page 26: ...Disk capacity 500 GB FRONT PANEL Display 7 segment led display Remote Control Keys On Off AUDIO Output 2 Vrms 0 dBfs Z 10 kohm DIGITAL AUDIO Output Optical SPDIF A V DATA IN OUT Scart TV scart RGB Video Output TV scart CVBS Video Output TV scart Analog Audio Output TV scart Digital Audio Output Optical output ...

Page 27: ...re the product has been the subject of unauthorised modifications or alterations or has been the subject of commercial use In the event of a problem with the product within the guarantee period please return it to your nearest store If the item is shown to have had an inherent defect present at the time of sale the store will provide you with a replacement Your statutory rights remain unaffected G...

Page 28: ...facture we cannot guarantee compatibility with future DVB transmissions due to changes that may be implemented in broadcast signals and technologies Some digital television functions may not be available in all countries We continually strive to improve our products therefore specifications may change without prior notice For advice on where to purchase accessories please contact the store where y...

Reviews: