background image

EN-10

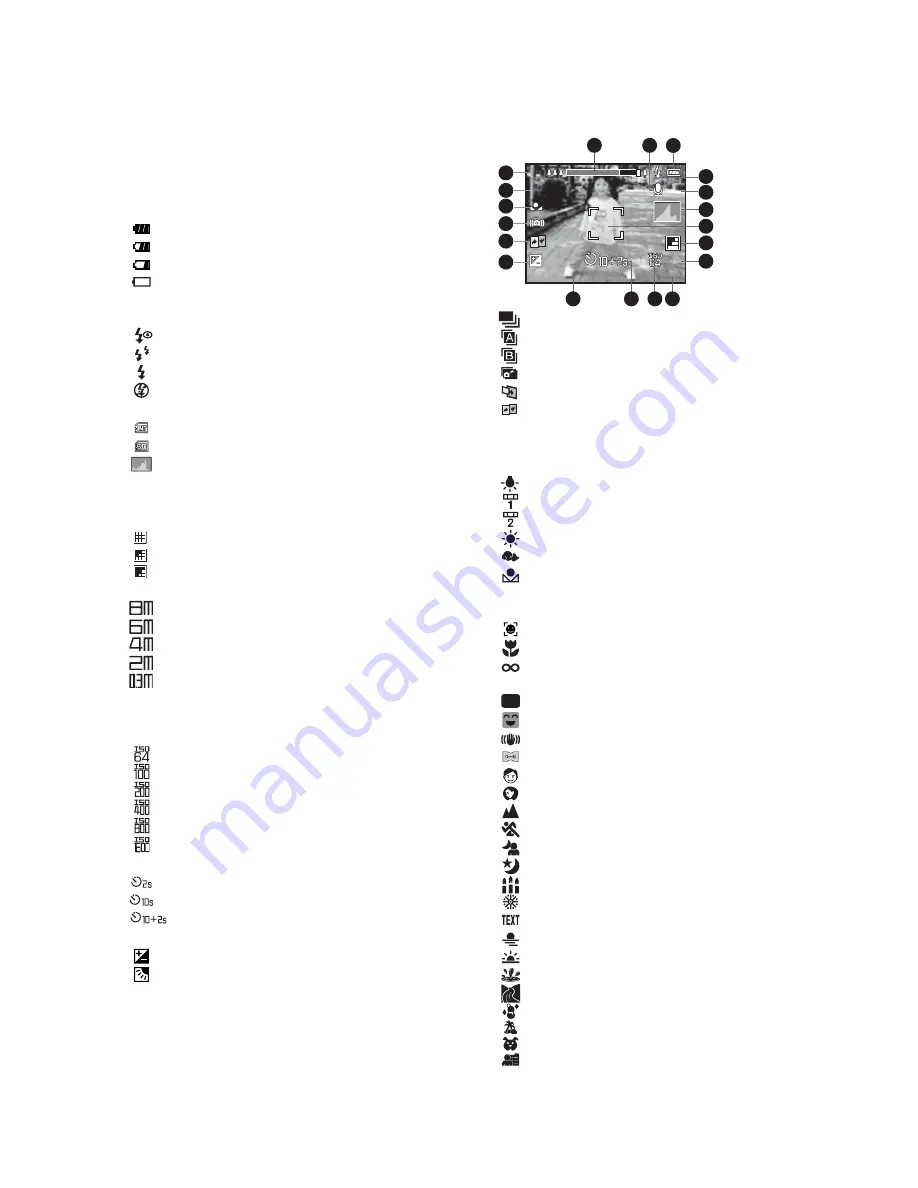
LCD Monitor Display

Capture mode

1. Zoom status
2. Voice memo
3. Battery condition

[

]    Full battery power

[

]     Medium battery power

[

]     Low battery power

[

]     No battery power

4. Flash  mode

[Blank] Auto Flash
[

]    Red-eye Reduction

[

]    Pre-flash

[

]    Forced Flash

[

]    Flash Off

5. Storage media

[

]   Internal memory (no card)

[

]

SD/SDHC memory card

6. [

] Histogram

7. Main focus area (When the shutter button is

pressed halfway)

8. Image quality

     [

]  

Fine

     [

]  

Standard

     [

]  

Economy

9. Image size resolution

[

]   3264 x 2448

[

]   2816 x 2112

[

]   2272 x 1704

[

]   1600 x 1200

[

]

640 x 480

10. Available number of shots
11. ISO

[Blank] Auto

[

] ISO 

64

[

] ISO 

100 

[

] ISO 

200

[

] ISO 

400 

[

] ISO 

800 

[

] ISO 

1600

12. Self-timer icon

[

 ]

2 sec.

[

] 10 

sec.

[

 ] 10+2 sec.

13. Date and time
14. [

]

Exposure compensation 

[

]

Backlight correction

(Adjust exposure value with the

e

 / 

f

buttons)

15. Capture mode icon

     [Blank] Single

      [

]

Continuous

      [

]

Auto Exposure Bracketing

      [

]

Burst

      [

]

flash

      [

]

Pre-Shot

      [

]

Couple Shot

16. Slow shutter warning
17. White balance

[Blank]  Auto
[

]

Incandescent

[

]

Fluorescent 1

[

]

Fluorescent 2

[

]

Daylight

[

]

Cloudy

[

]

Manual 

18. Focus setting

[Blank] Auto focus
[

]

Face detection

[

]   Macro 

[

]

Infinity

19. Scene  mode

[

]

Program AE

[

]

Smile Shot

[

]

Anti Shake

[

]

Panorama

[

]

Portrait Man

[

]

Portrait Lady

[

]

Landscape

[

]

Sports

[

]

Night Portrait

[

]

Night Scene

[

]

Candlelight

[

]

Fireworks

[

Text

[

]

Sunset

[

]

Sunrise

[

]

Splash Water

[

]

Flow Water

[

]

Snow

[

]

Beach

[

]

Pets

[

]

User Setting

P

m

2008 / 03 / 01 00 : 00

2008 / 03 / 01  00 : 00

00001

00001

00001

+ 0.3

+ 0.3

x4.0

x4.0

x4.0

f

f

1

2

3

10

11

12

13

4
5

6
7
8

9

14

15

16

17

18

19

q

q

P

Summary of Contents for HDC-887E

Page 1: ......

Page 2: ...llation If this equipment does cause harmful interference to radio or television reception which can be determined by turning the equipment off and on the user is encouraged to try to correct the interference by one or more of the following measures Reorient or relocate the receiving antenna Increase the separation between the equipment and receiver Connect the equipment into an outlet on a circui...

Page 3: ...your camera may be different from those described in this manual This is due to the fact that different retailers often specify slightly different product inclusions and accessories to suit their market requirements customer demographics and geographical preferences Products very often vary between retailers especially with accessories such as batteries chargers AC adapters memory cards cables pou...

Page 4: ...pair the camera This might cause fire or electric shock For repair or internal inspection ask the store of purchase Do not use the camera in areas near water This might cause fire or electric shock Take special care during rain snow on the beach or near the shore Do not place the camera on inclined or unstable surfaces This might cause the camera to fall or tilt over causing damage Keep the batter...

Page 5: ...a precision instrument Do not drop it strike it or use excessive force when handling the camera This might cause damage to the camera Do not use the camera in humid steamy smoky or dusty places This might cause fire or electric shock Do not remove the battery immediately after long period of continuous use The battery becomes hot during use Touching a hot battery might cause burns Do not wrap the ...

Page 6: ...one complete cycle before use The battery may feel warm after a long period of continuous use of the camera or the flash This is normal and not a malfunction The camera may feel warm after a long period of continuous use This is normal and not a malfunction If the battery is not to be used for a long period of time remove it from the camera to prevent leakage or corrosion and store it after no bat...

Page 7: ...os 20 VIDEO MODE 20 Recording Video Clips 20 Playing Back Video Clips 21 PLAYBACK MODE 21 Playing Back Still Images 22 Thumbnail Display 22 Removing Red eye 23 Attaching Voice Memos 24 Protecting Images 25 DPOF Settings 26 Erasing Images 27 MENU OPTIONS 27 Capture Menu 30 Video Menu 31 Playback Menu 32 Setup Menu 33 TRANSFERRING FILES TO YOUR COMPUTER 33 Downloading Your Files 34 USING THE CAMERA ...

Page 8: ...apturing images with a resolution of up to 3264 x 2448 pixels Package Contents Carefully unpack your camera and ensure that you have the following items Common Product Components Digital Camera User s manual Software CD ROM USB cable AV cable Camera strap Camera pouch Rechargeable lithium ion battery Battery charger AC adapter for battery charger Common Optional Accessories SD SDHC memory card Acc...

Page 9: ...EN 8 GETTING TO KNOW YOUR CAMERA Front View 1 Shutter button 2 Flash 3 Power button 4 Status LED 5 Microphone 6 Lens 7 Self timer LED 8 Zoom lever ...

Page 10: ...ton S button Focus button X button Flash button T button Self timer button Delete button W button Backlight Exposure compensation button 5 Strap holder 6 USB or AV OUT terminal 7 Set button Display button 8 Play button 9 Battery Memory card cover 10 Tripod socket 11 Speaker ...

Page 11: ... Self timer icon 2 sec 10 sec 10 2 sec 13 Date and time 14 Exposure compensation Backlight correction Adjust exposure value with the e f buttons 15 Capture mode icon Blank Single Continuous Auto Exposure Bracketing Burst Series flash Pre Shot Couple Shot 16 Slow shutter warning 17 White balance Blank Auto Incandescent Fluorescent 1 Fluorescent 2 Daylight Cloudy Manual 18 Focus setting Blank Auto f...

Page 12: ...speed value 14 DPOF icon 15 Protect icon 16 Mode icon Playback mode Video playback 1 Video status bar 2 Elapsed time 3 File number 4 Folder number 5 Sound off icon When the c button is pressed during video playback 6 Play mode 7 Mode icon 8 Total recorded time 2008 03 01 00 00 2008 03 01 00 00 00 21 00 21 x4 0 x4 0 x4 0 1 2 3 8 9 10 4 5 6 7 11 12 x x E E f f 100 0001 100 0001 100 0001 01 01 2008 0...

Page 13: ... this camera before its initial usage 5 Close the battery memory card cover and make sure it is locked securely To prevent valuable data from being accidentally erased from an SD SDHC memory card you can slide the write protect tab on the side of the SD SDHC memory card to LOCK To save edit or erase data on an SD SDHC memory card you must unlock the card To prevent damaging of an SD SDHC memory ca...

Page 14: ...arted and lights green when charging is completed The LED also lights green if no battery is inserted into the charger Charging time varies according to the ambient temperature and the status of battery Remove the battery after charging is completed The battery may feel warm after it has been charged or immediately after being used This is normal and not a malfunction When using the camera in cold...

Page 15: ...low these steps to set the correct date and time 1 Toggle the button to or 2 Press the button 3 Select Setup with the f button 4 Select Date Time with the c d buttons and press the button 5 Select the date format with the c d buttons and press the button Select the item s field with the e f buttons and adjust the value for the date and time with the c d buttons The time is displayed in 24 hour for...

Page 16: ...ect the displayed language with the c d buttons and press the button The setting will be stored Formatting the Memory Card or Internal Memory This utility formats the internal memory or memory card and erases all stored images and data 1 Press the button 2 Press the button 3 Select Setup menu with f button 4 Select Format with the c d buttons then press the button 5 Select Execute with the c d but...

Page 17: ...mpose your image in the LCD monitor Slide the zoom lever to side to zoom in on the subject and enlarges the subject on the LCD monitor Slide the zoom lever to side to zoom out on the subject and provides a wider angle image 4 Press the shutter button Pressing the shutter button down halfway automatically focuses and adjusts the exposure and pressing the shutter button down fully captures the image...

Page 18: ...y capture 3 images by default the flash mode setting is set to If the flash mode setting is changed to the camera will only capture an image after it detects a smile When capturing group shots the number of people is more than 1 the camera will automatically capture the image s when it detects two greatest smile faces The number of shots is depending on the flash mode setting If the camera could n...

Page 19: ...he top priority face main focus frame and gray ones around the other faces 3 Press the shutter button halfway down to lock the focus The main focus frame simultaneously turns green If the top priority face is out of focus all frames will be disappeared from the screen 4 Press the shutter button down fully to capture your image Subjects that are not suitable with this function a A person is wearing...

Page 20: ...with the c d buttons and press the button 5 Press the button to exit from the menu An icon is displayed on the screen 6 Compose the image press the shutter button down halfway then press it down fully VOICE RECORDING is displayed on the screen immediately and the voice memo recording starts 7 Press the shutter button one more time during recording or wait for 30 seconds VOICE RECORD END will be di...

Page 21: ...r than the current one Playing Back Video Clips You can play back recorded video clips on the camera You can also play back sound if recorded with the video 1 Press the button The last image appears on the screen 2 Select the desired video clip with the e f buttons 3 Press the button A press of the f e buttons during playback allows fast forward play fast reverse play To stop video playback press ...

Page 22: ...ns To view the previous image press the e button To view the next image press the f button Pressing the c button during image playback will result in a 90 degree clockwise rotation display Slide the zoom lever to side enlarges the image To return to normal magnification slide the zoom lever to side An icon is displayed with the video data Video clips cannot be rotated An icon is displayed with ima...

Page 23: ...image is displayed at its regular size An icon may be displayed in a thumbnail Removing Red eye You can use this function to remove the red eye effect after an image is taken 1 Press the button 2 Select the image that you want to edit with the e f buttons 3 Press the button 4 Select Fix Red Eyes with the c d buttons and press the button 5 Select Execute with the c d buttons and press the button 6 ...

Page 24: ...s and press the button 6 Press the button to exit from the menu 7 Press the shutter button VOICE RECORDING is displayed on the screen and recording starts 8 To stop recording a voice memo as it is being recorded press the shutter button again VOICE RECORD END will be displayed and the recording will end An icon is displayed with images that have been recorded with a voice memo Playing back voice m...

Page 25: ... press the button 2 Select Single or All with the c d buttons and press the button 3 Select Cancel Protect with the c d buttons and press the button The removal of image protection is executed and the camera returns to the playback mode Protecting multiple images simultaneously 1 Select Protect with the c d buttons from the playback menu and press the button 2 Select Select with the c d buttons an...

Page 26: ...n This displays the number of prints setting screen 7 Set the number of prints with the c d buttons and press the button You can set up to 9 prints for each image 8 Select Date Print with the c d buttons and press the button The date setting screen appears 9 Select date to On or Off with the c d buttons and press the button On The date of the image will also be printed Off The date of the image wi...

Page 27: ...Press the button 3 Select Select with the c d buttons and press the button The images are displayed in the thumbnail display 4 Select the image you want to erase with the e f buttons and press the d button The icon will be displayed One more press of the d button will cancel the operation Repeat this procedure and select all the images that you want to erase 5 Press the button 6 Select Execute wit...

Page 28: ...ss the button Scene Mode Select from 21 different scene modes in accordance with the shooting conditions Program AE Smile Shot Anti Shake Panorama Portrait Man Portrait Lady Landscape Sports Night Portrait Night Scene Candlelight Fireworks Text Sunset Sunrise Splash Water Flow Water Snow Beach Pets User Setting Size This sets the size of the image that will be captured 3264 x 2448 2816 x 2112 2272...

Page 29: ...e manually Cancel Execute ISO This sets the sensitivity for capturing images When the sensitivity is raised and the ISO figure is increased photography will become possible even in dark locations but the more pixelated grainier the image will appear Blank Auto ISO 64 ISO 100 ISO 200 ISO 400 ISO 800 ISO 1600 Metering This sets the metering method for calculating the exposure Color This sets the col...

Page 30: ...iately after the image is captured On Off Date Print The date of recording can be printed directly on the still images This function must be activated before the image is captured On Off Blank Single Captures one image at a time Continuous Permits continuous capture of up to 3 images AEB Permits 3 consecutive images in the order of standard exposure underexposure and overexposure compensation Burs...

Page 31: ...s the button Size This sets the size of the video clip that will be captured 640 x 480 320 x 240 Quality This sets the quality compression at which the video clip is captured Fine Standard Color This sets the color of the video clip that will be captured Normal Vivid Sepia Monochrome Blue Red Green Yellow Purple Audio This sets whether or not to record audio at the time of video recording On Off L...

Page 32: ...in this manual titled Protecting Images for further details Voice Memo Refer to section in this manual titled Attaching Voice Memos for further details LCD Bright Refer to section in this manual titled LCD Bright in Capture Menu for further details Resize Resizes a previously saved image Resizing replaces the original image with the changed image It is only possible to resize to a smaller size Qua...

Page 33: ...rmed for a specific period of time the power to the camera is automatically turned off This feature is useful for reducing battery usage 1 Min 2 Min 3 Min Off Date Time Refer to section in this manual titled Setting the Date and Time for further details Sys Reset This returns all basic settings to the camera s default settings The time setting will not be reset Cancel Execute Language Refer to sec...

Page 34: ...ssigned drive letter e or higher 7 Double click on the removable disk and locate the DCIM folder 8 Double click on the DCIM folder to open it to find more folders Your recorded images and video clips will be inside these folders 9 Copy Paste or Drag N Drop image and video files to a folder on your computer Mac users Double click the untitled or unlabeled disk drive icon on your desktop iPhoto may ...

Page 35: ...nd of the USB cable to an available USB port on your computer 4 Turn on your camera 5 Select PC Camera with the c d buttons and press the button 6 Position the camera steadily on top of your computer monitor or use a tripod 7 Launch the videoconferencing application software Simply follow the instructions in the application software to start your camera This function is not supported by Mac You ar...

Page 36: ... into immersive imaging Its intuitive interface and easy to use wizard deliver great looking panoramas while advanced warping blending and alignment tools ensure excellent results To install software 1 Insert the CD ROM that came with the camera into your CD ROM drive The welcome screen appears 2 Click the respective software name Follow the on screen instructions to complete the installation For ...

Page 37: ...card up to 4GB optional File format JPEG DCF 1 1 EXIF 2 2 DPOF AVI Lens 3x optical zoom lens Aperture range 2 9 W 5 2 T Focal length 5 7mm 17 1mm equivalent to 34mm 102mm on a 35mm camera Focus Range Standard 0 4m to infinity Macro Wide 0 1m to infinity Tele 0 35m to infinity Shutter speed 1 2 1 2000 sec Digital zoom 4x Capture mode 4x Playback mode Flash effective range 0 5m 2 4m Wide 0 5m 2 1m T...

Page 38: ...88 1177 2357 2816 x 2112 Fine 14 62 126 253 508 1018 2038 Standard 18 82 166 334 669 1340 2684 Economy 20 90 181 364 730 1461 2925 2272 x 1704 Fine 25 108 219 440 881 1765 3533 Standard 27 121 243 489 980 1963 3929 Economy 31 138 278 559 1120 2242 4489 1600 x 1200 Fine 47 206 415 834 1671 3345 6695 Standard 57 246 494 993 1989 3982 7969 Economy 63 273 549 1102 2208 4420 8847 640 x 480 Fine 118 509...

Page 39: ...e protected Remove the write protection Images do not appear on the LCD monitor LCD monitor is dark Adjust the brightness of the LCD monitor in the menu Although it is set to auto focus it does not focus The lens is dirty Wipe clean with a soft dry cloth or lens paper The distance to the subject is smaller than the effective range Get your subject within the effective focus range The contents on t...

Page 40: ... Select the item you want to configure with the c d buttons and press the button Images Select whether you want to print specific image or all images You may also select printing number for specific image Date Print According to the printer type select whether you want to print the image with date imprint or not Paper Size Select the desired paper size according to the printer type Layout Select t...

Page 41: ...th the c d buttons and press the button to start printing 6 The printing starts and the figure shown on the right hand side appears COMPLETE will be displayed temporarily reminding you that the printing procedure is finished If an error is detected during the connection i e the printer hardware problem between camera and printer PRINT ERROR will be displayed If an error is detected during the comm...

Page 42: ...oductos Italian Il simbolo è in accordo con la Direttiva 2002 96 EC sui Rifiuti Apparecchiature Elettriche ed Elettroniche RAEE Il simbolo indica l obbligo della raccolta separata delle apparecchiature elettriche ed elettroniche pertanto si raccomanda d utilizzare i sistemi di raccolta e o restituzione disponibili nella vostra zona per queste tipologie d apparecchiature Swedish Märket anger överen...

Page 43: ......

Page 44: ...er button 4 Status LED 5 Microphone 6 Lens 7 Self timer LED 8 Zoom lever EN 1 Rear View 1 LCD monitor 2 Mode button 3 Menu button 4 Direction button S button Focus button X button Flash button T button Self timer button Delete button W button Backlight Exposure compensation button 5 Strap holder 6 USB or AV OUT terminal 7 Set button Display button 8 Play button 9 Battery Memory card cover 10 Tripo...

Page 45: ... of battery Remove the battery after charging is completed 2 1 EN 3 CAPTURE MODE Capturing Images Your camera is equipped with a 3 0 full color TFT LCD monitor to help you compose images playback recorded images video clips or adjust menu settings 1 Press the button to turn the power on The status LED lights green and the camera is initiated If the power is turned on in or mode the lens will exten...

Page 46: ...s the button 4 Select Single or All with the c d buttons and press the button Single Erases the selected image or the last image All Erases all of the images except for the protected images Select Erases a number of selected images 5 Select Execute with the c d buttons and press the button To not erase select Cancel and press the button Erasing selected images This erases a number of selected imag...

Page 47: ...n f EN 7 TRANSFERRING FILES TO YOUR COMPUTER System Requirement Downloading Your Files 1 Connect one end of the USB cable to an available USB port on your computer 2 Connect the other end of the USB cable to the USB terminal on the camera 3 Turn on your camera 4 Select PC using the c d buttons and press the button 5 From the Windows desktop double click on My Computer 6 Look for a new removable di...

Page 48: ......

Reviews: