background image

11

When the machine is not use, the power source
should be disconnected.

ASSEMBLING AND DISASSEMBLING THE
DEPRESSED CENTER WHEEL (Fig. 2)

CAUTION Be sure to switch OFF and disconnect the

attachment plug from the receptacle to avoid
a serious accident.

1. Assembling (Fig. 2)
(1) Turn the disc grinder upsidedown so that the spindle

is facing upward.

(2) Align the across flats of the wheel washer with the

notched part of the spindle, then attach them.

(3) Fit the protuberance of the depressed center wheel

onto the wheel washer.

(4) Screw the wheel nut onto the spindle.
(5) While pushing the push button with one hand, lock

the spindle by turning the depressed center wheel
slowly with the other hand.
Tighten the wheel nut by using the supplied wrench
as shown in Fig.2.

2. Disassembling

Follow the above procedures in reverse.

CAUTIONS

Comfirm that the depressed center wheel is mounted
firmly.

Confirm that the push button is disengaged by
pushing push button two or three times before
switching the power tool on.

MAINTENANCE AND INSPECTION

1. Inspecting the depressed center wheel

Ensure that the depressed center wheel is free of
cracks and surface defects.

2. Inspecting the mounting screws

Regularly inspect all mounting screws and ensure
that they are properly tightened. Should any of the
screws be loose, retighten them immediately. Failure
to do so could result in serious hazard.

3. Inspecting the carbon brushes

For your continued safety and electrical shock
protection, carbon brush inspection and replacement
on this tool should ONLY be performed by a Hitachi
Authorized Service Center.

4. Replacing supply cord

If the supply cord of Tool is damaged, the Tool
must be returned to Hitachi Authorized Service
Center for the cord to be replaced.

5. Maintenance of the motor

The motor unit winding is the very “heart” of the
power tool. Exercise due care to ensure the winding
does not become damaged and/or wet with oil or
water.

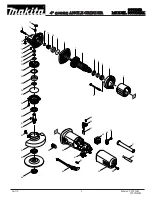
6. Service parts list
CAUTION:

Repair, modification and inspection of Hitachi Power
Tools must be carried out by a Hitachi Authorized
Service Center.
This Parts List will be helpful if presented with the
tool to the Hitachi Authorized Service Center when
requesting repair or other maintenance.
In the operation and maintenance of power tools,
the safety regulations and standards prescribed in
each country must be observed.

MODIFICATIONS:

Hitachi Power Tools are constantly being improved
and modified to incorporate the latest technological
advancements.
Accordingly, some parts may be changed without
prior notice.

NOTE
Due to HITACHI’s continuing program of research and
development, the specifications herein are subject to
change without prior notice.

 02Eng_G10SQ_ChS.p65

12.7.20, 9:51

11

Summary of Contents for G10SQ

Page 1: ...Read through carefully and understand these instructions before use Disc Grinder Handling instructions G 10SQ G 12SQ G 13SQ G12SQ 000 G10SQ cover Chs p65 10 2 16 10 20 2 ...

Page 2: ...eel nut 3 Depressed center wheel 4 Wheel washer 5 Wheel guard 6 Spindle 7 Push button 8 Off lock lever 9 Switch lever 0 Tail cover A On lock button 1 2 3 4 5 6 7 a 8 9 0 A B b A C 1 3 2 00Chs Table G10SQ Chs p65 10 2 8 14 10 1 ...

Page 3: ...2 01Chs G10SQ ChS p65 10 2 16 10 25 2 ...

Page 4: ...3 01Chs_G10SQ_ChS p65 12 7 26 10 26 3 ...

Page 5: ...4 01Chs_G10SQ_ChS p65 12 7 26 14 28 4 ...

Page 6: ...5 䡬 䡬 䡬 01Chs_G10SQ_ChS p65 12 7 20 9 59 5 ...

Page 7: ...6 䡬 䡬 䡬 䡬 䡬 䡬 䡬 01Chs_G10SQ_ChS p65 12 7 20 9 59 6 ...

Page 8: ...y adjusting key or wrench before turning the power tool on A wrench or a key left attached to a rotating part of the power tool may result in personal injury e Do not overreach Keep proper footing and balance at all times This enables better control of the power tool in unexpected situations f Dress properly Do not wear loose clothing or jewellery Keep your hair clothing and gloves away from movin...

Page 9: ...essory may fly away and cause injury beyond immediate area of operation j Hold power tool by insulated gripping surfaces only when performing an operation where the cutting accessory may contact hidden wiring or its own cord Cutting accessory contacting a live wire may make exposed metal parts of the power tool live and shock the operator k Position the cord clear of the spinning accessory If you ...

Page 10: ... fitted in accordance with the manufacturer s instructions Ensure that blotters are used when they are provided with the bonded abrasive product and when they are required Ensure that the abrasive product is correctly mounted and tightened before use and run the tool at no load for 30 s in a safe position stop immediately if there is considerable vibration or if other defects are detected If this ...

Page 11: ...he life of the machine and ensure a first class finish it is important that the machine should not be overloaded by applying too much pressure In most applications the weight of the machine alone is sufficient for effective grinding Too much pressure will result in reduced rotational speed inferior surface finish and overloading which could reduce the life of the machine 2 Grinding angle Do not ap...

Page 12: ...ly tightened Should any of the screws be loose retighten them immediately Failure to do so could result in serious hazard 3 Inspecting the carbon brushes For your continued safety and electrical shock protection carbon brush inspection and replacement on this tool should ONLY be performed by a Hitachi Authorized Service Center 4 Replacing supply cord If the supply cord of Tool is damaged the Tool ...

Page 13: ...4 W FLANGE D4 25 2 PUSHING BUTTON 1 3 GEAR COVER ASS Y 1 4 SPECIAL NUT M6 1 6 BALL BEARING 628VVC2PS2 L 1 7 BEARING HOLDER 1 8 ARMATURE 1 9 FAN GUIDE 1 10 HEX HD TAPPING SCREW D4 70 2 11 STATOR 1 12 DUST SEAL 1 13 BALL BEARING 626VVC2PS2L 1 14 RUBBER BUSHING 1 15 LOCK PIN 1 16 SEAL LOCK SCREW 2 W SP WASHER M4 10 17 BEARING COVER 1 18 BALL BEARING 6201VVCMPS2L 1 19 FELT PACKING 1 20 PACKING GLAND 1...

Page 14: ... KEY 1 23 SPINDLE 1 24 MACHINE SCREW W SP WASHER M5 16 2 25 SET PLATE 1 26 WHEEL GUARD ASS Y 1 27 WHEEL WASHER 1 28 D C WHEELS 115MM 4T A36Q 1 29 WHEEL NUT C 1 30 GEAR SET 1 31 HOUSING ASS Y 1 32 NAME PLATE 1 33 CONNECTOR 50091 1 34 TERMINAL 1 35 PILLAR TERMINAL 1 36 TAIL COVER B 1 37 TAPPING SCREW W FLANGE D4 30 1 38 TAPPING SCREW W FLANGE D4 20 1 39 MACHINE SCREW W WASHER M3 5 6 2 40 SWITCH 1 It...

Page 15: ... KEY 1 23 SPINDLE 1 24 MACHINE SCREW W SP WASHER M5 16 2 25 SET PLATE 1 26 WHEEL GUARD ASS Y 1 27 WHEEL WASHER 1 28 D C WHEELS 125MM 4T A36Q 1 29 WHEEL NUT C 1 30 GEAR SET 1 31 HOUSING ASS Y 1 32 NAME PLATE 1 33 CONNECTOR 50091 1 34 TERMINAL 1 35 PILLAR TERMINAL 1 36 TAIL COVER B 1 37 TAPPING SCREW W FLANGE D4 30 1 38 TAPPING SCREW W FLANGE D4 20 1 39 MACHINE SCREW W WASHER M3 5 6 2 40 SWITCH 1 It...

Page 16: ...209 Code No C99188622 F Printed in China Hitachi Koki Co Ltd 000_G10SQ_cover_Chs p65 12 7 20 9 00 1 ...

Reviews: