background image

– 8 –

EN

1. Open the battery compartment cover.

2. Insert two AA batteries, with each one

oriented correctly.

3. Close the cover.

NOTES

• Do not mix alkaline and manganese batteries.
• Do not mix old and new batteries.

Loading the Batteries

FUNCTIONAL OVERVIEW

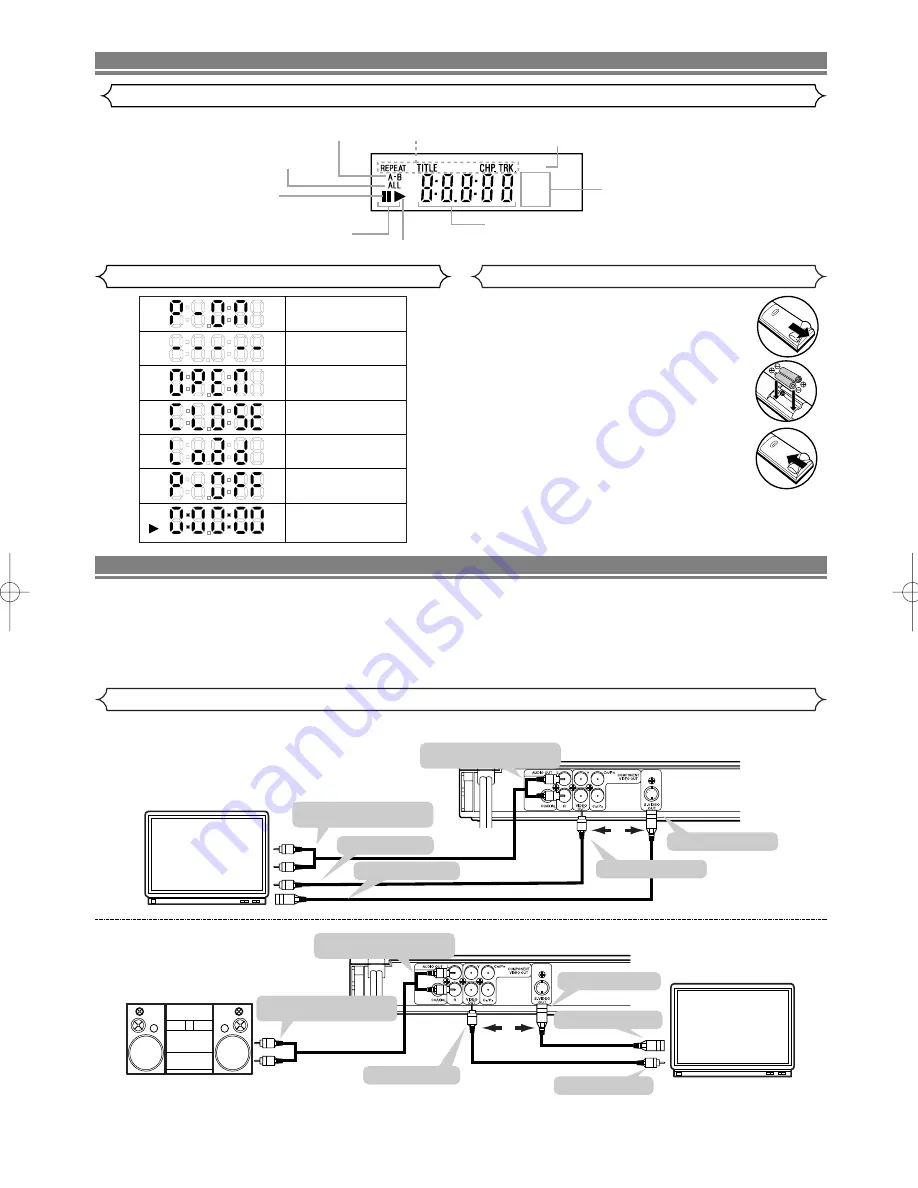
Display

Displays During Operation

Lights up when the inserted 
disc is being played back.

Displays a type of the disc 
which is inserted on the tray.
• DVD: DVD 
• CD: Audio CD, MP3

Lights up when the 
inserted disc comes 
to a pause.

Lights up when the 
A-B repeat function is on

Lights up when the 
repeat function is on.

Lights up when playing back 
in slow mode. (DVD)

Displays the elapsed time of the title 
or track. The number of a new title, 
chapter, or track is displayed when 
a chapter or track is switched. 

Lights up when the ALL
repeat function is on.

GROUP

P.SCAN

DVD

 CD

Lights up when the 
progressive scan 
system is activated.

Power on

No disc inserted/can not read 

Tray open

Tray closed

Loading the Disc

When a disc is being 
played back

Power off

DVD

HOOKUPS

CAUTION:

•  Be sure to turn off the Player and equipment before connecting.
•  Read through the operation manual for the equipment to be connected.
•  Be sure that the colors of the jacks and plugs match up when using VIDEO/AUDIO cables.
•  Be sure to keep the Player connection cables separate from the TV antenna cable when you install the Player, because it

may cause electrical interference when you are watching television programs.

•  DTS audio cannot be produced with an analogue connection.

Connecting to a TV using a VIDEO OUT Jack or an S-VIDEO OUT Jack

A/V-compatible or 

wide screen TV

To Right (red) and Left (white)

AUDIO OUT jacks

To VIDEO INPUT jack

To Right (red) and Left (white)

AUDIO INPUT jacks

To S-VIDEO OUT jack

To S-VIDEO INPUT jack

To VIDEO OUT jack

or

[Fig. 5]

Use an S-Video cable (commercially available) in place of the yellow video cable to enjoy higher picture quality.

[Fig. 6]

A/V-compatible or 

wide screen TV

or

To Right (red) and Left (white)

AUDIO OUT jacks

To VIDEO INPUT jack

To Right (red) and Left (white)

ANALOG AUDIO INPUT jacks

To S-VIDEO OUT jack

To S-VIDEO INPUT jack

To VIDEO OUT jack

Stereo system

[Fig. 4]

E5911UD

.qx4  04.1.27  0:05 PM  Page 8

Summary of Contents for DV-P745U

Page 1: ... antenna system should not be locat ed in the vicinity of overhead power lines or other electric light or power circuits or where it can fall into such power lines or circuits When installing an outside antenna system extreme care should be taken to keep from touching such power lines or circuits as contact with them might be fatal 16 Overloading Do not overload wall outlets extension cords or int...

Page 2: ...talled and used in accordance with the instructions may cause harmful interference to radio communications However there is no guarantee that interference will not occur in a particular installation If this equipment does cause harmful interference to radio or television reception which can be determined by turning the equipment off and on the user is encouraged to try to correct the interference ...

Page 3: ...T TITLE CHAPTER 12 REPEAT TRACK 12 A B REPEAT 12 Program CD 12 MP3 Playback 12 Random Playback CD 12 On Screen Information 13 Program MP3 13 Random Playback MP3 13 Audio Language 13 Stereo Sound Mode 13 Subtitle Language 13 Camera Angle 13 Changing the On Screen Display 13 Parental Control 14 RATING LEVEL 14 IF YOU FORGET THE PASSWORD 14 CONTROL LEVELS 14 Marker Setup Screen 14 DVD SETUP 14 Audio ...

Page 4: ... encoded in a specific region format can only be played back on DVD player with the same region code 1 ABOUT THE DISCS For Customer Use Read carefully the information located at the bottom of your DVD player and enter below the Serial No Retain this information for future reference Model No DVD player Serial No __________________________ Playable Discs The following discs can be played back on thi...

Page 5: ...he DVD Player which are used to send high quality Component Video to televisions equipped with component inputs Dimmer Dim the display brightness Bit rate indication DRC Dynamic range control You can control the range of sound volume Black Level Setting DVD Data on a DVD is divided into sections called titles and then into subsections called chapters each of which is given a title or chap ter numb...

Page 6: ...L OVERVIEW 9 MAIN AC Power Cord Connect to a standard AC outlet 10 COAXIAL Digital audio out Use coaxial digital audio out to connect to a compatible Dolby Digital receiver Use to connect to a Dolby Digital decoder or DTS decoder 11 AUDIO OUT Left Right Connect to the AUDIO inputs of an amplifier receiver or stereo system 12 VIDEO OUT Use a video cable to connect one of the jack to Video input on ...

Page 7: ...11 Arrow Buttons s s B B p po o Move the cursor and determines its position 12 ENTER Press to accept a setting 13 RETURN Returns to the previous operation 14 SKIP Press to skip Chapters or Tracks 15 STOP Press to stop the disc motion 16 E E Press to play a DVD an Audio CD or an MP3 disc in the fast reverse motion 17 PAUSE STEP Press to pause Disc playback Press repeatedly to advance the DVD pictur...

Page 8: ... is being played back Power off DVD HOOKUPS CAUTION Be sure to turn off the Player and equipment before connecting Read through the operation manual for the equipment to be connected Be sure that the colors of the jacks and plugs match up when using VIDEO AUDIO cables Be sure to keep the Player connection cables separate from the TV antenna cable when you install the Player because it may cause el...

Page 9: ... box connection remove that cable from your TV s antenna terminal and reconnect it to the coaxial antenna input terminal of the RF Modulator usually marked ANT IN then con nect the RF modulator to your TV s antenna terminal NOTE The picture quality from DVDs will not be as good if the DVD player is connected to the TV s antenna terminal through an RF Modulator Connecting to a TV or a Stereo TV tha...

Page 10: ...pens when the 1st layer switches to the 2nd layer This is not a malfunction 5 4 3 2 1 MP3 CD DVD Press MENU The DVD main menu will appear If the feature is not available symbol may appear on the TV screen If disc menu is available on the disc audio lan guage subtitle options chapters for the title and other options will appear for selection Press Arrow L K B s to select an item and ENTER to confir...

Page 11: ...n playback of an Audio CD at a specific Track Using the Numerical buttons Press numerical buttons to enter the desired Track number Playback will start at the selected track For single digit tracks 1 9 press a single number eg track 3 press 3 To play track 26 press 10 2 6 on the numerical button Using the SEARCH MODE Press SEARCH MODE The Track search display appears Within 30 seconds select a des...

Page 12: ... press REPEAT repeatedly until ALL appears during playback To erase all programs at once select ALL CLEAR and press the ENTER button at step 2 3 2 1 CD Program CD 12 EN PLAYING A DISC A B REPEAT Press A B REPEAT at your chosen starting point A appears briefly on the TV screen Press A B REPEAT again at your chosen end point A B appears briefly on the TV screen and the repeat sequence begins To exit...

Page 13: ...e top of the screen To turn off subtitles press s or B until OFF appears NOTES If your language is not shown after pressing AUDIO or SUBTITLE several times the disc may not have that lan guage However some discs allow you to change audio language or subtitle language setting in the disc menu Operation varies depending on the disc so refer to the manual included in the disc If you choose a Language...

Page 14: ...children DVD RATING LEVEL Rating Level allows you to set the rating level of your DVDs Play back will stop if the disc s ratings exceed the level you set Press SETUP in STOP mode Press s or B to select CUSTOM then press ENTER Press s or B to select PARENTAL then press ENTER Enter your four digit password then press ENTER Press K or L to select RATING LEVEL then press ENTER Press K or L to select t...

Page 15: ...e Only the languages supported by the disc can be select ed Press SETUP to exit NOTE Language Setting for Audio and Subtitle is not available with some discs Then use AUDIO and SUBTITLE Details are on page 13 6 5 QUICK 4 3 2 1 DVD Language Setting DISPLAY TV ASPECT 4 3 L BOX STILL MODE AUTO ANGLE MARK ON FRONT DISPLAY BRIGHT LOGO ON LANGUAGE AUDIO ORIGINAL SUBTITLE OFF DISC MENU ENGLISH PLAYER MEN...

Page 16: ...957 Malagasy 5953 Malay 5965 Malayalam 5958 Maltese 5966 Maori 5955 Marathi 5964 Moldavian 5961 Mongolian 5960 Nauru 6047 Nepali 6051 Norwegian NOR 6061 O R Occitan 6149 Oriya 6164 Oromo Afan 6159 Panjabi 6247 Pashto Pushto 6265 Persian 5247 Polish 6258 Portuguese POR 6266 Quechua 6367 Rhaeto Romance 6459 Romanian RUM 6461 Russian RUS 6467 S Samoan 6559 Sangho 6553 Sanskrit 6547 Scots Gaelic 5350 ...

Page 17: ...put Use a DIGITAL AUDIO OUT jack when outputting the DTS audio Picture freezes momentarily Check the disc for fingerprints scratches and during playback clean with a soft cloth wiping from center to edge Clean the disc Disc can t be played Clean the disc Ensure the disc label is facing up Check if the disc is defective by trying another disc Cancel the parental lock or change the control level Ins...

Page 18: ...idamente para avanzar la imagen DVD paso a paso o un fotograma cada vez 18 Botón D D Presione para avanzar rápidamente el Disco Presione el Botón PAUSE luego presione el Botón FWD iniciar a reproducción en movimiento lento Presione el Botón FWD repetidamente para cambiar la velocidad de avance del movimiento lento 19 Botón PLAY Presione para comenzar a reproducir 20 Botón DISC NAVIGATION Púlselo p...

Page 19: ...o de pista Se enciende cuando la función de repetición ALL está activada Se enciende cuando la función de repetición A B está activada GROUP P SCAN DVD CD Se enciende cuando el sistema de escaneado progresivo se activa 1 Abra la tapa del compartimiento de las pilas 2 Introduzca dos pilas AA con las polaridades colocadas correctamente 3 Cierre la tapa NOTAS No mezcle pilas alcalinas y de manganeso ...

Page 20: ...a en la pan talla Pulse el botón STOP para detener la reproducción 5 4 Hitachi has made every effort to assure you hours of trouble free operation from your unit However should you require service a network of Hitachi Authorized Service Facilities has been established in all 50 states and Puerto Rico Each facility will provide you with convenient and expedient assistance Our service Hot line opera...

Page 21: ... 21 SP MEMO ...

Page 22: ... 22 SP MEMO ...

Page 23: ... FOR PARTS THE DURATION OF THE APPLICABLE EXPRESS WARRANTY CONTAINED ABOVE HITACHI SHALL NOT BE LIABLE TO THE PURCHASER OR TO ANY OTHER PERSON FOR ANY INCI DENTAL OR CONSEQUENTIAL DAMAGES OR LOSS OF PROFIT OF PRODUCT RESULTING FROM ANY DEFECT IN OR MALFUNCTION OR FAILURE OF THIS HITACHI PRODUCT SOME STATES DO NOT ALLOW LIMITATIONS ON HOW LONG AN IMPLIED WARRANTY LASTS OR THE EXCLUSION OF INCIDENTA...

Page 24: ... 2 All repairs must be performed by a Hitachi Authorized Service Facility 3 This warranty is valid only in the U S A LIMITED WARRANTY Hitachi America Ltd Home Electronics Division Hitachi war rants this component in duration as stated below Register your product on line at hitachi com tv or mail this portion to the following address Attn Warranty Department Hitachi America Ltd Home Electronics Div...

Reviews: