background image

5.3  Installing the DSP Air Compressor

 I

nstall the 

DSP

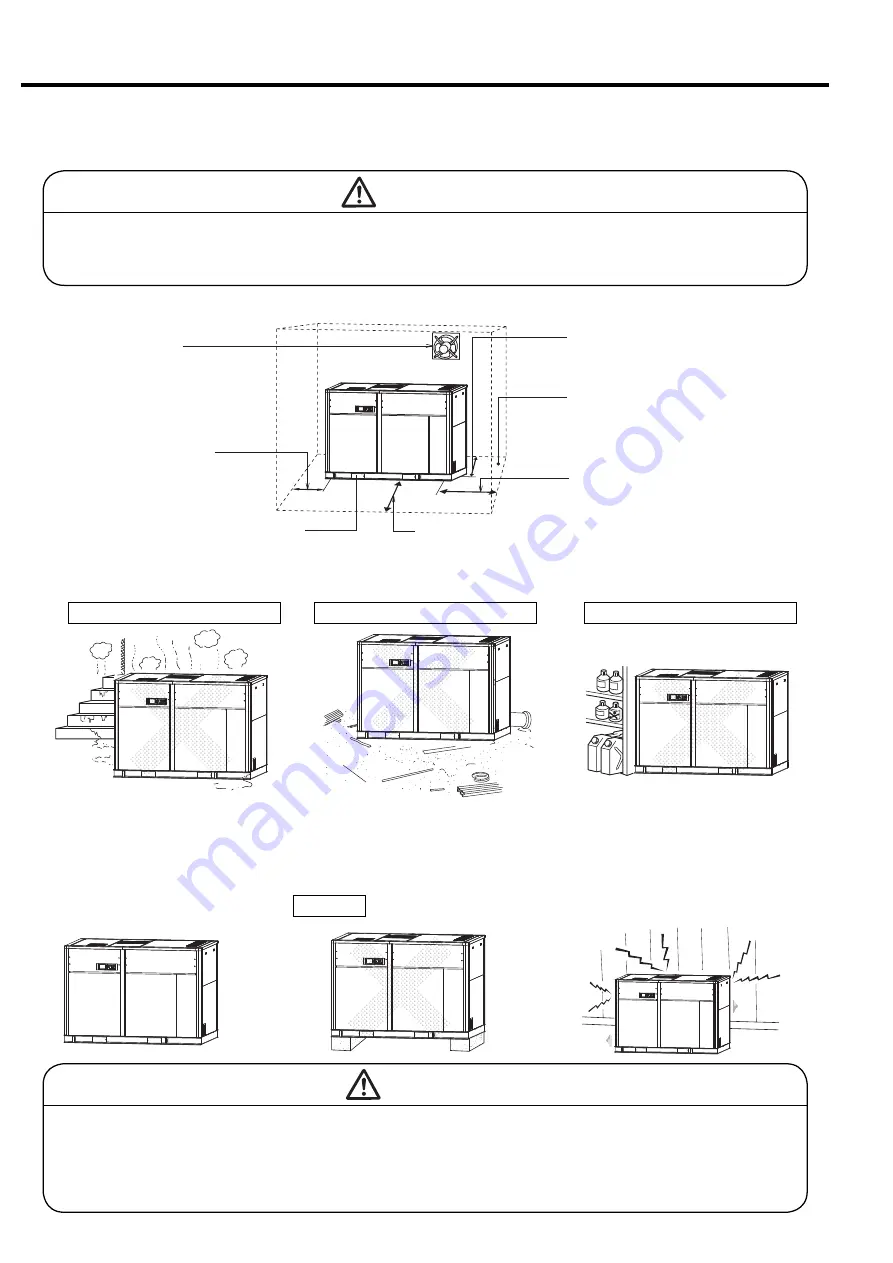
 in a bright, wide, and airy room as follows:

Piping and

Maintenance Space

Air Intake Maintenance Space

Maintenance Space

Maintenance Space

Keep a space of 1.0 m (39 

inches) or more to connect 

a plant airline pipe and 

ease the maintenance 

servicing.

Keep a space of 1.5 m (59 inches) or 

more. Note that the air intake grill is 

located on the rear enclosure panel.

Keep a space of 0.8 m (31 inches) or 

more to connect the discharge 

compressed air piping and for ease of 

maintenance.

Keep a space of 1.5 m (59 inches) or 

more to allow opening the front door.

Ventilating Fan

If you install the DSP in a 

small room, provide a 

ventilating fan to keep the 

room temperature at 40


(104

 ) or lower.

Plug the fork slots with 

the fork slot covers 

(standard accessory)

Foundation

Provide a vibration-absorbing mat if 

the foundation is vibrative. If it is too 

vibrative, look for another dequate 

location.


Install the 

DSP

 in a dry and dust-free room, and avoid the following.

 I

nstall the 

DSP

 on a level floor.


Do not install the 

DSP

 near a wall. Doing 

this may cause the operating sound to 
resonate and increase the sound levels.

Raindrops, Basements, Steam

Metals, Sand, Other Hard Materials

Harmful Gases

Do not set the DSP 
on the blocks.

(                                         )

Chlorine, hydrogen sulfide, sulfurous acid, highly 
concentrated ozone, and ammonium gases

38

5.  INSTALLING AND PIPING THE DSP [Installing the DSP Air Compressor]

 WARNING

1.  Keep flammable solvents or any other hazardous chemicals away from the 

DSP

. Such chemicals may be 

sucked by the air end, compressed, and exploded.

2. Do not use fire near the 

DSP

; otherwise the sparks may enter the air end and burn it internally.

Prohibited

 CAUTION

  Install the 

DSP

 indoors. Installing it outdoors may lead to a damage of the air end due to water vapor, 

dust, etc.

  The 

DSP

 installation room must have an air intake opening and an air exhaust opening and must be 

well ventilated. If the room is poorly ventilated, hot air exhausted by the DSP may cause the room 
temperature to rise abnormally and in the worst case lead to damage of the air end.

These conditions may cause leakage, 

condensation, rusting and CPU mal-

function.

These conditions may cause deterio-

ration of motor insulation level, dam-

age to the air end bearings and CPU 

malfunction.

These conditions may cause oil deterio-

ration, corrosion of coolers and peeling 

of the rotor coatings.

Installing on a level floor is required to keep an 
adequate amount of lubrication oil in the DSP 
and prevent excessive noise and vibration.

Summary of Contents for DSP-132W6N

Page 1: ...and this INSTRUCTION MANUAL completely thereby operating it safely and properly Place the INSTRUCTION MANUAL near the air compressor to make it available at any time and refer to it as the need arises This is a warning If handled improp erly death or severe injury could result This is a caution If handled improp erly injury and or physical damage could result This graphic is for items that need at...

Page 2: ... DSP s model name Serial Number etc into the back cover of this Instruction Manual Such information may be helpful when ordering parts periodic maintenance and overhaul Hitachi may make improvements and or changes in the products described in this publication at any time without notice DS P 160 V W 6 N Dry or Oil Free Rotary Screw Air Compressor Packaged N Type NEXT Series Frequency 6 60 Hz W Wate...

Page 3: ...essor 39 5 5 Ventilation of Air Compressor Room 43 6 STARTUP OPERATION 6 1 Air Compressor 44 6 2 Oil Mist Remover 46 7 WIRING 7 1 Power Supply Transformer and Power Cable 47 7 2 MIV and WIVM wiring 47 7 3 Connecting a Power Cable 47 7 4 Wiring Connection Diagram 50 7 5 Control Panel LCD monitor Specifications 50 8 STANDARD COMPONENTS 8 1 Standard Components 57 AND SUBSYSTEMS 8 2 Air Oil Flow 58 8 ...

Page 4: ...s operating or immediately after it has stopped as the components are extremely hot and can cause severe injury Before servicing the air compressor stop it disconnect the power then wait for the air compressor to cool down Heated WARNING Electric Shock Hazard Before servicing or wiring the air compressor disconnect the power This will prevent anyone from turning on the power and causing an elec tr...

Page 5: ...ning on the power and causing an electric shock that could lead to severe injury or death Do not allow any unlicensed person to wire the air compressor Always use a licensed electrician Ground the air compressor WARNING WARNING WARNING WARNING Hot Surface Do not directly touch the air end discharge air pipe and coolers when the air compressor is operating and immediately after it has stopped becau...

Page 6: ...pply Port Check the specifica tions power supply and voltage before connecting the power supply Air Exhaust Air Exhaust Air Exhaust Air Intake Air Intake Oil Filling Port Use the port to fill the gear case with oil OMR See page 55 for the details Oil Level Gauge This indicates the quantity of the oil in the gear case Check the oil level before starting the DSP and when operating it Sling Fitting U...

Page 7: ... the air compressor Air Exhaust Air Compressor Package Enclosure Enclosure panels lower the sound level of the air compressor package Plate of Operating Servicing Instructions Read carefully the plate before operating and servicing the DSP Sling Fitting Use the sling fitting when moving and installing the DSP air compressor Air Intake Air Compressor Package Compressed Air Discharge Air Intake Inle...

Page 8: ...il Filter Air Intake Filter 1st Stage Air end 2nd Stage Air end Main Motor Oil Mist Remover Discharge Pipe Compressed Air Discharge Oil Level Gauge Common Base Starter Control Box Safety Relief Valve Enclosure Instrument Panel Gear Case Oil Filling Port Oil Pump Oil Cooler Intercooler Blow off air cooler ...

Page 9: ...OWER light off 2 3 Daily Operating Components Controls on the Instrument Panel Aftercooler and Intercooler Condensate Drain Valve Lubricating Oil Oil Level Gauge 1 2 3 4 Oil Use genuine Hitachi GL 68 DSP Compressor Oil Replace the oil every 8 000h operating hour or every 2 year whichever comes earlier モニタ メニュー リセッ ト 遠 方 機 能 電 源 運 転 停 止 運転状況 故 障 運転管理 負 荷 遠 方 起動待ち 設 定 自 動 UP DOWN 警 報 記 憶 表示切替 ワイ ドモー...

Page 10: ...the sight glass on the control line filter Control Line Filter Sight Glass Shut off the cooling water when the compressor is off Open the peacock for draining water Also open the valve of the water drain port and drain the cooling water Be especially careful of freezing during the winter For details see page 61 Water drain peacock Water drain port Cooling Water 5 ...

Page 11: ... 障 運転管理 負 荷 遠 方 起動待ち 設 定 自 動 UP DOWN 警 報 記 憶 表示切替 ワイ ドモー ド AUTO MONITOR MENU SET SELECT WIDE 2 RUNNING CONTROL START REMOTE 1 FUNC 10h ALARM STR REMOTE RUNNING MODE AUTO START POWER LOAD RESET SHUTDOWN STOP MONITOR UNLOAD STOP Keeping the second stage air end as dry as possible is essential for preventing it from rusting due to a long term operation suspension When stopping the DSP therefore execu...

Page 12: ... light yellow ON glowing when an automatic operation an AUTO operation a schedul ing operation or lead lag operation is activated ON flashing when external calendar or scheduling operation is abnormal page 16 20 RESET Button Reset the system or cancels the shutdown alarm circuit page 15 MENU Button Functions to display the menu screen and move the cursor page 18 UP DOWN Buttons SET Button It saves...

Page 13: ...the instrument panel it also acts as a right arrow key stop page 28 Starts the air compressor The OPERATION light red turns on while the compressor is running Press this button to stop the air compressor The air compressor will stop after removing the condensate from the air end This stop button is effective while a stand alone operation EMERGENCY STOP button Stops for emergency page 12 POWER ligh...

Page 14: ... 㼀 㻵 㻹 㻱 䠖 㻞 㻠 䡏 㼁 㻺 㻸 㻻 㻭 㻰 㻌 㼀 㻵 㻹 㻱 䠖 㻝 䡏 㻯 㼁 㻾 㻾 㻱 㻺 㼀 䠖 㻡 㻜 䠝 㻲 㻾 㻱 㻽 㼁 㻱 㻺 㻯 㼅 䠖 㻞 㻟 㻚 㻤 䠤 䡖 㻻 㼁 㼀 㻼 㼁 㼀 䠖 㻝 㻜 㻚 㻡 䡇 䠳 The asterisk flashes when the clock and total run ning hours are engaged 5 sec 3 2 2 Start Stop When the START button is pressed the START light turns on and the compressor starts operating When run ning the asterisk on the right side of running hours flashes and running tim...

Page 15: ... 㼀 㻱 㼜 㼟 㻴 㻵 㻳 㻴 㻌㻰 㻵 㻿 䠊 㼀 㻱 㼜 㼟 㼕 㼕 㻯 㻻 㻺 㼀 㻭 㻯 㼀 㻻 㻾 㻌㻱 㻾 㻾 䠖 㻻 㼂 㻱 㻾 㻸 㻻 㻭 㻰 䠖 㻸 㻻 㼃 㻌 㼃 䠊 㻵 㻺 㼀 㻿 㼀 㻳 㻌 㻼 䠊 㻰 㻾 㼅 㻱 㻾 㻌㻌㻌㻌 㼃 䠋 㻻 㻌 㻿 㻱 㻼 䠊 㻱 㻸 㻱 㻹 㻱 㻺 㼀 㻼 㼞 㼑 㼟 㼟 㻾 㻱 㻿 㻌 㼍 㼒 㼠 㼑 㼞 㻌 㻯 㻴 㻷 䠊 㻝 3 3 1 How to Move between the Various Displays Menu Displays Follow the bottom line message on the display 3 3 How to Use the liquid Crystal Display LCD About the LCD Backlight 1 In the event that no bu...

Page 16: ... 㼀 䠊 㼀 㻱 㻹 㻼 䠖 㻖 㻖 㻖 䉣 㻞 㻺 㻰 㻌 㻿 㼁 㻯 㼀 䠊 㼀 䠊 䠖 㻜 㻤 䉣 㻹 㻭 㻵 㻺 㼀 㻱 㻺 㻭 㻺 㻯 㻱 㻴 㻾 䠊 㼀 㻻 㻌 㻹 㻭 㻵 㻺 㼀 䠖 㻜 㻜 㻜 㻜 䡄 㻺 㻱 㼄 㼀 㻌 㻹 㻭 㻵 㻺 㼀 䠖 㻖 㻖 㻖 㻖 㻝 1 Displays current time Asterisk flashes 2 Indicates a capacity control type 3 Displays compressor discharge port pressure 4 Indicates total running hours RUN HOUR total loaded hours LOAD HOUR and total number of loads LOAD TIMES Blink asterisk indicates runn...

Page 17: ...on nection FAILURE and TEMPERATURE SENSOR flash and the location of the abnormality is indicated 㻞 㻜 㻜 㻥 䠋 㻜 㻤 䠋 㻜 㻝 㻝 㻥 䠖 㻝 㻥 㻖 㼀 㼅 㻼 㻱 䠖 㼂 㻿 㻰 㻭 㻌 㻌 㻌 㻌 㻌 㻌 㻰 㻵 㻿 䠊 㻼 㻾 㻱 㻿 㻿 䠖 䚷 䚷 㻢 㻣 㼜 㼟 㼕 䠘 㻲 㻭 㻵 㻸 㼁 㻾 㻱 䠚 㻿 㼅 㻿 㼀 㻱 㻹 㻱 㻾 㻾 䠖 㼙 㼙 㼙 㼙 㻿 㼅 㻿 㼀 㻱 㻹 㻌 㻾 㻱 㼀 㻾 㼅 㻼 㻯 㻮 㻌 㻱 㻾 㻾 䠖 㼚 㼚 㼚 㼚 㼚 㼚 㻼 㻾 㻱 㻿 㻿 䠊 㻿 㻺 㻿 㻾 㻌 㻱 㻾 㻾 䠖 㼛 㼀 㻱 㻹 㻼 䠊 㻿 㻺 㻿 㻾 㻱 㻾 㻾 䠖 㼜 㻰 䡅 㼟 㼏 㼛 㼚 㼚 㼑 㼏 㼠 㼜 㼛 㼣 㼑 㼞 㼟 㼚 㼐 㼏 㼛 㼚 㼠 㼍 㼏 㼠...

Page 18: ...Operation starts automatically when the preset restart time comes LEAD LAG OPERATION STOP Note applies only to machines equipped with two unit alternate operation AUTO light ON When the operation control mode is set to dual or backup on the operation mode setting screen standby status of the slave machine in dual or backup operation is indicated DRYER PRESTARTED Note Applies only to machines equip...

Page 19: ...㻿 㻱 㼀 㻌 㼍 㼒 㼠 㼑 㼞 㻌 㻯 㻴 㻷 䠊 㻹 㻭 㻵 㻺 㼀 䠊 㻯 㻻 㻹 㻼 㻸 㻱 㼀 㻱 㻰 㻿 㼃 㻵 㼀 㻯 㻴 㻱 㻰 㻌 㼀 㻻 㻌 㻸 㻻 㻯 㻭 㻸 㻵 㻺 㻌 㻻 㼂 㻱 㻾 䠮 㻵 㻰 㻱 㻹 㻻 㻰 㻱 㻵 㻺 㻌 㼁 㻺 㻸 㻻 㻭 㻰 㻌 㻿 㼀 㻻 㻼 㻿 㼃 㻵 㼀 㻯 㻴 㻱 㻰 㻌 㼁 㻌 㻹 㻻 㻰 㻱 Every these calendar periods Service the DSP according to the schedules 0 5 years 1 5 years 2 5 years 3 5 years 4 5 years 5 5 years Half Yearly 1 0 years 5 0 years Yearly Half Yearly 2 0 years 4 0 years 2 Yearly Yearly H...

Page 20: ...㻱 㼀 㻴 㻻 㻰 䠖 㻠 䠊 㻿 㼃 㻵 㼀 㻯 㻴 㻻 㼂 㻱 㻾 䠖 㻜 㻝 㻡 㼟 㻭 㻼 㻻 㼂 㻾 㻾 㻸 㻳 㻸 㻿 㻺 When the display switches to the details screen move to the line to be altered with the but tons Move to the item to be altered with the button Alter the setting value with the buttons After altering the setting value press the SET button The cursor moves to the number Press the SET button again The cursor moves to the first numbe...

Page 21: ... conditions for water cooled compressor Displays status of instantaneous power interruption IPI restart setting Displays compressor number Must be distinguished by number is using communication function The screen provides the model and serves as a target for setting status Check the screen when making an inquiry IMPORTANT IMPORTANT Altered setting values can only be entered when the com pressor i...

Page 22: ...imit If control pressure and recovery pressure change 1 to 5 Five Start Stop Time Patterns START Starting Time STOP Stopping Time Y or N Yes starts or stops as scheduled 2 DATA MEASUREMENT TIME Time for recording operation data twice a day can be set Recorded operation data can be confirmed by the 5 operation data record screen If the time limit is altered consult with your dealer or the Hitachi S...

Page 23: ...ded by data measurement time Up to 12 times can be recorded after which the oldest data is deleted one at a time the latest data is displayed for item 1 The screen shows record for 2 times and the necessary data can be con firmed by button operation If altered before time is up the data prior to change is maintained and the time recorded as soon as the data is altered changes 1 and 2 Indicates the...

Page 24: ...ackup etc Dual operation time Switch conditions Switch time Backup pressure Differential pressure Unload Differential pressure Dual operation remaining time AUTO change Speed control mode Factory set V type only Capacity Control Screen Type Left Capacity control F019 Example I type load unload type Type Center Setting type F018 Example Setting 1 Type Right Function Option not supported Pressure lo...

Page 25: ...r with L Press the SWITCH DISPLAY button Load count is then displayed on the screen in units of 10 000 times together with U Each time the SWITCH DISPLAY button is subsequently pressed it continues on to 2 Display of shutdown history and 3 Monitor display of various settings To return one item at a time press 2 To return to discharge pres sure press RESET If the alarm or shutdown light is flashing...

Page 26: ...Y Press 16 times Discharge pressure display A Capacity control type No 0 Control status No 1 Start pressure 1 100 100psi No 2 Recover pressure 1 087 87psi No 5 Start pressure 2 100 100psi No 8 Instantaneous power interruption IPI setting 000 No 9 Compressor address 001 No 1 No 6 Recover pressure 2 087 87psi No 7 Pressure differential 2 007 7psi No 3 Pressure differential 1 007 7psi リセット 1 表示切替 1 2 N...

Page 27: ...taneous power inter ruption IPI setting 0 1 1 0 0 ON 1 OFF F003 Instantaneous power inter ruption IPI detection period setting 1 5 1 1 When IPI is available Instantaneous power interruption is detected between 20ms and the setting detection period then the compressor restarts page 25 Remote operation set ting F005 Remote control switch method 0 3 1 0 0 Panel setting 1 Local fixed 2 Remote fixed 3 ...

Page 28: ...48 F028 Recovery pressure 1 cut in pressure 0 5 0 98 73 142 0 01MPa 1 5psi 0 97 141 F029 P type recovery pressure 1 restart pressure 0 5 0 98 73 142 0 01MPa 1 5psi 0 97 141 Pressure setting 2 3 F035 Control pressure setting 2 control pressure 0 5 1 0 73 145 0 01MPa 1 5psi 1 0 145 F036 Start pressure 2 cut out pressure 0 5 1 02 73 148 0 01MPa 1 5psi 1 02 148 F037 Recovery pressure 2 cut in pressure...

Page 29: ...ing F011 of F mode Capacity control mode AUTO ON AUTO OFF F011 0 Enable 1 Disable Digital monitor display 0 AXX 0 UXX After altering confirm the capacity control mode by dis play of various settings on the digital monitor page 23 For capacity control operation and details see pages 29 and 62 63 Pressure for control can also be switched by F018 pressure setting 1 pressure setting 2 27 3 OPERATING T...

Page 30: ...al operation mode 2 To fix remote operation to remote operation mode Switch from the monitor mode to the setting mode F mode Change the remote operation switch method for remote operation setting F005 from 0 Panel set ting to 2 Remote fixed The REMOTE light lights to indicate that the remote operation mode has been set 3 To set to remote operation by operation button provided externally Consult wi...

Page 31: ...ncerning the air tank see page 41 This function is used for load unload type control and operates only for the ordinary pressure setting Line pressure Energy Saving Effect Load Unload Time Start pressure Unload start pressure Recovery pressure Loadrecoverypressure Start pressure is automatically reduced 15 psi 7 psi Factory set upper lower limit pressure differential ECOMODE differential pressure ...

Page 32: ...ows for starting model Check the pressure after the compressor starts up The compressor stops running if the oil pressure does not rise to at least 12 psi The compressor switches to full load operation within 15 seconds for the starting model and within 8 seconds for the reactor starting model Make sure the discharge pressure rises gradually Make sure the maximum pressure does not exceed the spec ...

Page 33: ...r piping and drain the cooling water To avoid damaging the casing and cooler be careful not to allow freezing during the winter 㻞 㻜 㻜 㻥 䠋 㻜 㻠 䠋 㻝 㻟 㻝 㻥 䠖 㻜 㻞 㻼 㻾 㻱 㻿 㻿 㼁 㻾 㻱 㻵 㻺 㼀 㻿 㼀 㻳 䠊 㻼 䠖 㻌 㻌 㻞 㻥 㼜 㼟 㼕 㻻 㻵 㻸 㻌 㻼 㻾 㻱 㻿 䠖 㻌 㻌 㻝 㻡 㼜 㼟 㼕 㻯 㻸 㼀 䠊 㻼 㻾 㻱 㻿 䠖 㻖 䠊 㻖 㻖 㼜 㼟 㼕 㼀 㻱 㻹 㻼 㻱 㻾 㻭 㼀 㼁 㻾 㻱 㻰 㻵 㻿 䠊 㼀 㻱 㻹 㻼 㻝 䠖 㻟 㻞 㻜 䉣 㻰 㻵 㻿 䠊 㼀 㻱 㻹 㻼 㻞 䠖 㻟 㻝 㻝 㻟 㻤 䉣 㻻 㻵 㻸 㻌 㼀 㻱 㻹 㻼 䠖 㻟 㻢 䉣 㻯 㻸 㼀 䠊 㼀 㻱 㻹 㻼 䠖 㻖 㻖 㻖 ...

Page 34: ...rsa Tighten the locknut and replace the cap IMPORTANT Relief Valve 3 7 Adjusting the DSP 3 7 1 While Operating the DSP Air Compressor 3 7 2 Regulating the Oil Pressure Locknut Seal Washer Air Intake Filter Suction Throttle Valve Usually keep the bolt tightened but not excessively Adjusting Bolt Suction Bypass Valve The first steps to resolve the lower suction vacuum pressure are as following A Cle...

Page 35: ...e rises above the below settings Blinks in red Thermistor Yes See page 35 Press RESET button 56 Warning seeting 5 41 Interstage pressure 0 27MPa 39psi or higher Blinks in red Pressure sensor Yes See page 35 Press RESET button 52 2nd stage suction air temperature 70 158 or higher after the intercooler Blinks in red Thermistor Yes See page 35 Press RESET button 5B Oil temperature 70 158 or higher Bl...

Page 36: ...s in red CPU Yes Disconnect and reconnect the power If the problem is reproduced change the PCB Press RESET button 43 47 48 ROM2 RAM2 LCD Memory failed Blinks in red CPU Yes Disconnect and reconnect the power If the problem is reproduced change the PCB Press RESET button 41 42 46 CT error Disconnected Blinks in red CPU Yes Disconnect the power and check the CT sensor wire for tightness Press RESET...

Page 37: ...gh S H U T D O W N 2 N D S U C T T E M P P r e s s R E S a f t e r C H K 1 Cooling water pump Failed or Cooling water pressure Fluctuating 2 Intercooler Dirty 1 Check the cooling water system 2 Clean the intercooler Shutdown Oil temperature too high S H U T D O W N O I L H I G H T E M P P r e s s R E S a f t e r C H K 1 Oil cooler Dirty 2 Room temperature High 3 Oil temperature control valve Faile...

Page 38: ...elief valve Replace if necessary Go to the procedure The vacuum indicator shows a red mark Gear case has a positive internal pressure Yes No NOTE The safety relief valve opens immediately when starting the DSP the control air pressure is still low or when the DSP has stopped This is a normal occurrence Accumulated oil is visible in the tube between the ele ment housing and the float trap Clean the...

Page 39: ...t damaged or deformed in transportation Model Nameplate Standard Accessories Motor Output kW Model Frequency Hz 5 2 Conveying the DSP Air Compressor With a Forklift With a Shop Crane After installing the DSP plug the fork slots with the fork slot covers Model Total Mass DSP 132WN DSP 145WN DSP 160WN 3 800 kg 8 378 lb DSP 200WN DSP 240WN 4 800 kg 10 582 lb Foundation Bracket 4 pieces Foundation Bol...

Page 40: ...ops Basements Steam Metals Sand Other Hard Materials Harmful Gases Do not set the DSP on the blocks Chlorine hydrogen sulfide sulfurous acid highly concentrated ozone and ammonium gases 38 5 INSTALLING AND PIPING THE DSP Installing the DSP Air Compressor WARNING 1 Keep flammable solvents or any other hazardous chemicals away from the DSP Such chemicals may be sucked by the air end compressed and e...

Page 41: ...E DSP Piping the DSP Air Compressor Stop Valve Stop Valve Discharge Air Opened Closed Air Receiver Tank Operating DSP Non Operating DSP Motorized isolation valve VSD only Motorized isolation valve VSD only If you operate only one of the two or more DSPs keep fully closed the discharge stop valve of the non operating DSP If you operate the two DSPs alternately and automatical ly use an electric dri...

Page 42: ...d ary side of the motorized isolation valve Mount the pressure detecting pipe customer supplied and motorized isolation valve standard accessory Connect the pressure detecting pipe from the position on the upper pipe which is as close as possible to the sec ondary side of the motorized isolation valve to the receiver pressure detecting port of the compressor Also avoid operating the equipment with...

Page 43: ... into one Also do not merge any condensate drain pipe into an external condensate drain pipe for exam ple one for other DSPs or one for an air receiver tank Otherwise a pressure difference may be gener ated as a result the DSP cannot drain the condensate or can drain it only abnormally or you cannot visually check whether the condensate is regularly drained 5 4 6 Condensate Drain Piping Drain Pit ...

Page 44: ...e air dryer is not used to the upper section of the air receiver This allows you to less frequently drain the condensate from the filter bowl 5 4 8 Connecting with the Control Air Pipe 5 4 7 Cooling water piping Piping for supplying water to and draining water from the cooler is required Mount the water drain valves of the cooling water outlet and inlet downward facing downward as shown in the fig...

Page 45: ... intake opening Technical Data for Room Ventilation Model DSP 132WN DSP 145WN DSP 160 V WN DSP 200WN DSP 240 V WN Discharge Pressure MPa psi 0 75 0 86 1 0 110 125 145 Heat Generation MJ h 57 60 67 90 98 BTU 54 036 56 880 63 516 85 320 92 904 Recommended Ventilating Fan m3 min cmf 150 5 300 160 5 650 180 6 360 240 8 480 260 9 180 The capacity is based on the allowable room temperature rise of 5 41 ...

Page 46: ...ワイドモード STR 機 能 FUNC リセット RESET SELECT WIDE UNLOAD STOP RUNNING CONTROL 運転管理 RUNNING MODE ALARM 警 報 運転状況 故 障 LOAD SHUTDOWN REMOTE 負 荷 遠 方 電 源 POWER 起動待ち AUTO START 停 止 STOP 運 転 START 1 2 記 憶 遠 方 REMOTE 表示切替 ワイドモード STR 機 能 FUNC リセット RESET SELECT WIDE UNLOAD STOP DIS PRESS 110psi INTSTG P 22psi OIL PRESS 22psi CLT PRESS psi CAUTION Before you connect the power verify that the DSP is correctly install...

Page 47: ... 㻱 㻾 㻭 㼀 㼁 㻾 㻱 㻰 㻵 㻿 䠊 㼀 㻱 㻹 㻼 㻝 䠖 㻝 㻢 㻜 䉣 㻰 㻵 㻿 䠊 㼀 㻱 㻹 㻼 㻞 䠖 㻝 㻣 㻜 䉣 㻻 㻵 㻸 㻌 㼀 㻱 㻹 㻼 䠖 㻡 㻤 䉣 㻯 㻸 㼀 䠊 㼀 㻱 㻹 㻼 䠖 㻖 㻖 㻖 䉣 㻞 㻺 㻰 㻌 㻿 㼁 㻯 㼀 䠊 㼀 䠊 䠖 㻠 㻞 䉣 㻹 㻭 㻵 㻺 㼀 㻱 㻺 㻭 㻺 㻯 㻱 㻴 㻾 䠊 㼀 㻻 㻌 㻹 㻭 㻵 㻺 㼀 䠖 㻜 㻜 㻜 㻜 䡄 㻺 㻱 㼄 㼀 㻌 㻹 㻭 㻵 㻺 㼀 䠖 㻖 㻖 㻖 㻖 モニタ メニュー リセッ ト 遠 方 機 能 電 源 運 転 停 止 運転状況 故 障 運転管理 負 荷 遠 方 起動待ち 設 定 自 動 UP DOWN 警 報 記 憶 表示切替 ワイ ドモー ド AUTO MONITOR MENU SET SELECT WIDE 2 RUNNING CONTROL START REMOT...

Page 48: ...ve it to the atmosphere for preventing its abnormal rise and thereby oil mists are inevitably vented Avoid therefore a long time unloading operation as possible as you can and if it is unavoidable take a precaution so that the DSP dos not suck the oil mists 2 If you use two or more DSPs in parallel the system forces a specific unit to unload for a long time Its oil mist remover ejector seldom oper...

Page 49: ...city values are reference data some power supplies may require a larger capacity transformer 2 Lower thickness values are based on the power cable length of less than 20 m In the event that the power cable is longer than 20m employ a thicker one Provide intermediate terminals to keep the thickness lower than the maximum values at the air compressor terminal block Always control the maximum drop of...

Page 50: ...le see illustration below If the customer utilize bushings by their own follow UL requirements Type 1 device is the minimum level of replacement for the provided rubber bushings Customer should follow UL requirement See refer ences below a The branch circuit protection shall be 460V500A 132kW model 460V500A 145kW model 460V600A 160kW model 460V800A 200kW model 460V800A 240kW model maximum UL liste...

Page 51: ...around the DSP install the HITACHI noise filters as specified below on the power cable 5 The inverter in the starter is attached with a digital operator for setting and operating the inverter Hitachi has finished adjusting the digital operator to the appropriate settings before shipping the DSP from the factory Do not operate the attached digital operator otherwise the inverter may mal function an...

Page 52: ...lay Clock Control Setting Discharge pressure Interstage Pressure Oil pressure Operating hours Loading hours Number of load unload Dis Temp 1 Dis Temp 2 Oil Temp Current 2nd stage Air End Suction temp Hours before next maintenance Next maintenance Load ratio ON time OFF time 2 Message Display Inspection Auto Stop Restart Message IPI retry Unload stop running 3 Alarm Shutdown Display Alarm Setting C...

Page 53: ...ORT CIRCUIT WIRES FROM EITHER OF THE TWO UNITS USP DA1 33 32 LED CN USP DA DA C D1 D2 D3 D4 D5 D6 SLAVE TB3 REFER TO THE WIRING DIAGRAM 1 G CLASS 1 CONTROL CIRCUIT CN8 CN9 CN10 TAB2 TAB1 C REFERENCE C C CLASS 1 CONTROL CIRCUIT SYMBOL PWB1 PWB2 LCD PS4 TH4 TH5 TB0 TB2 3 CT USP ES BT PARTS NAME CONTROL PC BOARD DISPLAY PC BOARD LCD MONITOR PRESSURE SENSOR OIL THERMISTOR 1ST DIS THERMISTOR OIL TERMIN...

Page 54: ...ERNAL LOAD UNLOAD REMOTE OPERATION DRYER ANSWER OPERATION ANSWER OVER LOAD OVER LOAD 1 3 5 7 S K S K S3 18 35 S3 6 S3 S2 R3 C DA1 DA S2 R4 R2 41 42 S2 43 44 DA 45 46 DA 2 1 2 1 49M 2 S K S K S K S K 1 2 REFER TO THE INSIDE OF THE AIR COMPRESSOR BUT NOT IN THE CONTROL PANEL REFER TO CONPONENTS THAT ARE EXTERNAL TO THE AIR COMPRESSOR PACKAGE NOTES 1 SIZING OF ELECTRICAL COMPONENTS NOT SUPPLIED BY HI...

Page 55: ...1 33 32 LED DA C 4 3 2 1 RUNNING CONTROL RUNNING MODE REMOTE POWER LOAD SHUTDOWN AUTO START 10h REMOTE FUNC RESET SELECT WIDE DC24V C DC GND DA SHORT CIRCUIT DURING LEAD LAG OPERATION REMOVE TWO SHORT CIRCUIT WIRES FROM EITHER OF THE TWO UNITS D1 D2 D3 D4 D5 D6 CN25 CN19 485FC CN20 CN18 485DP CN17 485EX OPE2 OPE1 1 2 3 1 2 3 1 2 3 4 1 9 1 13 CN23 CN21 DUAL 1 5 1 2 3 4 5 6 7 8 PID OUTPUT 0 5V OPERA...

Page 56: ...Y a CONTACT 0 5A EXTERNAL LOAD UNLOAD a CONTACT 0 5A REMOTE SETTING a CONTACT 0 5A OPERATION DRY a CONTACT 0 5A S K UNLOAD STOP C DA1 DA S2 R4 R2 41 42 S2 43 44 DA 45 46 DA REFER TO THE WIRING DIAGRAM 2 REFERENCE REFER TO THE INSIDE OF THE AIR COMPRESSOR BUT NOT IN THE CONTROL PANEL REFER TO CONPONENTS THAT ARE EXTERNAL TO THE AIR COMPRESSOR PACKAGE S K S K S K S K NOTES 1 SIZING OF ELECTRICAL COM...

Page 57: ... DA1 33 32 LED DA C 4 3 2 1 RUNNING CONTROL RUNNING MODE REMOTE POWER LOAD SHUTDOWN AUTO START 10h REMOTE FUNC RESET SELECT WIDE DC24V C DC GND DA SHORT CIRCUIT DURING LEAD LAG OPERATION REMOVE TWO SHORT CIRCUIT WIRES FROM EITHER OF THE TWO UNITS D1 D2 D3 D4 D5 D6 CN25 CN19 485FC CN20 CN18 485DP CN17 485EX OPE2 OPE1 1 2 3 1 2 3 1 2 3 4 1 9 1 13 CN23 CN21 DUAL 1 5 1 2 3 4 5 6 7 8 PID OUTPUT 0 5V OP...

Page 58: ...10 SHORT CIRCUIT DURING REMOTE OPERATION REMOVE SHORT CIRCUIT WIRES 4 3 2 1 1 3 5 7 S K S K S K S3 37 S1 R3V S2 R3V S2 R3D C DA1 DA S2 R4 R2 41 42 S2 43 44 DA 45 46 DA 2 1 2 1 2 1 2 1 S K S K FM CM1 PLC P24 FW 8 H 0 OI L CM2 12 RUN 11 AL2 AL1 AL0 NOTES 1 SIZING OF ELECTRICAL COMPONENTS NOT SUPPLIED BY HITACHI IS THE RESPONSIBILITY OF THE CUSTOMER 2 RATED DRY CONTACT IS AC110V 0 5A MAX 3 SIGNAL INP...

Page 59: ... speed and purges the compressed air to atmosphere simultaneously Intercooler The DSP employs a shell and tube type of water cooled intercooler The intercooler cools the hot compressed air of about 0 20MPa 29 psi that is dis charged from the first stage air end After reducing the compressed air temperature down to less than the cooling water temperature 15 to 20 59 to 68 the intercooler separates ...

Page 60: ... abnormal rise of the gear case internal pressure 8 2 Air Oil Flow Compressor Air Flow Oil Flow Cooling Air Flow Gear Case Vent Pipe Cooling Water Flow Oil sump is located in the bottom of the gear case Oil flows through the oil strainer with a 120 mesh filter screen to the oil pump driven by a dedicated motor After filtration through the oil filter with 5 μ m filter fine ness cooled oil lubricate...

Page 61: ...ches Symbol Description PS2 Pressure Sensor discharge air pressure PS4 Pressure Sensor oil pressure PS1 Pressure Sensor interstage pressure TH2 Temperature Sensor 2nd stage in TH4 Temperature Sensor 1st stage out TH3 Temperature Sensor 2nd stage out TH5 Temperature Sensor oil 63SV Pressure Differential Sensor For suction Filter clogging detection Capacity Control Blowoff Air Flow 21 Air Intake Fil...

Page 62: ... End 3 Gear Case 4 Stepup Gear 5 Motor 6 Intercooler 7 Check Valve 8 Aftercooler 9 Safety Valve 10 Discharge Air Outlet 12 Check Valve 13 Y type strainer 14 Solenoid Valve 15 Orifice Capacity Control Blowoff Air Flow 21 Air Intake Filter 22 Blowoff Valve 1 23 Blowoff Valve 2 24 Blowoff Silencer 25 Blowoff air cooler Oil Flow 31 Oil Strainer 32 Oil Pump 33 Relief Valve 34 Oil Filter 35 Oil Cooler 3...

Page 63: ...ifferential between inlet and outlet MPa psi 0 10 15 Temperature Differential between inlet and outlet about 10 50 Water Pressure MPa psi 0 15 22 to 0 49 71 Cooling Water Quality No Item Make up Water System Water Used Problem Corrosion Scale 1 2 3 4 5 6 7 8 9 10 11 12 13 14 15 pH at 25 Electrical Conductance at 25 ms m Chloride Ion Clー mgClー liter Sulfuric Acid Ion SO4 2ー mgSO4 2ー ℓ Acid Consumpt...

Page 64: ...llvoltage connection 3 Way Solenoid Valve 3 1st Stage Air End Intercooler Check Valve 2nd Stage Air End Orifice Check Valve Aftercooler Compressed Air Discharge Pressure Sensor Control Line Filter 3 Way Solenoid Valve 2 3 Way Solenoid Valve 4 3 Way Solenoid Valve 1 For 20 seconds after starting with a star delta starter For 15 seconds after starting with reactor starter Control Air Flow Starting S...

Page 65: ... culating a load ratio If the load ratio is 30 and the motor has stopped restarted maximum 3 times for the past 150 minutes then the motor stops Stop Delay Time 10 seconds are required to complete blowing off the compressed air and to be prepared to restart Starting and Pressure Raising Loading Unloading Power Save Operation load unload cycling interval standard 30 seconds Loading Unloading Air Re...

Page 66: ...240VWN 100 to 55 100 to 60 240VWN 35 to 60 35 to 53 160VWN 60 to 5 70 to 5 24 24 Two Step Purge Start Stop Control Upper purge start 0 77 0 95 0 75 0 93 AUTO ON INVA or AUTO OFF INVB 240VWN 55 to 5 60 to 5 Lower purge stop 0 72 0 90 0 65 0 83 5 to 0 Motor stopped Motor Stop Restart Control AUTO operation Lower motor restart 0 72 0 90 0 65 0 83 AUTO ON INVA The DSP supports the 3 capacity control s...

Page 67: ...wer When the pressure detected by the pressure sensor drops to a lower purge stop pressure point the system increases the frequency to 40 35 Hz and the blowoff solenoid valve 1 reoper ates to stop the purging returning the system control back to CPCS Motor Speed Control 240VWN Models The differential range between the upper pressure point and the lower pressure point must be 0 05 MPa or more Motor...

Page 68: ...ompressed air by the oil mist remover The incorporated ejector uses the compressed air to gen erate a vacuum pressure which maintains a negative pressure on the oil mist remover subsystem This prevents the gear case internal pressure from rising due to a resistance of the element By installing the oil mist remover 1 There is no need to extend a gear case vent pipe out doors avoiding any type of tr...

Page 69: ...nditions If your DSP is in sever environ mental and operating conditions service it at more frequent intervals Standard maintenance schedule A is based on the 8 000 operating hours per year while B 4 000 hours Select either A or B according to your own operat ing hours per year If your DSP is in sever high humid dusty etc conditions however always select A regardless of your operating hours Any of...

Page 70: ...r Clean Fixed VSD Control Line Filter Clean Fixed Speed only Aftercooler Drain Pipe Strainer Clean Fixed VSD Intercooler Drain Pipe Strainer Clean Fixed VSD Oil Filter secondary side Check oil press Fixed VSD Clean if necessary Oil Strainer first side Clean Fixed VSD Safety Relief Valve Operation Check Fixed VSD Aftercooler Check Clean Fixed VSD Clean if necessary Intercooler Check Clean Fixed VSD...

Page 71: ...nsulation resistance and clean Description Maintenance Classification Model Type Remarks Control Line Filter Element Replace Fixed Speed only Purge air solenoid For purge and anti reverse rotation in electrical outage Replace VSD only Oil Pump Oil Seal Replace Fixed VSD Oil Pump Bearing Replace Fixed VSD Check Valve Replace Fixed VSD Drain Discharge Solenoid Valve Replace Fixed VSD Check Valve for...

Page 72: ...K Oil Level Check Fixed VSD Add as required Aftercooler Drain Condensate Drain Fixed VSD Intercooler Drain Condensate Drain Fixed VSD Control Air Pipe Filter Drain Condensate Drain Fixed Speed only Motor Grease Greasing Fixed VSD 1 Daily 3 Months Schedule for yearly 4 000 or less operating hours 2 Bi Annual Schedule for yearly 4 000 or less operating hours Description Maintenance Classification Mo...

Page 73: ...or bearing Replace Fixed VSD Air End Assembly Replace Fixed VSD Replace by overhauled Air End Ass y Bearing Gear Case Replace Fixed VSD Demister Replace Fixed VSD 3 way Solenoid Valve Replace Fixed Speed only Oil Strainer first side Replace Fixed VSD Motor Shaft Seal parts Check Clean Fixed VSD Temperature Control Valve Replace Fixed VSD Oil Level Gauge Replace Fixed VSD Battery Replace Fixed VSD ...

Page 74: ...k your distributor to service the Oil Mist Remover 9 3 Oil Mist Remover Maintenance Part or Item Daily Bi Annually Annually 2 years 3 years 6 Years Remark 8 000Hr years 4 000Hr years Regulator Settings Vacuum Indicator Safety Relief Valve Regulator Performance Float Trap Nozzle Disassemble and clean if necessary Vacuum Indicator Disassemble and clean if necessary Air Filter Element Disassemble and...

Page 75: ...f the filter element is excessively dirty clean by immersing in for about 30 minutes in a neutral deter gent diluted with water After doing so rinse well with clean water max water pressure 0 27 MPa 39 psi Shake off the excess water and allow it to dry After making sure the filter element is dry mount the filter element in the filter duct and fasten with the wing nut 9 4 How to Service the DSP Air...

Page 76: ...er Clean the element and mount it by performing the procedure in reverse order Switch 3 way changeover valve I on the intercool er side from the B side to the A side 2 After cooler side Switch 2 way valve A on the after cooler side from the C side to the D side Make sure 2 way valve B is fully closed E side In this state strainer side pressure is drained Remove the strainer element If 2 way valves...

Page 77: ...in er element every 2 years if operating 8000 hours per year or 3 years if operating 4000 hours per year with new parts Orifices Orifice cleaning Make sure a minute quantity of condensate drains from the intercooler discharge port every 20 seconds when loading the com pressor If no condensate comes out clean the strainer element and orifices If the compressor is operated with no con densate being ...

Page 78: ...ve Some models are equipped with the safety relief valve without the chain For checking the safety relief valve operation of these models turn the top cap of the safety relief valve anti clockwise to blow After check ing turn the cap clockwise and close it Lever of Safety Relief Valve Lever of Safety Relief Valve Rear Left Upper Cover Rear Center Cover During inspection of the operation of the saf...

Page 79: ... the oil filter Use a filter wrench to loosen and remove the oil filter from the oil filter support of the gear case Remove the oil filter element Apply clean oil onto the filter O ring Tighten the oil filter until the O ring surface comes in contact with the oil filter seating surface Seat the oil filter O ring by tightening the filter with both hands Immediately after compressor restart verify t...

Page 80: ...pe Open the condensate drain valve of the aftercooler to release the compressed air Check the LCD and verify that the DIScharge PRESSure shows 0 MPa or the atmospheric pressure 2 Removing the Enclosure Panels Remove the rear upper cover 3 Disassembling Disconnect the discharge pipe from the check valve cover and remove it Remove the fastening bolts of the check valve cover Remove the check valve c...

Page 81: ...cale Removal Remove the oil cooler water chamber cover Flush with Rydlymeand use a brass wire brush to remove the scale from the inner surfaces of the oil cooler tube nest Aftercooler Intercooler If scale build up occurs often contact the local Hitachi distributor for scale removal 9 Clean Coolers ...

Page 82: ...mounted on the back of the LCD unit Unplug the batteries from the connector The batteries are held in place by double sided adhesive tape Replace with new batteries 3 Precautions concerning disposal of old batteries Either return used batteries to your dealer or properly dispose of them through an industrial waste disposal contractor in accordance with the Law concerning disposal and cleaning of d...

Page 83: ...ion Heated Thermal Relay Tripped breaker Tripped Electric Leak Low Insulation Resistance Corrective Action Frame Bearing Installation Loose botls Retighten the bolts Wiring Poor gounding Ground properly Inadequate breaker capacity NOTE 3 Replace with properly specified capacity breaker Broken wires Install new wires Failed starter and switch contact NOTE 3 Check the contacts and replace if necessa...

Page 84: ...WN 140g 140g DSP 200WN DSP 240WN VWN 250g 250g The proper amount of grease must be applied to the main motor to ensure that there is no leakage and or overheating of the bearings Ensure that the main motor is properly greased during the commission ing of the start up of the compressor If the compressor has not been operational for 3 months grease when restarting Following 9 1 Air Compressor Mainte...

Page 85: ...e the element with a new element Remove the upper 4 set screws and remove the upper part of the regulator Replace the diaphragm and the valve stem with new components Be careful not to install the new diaphragm upside down 3 Relief Valve Replace the sheet and spring Annually Turn the nut and remove the plate Replace the sheet and the spring with new components Assemble all the parts with placing t...

Page 86: ...sting during routine operation as well Unloading the compressor prior to stopping enables moisture in the second stage air end to be removed Drying out the inside of the compressor is an effective way to prevent rust from developing in the second stage air end when unused for an extended period of time IMPORTANT モニタ メニュー リセッ ト 遠 方 機 能 電 源 運 転 停 止 運転状況 故 障 運転管理 負 荷 遠 方 起動待ち 設 定 自 動 UP DOWN 警 報 記 憶 ...

Page 87: ... stage air end 277 Cooling oil jacket upper cover 278 Gasket oil jacket upper cover 283 Cooling oil jacket lower cover 284 Gasket oil jacket lower cover 301 Gear Case Upper 302 Bull Gear 303 Gear Shaft 304 Tapered Roller Bearing 65φ 305 Tapered Roller Bearing 75φ 307 Gear oil pump 310 Bearing Nut 311 Snap Ring 313 Support Bearing 316 Gasket oil filling port 317 Plug oil filling port 318 Snap Ring ...

Page 88: ...91 Shaft Seal 393 Packing shaft seal 401 Motor 415 Packing motor 419 Cover shaft seal 421 Base air end 425 Vibration Isolation Rubber 426 Support Bolt 1 gear case 429 Support Bolt 2 gear case 453 Bearing Load side 454 Bearing Anti Load side 455 Grease 457 Pull Gear motor 460 Gear Stud oil pump 461 Gear Shaft oil pump F72 Grease Pan 2 Motor Assembly ...

Page 89: ...king air cylinder 512 Packing air end air intake 513 Packing STV cover 514 Valve Plate A STV 515 Valve Plate B STV 517 Piston air cylinder 518 Seal Packing 3 519 Seal Packing 4 521 Seal Packing 5 522 Bush air cylinder 525 Tie Rod air cylinder 526 Cover air cylinder Ref No Description 528 Baffle Plate 529 Spring Washer SUS 530 Nut 532 Body blowoff valve 534 Seal Washer air cylinder 535 Nut 536 Wave...

Page 90: ...e Valve Assembly 502 Body STV 511 Packing air cylinder 512 Packing air end air intake 513 Packing STV cover 554 Unloader Cover 555 Unloader Cover Packing 558 By pass Valve adjustment Bolt 559 Seal Washer E11 Unloader Cover F44 Unloader Base F46 O ring Packing 4 Air Intake Variable Speed Drive Control ...

Page 91: ...y 610 Oil cooler Assembly 611 Tube Nest oil cooler 612 Cover oil cooler water chamber 613 Gasket oil cooler water chamber 614 Cover oil cooler 615 Gasket oil cooler cover 616 Support oil cooler 623 Intercooler Assembly 624 Shell intercooler 625 Tube Nest intercooler 626 Gasket intercooler tube nest 628 Base coolers 629 Support oil cooler 637 Vibration Isolation Rubber E35 Vibration Isolation Rubbe...

Page 92: ... 328 Bearing 329 Oil Seal 342 Body 343 Housing oil pump bearing 345 Key 353 Inner Rotor 354 Outer Rotor 355 Shaft 356 Key 362 Snap Ring 363 O Ring 378 Bush Bearing 744 749 757 748 719 746 Ref No Description 719 Digital Panel 744 Lithium Battery 746 Control PCB 748 Seat instrument panel 749 Display Unit 757 Screw 6 Oil Pump 7 Instrument Panel ...

Page 93: ...ing Fan D73 Protective Relay D75 Transformer E48 Rubber Bush E49 Rubber Bush E50 Rubber Bush F81 Terminal Block G02 Conduit Nut Ref No Description 700 Control Panel 701 Electromagnetic Contactor 702 Electromagnetic Contactor 704 Electromagnetic Switch 708 Current Transformer 709 Terminal Block 729 Electromagnetic Contactor 743 Rubber Bush 745 CPU PCB 929 Rubber Bush 931 Handle 935 Hinge B44 Door B...

Page 94: ...ine Filter G81 Temperature Switch Ref No Description D06 Terminal Block D07 Auxiliary Relay D08 Auxiliary Relay D12 Cooling Fan D73 Protective Relay D75 Transformer E02 Inverter Cooling Fan 1 E03 Inverter Cooling Fan 2 E07 Smoothing Condenser E10 Inverter E48 Rubber Bush E49 Rubber Bush E50 Rubber Bush F81 Terminal Block Ref No Description 700 Control Panel 704 Electromagnetic Switch 708 Current T...

Page 95: ...3 025 Air Piping 4 026 Air Piping 5 029 Air Piping 6 033 Gasket 1 discharge piping 034 Gasket 1st stage air end discharge flange 035 Gasket 1st stage 036 Gasket 2nd stage 039 Gasket 2nd stage air end discharge flange 044 Intercooler Header 865 Gasket 2 discharge piping 868 Cover check valve Ref No Description 870 Gasket 871 Check Valve 874 Discharge Piping 875 Safety Valve D70 Thermistor 1 D71 The...

Page 96: ... F40 F35 Ref No Description 880 Oil Strainer 882 Oil Filter Element 887 Oil Drain Valve D34 O Ring F12 Oil Drain Valve F31 Seat 1 oil piping F32 Breathing Piping F35 Seat 2 oil piping F37 Seat 3 oil piping F40 Support oil mist remover 11 Oil Piping 1 ...

Page 97: ...95 11 PARTS LIST 773 D35 D35 D81 D81 774 D35 D35 888 Ref No Description 773 Oil Drain Piping 1 774 Oil Drain Piping 2 888 Temperature Sensor D35 O Ring D81 Nozzle 1 12 Oil Piping 2 ...

Page 98: ...iping Ref No Description 009 Flexible Piping 011 Pet Cock 017 Stop Valve for a water flow control 018 Seat 4 cooling water piping 096 Water Drain Valve B40 Seat 1 cooling water piping B41 Seat 2 cooling water piping D36 O Ring F36 Seat 3 cooling water piping F47 Vibration Isolation Rubber ...

Page 99: ...Cover 2 blowoff silencer E69 Seat 2 blowoff silencer E79 Blowoff Silencer 2 E93 Purge air cooler E94 Blowoff Air Piping 1 E95 Blowoff Air Piping 2 E96 Blowoff Air Piping 3 Ref No Description 006 Y type strainer 007 Gasket y type strainer 043 Check Valve 045 Orifice condensate piping 047 Y type strainer Element 876 Stop Valve F67 3 way Switching Valve F69 Support drain piping F48 Vibration Isolatio...

Page 100: ... 036 Gasket 2nd stage 900 Blowoff Silencer 901 Seat blowoff silencer 902 Cover blowoff silencer D29 Seat blowoff piping 1 E21 Blowoff Solenoid Valve E22 Blowoff Solenoid Valve E23 Seat blowoff piping 1 E68 Blowoff Solenoid Valve E93 Purge air cooler 16 Blowoff Air Piping Variable Speed Drive Control ...

Page 101: ...46 Orifice 085 O ring control line filter 799 Element control line filter 892 Support plate solenoid valve 898 Pressure Differential Indicator 899 Solenoid Valve Manifold A80 Transparent Hose A81 Hose Connector A82 Wire Clamp D26 Pressure Sensor D79 Filter Nipple D99 Interstage Pressure Sensor F48 Vibration Isolation Rubber F79 Air Exhaust Valve 17 Control Air Piping Fixed Speed ...

Page 102: ...upply pressure D99 Interstage pressure D26 Discharge pressure Ref No Description 898 Pressure Differential Indicator D26 Pressure Sensor D79 Filter Nipple D99 Interstage Pressure Sensor 18 Control Air Piping Variable Speed Drive Control ...

Page 103: ...38 938 932 933 922 949 E12 977 D22 973 937 907 908 909 910 911 969 970 984 984 985 938 974 918 976 903 D60 674 674 671 672 673 E76 D85 948 952 927 925 D91 923 D90 956 957 958 959 960 F62 926 A71 E65 975 978 E71 H59 H60 D25 D14 D14 E72 E73 E74 F63 Ref No Description 671 Ventilating Fan Duct 672 Cover 1 ventilating fan duct 673 Cover 2 ventilating fan duct 674 Ventilation For Mount Frame 903 Cover a...

Page 104: ... Ref No Description D37 Element D38 O Ring D39 Solenoid Valve D40 Pressure Gauge D41 Ejector D42 Vacuum Indicator D43 Valve Sheet D44 Valve Spring D45 Air Filter Air Pressure Regulator D46 Diaphragm air pressure regulator D47 Valve Stem air pressure regulator D48 Element air filter D49 Float Trap D78 Packing 20 Oil Mist Remover ...

Page 105: ... If you still cannot find the answer contact your distributor and declare the following information Model TYPE Serial Number MFG NO Check the nameplate on the product Total Operating Hours and Delivery Date Your Problem Customer s Operation Interruption Condition Note down your Compressor s Specifications for reference in the future Model DSP kW Hz Compressor Mfg No Installation Date day month yea...

Page 106: ...0 17 to 0 3 24 to 43 Unloading 0 08 to 0 12 to 0 0 75 0 86 1 0 110 125 145 or less 63 145 or less 40 104 or less 63 145 or less 0 12 17 to 0 18 26 Condensate drained Condensate drained Condensate drained Inspect oil level gauge Benchmarks VSD 210 410 Loading 0 75 110 0 86 125 0 17 to 0 30 24 to 43 1 0 145 0 17 to 0 3 24 to 43 Unloading 0 02 to 0 10 3 to 15 0 75 0 86 1 0 110 125 145 or less 63 145 ...

Page 107: ...uction throttle valve Main Motor Nominal Output kW HP 132 177 SF 1 15 145 194 SF 1 1 170 228 SF 1 035 Type TFO KK Totally Enclosed Motor Voltage V 460 460 460 Maximum current A 240 250 275 Frequency Hz 60 60 60 Number of Pole 4 Pole Insulation Class Class F Cooling Fan Motor Nominal Output kW HP 0 4 0 54 Type PN 404 04H Voltage V 460 460 460 Current A 1 0 1 0 1 0 Frequency Hz 60 60 60 Number of Po...

Page 108: ...on throttle valve Main Motor Nominal Output kW HP 200 268 SF 1 15 240 322 SF 1 1 Type TFO KK Totally Enclosed Motor Voltage V 460 460 Maximum current A 352 399 Frequency Hz 60 60 Number of Pole 4 Pole Insulation Class Class F Cooling Fan Motor Nominal Output kW HP 0 4 0 54 Type PN 404 04H Voltage V 460 460 Current A 1 0 1 0 Frequency Hz 60 60 Number of Pole 4 Pole Insulation Class Class E Other Oi...

Page 109: ...top control Main Motor Nominal Output kW HP 170 228 SF 1 035 240 322 SF 1 1 Type TFO KK Totally Enclosed Motor Voltage V 460 Maximum current A 275 399 Frequency Hz 60 Number of Pole 4 Pole Insulation Class Class F Cooling Fan Motor Nominal Output kW HP 0 4 0 54 Type PN 404 04H Voltage V 460 Current A 1 0 Frequency Hz 60 Number of Pole 4 Pole Insulation Class Class E Other Oil Cooler Water Cooled H...

Page 110: ...Printed in Japan Hitachi Industrial Equipment Systems Co Ltd DSA 586A 2013 1 Note the Compressor s Specifications for future reference on the table in section 11 ...

Reviews: