background image

29

REMO

TE CONTR

OL

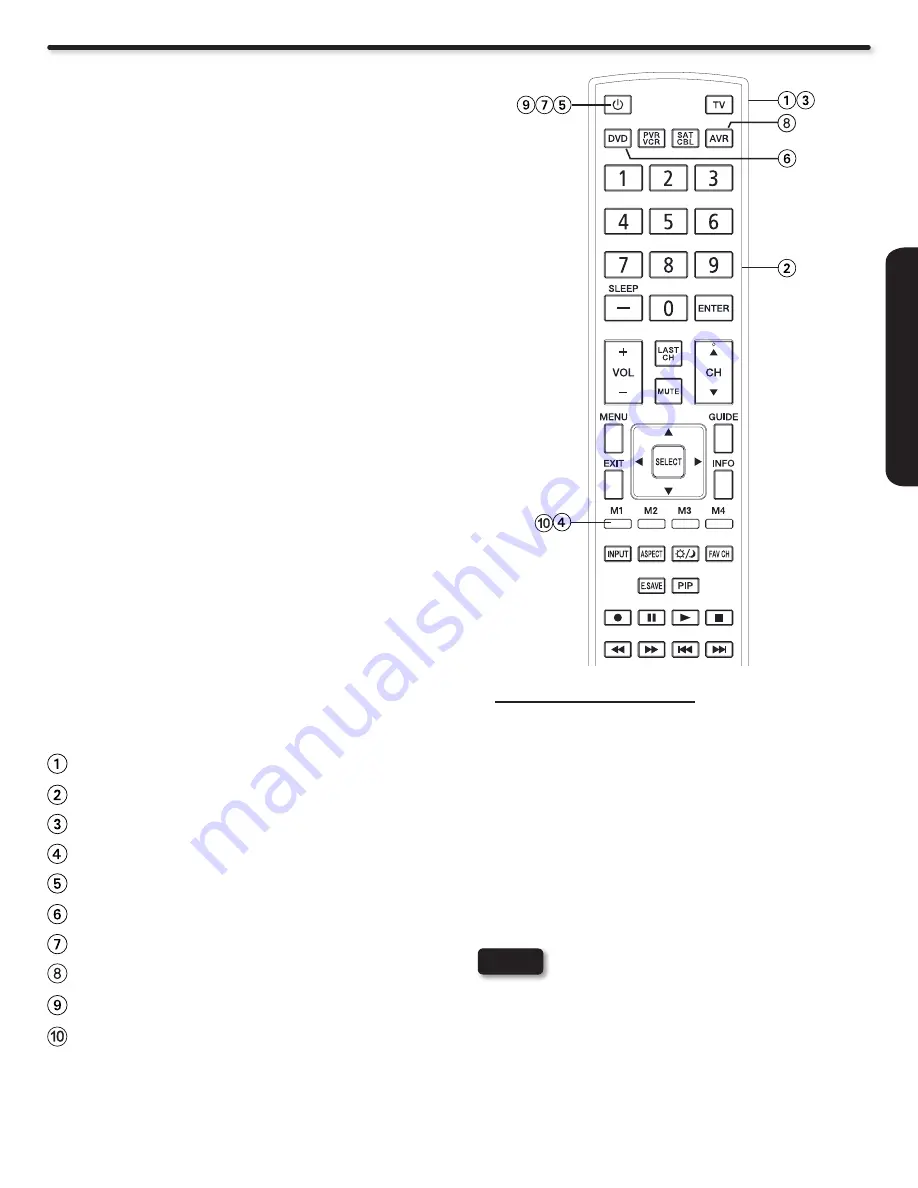
How to Use the Macro Buttons

Press the TV mode key on the R/C.


Press and hold the TV mode key and enter the 


following sequence “9,7,8”.
Select the macro key that you would like to clear 


(M1,M2,M3,M4).
Press the same Macro key that you select to 


clear.
The R/C will return to normal state and the TV 


mode LED will turn off.

If  no  Macro  steps  are  entered  within  10  seconds 

• 

while the R/C is in Macro learning state, the R/C will 

automatically return to it’s normal state.

Backligthing is not available when the R/C is in it’s 

• 

macro learning state.

Please remember that last R/C Mode key that 

• 

was 

pressed during a Macro setting it will be the mode 

where the R/C continue to operate; to end correctly, 

press the TV mode to your macro sequence. 

How to Clear a Macro key

This optional feature allows the user to record a sequence of 

keys to conveniently operate multiple devices with one key 

press. The Macro can only be created on the control’s TV mode.

Macro Setup procedure

Select TV mode by pressing the TV button.

1. 

Hold down the TV button on the remote and enter the digits 

2. 

“9”, “7”, “8” in sequence.

The TV mode LED will come on and remain on to signal 

3. 

that the macro learning state is ready, if not please try again 

step 2.

Select one of the Macro keys (M1,M2,M3,M4) that the 

4. 

Macro will be setup on.

Enter the key sequence that the Macro steps will include 

5. 

(up to 10 keystrokes per Macro). To enter a delay between 

steps the user should press the current mode button (TV, 

DVD, PVR, SAT, AVR).

After all macro steps are entered press the same Macro 

6. 

key that was pressed (M1,M2,M3,M4).

The remote will return to it’s normal state and the TV mode 

7. 

LED will turn off.

Upon entry of an invalid key sequence, the R/C shall display 

8. 

a 1-second long blink and return to normal operation. An 

invalid sequence is recognized as a key press that is not a 

Macro key (M1,M2,M3,M4) after step 3.

A  macro  will  overwrite  the  previous  macro  if  one  was 

9. 

already programmed.

MACRO SETUP EXAMPLE (Power ON , TV, DVD player and 
Audio Device)

Press TV mode on the R/C.

Enter the sequence “ 9,7,8” buttons of the R/C..

Check if in Macro Learning Mode (TV mode LED is on).

Press the Macro button “M1” of the R/C.

Press the POWER button.

Press the DVD mode key.

Press the POWER key.

Press the AVR mode key.

Press the POWER key.

Finally press the Macro button “M1” to complete the macro 

capture. The R/C will return to it’s normal state and the TV 

mode LED indicator will turn off.

(In  order  to  turn  ON  the  devices,  the  External  Device 

Control Setup for each mode have to be done first, please 

refer to pages 31 and 32 for the R/C codes.)

NOTES

Summary of Contents for DIRECTOR'S SERIES P50X902

Page 1: ...ial number of your Plasma Television for future reference SERIAL NO This information is located on the back and right side of the television PLASMA TELEVISION Operating Guide for P50X902 IMPORTANT SAFETY INSTRUCTIONS 2 4 FIRST TIME USE 5 17 THE REMOTE CONTROL 18 32 ON SCREEN DISPLAY 33 49 USEFUL INFORMATION 50 57 LIMITED WARRANTY 58 END USER LICENSE AGREEMENT FOR HITACHI DTV SOFTWARE 59 65 ANNEXES...

Page 2: ...ans le cas peu probable que des problèmes relatifs à la sécurité soient identifiés pour le modèle de votre appareil Les numéros de modèle et de série sont indiqués à l arrière du téléviseur é plasma Le symbole représentant une flèche en forme d éclair dans un triangle équilatéral sert à avertir l utilisateur de la présence à l intérieur de l appareil d un courant électrique suffisamment important ...

Page 3: ... this product in accordance with applicable environmental laws For product recycling and disposal information contact your local government agency or www eRecycle org in California the Electronic Industries Alliance at www eiae org in the US or the Electronic Product Stewardship Canada at www epsc ca in Canada FOR MORE INFORMATION CALL 800 HITACHI FEDERAL COMMUNICATIONS COMMISSION NOTICE This equi...

Page 4: ...on furniture that can easily be used as steps such as a chest of drawers Remember that children can become excited while watching a program especially on a larger than life flat panel display Care should be taken to place or install the display where it cannot be pushed pulled over or knocked down Care should be taken to route all cords and cables connected to the flat panel display so that they c...

Page 5: ...onsumption depending on the room brightness For Low room brightness it will decrease energy consumption and for High room brightness it will increase energy consumption Set to Off energy consumption will depend on contrast mode setting Contrast Mode Dynamic setting will increase energy consumption Normal mode will decrease energy consumption Black Side Panel Set to ON it will decrease energy consu...

Page 6: ...UTION CAUTION r Operating Guide NEED MORE INFO ON THE DTV TRANSITION See page 41 in this Operating Guide and please visit www dtvtransition org READ THE ENCLOSED INSTRUCTIONS CAREFULLY KEEP THIS OPERATING GUIDE FOR FUTURE REFERENCE Record the serial number of your Plasma Television for future reference SERIAL NO This information is located on the back and right side of the television PLASMA TELEVI...

Page 7: ... shown below Location Select an area where sunlight or bright indoor illumination will not fall directly on the picture screen If so drapes or screens can be used to reduce the reflection Also be sure that the location selected allows a free flow of air to and from the perforated back cover of the set In order to prevent an internal temperature increase maintain a space of 10 cm 4 inches from the ...

Page 8: ...nal screws A that comes in the TV for the Wall Mount Bracket The length is not long enough Wall Mount Brackets Screw Length A Insertion length B Spring Washer C Plane Washer D Wall Mount Bracket E Example A B C D E A 13 15 mm B 9 11 mm C 1 mm D 1 mm E 2 mm The screw type Theread ISO M6 Metric type do not use Standard type For Wall Mount assembly please refer to the Installation Manual of the Wall ...

Page 9: ...rves as EXIT button when in MENU mode VOLUME level Press these buttons to adjust the sound level The volume level will be displayed on the TV screen These buttons also serve as the cursor left and right buttons when in MENU mode CHANNEL selector Press these buttons until the desired channel appears in the top right corner of the TV screen These buttons also serve as the cursor down and up buttons ...

Page 10: ...gnals remain in digital format HDMI assures that pristine high definition images retain the highest video quality from the source all the way to your television screen Use the HDMI input for your AV Equipment such as Set Top Boxes or DVD players equipped with an HDMI output connection NOTE NOTES NOTES HDMI the HDMI logo and High Definition Multimedia Interface are trademarks or registered trademar...

Page 11: ...elect TV AVR Press this button to change input mode Energy Save Button TV Press this button to set Power Consumption reduction based on three levels Min Med Max Pause Button TV DVD PVR VCR Press this button to show and change the Freeze mode of the TV Also used to pause while in DVD or PVR VCR mode DVD VCR CONTROL BUTTONS SAT CBL DVD PVR VCR AVR Control the functions of your Satellite Receiver Set...

Page 12: ... VHF or UHF Antenna To Antenna Terminal Connecting a 300 Ohm twin lead connector may cause interference Using a 75 Ohm coaxial cable is recommended NOTE Rear Panel Jack Antenna Terminal Connect the power cord to your TV set and secure it a with the cable tie see page 7 Connect the power cord to the AC Wall outlet b When both VHF and UHF antennas are connected c Attach an optional antenna cable mix...

Page 13: ...be brighter This setting is intended for showroom and shop use If later you want to change the Energy Savings Initial Settings you can using the Setup Menu refer to page 48 Please Select HOME or RETAIL HOME RETAIL HOME mode meets Energy Star guidelines and is best for home use RETAIL mode uses more energy and is intended for in store display Move SEL Select Energy Savings Initial Settings RETAIL M...

Page 14: ...urces Connect an external source to one of the INPUT terminals then press the INPUT button to show the INPUTS menu Use the CURSORS and to select the Input of your choice Then press the SELECT button or the CURSOR to confirm your choice see page 21 Example Selecting the Air Cable Antenna Input Completely insert connection cord plugs when connecting to side panel jacks If you do not the played back ...

Page 15: ... Y CBCR In this case connect the components CB output to the TV s PB input and the components CR output to the TV s PR input It may be necessary to adjust TINT to obtain optimum picture quality when using the Y PBPR inputs See page 35 When using a HDMI input from a Set Top Box it is recommended to use a 1080p 1080i or 720p input signal When HDMI input a 1080p signal it is recommended that the leng...

Page 16: ...O L R TV REAR PANEL Yellow White Red DVD player VCR Home video game system Camcorder VCR CONNECTING A COMPONENT AND STEREO AUDIO SOURCE TO INPUT 1 or 2 YPBPR Connect the Y PB CB PR CR and AUDIO cables from the 1 Y PB CB PR CR OUT and AUDIO OUT jacks of the DVD PLAYER or HDTV Set Top Box to the INPUT 1 or 2 YPBPR and AUDIO jacks A DVD connection to Rear Panel Input 2 example is shown on the right P...

Page 17: ...The connected digital output device controls the HDMI interface so proper set up of device user settings determines final video appearance NOTES HDMI OUT HDMI HDMI HDMI DIGITAL OUTPUT CAPABILITY TV REAR PANEL HDMI Input DVI to HDMI Input DIGITAL OUTPUT DVI DIGITAL OUTPUT CAPABILITY TV REAR PANEL Audio Output L R CONNECTING AN EXTERNAL AUDIO AMPLIFIER To monitor the audio level of the Plasma TV to ...

Page 18: ... See pages 25 32 for instructions on how to program the remote to control your device CHANNEL SELECTOR FAVORITE CHANNEL FAV CH ENTER buttons TheCHANNELSELECTORbuttonsareusedtoselectchannels lock access code etc Use the CHANNEL SELECTOR buttons to enter one two or three numbers to select channels Enter 0 first for channels 1 to 9 or simply press the single digit channel you wish to tune then press ...

Page 19: ...t all On Screen Displays INFO button Press this button when you want to check the channel being received the picture source if the channel has stereo ST or second audio program SAP the time CHANNEL ID and if the TIMER is set ANALOG CHANNELS Analog Channel A Main Picture Source Channel Indication Broadcast Channel Indication Clock Picture Format Broadcast Rating Audio Broadcast Program Information ...

Page 20: ...the images through the following options For Automatic aspect ratio adjustment depending on the input signal to fill the screen please refer to Auto Aspect function on page 37 Each input has a memory for the Aspect setting Changing the aspect on one input will not affect the aspect settings on other inputs Vertical position adjustments are directly available when you choose 4 3 EXPANDED ZOOM1 ZOOM...

Page 21: ...htness and contrast adjustment Select NIGHT for night time viewing with less brightness and contrast for a more detailed picture see page 35 for settings changes NOTE For automatic DAY NIGHT picture mode settings see page 45 INPUT button When the remote control is in TV mode press this button to access the INPUTS menu Use the CURSOR and SELECT buttons to scroll and select the inputs that are being...

Page 22: ...vidual photos The screen may show Input device not detected if the MMC SD memory card is not inserted ROTATE Select this menu item to rotate selected photos either clockwise CURSOR PAD and counterclockwise CURSOR PAD Rotate SLIDESHOW Select this menu item to start a slideshow of the digital photos While the Interval sub menu is highlighted press the SELECT button to cycle through the interval time...

Page 23: ...l Press the CURSOR PAD or to enable the sub picture sound NOTE PIP MODE PICTURE IN PICTURE Select CABLE AIR INPUT 1 3 or HDMI 1 2 3 from the INPUTSmenu Selectachannelthathasa1080p 1080i 720p signal To prevent a pattern burn occasionally move the sub picture using the CURSOR PAD buttons or Main Picture Sub Picture OUTPUT VIDEO L R TV REAR PANEL Yellow White Red DVD player VCR Home video game system...

Page 24: ...in Freeze SPLIT and STROBE This is convenient when trying to write down the address for a mail order company recording statistics for a sporting event etc To return the picture to motion press the EXIT button MAIN FREEZE Press the PAUSE button to freeze one frame of the picture you are currently viewing and the frozen frame will show in the Main Picture Press the EXIT button to return to normal vi...

Page 25: ...t preset code is entered When this occurs the remote control is programmed for your cable box If the cable box does not turn off try a different four digit preset code The remote will now control your Cable box 777 Repeat the same procedure for your set top box or satellite receiver select SAT CBL your DVD select DVD your VCR PVR select VCR PVR or your AVR select AVR How to Use the Remote to Contr...

Page 26: ...uttons are for operating the TV Day Night PIP Input Aspect Vol Up Down Mute E Save NOTE PRECODED CABLE BOX buttons These buttons transmit the chosen precoded cable codes Power Cursor Select Number PAD Menu Info Enter Exit Channel Up Down Dash Guide Last CH Fav CH Play Stop Pause RWD FWD Skip FWD Skip RWD Record Macro keys EXCLUSIVE TV buttons These buttons are for operating the TV Day Night PIP In...

Page 27: ...D codes Power Number PAD Play Stop Pause RWD FWD Skip FWD Skip FWD Menu Info Cursor Select Channel Up Down Exit Record Dash Enter Guide EXCLUSIVE TV buttons These buttons are for operating the TV Day Night PIP Input Aspect Vol Up Down Mute E Save PRECODED VCR PVR buttons These buttons transmit the chosen precoded VCR PVR codes Power Cursor Select Enter Menu Channel Up Down Dash Exit Number PAD Pla...

Page 28: ...the AVR for operation of the buttons exclusively for the AVR PRECODED AVR buttons These buttons transmit the chosen precoded AVR codes Power Cursor Select Vol Up Down Menu Channel Up Down Mute Exit Number PAD Play Pause Stop RWD Skip RWD FWD Skip FWD Input Record Enter EXCLUSIVE TV buttons These buttons are for operating the TV Day Night PIP Aspect E Save Info NOTE ...

Page 29: ...y if not please try again step 2 Select one of the Macro keys M1 M2 M3 M4 that the 444 Macro will be setup on Enter the key sequence that the Macro steps will include 555 up to 10 keystrokes per Macro To enter a delay between steps the user should press the current mode button TV DVD PVR SAT AVR After all macro steps are entered press the same Macro 666 key that was pressed M1 M2 M3 M4 The remote ...

Page 30: ...wice and turn off The remote will stay in learn mode return to step 4 If the code is not learn successfully the respective mode LED will blink for 1 second and you will have to return to step 4 In order to exit the learning process press and hold 8 the Mode key for 3 seconds LEARNING SETUP EXAMPLE Learn AUDIO language key from a DVD player Press and hold DVD mode on the R C Enter the sequence 9 7 ...

Page 31: ...EMEREX 0032 EMERSON 0037 0184 0240 0000 0121 0043 0209 0002 0278 0479 1593 FISHER 0039 0047 0000 0104 0046 FUJI 0035 0033 FUJITSU 0000 FUNAI 0037 0000 0072 0278 1593 GARRARD 0000 GATEWAY 1972 GE 0060 0035 0048 0240 0000 0065 GEMINI 0060 GENEXXA 0037 0000 0278 GO VIDEO 0240 0432 0526 0614 GOLDSTAR 0035 0037 0039 0000 0278 0038 GOODMANS 0037 0081 0000 0072 0278 GRADIENTE 0000 GRANADA 0081 0042 GRUND...

Page 32: ...7 1769 OPPO 0575 1224 1525 2185 OPTIMUS 0571 PALSONIC 0672 0852 PANASONIC 0503 0490 0571 0703 1641 1762 PHILCO 0675 PHILIPS 0503 0539 0646 0675 1267 1340 1354 2056 2084 PIANODISC 1024 PIONEER 0525 0571 0142 0631 1571 POLAROID 1020 1061 1086 POLK AUDIO 0539 PORTLAND 0770 PRESIDIAN 0675 PRIMA 2126 2127 PROCEED 0672 PROSCAN 0522 PROVISION 0778 RADIONETTE 0741 RADIOSHACK 0571 RCA 0522 0571 0790 0822 1...

Page 33: ... or AUTO STD xvColor for more natural colors Changes the gamma ratio value to produce pictures of greater contrast Select from three different levels to enhance image definition for crisp and clear images Select from three different levels to reduce color smear luminance for true and brilliant color definition Adjust and balance individual colors to make either deeper or more pure according to you...

Page 34: ...ish French or Spanish OSD Language and OSD Contrast Select Screen Saver options to prevent uneven screen aging Select Power Consumption Savings options Label Video Inputs VCR DVD etc and select Game Mode Feature to display dialogue text and change its appearance Select between two IR Output modes for controlling external AV equipment Adjust the brightness intensity of the LED indicating light Set ...

Page 35: ...se this function to adjust the level of color in the picture Tint Use this function to adjust flesh tones so they appear natural Sharpness Use this function to adjust the amount of fine detail in the picture Color Temperature Set this to High for cooler color with more blue set to Medium for more natural color set to Standard for accurate color or set to D Cinema for color to match the cinema accu...

Page 36: ...e shot on film at 24 frames or still pictures per second instead of 30 frames or 60 fields like video When film is transferred to video for television viewing the disparity between the two frame rates must be reconciled This involves a process known as 3 2 pulldown When AUTO MOVIE MODE is set to ORIGINAL your Hitachi Plasma Television will activate the circuitry for this special feature to improve...

Page 37: ...ally select the Aspect Ratio There are different aspect ratio available according with the signal in use See page 63 Vertical Position This function allows you to move the picture up and down when the aspect mode is 4 3 EXPANDED ZOOM1 ZOOM2 or 16 9 ZOOM For example it will be useful for centering the picture Video if you want to see sports scores or news tickers Adjustable range is 10 video center...

Page 38: ...TINGS 2 to return to the previous menu SPLIT Mode Demonstration Select the SPLIT mode to see a line splitting the picture by half where the left half is with the Smooth Motion Demo turn on and the half in the right is with the Smooth Motion Demo turn off You will see the difference when using Hitachi new feature Auto Movie Mode Smooth Motion in left half within the same picture when you watch a mo...

Page 39: ...lume Auto Noise Cancel Internal Speakers Audio Move SEL Select On Dolby Digital 1 Unknown Off Off On Internal Speakers This function is useful when using external speakers Select ON if using the internal speakers only Select TV as Center when using the TV as the center speaker Select OFF if you prefer to use the speakers from a separate stereo system Auto Noise Cancel This function eliminates the ...

Page 40: ... PAD and for letter entries to enter the ZIP code USA or postal code CANADA of your location NOTE For USA is a 5 digit ZIP CODE For CANADA is a 6 digit ZIP CODE Screen 3 Please select which service s you would like your TV Guide On Screen TM to support Check all that apply Use the CURSOR PAD and to highlight your choice then press the SELECT button then select Next Screen 4 Are the above settings ...

Page 41: ...nd which are your FAVORITE FAV CHANNELS FAV CH Skip Lock ID On Off 4 On Off 5 On Off 6 On Off 7 On Off 8 On Off 9 On Off 10 On Off 3 1 Channel List Channel Manager No Info AM AM Move Return INFO DETAIL Use the CURSOR PAD to navigate the Channel List 1 Press the SELECT button to select ON or OFF on the SKIP 2 and LOCK columns To select LOCK column input the access code Default access 3 code 0000 Pr...

Page 42: ...EYS can be set individually When SET CHANNEL LOCK is turned on the picture and sound for the chosen channel will be blocked out When LOCK PANEL CONTROL KEYS is turned on all buttons on the Side Panel will be deactivated except the POWER Switch Movie Ratings Use Movie Ratings to prevent viewing of any movie that you feel may be inappropriate due to its content see page 43 TV Ratings Use TV Ratings ...

Page 43: ...idelines Careful attention is paid to themes which could threaten children s sense of security and well being There will be no realistic scenes of violence Depictions of aggressive behaviour will be infrequent and limited to portrayals that are clearly imaginary comedic or unrealistic in nature Other Content Guidelines There will be no offensive language nudity or sexual content C8 Programming gen...

Page 44: ...adults Contains constant violence or scenes of extreme violence Region 5 Alternate Ratings Example Only G General audiences All ages admitted PG Parental guidance suggested Some material may not be suitable for children PG 13 Parents strongly cautioned Some material may be inappropriate for children under 13 R Restricted Under 17 requires accompanying parent or adult guardian NC 17 No one 17 and u...

Page 45: ...tomatically calculate the clock adjustment for Daylight Saving The TV counts electrical pulses for regulating the TIMERS When the power cord is unplugged in quickly the clock is stopped momentarily and the TIME indication will become slow The Set The Clock submenu will be unavailable grayed out when TV Guide On Screen is set up refer to page 40 Set Sleep Timer Select this feature to set your SLEEP...

Page 46: ...f feature is active Press any key to continue viewing Move SEL Select Press the 1 CURSOR PAD or to highlight Energy Options Press the 2 CURSOR PAD or to select your choices Picture Energy Saving This function allows you to choose power consumption reduction based on 3 levels Min Medium and Max Select SETUP when setting your TV up for the first time Video Audio TV Guide On Screen Channel Manager Lo...

Page 47: ...cally turn off after three hours NOTES NOTE Set The Closed Captions Closed Captions are the dialogue narration and or sound effects of a television program or home video which are displayed on the TV screen Your local TV program guide denotes these programs as or Set The Closed Captions Setup Caption Display Off Analog Mode Captions Channel 1 Digital Language 1 Unknown Font Default Size Standard C...

Page 48: ...umber of IR remotes and key presses required for basic operation of your AV system Select OFF to disable this option HDMI CEC On Off Move SEL Return Set HDMI CEC Options Setup With HDMI CEC feature you can interface the connected equipment through the HDMI terminal automatically if the connected equipment meets an industry standard HDMI CEC Consumer Electronics Control Please check if the connecte...

Page 49: ...or lock the Power Swivel Exit the OSD menu system before controlling the motorized stand Power Swivel Power Swivel Press the 2 CURSOR PAD to rotate the TV to the right Press the 3 CURSOR PAD to rotate the TV to the left Release the 4 CURSOR PAD to stop rotation The Power Swivel has a maximum turning angle of 30 left and right Do not place any objects in the path of the plasma television when using...

Page 50: ...PPEAR TO HAVE A LOSS OF POWER PLEASE FOLLOW THIS PROCEDURE Press the POWER SWITCH ON OFF SWITCH once 1 If there is still no power wait 30 seconds and press the POWER SWITCH again 2 If there is still no power unplug the power cord from the wall Wait 30 seconds and plug the power cord back in Press 3 the POWER SWITCH again This protective technology should provide or years of lasting entertainment f...

Page 51: ...g the INFO button on the remote control The available screen display aspect is different depending on the current signal status 11 19 66 No power Check or ensure Power switch is on Normally if Power switch is On the Stand By LED will be lit 9 12 Turns Off by itself Check or ensure Timer settings are not activated 11 19 45 Turns On by itself Check or ensure Timer settings are not activated Check if...

Page 52: ...rast in the picture PREVENTION OF AN OBSTACLE TO RADIO RECEIVERS This television has been designed pursuant to the FCC class B Rules This is to prevent a problem to Radio receivers If this television causes a problem to Radio receivers then take the following steps Keep the television away from Radio Adjust Radio antennas in order for the television not to receive interference The antenna cable of...

Page 53: ... is too high The plasma display panel display images by means of electrical discharges inside the panel This may cause the temperature of the panel surface to increase Please note that this is not a malfunction 6 Plasma Surface A reinforced glass filter is installed over the plasma panel surface A strong impact to the front panel risk a danger of glass breakage 7 Transportation Please transport th...

Page 54: ...6 W 4 90 A Antenna Input Impedance 75 Ohm Channel Coverage 191ch VHF Band 2 13 UHF Band 14 69 CATV Mid Band A5 A1 AI Super Band J W Hyper Band W 1 W 28 Ultra Band W 29 W 94 Television System NTSC Standard ATSC Standard 8 VSB 64 QAM 256 QAM Video 1 0Vp p 75 Ohm S Video Luminance Y 1 0Vp p 75 Ohm Chrominance C 0 286Vp p 75Ohm Component Video Luminance Y 1 0Vp p 75 Ohm Chrominance PB PR 0 7Vp p 75 Oh...

Page 55: ... Guide On Screen est protégé par au moins un des brevets américains USA de Gemstar TV Guide International Inc et ou de ses sociétés affililiées 6 498 895 6 850 693 6 396 546 5 940 073 6 239 794 Disclaimer Notice Gemstar TV Guide International Inc and or its related affiliates are not in any way liable for the accuracy or availability of the program schedule information or other data in the TV Guid...

Page 56: ... AREA 43 9 16 1105 9 ACTIVE AREA 24 11 16 626 4 19 1 8 485 5 DEPTH 4 5 16 109 6 15 3 4 400 13 330 23 1 16 586 CENTER OF THE SCREEN HOLE FOR WALL MOUNT 4 PLACES Units Inches mm Screw Length A Insertion length B Spring Washer C Plane Washer D Wall Mount Bracket E Example A B C D E A 13 15 mm B 9 11 mm C 1 mm D 1 mm E 2 mm The screw type Theread ISO M6 Metric type do not use Standard type Side View W...

Page 57: ... 800 HITACHI 800 448 2244 Monday Friday 9 00 am 7 00 pm EST Saturday 9 00 am 5 00 pm EST Pour de plus amples renseignements sur le service durant la période couverte par la garantie sur le fonctionnement ou pour de l assistance technique communiquez avec Au Canada 800 HITACHI 800 448 2244 Lundi Vendredi 9 00 am 7 00 pm L EST Samedi 9 00 am 5 00 pm L EST Hitachi Home Electronics Canada Customer Ser...

Page 58: ...ified Service Centers CERTIFIED SERVICE CENTER IMPORTANT Before using or installing your Product please complete this form and attach your sales receipt and retain them for your records This will help facilitate proper warranty coverage MODEL NO SERIAL NO DEALER NAME DATE OF PURCHASE DEALER ADDRESS CITY STATE Warranty Limitations This Hitachi Limited Warranty does not cover A Any Product that has ...

Page 59: ... DO NOT AGREE WITH ALL THE TERMS AND CONDITIONS OF THIS AGREEMENT OR ALL THE TERMS AND CONDITIONS OF ANY DIFFERENT OR SUPPLEMENTARY LICENSE THAT MAY ACCOMPANY SUCH UPGRADE A DO NOT USE ANY HITACHI PROVIDED FLASH CARD OR OTHER MEDIA B DO NOT PERFORM INSTALL ANY HITACHI PROVIDED UPGRADE SOFTWARE ON YOUR DTV AND C PROMPTLY RETURN SUCH FLASH CARD OR OTHER MEDIA TO HITACHI EXPORT RESTRICTIONS 5 HITACHI...

Page 60: ...Foundation Inc Such software modules incorporated in this Hitachi TV are shown in the table below and the applicable license s are detailed on the following pages of this Operating Guide Software Module Applicable Software License Linux Kernel busybox dhcpcd ifupdow net tool iptables libstdc 5 GNU GENERAL PUBLIC LICENSE Version 2 glibc libposixtime GNU LESSER GENERAL PUBLIC LICENSE Version 2 1 If ...

Page 61: ...ll third parties under the terms of this License c If the modified program normally reads commands interactively when run you must cause it when started running for such interactive use in the most ordinary way to print or display an announcement including an appropriate copyright notice and a notice that there is no warranty or else saying that you provide a warranty and that users may redistribu...

Page 62: ... software and of promoting the sharing and reuse of software generally NO WARRANTY 11 BECAUSE THE PROGRAM IS LICENSED FREE OF CHARGE THERE IS NO WARRANTY FOR THE PROGRAM TO THE EXTENT PERMITTED BYAPPLICABLE LAW EXCEPT WHEN OTHERWISE STATED IN WRITING THE COPYRIGHT HOLDERS AND OR OTHER PARTIES PROVIDE THE PROGRAM AS IS WITHOUT WARRANTY OF ANY KIND EITHER EXPRESSED OR IMPLIED INCLUDING BUT NOT LIMIT...

Page 63: ...achieve this non free programs must be allowed to use the library A more frequent case is that a free library does the same job as widely used non free libraries In this case there is little to gain by limiting the free library to free software only so we use the Lesser General Public License In other cases permission to use a particular library in nonfree programs enables a greater number of peop...

Page 64: ...ith the Library with the complete machine readable work that uses the Library as object code and or source code so that the user can modify the Library and then relink to produce a modified executable containing the modified Library It is understood that the user who changes the contents of definitions files in the Library will not necessarily be able to recompile the application to use the modifi...

Page 65: ...TED BY APPLICABLE LAW EXCEPT WHEN OTHERWISE STATED IN WRITING THE COPYRIGHT HOLDERS AND OR OTHER PARTIES PROVIDE THE LIBRARY AS IS WITHOUT WARRANTY OF ANY KIND EITHER EXPRESSED OR IMPLIED INCLUDING BUT NOT LIMITED TO THE IMPLIED WARRANTIES OF MERCHANTABILITY AND FITNESS FOR A PARTICULAR PURPOSE THE ENTIRE RISK AS TO THE QUALITY AND PERFORMANCE OF THE LIBRARY IS WITH YOU SHOULD THE LIBRARY PROVE DE...

Page 66: ...es Yes No ID Yes Yes Yes Yes Yes Yes Auto OFF No Signal Video NTSC Auto ON 16x9 Yes Initial Yes Letter Yes Yes Yes Initial Yes 4x3 Yes Yes Initial Yes Yes No ID Yes Yes Yes Yes Yes Yes Auto OFF Input 3 Video S Video NTSC Auto ON 16x9 Yes Initial Yes Letter Yes Yes Yes Initial Yes 4x3 Yes Yes Initial Yes Yes No ID Yes Yes Yes Yes Yes Yes Auto OFF Yes Yes Yes Yes Yes Yes HDMI 1 Input1 DVI HDMI DVI 1...

Page 67: ...ponent Composite S IN HDMI 1080i p 16x9 Yes Yes Yes Yes 720p 16x9 Yes Yes Yes Yes 480p 16x9 Yes 2 Yes 2 Yes 2 Yes 2 480p 4x3 480i 16x9 Yes 2 Yes 2 Yes 2 Yes 2 480i 4x3 PIP 4x3 Digital Air or Cable 1080i 16x9 Yes 1 Yes Yes 1 Yes 720p 16x9 Yes 1 Yes Yes 1 Yes 480p 16x9 Yes 1 Yes Yes 1 Yes 480p 4x3 480i 16x9 Yes 1 Yes Yes 1 Yes 480i 4x3 Component Composite S IN HDMI 1080i p 16x9 Yes Yes 720p 16x9 Yes...

Page 68: ...R Out 10 48 L Language Audio 39 Lip Sync 37 Locks ChangeAccess Code 42 Channel Lock 42 Lock Panel Control Keys 42 Movie Ratings 42 43 TV Ratings 42 43 TVRatings Canadian English 42 43 TVRatings Canadian French 42 44 Region5 DownloadableVChip 42 44 LTI 36 M Menu Preference Language 46 OSD Contrast 46 N Noise Reduction 35 P Perfect Volume 39 Photo Input 22 Picture Mode 35 Picture in Picture 23 Power...

Page 69: ...69 Notes ...

Page 70: ...Printed In México QR75521 ...

Reviews: