background image

10

  Unnecessary wear on the engine parts

  Abnormal fuel consumption

32

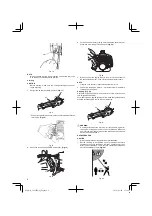
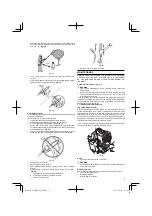
Fig. 28

Clean the air 

fi

 lter daily or more often if working in exceptionally 

dusty areas.

Cleaning the air 

fi

 lter

Remove the air 

fi

 lter cover and the 

fi

 lter (32). Rinse it in warm soap 

suds. Check that the 

fi

 lter is dry before reassembly. An air 

fi

 lter 

that has been used for some time cannot be cleaned completely. 

Therefore, it must regularly be replaced with a new one. A damaged 

fi

 lter must always be replaced.

Fuel 

fi

 lter (Fig. 29)

Drain all fuel from fuel tank and pull fuel 

fi

 lter line from tank. Pull 

fi

 lter 

element out of holder assembly and rinse element in warm water with 

detergent.
Rinse thoroughly until all traces of detergent are eliminated. 

Squeeze, do not wring, away excess water and allow element to air 

dry.

Fig. 29

NOTE


If element is hard due to excessive dirt build-up, replace it.

Chain oil 

fi

 lter (Fig. 30)

Remove the oil 

fi

 lter and thoroughly wash it in solvent.

Fig. 30

Spark plug (Fig. 31)

The spark plug condition is in

fl

 uenced by:

  An incorrect carburetor setting

  Wrong fuel mixture (too much oil in the gasoline)

  A dirty air 

fi

 lter

  Hard running conditions (such as cold weather)

These factors cause deposits on the spark plug electrodes, which 

may result in malfunction and starting di

  culties. If the engine is 

low on power, di

  cult to start or runs poorly at idling speed, always 

check the spark plug 

fi

 rst. If the spark plug is dirty, clean it and check 

the electrode gap. Re-adjust if necessary. The correct gap is 0.6 

mm. The spark plug should be replaced after about 100 operation 

hours or earlier if the electrodes are badly eroded.

0.6 mm

Fig. 31

NOTE


In some areas, local law requires using a resistor spark plug 

to suppress ignition signals. If this machine was originally 

equipped with resistor spark plug, use same type of spark plug 

for replacement.

Mu

  er (Fig. 32)

Remove the mu

  er and clean out any excess carbon from the 

exhaust port or mu

  er inlet every 100 hours of operation.

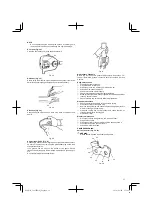
Fig. 32

Cylinder (Engine cooling) (Fig. 33)

The engine is air cooled and air must circulate freely around engine 

and over cooling 

fi

 ns on cylinder head to prevent overheating.

Every 100 operating hours, or once a year (more often if conditions 

require) clean 

fi

 ns and external surfaces of engine of dust, dirt and oil 

deposits which can contribute to improper cooling.

Fig. 33

000Book̲CS27EPA(S)̲Eng.indb   10

000Book̲CS27EPA(S)̲Eng.indb   10

2014/06/04   15:14:27

2014/06/04   15:14:27

Summary of Contents for CS 27EPA (S)

Page 1: ... read through these HANDLING INSTRUCTIONS to ensure efficient safe operation It is recommended that these INSTRUCTIONS be kept readily available as an important reference when using this machine 000Book CS27EPA S Eng indb 1 000Book CS27EPA S Eng indb 1 2014 06 04 15 14 26 2014 06 04 15 14 26 ...

Page 2: ...nd observe the following safety precautions and warnings Careless or improper use of the unit may cause serious or fatal injury Read understand and follow all warnings and instructions in this manual and on the unit Always wear eye head and ear protectors when using this unit Choke Run position Open Choke Start position Closed Emergency stop Hot surface Before using your machine Read the manual ca...

Page 3: ... Drive shaft tube 6 Handle bar 7 Priming pump 8 Ignition switch 9 Guide bar 10 Throttle trigger lockout 11 Choke lever 12 Engine 13 Angle transmission 14 Handle grip 15 Saw chain 16 Guide bar cover 17 Suspension eyelet 18 Oil tank cap 19 Combi box spanner 20 Handling instructions 20 19 16 12 1 3 8 18 9 10 5 13 11 2 15 7 6 4 17 14 000Book CS27EPA S Eng indb 3 000Book CS27EPA S Eng indb 3 2014 06 04...

Page 4: ... tank before storing the unit machine It is recommended that the fuel be emptied after each use If fuel is left in the tank store so fuel will not leak Store unit machine and fuel in area where fuel vapors cannot reach sparks or open flames from water heaters electric motors or switches furnaces etc WARNING Fuel is easy to ignite or get explosion or inhale fumes so that pay special attention when ...

Page 5: ...n tube locking bolt 1 about ten turns so that the bolt point will not obstruct drive shaft tube to be inserted When inserting drive shaft tube hold the tube locking bolt outward preventing inside fitting from obstructing as well Insert the drive shaft into the clutch case of the engine properly until the marked position 2 on the drive shaft tube meets the clutch case 1 2 Fig 1 NOTE When it is hard...

Page 6: ...ove the side case 16 Fig 8 15 16 Fig 8 3 Install the chain bar 17 onto the bolts 18 then push it toward the sprocket 19 as far as it will go Make sure that the boss of chain tension adjust bolt 20 fits into the hole 21 of the bar Fig 9 20 19 18 17 21 Fig 9 NOTE Slightly move the bar back and forth and make sure the chain tension boss 20 fits into the hole 21 in the bar properly 4 Confirm the direc...

Page 7: ...lways mix fuel and oil in a separate clean container Always start by filing half the amount of fuel which is to be used Then add the whole amount of oil Mix shake the fuel mixture Add the remaining amount of fuel Mix shake the fuel mix thoroughly before filling the fuel tank Fueling WARNING Always shut off the engine before refueling Slowly open the fuel tank when filling up with fuel so that possi...

Page 8: ...low the engine about 2 3 minutes to warm up before subjecting it to any load Stopping Fig 21 Decrease engine speed and run at an idle for a few minutes then turn off ignition switch 29 For models with an engine ignition switch keep the ignition switch pressed until the engine comes to a complete stop 29 30 Fig 21 WARNING A cutting attachment can injure while it continues to spin after the engine is...

Page 9: ...MAY BE PERFORMED BY ANY NON ROAD ENGINE REPAIR ESTABLISHMENT OR INDIVIDUAL Carburetor adjustment Fig 27 WARNING The cutting attachment may be spinning during carburetor adjustments Never start the engine without the complete clutch cover and tube assembled Otherwise the clutch can come loose and cause personal injuries In the carburetor fuel is mixed with air When the engine is test run at the fac...

Page 10: ...d running conditions such as cold weather These factors cause deposits on the spark plug electrodes which may result in malfunction and starting difficulties If the engine is low on power difficult to start or runs poorly at idling speed always check the spark plug first If the spark plug is dirty clean it and check the electrode gap Re adjust if necessary The correct gap is 0 6 mm The spark plug shou...

Page 11: ...ly maintenance Clean the exterior of the unit Clean the chain oil filter port Clean the groove and oil filter port in the guide bar Clean the side case of saw dust Check that the saw chain is sharp Check that the bar nuts are sufficiently tightened Make sure that the chain transport guard is undamaged and that it can be securely fitted Check that nuts and screws are sufficiently tightened Weekly maint...

Page 12: ...ward an outside cutter Fig 40 Fig 40 4 Round off front corner to maintain original shape of depth gauge after using depth gauge tool Always follow the recommended depth gauge setting found in the maintenance or operator manual for your saw Fig 41 Fig 41 GENERAL INSTRUCTIONS FOR FILING CUTTERS File 48 cutter on one side of the chain from the inside out File on forward stroke only Fig 42 5 Keep all c...

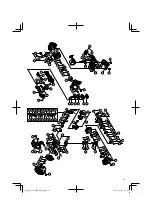
Page 13: ... 78 79 70 64 46 47 21 22 25 27 35 36 37 20 32 23 26 28 29 30 31 33 34 38 39 40 41 24 58 A B C 111 112 113 114 115 116 117 9 118 119 120 121 122 123 124 125 126 131 130 128 133 139 135 138 136 137 140 143 144 141 145 101 102 103 104 105 106 107 108 109 110 142 127 129 134 132 000Book CS27EPA S Eng indb 13 000Book CS27EPA S Eng indb 13 2014 06 04 15 14 27 2014 06 04 15 14 27 ...

Page 14: ...14 000Book CS27EPA S Eng indb 14 000Book CS27EPA S Eng indb 14 2014 06 04 15 14 27 2014 06 04 15 14 27 ...

Page 15: ...BE RUBBER B 1 117 STOP RING C 12 OUTER 1 118 FAN CASE 1 119 CLUTCH DRUM COMP 1 120 STEP BOLT 2 121 BENT WASHER 8 2 122 CLUTCH PLATE A 2 123 CLUTCH ASS Y 1 124 CLUTCH WASHER B 2 125 HEX NUT M8 1 126 WASHER M8 1 127 HEX HOLE BOLT 4 18WS 2 128 EARTH CORD 1 129 IGNITION COIL ASS Y 1 130 CORD 1 131 CORD 1 132 CORD 1 133 MAGNETO ROTOR COMP 1 134 SHIELD TUBE ASS Y 1 135 FUEL PIPE 1 136 TANK CAP ASS Y 1 1...

Page 16: ...agawa Intercity Tower A 15 1 Konan 2 chome Minato ku Tokyo Japan 403 Code No E99247113 NS Printed in Japan 000Book CS27EPA S Eng indb 16 000Book CS27EPA S Eng indb 16 2014 06 04 15 14 28 2014 06 04 15 14 28 ...

Reviews: