background image

9

Setting up

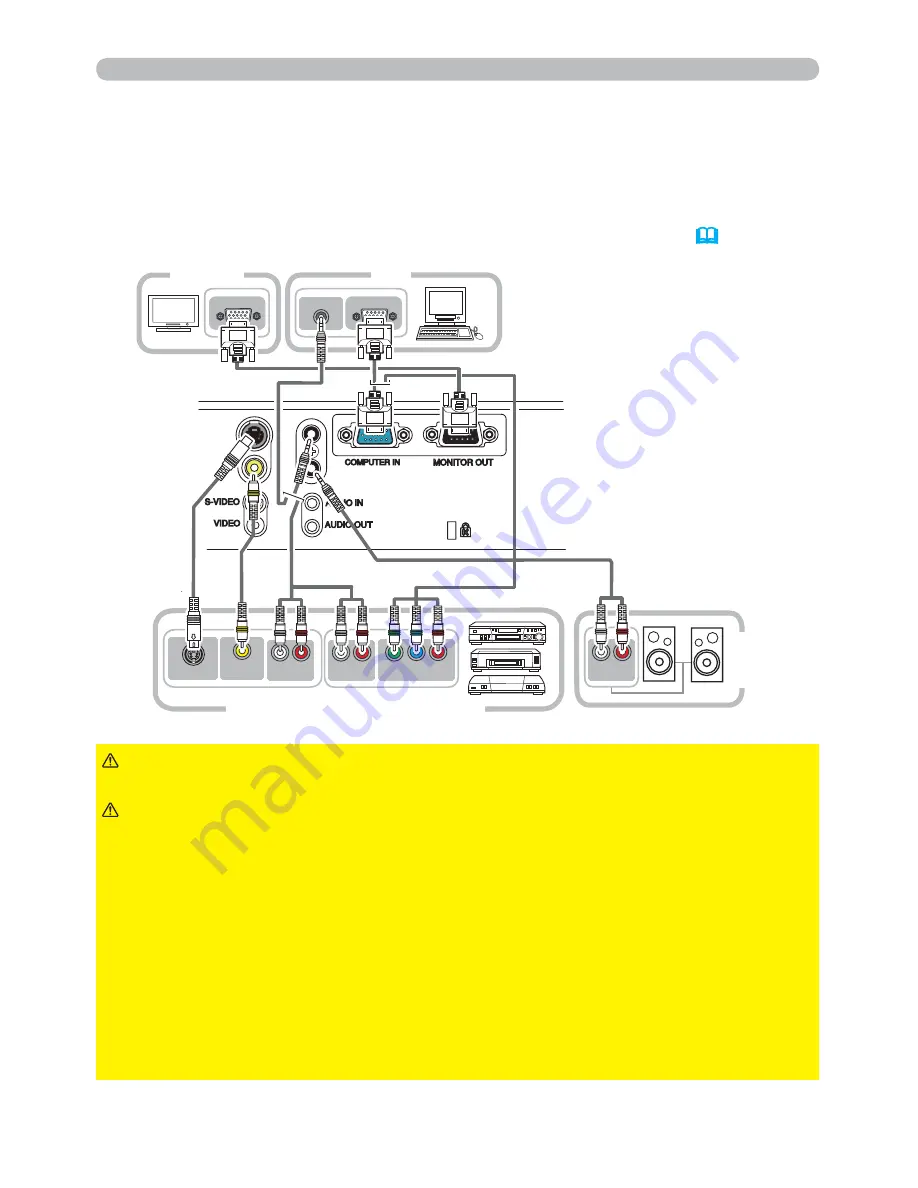
VIDEO OUT

AUDIO OUT

RGB OUT

RGB IN

S-VIDEO OUT

L  R

AUDIO IN


Y       C

B

/P

B

     C

R

/P

R

COMPONENT VIDEO OUT

L  R

AUDIO OUT

L  R

AUDIO OUT

Connecting your devices

Be sure to read the manuals for devices before connecting them to the projector. 
Make sure that all the devices are suitable to be connected with this product, and 
prepare the cables required to connect. Please refer to the following illustrations 
to connect them. To input component video signal to 

COMPUTER IN

 port, please 

see the description of the COMPUTER IN item of the INPUT menu 

(


32

)

.

VCR/DVD/Blu-ray Disc player

Speakers

(with an 

DPSOL¿HU

PC

Monitor

Do not disassemble or modify the projector and accessories.

Be careful not to damage the cables, and do not use damaged cables.

WARNING

Turn off all devices and unplug their power cords prior to 

connecting them to projector. Connecting a live device to the projector may 
generate extremely loud noises or other abnormalities that may result in 
malfunction or damage to the device and the projector.

Use appropriate accessory or designated cables. Ask your dealer about non-

accessory cables which may be required a speci

c length or a ferrite core by 

the regulations. For cables with a core only at one end, connect the end with the 
core to the projector.

Make sure that devices are connected to the correct ports. An incorrect 

connection may result in malfunction or damage to the device and the projector.

NOTICE

Use the cables with straight plugs, not L-shaped ones, as the input 

ports of the projector are recessed.

CAUTION

Summary of Contents for CP-RX82

Page 1: ...hese symbols are described below About this manual WARNING CAUTION This symbol indicates information that if ignored could possibly result in personal injury or even death due to incorrect handling This symbol indicates information that if ignored could possibly result in personal injury or physical damage due to incorrect handling Please refer to the pages written following this symbol Mac is a r...

Page 2: ...d from the power outlet Thank you for purchasing this projector NOTE The information in this manual is subject to change without notice The manufacturer assumes no responsibility for any errors that may appear in this manual The reproduction transmission or use of this document or contents is not permitted without express written authority WARNING Before using read these user s manuals of this pro...

Page 3: ... place flower vases pots cups cosmetics liquids such as water etc on or around the projector Do not place metals combustibles etc on or around the projector To avoid penetration of foreign objects do not put the projector into a case or bag together with any thing except the accessories of the projector signal cables and connectors Never disassemble and modify The projector contains high voltage c...

Page 4: ...n in households where children are present Use only the correct power cord and the correct power outlet Incorrect power supply could result in fire or electrical shock Use only the correct power outlet depending on the indication on the projector and the safety standard The enclosed power cord must be used depending on the power outlet to be used Be cautious of the power cord connection Incorrect ...

Page 5: ...sconnecting the power cord or cables do it with your hand holding the plug or connector Do not place the cord near the heater Avoid bending the power cord sharply Do not attempt to work on the power cord Be careful in handling the battery of the remote control Incorrect handling of the battery could result in fire or personal injury The battery may explode if not handled properly Keep the battery ...

Page 6: ... periodically If the air filter becomes clogged by dust or the like internal temperature rises and could cause malfunction The projector may display the message such as CHECK THE AIR FLOW or turn off the projector to prevent the internal heat level rising When the indicators or a message prompts you to clean the air filter clean the air filter as soon as possible If the soiling will not come off t...

Page 7: ... detergent directly Do not use an aerosol sprays solvents volatile substances or abrasive cleaner Before using chemical wipes be sure to read and observe the instructions Do not allow long term close contact with rubber or vinyl About bright spots or dark spots Although bright spots or dark spots may appear on the screen this is a unique characteristic of liquid crystal displays and such do not co...

Page 8: ...emote control sensors could invalidate the remote control Avoid radio interference Any interfering radiation could cause disordered image or noises Avoid radio generator such as a mobile telephone transceiver etc around the projector About displaying characteristic The display condition of the projector such as color contrast etc depends on characteristic of the screen because the projector uses a...

Page 9: ...is product contains a mercury lamp do not put in trash Dispose of in accord with environmental laws For lamp recycling go to www lamprecycle org in USA For product disposal contact your local government agency or www eiae org in the US or www epsc ca in Canada For more information call your dealer Do not open the lamp cover while the projector is suspended from above This is dangerous since if the...

Page 10: ...asures Reorient or relocate the receiving antenna Increase the separation between the equipment and receiver Connect the equipment into an outlet on a circuit different from that to which the receiver is connected Consult the dealer or an experienced radio TV technician for help INSTRUCTIONS TO USERS This equipment complies with the requirements of FCC Federal Communication Commission equipment pr...

Page 11: ...4 ASPECT KEYSTONE PICTURE MODE ECO MODE MIRROR RESET FILTER TIME LANGUAGE ADVANCED MENU EXIT PICTURE menu 26 BRIGHTNESS CONTRAST GAMMA COLOR TEMP COLOR TINT SHARPNESS MY MEMORY IMAGE menu 29 ASPECT OVER SCAN V POSITION H POSITION H PHASE H SIZE AUTO ADJUST EXECUTE INPUT menu 31 PROGRESSIVE VIDEO NR COLOR SPACE VIDEO FORMAT COMPUTER IN FRAME LOCK RESOLUTION SETUP menu 34 KEYSTONE AUTO ECO MODE ECO ...

Page 12: ...ad use by the following features Checking the contents of package 9 This projector realizes the large projection image even if in a small space 9 This compact lightweight projector uses a front exhaust system that keeps the user comfortable by directing hot air away from the user Please see the Contents of package section in the User s Manual concise which is a book Require of your dealer immediat...

Page 13: ...e or just after use since it is too hot Do not look into the lens or vents while the lamp is on since the strong light is not good for your eyes Do not handle the elevator buttons without holding the projector since the projector may drop down Do not use the security bar and slot to prevent the projector from falling down since it is not designed for it WARNING Maintain normal ventilation to preve...

Page 14: ... button 22 It consists of four cursor buttons 4 BLANK button 21 5 POWER indicator 11 13 59 6 TEMP indicator 59 7 LAMP indicator 59 Rear panel 9 1 VIDEO port 2 S VIDEO port 3 AUDIO IN port 4 AUDIO OUT port 5 COMPUTER IN port 6 MONITOR OUT port 1 0 87721 1 3 2 4 7 6 5 1 4 2 3 5 6 ...

Page 15: ...EEZE button 21 17 MY BUTTON 1 button 45 18 MY BUTTON 2 button 45 19 KEYSTONE button 19 20 POSITION button 18 23 21 MENU button 22 22 cursor buttons 22 23 ENTER button 22 24 ESC button 22 25 RESET button 22 26 Battery cover 12 Back of the remote control 26 2 1 6 5 16 8 9 19 17 20 22 24 10 4 3 7 12 14 11 13 15 18 21 23 25 VIDEO DOC CAMERA KEYSTONE ASPECT SEARCH BLANK MUTE MY BUTTON POSITION 1 2 ESC ...

Page 16: ... distance Screen height Screen height Projection distance Screen height Screen height min max min max type inch m m inch m inch cm inch cm inch m inch m inch cm inch cm inch 30 0 8 0 9 35 1 1 43 39 15 7 3 1 0 39 1 2 47 36 14 1 0 40 1 0 1 2 47 1 5 58 52 21 9 3 1 3 52 1 6 63 49 19 1 0 50 1 3 1 5 60 1 8 72 65 26 11 4 1 7 65 2 0 79 61 24 1 1 60 1 5 1 8 72 2 2 87 78 31 13 5 2 0 78 2 4 95 73 29 2 1 70 1...

Page 17: ...tor Do not place anything that may be sucked into or stick to the vents on the bottom of the projector This projector has some intake vents also on the bottom Do not place the projector anyplace where it may get wet Getting the projector wet or inserting liquid into the projector could cause re electric shock and or malfunction of the projector Do not place the projector in a bathroom or the outdo...

Page 18: ...ssories Be careful not to damage the cables and do not use damaged cables WARNING Turn off all devices and unplug their power cords prior to connecting them to projector Connecting a live device to the projector may generate extremely loud noises or other abnormalities that may result in malfunction or damage to the device and the projector Use appropriate accessory or designated cables Ask your d...

Page 19: ...l of the corresponding laptop PC When the picture resolution is changed on a PC depending on an input automatic adjustment function may take some time and may not be completed In this case you may not be able to see a check box to select Yes No for the new resolution on Windows Then the resolution will go back to the original It might be recommended to use other CRT or LCD monitors to change the r...

Page 20: ...fy the power cord WARNING Using the security bar and slot AC IN Power cord A commercially available anti theft chain or wire can be attached to the security bar on the projector Refer to the gure to choose an anti theft chain or wire Also this product has the security slot for the Kensington lock For details see the manual of the security tool Do not use the security bar and slot to prevent the pr...

Page 21: ...unding environment Be sure to use only the batteries speci ed Do not use batteries of different types at the same time Do not mix a new battery with used one Make sure the plus and minus terminals are correctly aligned when loading a battery Keep a battery away from children and pets Do not recharge short circuit solder or disassemble a battery Do not place a battery in a re or water Keep batterie...

Page 22: ... the remote control The message Power off will appear on the screen for about 5 seconds Turning off the power 2 Press the STANDBY ON button again while the message appears The projector lamp will go off and the POWER indicator will begin blinking in orange Then POWER indicator will stop blinking and light in steady orange when the lamp cooling is complete 59 Do not turn the projector on for about ...

Page 23: ...muting the sound When is selected for current picture input port the sound is always muted Please see AUDIO SOURCE item of AUDIO menu 36 C C Closed Caption is automatically activated when sound is muted and an input signal containing C C is received This function is available only when the signal is NTSC for VIDEO or S VIDEO or 480i 60 for COMPUTER IN and when AUTO is selected for DISPLAY in the C...

Page 24: ...rt is selected the projector will check S VIDEO port rst S VIDEO VIDEO VIDEO button VIDEO DOC CAMERA KEYSTONE ASPECT SEARCH BLANK MUTE MY BUTTON POSITION 1 2 MENU COMPUTER MY SOURCE AUTO MAGNIFY PAGE UP VOLUME DOWN ON OFF 㧗 FREEZE MY SOURCE DOC CAMERA button 1 Press COMPUTER button on the remote control to select the COMPUTER IN port COMPUTER button VIDEO DOC CAMERA KEYSTONE ASPECT SEARCH BLANK MU...

Page 25: ...to the state selected before the operation Searching an input signal While ON is selected for AUTO SEARCH item in OPTION menu 43 the projector will keep checking the ports in above order repeatedly till an input signal is detected For a computer signal NORMAL Æ 4 3 Æ 16 9 Æ 16 10 For a video signal s video signal or component video signal 4 3 Æ 16 9 Æ 14 9 For no signal 4 3 xed SEARCH button ASPEC...

Page 26: ...knobs in order to lock the elevator feet To loose an elevator foot pull up the elevator knob on the same side as it To nely adjust twist the foot 4 After making sure that the elevator feet are locked put the projector down gently 5 If necessary the elevator feet can be manually twisted to make more precise adjustments Hold the projector when twisting the feet Do not handle the elevator buttons wit...

Page 27: ...the application window is set to its maximum size prior to attempting to use this feature A dark picture may still be incorrectly adjusted Use a bright picture when adjusting For a video signal and s video signal The video format best suited for the respective input signal will be selected automatically This function is available only when the AUTO is selected for the VIDEO FORMAT item in the INPU...

Page 28: ...KEYSTONE button again Even if you do not do anything the dialog will automatically disappear after a few seconds The adjustable range of this function will vary among inputs For some input this function may not work well When the projector is inclined to near 30 degree or over this function may not work well KEYSTONE button VIDEO DOC CAMERA KEYSTONE ASPECT SEARCH BLANK MUTE MY BUTTON 1 2 COMPUTER ...

Page 29: ...splayed on the dialog use the cursor buttons to adjust the magni cation ratio The magni cation ratio will be adjusted with ne steps And changes in the ratio in single steps are subtle so they may be hard to recognize 5 Press the MAGNIFY OFF button on the remote control to exit magni cation The MAGNIFY dialog will automatically disappear in several seconds with no operation The dialog will appear a...

Page 30: ...REEN menu 39 and the projector will go into the FREEZE mode which the picture is frozen To exit the FREEZE mode and restore the screen to normal press the FREEZE button again Temporarily freezing the screen The projector automatically exits from the FREEZE mode when some control buttons are pressed If the projector continues projecting a still image for a long time the LCD panel might possibly be ...

Page 31: ... the projector works as the cursor buttons The basic operations of these menus are as follows In the EASY MENU MENU button Cursor buttons RESET button ENTER button MENU button Cursor buttons ESC button continued on next page INPUT button 1 Use the cursor buttons to select a menu If you want to change it to the EASY MENU select the EASY MENU The items in the menu appear on the right side 2 Press th...

Page 32: ...ET button on the remote control during the operation Note that some items ex LANGUAGE VOLUME cannot be reset In the ADVANCED MENU when you want to return to the previous display press the cursor button or ESC button on the remote control Indication in OSD On Screen Display The meanings of the general words on the OSD are as follows Indication Meaning EXIT Selecting this word nishes the OSD menu It...

Page 33: ...COLOR TEMP settings Choose a suitable mode according to the projected source NORMAL Ù CINEMA Ù DYNAMIC Ù BOARD BLACK DAYTIME Ù WHITEBOARD Ù BOARD GREEN GAMMA COLOR TEMP NORMAL 1 DEFAULT 2 MID CINEMA 2 DEFAULT 3 LOW DYNAMIC 3 DEFAULT 1 HIGH BOARD BLACK 4 DEFAULT 4 Hi BRIGHT 1 BOARD GREEN 4 DEFAULT 5 Hi BRIGHT 2 WHITEBOARD 5 DEFAULT 2 MID DAYTIME 6 DEFAULT 6 Hi BRIGHT 3 When the combination of GAMMA...

Page 34: ...ing the button performs resetting FILTER TIME The usage time of the air lter is shown in the menu Performing this item resets the lter time which counts usage time of the air lter A dialog is displayed for con rmation Selecting the OK using the button performs resetting See the FILTER TIME item in OPTION menu 44 LANGUAGE Using the buttons changes the display language See the LANGUAGE item in SCREE...

Page 35: ...ing the buttons and adjust the level using the buttons You can display a test pattern for checking the effect of your adjustment by pressing the ENTER button Each time you press the ENTER button the pattern changes as below No pattern Ö Gray scale of 9 steps Ramp Õ Gray scale of 15 steps The eight equalizing bars correspond to eight tone levels of the test pattern Gray scale of 9 steps except the ...

Page 36: ...press the ENTER button the pattern changes as below No pattern Ö Gray scale of 9 steps Ramp Õ Gray scale of 15 steps Lines or other noise might appear on the screen when this function is operated but it is not a malfunction COLOR Using the buttons adjusts the strength of whole color Weak Ù Strong This item can be selected only for a video s video and component video signal TINT Using the buttons a...

Page 37: ...ored of a memory will be lost by saving new data into the memory LOAD 1 LOAD 2 LOAD 3 LOAD 4 Performing a LOAD function loads the data from the memory linked in the number included in the function s name and adjusts the picture automatically depending on the data The LOAD functions whose linked memory has no data are skipped Remember that the current adjusted condition will be lost by loading data...

Page 38: ...r adjusting the vertical position may cause noise to appear on the screen If this occurs please reset the vertical position to the default setting Pressing the RESET button when the V POSITION is selected will reset the V POSITION to the default setting When this function is performed on a video signal or an s video signal the range of this adjustment depends on OVER SCAN above setting It is not p...

Page 39: ...ature A dark picture may still be incorrectly adjusted Use a bright picture when adjusting For a video signal and s video signal The video format best suited for the respective input signal will be selected automatically This function is available only when the AUTO is selected for the VIDEO FORMAT item in the INPUT menu 32 The vertical position and horizontal position will be automatically set to...

Page 40: ...m But these may cause a certain defect for example jagged line of the picture for a quick moving object In such a case please select OFF even though the screen image may lose sharpness VIDEO NR Using the buttons switches the noise reduction mode HIGH Ù MID Ù LOW This function is performed only for a video signal s video signal or component video signal of 480i 60 or 576i 50 COLOR SPACE Using the b...

Page 41: ...R IN 1 Use the buttons to select the computer input signal type AUTO Ù SYNC ON G OFF Selecting the AUTO mode allows you to input a sync on G signal or component video signal from the port To input component video signal to the projector an RCA to D sub cable or adapter is required In the AUTO mode the picture may be distorted with certain input signals In such a case remove the signal connector so...

Page 42: ...custom resolution use the buttons to select the CUSTOM and the RESOLUTION_CUSTOM box will be displayed Set the horizontal HORZ and vertical VERT resolutions using the buttons This function may not support all resolutions 5 Move the cursor to OK on screen and press the or ENTER button The message ARE YOU SURE YOU WISH TO CHANGE RESOLUTION appears To save the setting press the button The horizontal ...

Page 43: ... the ECO MODE below setting An OSD message AUTO ECO MODE will be displayed for tens of seconds when the projector starts with this function activated ECO MODE Using the buttons changes the eco mode setting NORMAL Ù ECO When the ECO is selected acoustic noise and screen brightness are reduced MIRROR Using the buttons switches the mode for mirror status NORMAL Ù H INVERT Ù V INVERT Ù H V INVERT STAN...

Page 44: ...t in the standby mode 2 Select the output signal from the MONITOR OUT port using buttons Select OFF to disable the MONITOR OUT port for the input port or standby mode chosen in the step 1 If you have changed the setting of STANDBY it applies only to the current standby mode NORMAL or SAVING selected under STANDBY MODE without changing the setting of the other mode The factory settings are as follo...

Page 45: ...the AUDIO OUT port and built in speaker of this projector However the built in speaker does not work when SPEAKER is set to OFF 1 Choose a picture input port using the buttons Choose AUDIO OUT STANDBY to select the sound output in the standby mode 2 Select the output signal from the AUDIO OUT port using buttons Select to mute the sound from the input port or in the standby mode chosen in the step ...

Page 46: ... on the remote control MyScreen Ù ORIGINAL Ù BLUE Ù WHITE Ù BLACK MyScreen Screen can be registered by the MyScreen item 38 ORIGINAL Screen preset as the standard screen BLUE WHITE BLACK Plain screens in each color To avoid remaining as an afterimage the MyScreen or ORIGINAL screen will change to the plain black screen after several minutes START UP Using the buttons switches the mode for the star...

Page 47: ...sts the frame position Please move the frame to the position of the image which you want to use The frame may not be able to be moved for some input signals To start registration press the ENTER or INPUT button on the remote control To restore the screen and return to the previous dialog press the RESET button on the remote control Registration takes several minutes When the registration is comple...

Page 48: ... INPUT IS DETECTED SYNC IS OUT OF RANGE INVALID SCAN FREQ NOT AVAILABLE Searching while searching for the input Detecting while an input signal is detected AUTO ECO MODE while starting up with AUTO ECO MODE The indication of the input signal displayed by changing The indication of the aspect ratio displayed by changing The indication of the PICTURE MODE displayed by changing The indication of the ...

Page 49: ...fy the name assigned to the port select CUSTOM NAME and press the button 6 The current name will be displayed on the rst line Use the buttons and the ENTER or INPUT button to select and enter characters To erase 1 character at one time press the RESET button or press the and INPUT button at the same time Also if you move the cursor to DELETE or ALL CLEAR on screen and press the ENTER or INPUT butt...

Page 50: ...1 Ù DOT LINE4 You can turn a map upside down and scroll it horizontally when MAP1 or MAP2 is selected To invert or scroll the map display the guidance by pressing the RESET button on the remote control three seconds or more when MAP1 or MAP2 appears While the guidance is displayed Press the cursor button and then press the ENTER or INPUT button to place the Northern Hemisphere on the top Press the...

Page 51: ...he caption is not displayed when the OSD menu is active The Closed Caption is the function to display the dialogue narration and or sound effects of a television program or other video sources The Closed Caption availability is depending upon broadcaster and or content MODE Select Closed Caption MODE setting from following options using buttons CAPTIONS Ù TEXT CAPTIONS Display Closed Caption TEXT ...

Page 52: ...urrent port Then when an input is found the projector will stop searching and display the image COMPUTER IN VIDEO Õ S VIDEO DIRECT POWER ON Using the buttons turns on off the DIRECT POWER ON function ON Ù OFF When set to the ON the lamp in projector will be automatically turned on without the usual procedure 13 only when the projector is supplied with the power after the power was cut while the la...

Page 53: ...of the lamp counted after the last resetting It is shown in the OPTION menu Pressing the RESET button on the remote control or the button of the projector displays a dialog To reset the lamp time select the OK using the button CANCEL Ö OK Please reset the lamp time only when you have replaced the lamp for a suitable indication about the lamp For the lamp replacement see the section Replacing the l...

Page 54: ...o saved data appears When the current adjustment is not saved to memory the dialog as shown in the right appears If you want to keep the current adjustment please press the button to exit Otherwise loading a data will overwrite the current adjusted condition PICTURE MODE Changes the PICTURE MODE 24 FILTER RESET Displays the lter time reset con rmation dialogue 44 TEMPLATE Makes the template patter...

Page 55: ...hoose DISABLE to disable the automatic adjustment and make adjustment manually GHOST 1 Select a color element of ghost using the buttons 2 Adjust the selected element using the buttons to disappear ghost FILTER MESSAGE Use the button to set the timer for notifying by the message when to replace the lter unit 100h Ù 200h Ù 500h Ù 1000h Ù 2000h Ù 3000h Ù 4000h Ù 5000h Ù OFF After choosing an item ex...

Page 56: ..._INFORMATION It shows the information about the current input The FRAME LOCK message on the dialog means the frame lock function is working This item can t be selected for no signal and sync out When the MY TEXT DISPLAY is set to ON the MY TEXT is displayed together with the input information in the INPUT_ INFORMATION box 52 FACTORY RESET Selecting OK using the button performs this function By thi...

Page 57: ...ed press and hold the RESET button on the remote control for about 3 seconds or press and hold the INPUT button for 3 seconds while pressing the button on the projector 2 The 10 digit Inquiring Code will be displayed Contact your dealer with the 10 digit Inquiring Code Your password will be sent after your user registration information is con rmed If there is no key input for about 55 seconds whil...

Page 58: ...urn to MyScreen PASSWORD on off menu When a password is set for MyScreen The MyScreen registration function and menu will be unavailable The MyScreen Lock menu will be unavailable The START UP setting will be locked on MyScreen and the menu will be unavailable Turning the MyScreen PASSWORD off will allow normal operation of these functions Please do not forget your MyScreen PASSWORD 2 Turning off ...

Page 59: ...again If an incorrect PIN Code is input 3 times the projector will turn off Afterwards the projector will turn off every time an incorrect PIN code is input The projector will also turn off if there is no key input for about 5 minutes while the Enter PIN code box is displayed This function will activate only when the projector is started after AC power is turned off Please do not forget your PIN c...

Page 60: ...ight side of the NEW PASSWORD AGAIN box and press button to display the NOTE NEW PASSWORD box for about 30 seconds then please make note of the password during this time Pressing the ENTER button on the remote control or button on the projector will return to the MY TEXT PASSWORD on off menu 2 Turning off the MY TEXT PASSWORD 2 1 Follow the procedure in 1 1 to display the MY TEXT PASSWORD on off m...

Page 61: ...R or INPUT button to select and enter characters To erase 1 character at one time press the RESET button or press the and INPUT button at the same time Also if you move the cursor to DELETE or ALL CLEAR on screen and press the ENTER or INPUT button 1 character or all characters will be erased The MY TEXT can be input up to 24 characters on each line 3 To change an already inserted character press ...

Page 62: ...loosen any other screws 5 Insert the new lamp and retighten rmly the 2 screws of the lamp that are loosened in the previous process to lock it in place 6 While putting the interlocking parts of the lamp cover and the projector together slide the lamp cover back in place Then rmly fasten the screw of the lamp cover 7 Turn the projector on and reset the lamp time using the LAMP TIME item in the OPTI...

Page 63: ...t come out from the projector s vent holes and not to get them into your eyes or mouth Before replacing the lamp turn the projector off and unplug the power cord then wait at least 45 minutes for the lamp to cool sufficiently Handling the lamp while hot can cause burns as well as damaging the lamp Never unscrew except the appointed marked by an arrow screws Do not open the lamp cover while the pro...

Page 64: ...on and around the lter cover 3 Pick and pull up the lter cover knobs to take it off 4 Use a vacuum cleaner for the lter vent of the projector 5 Take the lter out pulling the lter s knob up while holding the lter cover 7 Put the lter back into the lter cover 8 Put the lter unit back into the projector When you replace the lamp please replace the air lter An air lter of speci ed type will come toget...

Page 65: ...s clogged by dust or the like internal temperatures rise and could cause a re a burn or malfunction to the projector WARNING Please replace the air lter when it is damaged or too soiled When you replace the projection lamp please replace the air lter An air lter of speci ed type will come together with a replacement lamp for this projector Please reset the lter time only when you have cleaned or r...

Page 66: ...or inserting liquids in the projector It could result in a re an electric shock and or malfunction to the projector Do not put anything containing water cleaners or chemicals near the projector Do not use aerosols or sprays WARNING Please take right care of the projector according to the following Incorrect care could cause not only an injury but adverse in uence such as discoloration peeling pain...

Page 67: ...he power is turned on Message Description There is no input signal Please con rm the signal input connection and the status of the signal source The horizontal or vertical frequency of the input signal is QRW ZLWKLQ WKH VSHFL HG UDQJH Please con rm the specs for your projector or the signal source specs An improper signal is input Please con rm the specs for your projector or the signal source spe...

Page 68: ...nutes After the projector has suf ciently cooled down please make con rmation of the following items and then turn the power on again Is there blockage of the air passage aperture Is the air lter dirty Does the peripheral temperature exceed 35 C If the same indication is displayed after the remedy please change the lamp referring to the section Replacing the lamp Blinking In Red or Lighting In Red...

Page 69: ... of the air passage aperture Is the air lter dirty Does the peripheral temperature exceed 35 C If the same indication is displayed after the remedy please set FAN SPEED of SERVICE item in OPTION menu to HIGH 46 Lighting In Green Simultaneous blinking in Red W LV WLPH WR FOHDQ WKH DLU OWHU Please immediately turn the power off and clean or change the air lter referring to the section Cleaning and r...

Page 70: ...disconnect the power plug from the power outlet and allow the projector to cool down at least 45 minutes After the projector has suf ciently cooled down please make con rmation of the attachment state of the lamp and lamp cover and then turn the power on again 53 54 Neither sounds nor pictures are outputted The signal cables are not correctly connected Correctly connect the connection cables 9 Sig...

Page 71: ...on cables 9 7KH EULJKWQHVV LV DGMXVWHG WR DQ H WUHPHO ORZ OHYHO Adjust the BRIGHTNESS to a higher level using the menu function 26 The computer cannot detect the projector as a plug and play monitor Make sure that the computer can detect a plug and play monitor using another plug and play monitor 10 The BLANK screen is displayed Press the BLANK button on the control panel or the remote control 21 ...

Page 72: ...he lens is dirty or misty Clean the lens referring to the section Caring for the lens 57 No signal is output from the MONITOR OUT and AUDIO OUT ports The SAVING function is working in the standby state Select the NORMAL for the STANDBY MODE item in the SETUP menu 34 Some kind of image degradation such as ickering or stripes appear on the screen When the projector is operating in Eco mode ÀLFNHULQJ...

Page 73: ... may appear on the screen this is a unique characteristic of liquid crystal displays and it does not constitute or imply a machine defect The projector may make a rattling sound when tilted moved or shaken since a ap to control the air ow inside of the projector has moved Be aware that this is not a failure or malfunction NOTE ...

Page 74: ...ing protruding parts Please refer to the following gure Weight mass approx 2 1 kg Ports Computer input port COMPUTER IN D sub 15 pin mini x1 Computer output port MONITOR OUT D sub 15 pin mini x1 Video input port S VIDEO mini DIN 4 pin x1 VIDEO RCA x1 Audio input output port AUDIO IN Stereo mini x1 AUDIO OUT Stereo mini x1 Optional parts Lamp DT01151 LU OWHU NJ27422 Mounting accessary HAS X1 Bracke...

Page 75: ...66 221 306 77 83 Specifications Speci cations continued unit mm ...

Page 76: ...80 x 1024 64 0 60 0 VESA SXGA 60Hz 1280 x 1024 80 0 75 0 VESA SXGA 75Hz 1280 x 1024 91 1 85 0 VESA SXGA 85Hz 1400 x 1050 65 2 60 0 VESA SXGA 60Hz 1600 x 1200 75 0 60 0 VESA UXGA 60Hz NOTE Be sure to check jack type signal level timing and resolution before connecting this projector to a PC Some PCs may have multiple display screen modes Use of some of these modes will not be possible with this pro...

Page 77: ... 600 1 6 3 2 16 2 0 3 3 21 600 1 SVGA 75Hz 800 x 600 1 1 2 7 14 2 0 6 3 27 600 1 SVGA 85Hz 832 x 624 1 1 3 9 14 5 0 6 3 39 624 1 Mac 16 mode 1024 x 768 2 1 2 5 15 8 0 4 6 29 768 3 XGA 60Hz 1024 x 768 1 8 1 9 13 7 0 3 6 29 768 3 XGA 70Hz 1024 x 768 1 2 2 2 13 0 0 2 3 28 768 1 XGA 75Hz 1024 x 768 1 0 2 2 10 8 0 5 3 36 768 1 XGA 85Hz 1152 x 864 1 2 2 4 10 7 0 6 3 32 864 1 1152 x 864 75Hz 1280 x 768 1...

Page 78: ...60 480p 60 576i 50 576p 50 720p 50 60 1080i 50 60 1080p 50 60 Pin Signal Pin Signal 1 Video Red Cr Pr 9 No connection 2 Video Green Y 10 Ground 3 Video Blue Cb Pb 11 No connection 4 No connection 12 A SDA DDC data No connection 5 Ground B No connection 6 Ground Red Ground Cr Pr 13 H sync Composite sync No connection 7 Ground Green Ground Y 14 V sync No connection 8 Ground Blue Ground Cb Pb 15 A SC...

Page 79: ...r signal 0 286Vp p NTSC burst 75Ω terminator Color signal 0 300Vp p PAL SECAM burst 75Ω terminator 2 Brightness signal 1 0Vp p 75Ω terminator 3 Ground 4 Ground Connection to the ports continued 4 3 2 1 D VIDEO RCA jack System NTSC PAL SECAM PAL M PAL N NTSC4 43 PAL 60Hz 1 0 0 1Vp p 75Ω terminator C D ...

Page 80: ...5 Connection to the ports continued E AUDIO IN Ø3 5 stereo mini jack 200 mVrms 47kΩ terminator F AUDIO OUT Ø3 5 stereo mini jack 200 mVrms 1kΩ output impedance F E ...

Page 81: ...onent video signal to the COMPUTER IN port of the projector use a RCA to D sub cable or adapter For about the pin description of the required cable or adapter refer to the descriptions about COMPUTER IN port 3 RCA plugs D sub plug VCR DVD Blu ray Disc player RCA connectors Connection to the ports continued ...

Page 82: ...ls explanation 2 Important safety instruction 2 Regulatory notices 3 About Electro Magnetic Interference 3 About Waste Electrical and Electronic Equipment 4 Contents of package 4 Preparations 5 Loading batteries into the remote control 5 Arrangement 6 Connecting your devices 7 Connecting power supply 8 Turning on the power 8 Adjusting the projector s elevator 9 Displaying the picture 10 Turning of...

Page 83: ... the projector from the power outlet if the projector is not used for the time being Do not open or remove any portion of the product unless the manuals direct it For internal maintenance leave it to your dealer or their service personnel Use only the accessories specified or recommended by the manufacturer Modify neither the projector nor accessories Let neither any things nor any liquids enter to...

Page 84: ...sed in accordance with the instructions may cause harmful interference to radio communications However there is no guarantee that interference will not occur in a particular installation If this equipment does cause harmful interference to radio or television reception which can be determined by turning the equipment off and on the user is encouraged to try to correct the interference by one or mo...

Page 85: ...with the Waste Electrical and Electronic Equipment Directive 2002 96 EC WEEE The mark indicates the requirement NOT to dispose the equipment including any spent or discarded batteries or accumulators as unsorted municipal waste but use the return and collection systems available If the batteries or accumulators included with this equipment display the chemical symbol Hg Cd or Pb then it means that...

Page 86: ...G Always handle the batteries with care and use them only as directed Improper use may result in battery explosion cracking or leakage which could result in fire injury and or pollution of the surrounding environment Be sure to use only the batteries specified Do not use batteries of different types at the same time Do not mix a new battery with used one Make sure the plus and minus terminals are co...

Page 87: ...accessories to the service personnel Read and keep the user s manual of the mounting accessories used CAUTION Avoid placing the projector in smoky humid or dusty place Position the projector to prevent light from directly hitting the projector s remote sensor Screen size diagonal 4 3 screen 16 9 screen Projection distance Screen height Screen height Projection distance Screen height Screen height ...

Page 88: ...e careful not to damage the cables and do not use damaged cables CAUTION Turn off all devices and unplug their power cords prior to connecting them to projector Connecting a live device to the projector may generate extremely loud noises or other abnormalities that may result in malfunction or damage to the device and the projector Use appropriate accessory or designated cables Ask your dealer abo...

Page 89: ...ons may result in fire and or electrical shock Only use the power cord that came with the projector If it is damaged consult your dealer to get a new one Only plug the power cord into an outlet whose voltage is matched to the power cord The power outlet should be close to the projector and easily accessible Remove the power cord for complete separation Never modify the power cord NOTICE ʇThis produ...

Page 90: ...side of the projector to the desired height 3 Release the elevator knobs in order to lock the elevator feet 4 After making sure that the elevator feet are locked put the projector down gently 5 If necessary the elevator feet can be manually twisted to make more precise adjustments Hold the projector when twisting the feet To loose an elevator foot pull up the elevator knob on the same side as it C...

Page 91: ...t the screen size 6 Use the focus ring to focus the picture VOLUME button VOLUME button MUTE button VIDEO button COMPUTER button ASPECT button NOTE The ASPECT button does not work when no proper signal is inputted For the details of how to adjust the picture please see the Operating Guide in the CD VIDEO DOC CAMERA KEYSTONE ASPECT SEARCH BLANK MUTE MY BUTTON POSITION 1 2 ESC ENTER MENU RESET COMPU...

Page 92: ...perations might cause the lamp to malfunction or shorten the lifetime of some parts including the lamp WARNING Do not touch around the lamp cover and the exhaust vents during use or just after use since it is too hot Remove the power cord for complete separation The power outlet should be close to the projector and easily accessible NOTE Please power off the projector after any connected devices a...

Page 93: ...ow of the lamp and slowly pick up the lamp by the handle Never loosen any other screws 5 Insert the new lamp and retighten firmly the 2 screws of the lamp that are loosened in the previous process to lock it in place 6 While putting the interlocking parts of the lamp cover and the projector together slide the lamp cover back in place Then firmly fasten the screw of the lamp cover 7 Turn the projecto...

Page 94: ...ctor s vent holes and not to get them into your eyes or mouth Before replacing the lamp turn the projector off and unplug the power cord then wait at least 45 minutes for the lamp to cool sufficiently Handling the lamp while hot can cause burns as well as damaging the lamp Never unscrew except the appointed marked by an arrow screws Do not open the lamp cover while the projector is suspended from ...

Page 95: ...er unit back into the projector 9 Turn the projector on and reset the filter time using the FILTER TIME item in the EASY MENU 1 Press the MENU button to display a menu 2 Point at the FILTER TIME using the button then press the button A dialog will appear 3 Press the button to select OK on the dialog It performs resetting the filter time Cleaning and replacing the air filter WARNING Before taking care...

Page 96: ...ectors icon appeared on the desktop screen 2 When main html file is clicked Web browser will start and Initial window will appear 2 Click the model name of your projector first and then click language you want from the displayed list The User s manual detailed will open CAUTION Only use the CD ROM in a computer CD drive The CD ROM is designed for PC use only NEVER INSERT THE CD ROM INTO A NON COMP...

Page 97: ... refer to the following figure Weight mass approx 2 1 kg Ports Computer input port COMPUTER IN D sub 15 pin mini x1 Computer output port MONITOR OUT D sub 15 pin mini x1 Video input port S VIDEO mini DIN 4 pin x1 VIDEO RCA x1 Audio input output port AUDIO IN Stereo mini x1 AUDIO OUT Stereo mini x1 Optional parts Lamp DT01151 Air filter NJ27422 Mounting accessary HAS X1 Bracket for ceiling mount HAS ...

Page 98: ...itachidigitalmedia com Trademark acknowledgment Mac Macintosh and Mac OS are registered trademarks of Apple Inc Pentium is a registered trademark of Intel Corp Adobe and Acrobat Reader are registered trademarks of Adobe Systems Incorporated Microsoft and Internet explorer Windows Windows NT Windows Vista are registered trademarks of Microsoft Corporation PowerPC is a registered trademark of Intern...

Page 99: ...er deler av det er ikke tillatt uten uttrykt skriftlig tillatelse OPMERKING De informatie in deze handleiding kan zonder voorafgaande kennisgeving veranderd worden De fabrikant neemt geen enkele verantwoordelijkheid voor de eventuele fouten in deze handleiding Reproductie overdracht of het gebruik van dit document is niet toegestaan zonder uitdrukkelijke toestemming van de betreffende partij NOTA ...

Page 100: ...sundaviks Alle 15 169 29 Solna SWEDEN Sweden Tel 46 856 27 1100 Finland Tel 358 10 8503 085 Norway Tel 47 9847 3898 Denmark Tel 45 43 43 6050 Email rma nordic hitachi eu com Hitachi Australia Pty Ltd Level 3 82 Waterloo Road North Ryde N S W 2113 AUSTRALIA Tel 61 2 9888 4100 Fax 61 2 9888 4188 http www hitachi com au Hitachi Hong Kong Ltd 18 F Ever Gain Centre 28 On Muk Street Shatin N T HONG KONG...

Reviews: