background image

5

English

SPECIFICATIONS

*Be sure to check the nameplate on product as it is subject to change by areas.

STANDARD ACCESSORIES

(1) Hexagon bar wrench ................................................ 2
Standard accessories are subject to change without notice.

APPLICATIONS

Cutting and pocket cutting mild steel, stainless steel,
copper and aluminium plates corrugated plates and
trapezoidal plates.

PRIOR TO OPERATION

1. Power source

Ensure that the power source to be utilized conforms
to the power requirements specified on the product
nameplate.

2. Power switch

Ensure that the power switch is in the OFF position.
If the plug is connected to a receptacle while the
power switch is in the ON position, the power tool
will start operating immediately, which could cause
a serious accident.

3. Extension cord

When the work area is removed from the power
source, use an extension cord of sufficient thickness
and rated capacity. The extension cord should be
kept as short as practicable.

4. Die Inspection

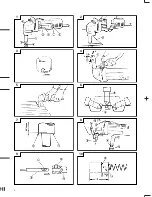
Inspect for looseness of the M8 hexagon socket set
screw used for mounting the die holder, the M3
machine screws used for mounting the die (see

Fig. 4

) and the M5 hexagon socket set screws used

for mounting the punch (see 

Fig. 8

). Caution should

be exercised because, if any of these screws are
loose, not only does cutting performance deteriorate
but the machine can also be damaged.

5. Lubrication

Before use, carefully lubricate the sliding surfaces
around the die and punch (see 

Fig. 1

) with a suitable

amount of machine oil or spindle oil.

CUTTING

CAUTION

Never try to cut materials that are too large for the
capacity of the machine since this may cause
damage.

Applying cutting oil (spindle oil, machine oil, and
so on) along the shearing line may decrease wear
of the punch and die.
Use care to prevent cutting oil adhering to the
housing since the surface may be damaged.

The cutting directions of Punch shape (

I

) (see 

Fig.

11

) are in the 3 directions of A, B and C (see 

Fig.

4

) and these directions can be changed, but punch

shape (

II

) can be cut in direction B only.

1. Cutting plates

As shown in 

Fig. 2

, hold the plates being cut parallel

with the machine and apply a light force while
cutting. When pocket cutting, make a hole 23 mm
in diameter or larger, as shown in 

Fig. 3

, and start

cutting with the tip of the die holder.

2. Cutting corrugated and trapezoidal plates

(1) The cutting direction of this machine can be rotated

in 90° increments in 3 directions (A, B and C) (see

Fig. 4

) by loosening the M8 hexagon socket set

screw mounting the die holder. Set the cutting
direction in the B or C direction to cut trapezoidal
plates. After that, securely tighten the M8 hexagon
socket set screw.

(2) Grip the machine firmly with both hands as shown

in 

Fig. 5

, align with the shape of the trapezoidal

plate, push the machine forward until the die holder
is at right angles as shown in 

Fig. 6

  and make the

cut.

REPLACING PUNCH AND DIE

CAUTION

In this case, be sure to previously disconnect the
plug from the power supply.

1. Service Life of the Punch and Die

Wear and damage to the cutting edges of the punch
and die can greatly influence the cutting operation.
Under normal usage, the service life of the punch
and die is as shown in the table below. Replace
the punch and die promptly when the end of the
service life approaches. The punch and die should
be replaced at the same time.

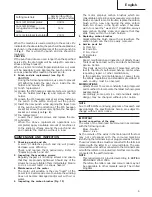
Voltage (by areas)*

(110V, 115V, 120V, 127V, 220V, 230V, 240V)

Power Input

400W*

Cutting

Mild Steel plate(400N/mm

2

)

1.6 mm

capacity

Stainless steel plate (600N/mm

2

)

1.2 mm

Aluminium plate (200N/mm

2

)

2.3 mm

Number of strokes at no load

2000/min

Minimum cutting radius

40 mm

Width of nibbling groove

5 mm

Weight (without cord)

1.7 kg

Summary of Contents for CN 16

Page 1: ...o leggere attentamente e comprendere queste instruzioni Deze gebruiksaanwijzing s v p voor gebruik zorgvuldig doorlezen Leer cuidadosamente y comprender estas instrucciones antes del uso Antes de usar leia com cuidado para assimilar estas instruções ιαβάστε προσεκτικά και κατανοήσετε αυτές τις οδηγίες πριν τη χρήση Handling instructions Bedienungsanleitung Mode d emploi Instruzioni per l uso Gebru...

Page 2: ...1 1 2 4 6 8 3 5 7 10 9 ...

Page 3: ...nze Nr der Kohlenbürste Français Plaque signalétique Interrupteur Poinçon Matrice Support de matrice Couvercle du jeu de pignons Support du balai Capuchon de la brosse Matériel de coupe Vis machine M3 Vis de fixation à tête hexagonal M8 Direction de coupe Piston Vis de fixation à tête hexagonale M5 Arête de découpe du perforateur Usure due à l abrasion Orifice conique Limite d usure No de balai en...

Page 4: ...beza hueca hexagonal M5 Borde de corte del punzón Desgaste debido a la abrasión Agujero cónico Límite de desgaste No de la escobilla de carbón Português Placa de identificação Interruptor Perfurador Matriz Suporte de matriz Cobertura da engrenagem Suporte da escova Tampa da escova Material para cortar Parafuso de máquina M3 Parafuso de fixação de cabeça sextavada M8 Direção do corte Pistão Parafus...

Page 5: ...uctions for lubrication and changing accessories Inspect tool cords periodically and if damaged have it repaired by authorized service center Inspect extension cords periodically and replace if damaged Keep handles dry clean and free from oil and grease 15 Disconnect tools When not in use before servicing and when changing accessories such as blades bits and cutters 16 Remove adjusting keys and wr...

Page 6: ...he punch and die Use care to prevent cutting oil adhering to the housing since the surface may be damaged 䡬 The cutting directions of Punch shape I see Fig 11 are in the 3 directions of A B and C see Fig 4 and these directions can be changed but punch shape II can be cut in direction B only 1 Cutting plates As shown in Fig 2 hold the plates being cut parallel with the machine and apply a light for...

Page 7: ...ploys carbon brushes which are consumable parts Since an excessively worn carbon brush can result in motor trouble replace the carbon brush with a new one having the same carbon brush No shown in the figure when it becomes worn to or near the wear limit In addition always keep carbon brushes clean and ensure that they slide freely within the brush holders 5 Replacing carbon brushes Disassemble the...

Page 8: ...rborne noise and vibration The measured values were determined according to EN50144 The typical A weighted sound pressure level 80 dB A Wear ear protection The typical weighted root mean square acceleration value does not exceed 2 5m s2 ...

Page 9: ...l sollte gegen Hitze Öl und scharfe Kanten geschützt werden 12 Den Arbeitsplatz gut absichern Zwingen oder einen Schraubstock zur Befestigung des Werkstücks verwenden Das ist sicherer als die Benutzung der Hände und macht beide Hände zur Bedienung des Werkzeugs frei 13 Sich niemals weit überbeugen Immer einen festen Stand und ein sicheres Gleichgewicht bewahren 14 Die Werkzeuge sollten sorgfältig ...

Page 10: ...eht werden siehe Abb 4 Dazu zuerst die M8 Sechskant Stellschraube des Formhalters lösen STANDARDZUBEHÖRE 1 Sechskantschlüssel 2 Das Standardzubehör kann ohne vorherige Bekanntmachung jederzeit geändert werden ANWENDUNGSGEBIETE 䡬 Schneiden und Taschenschneiden von Eisenblechen Nirosta Sahlblechen Kupfer und Aluminiumblechen Wellblechen und Trapezblechen VOR INBETRIEBNAHME 1 Netzspannung Prüfen daß ...

Page 11: ... der Halterung frei bewegen können 5 Austausch einer Kohlebürste Der Bürstendeckel wird mit einem Steckschlüssel abmontiert Dann kann die Kohlebürste leicht entfernt werden 6 Liste der Wartungsteile A Punkt Nr B Code Nr C Verwendete Anzahl D Bemerkungen ACHTUNG Reparatur Modifikation und Inspektion von Hitachi Elektrowerkzeugen müssen durch ein autorisiertes Hitachi Kundendienstzentrum durchgeführ...

Page 12: ...emachten technischen Angaben nicht ausgeschlossen Information über Betriebslärm und Vibration Die Meßwerte wurden entsprechend EN50144 bestimmt Der typische A gewichtete Schalldruckt ist 80 dB A Bei der Arbeit immer einen Ohrenschutz tragen Der typische gewichtete Effektiv Beschleunigungswert überschreitet nicht 2 5 m S2 ...

Page 13: ...our faire fonctionner l outil 13 Ne pas présumer de ses forces Essayer de garder son équilibre en toute circonstance 14 Entretenir les outils avec soin Les conserver bien aiguisés et les nettoyer afin d en obtenir les meilleures performances et de pouvoir les utiliser sans danger Suivre les instructions pour le graissage et le changement des accessoires Vérifier régulièrement les fils et cordons e...

Page 14: ...laques d acier doux d acier inoxydable de cuivre d aluminium de tôle ondulée et trapézoïdales AVANT LA MISE EN MARCHE 1 Source de puissance S assurer que la source de puissance àutiliser correspond àla puissance indiquée sur la plaque signalétique du produit 2 Interrupteur de puissance S assurer que l interrupteur de puissance est en position ARRET Si la fiche est branchée alors que l interrupteur...

Page 15: ... Fig 10 Le moteur utilise des balais en carbone qui sont des pièces qui s usent Comme un balai en carbone trop usé peut détériorer le moteur le remplacer par un nouveau du même No que celui montré à la figure quand il est usé ou à la limite d usure En outre toujours tenir les balais propres et veiller à ce qu ils coulissent librement dans les supports 5 Remplacement d un balai en carbone Démonter ...

Page 16: ...gramme permanent de recherche et de développement HITACHI ces spécifications peuvent faire l objet de modifications sans avis préalable Ce produit est conforme aux prescriptions 76 889 CEE et 82 499 CEE Référence VDE 5008 6 2660 1083 Au sujet du bruit et des vibrations Les valeurs mesurées ont été déterminées en fonction de la norme EN50144 Le niveau de pression acoustique pondéré A est de 80 dB A...

Page 17: ...rmi Fissare saldamente l oggetto in una morsa Èpiù sicuro che non tenendolo fermo con le mani che restano libere per maneggiare l elettroutensile 13 Non squilibrare il corpo durante l esecuzione di un lavoro Stare sempre su due piedi in equilibrio stabile 14 Trattare gli utensili elettrici con cura Tenerli sempre puliti ed affilati per un funzionamento migliore e più sicuro Seguire le istruzioni d...

Page 18: ...io da macchina o simili lungo la linea di tranciatura può diminuire l usura del punzone e della matrice Fare attenzione per evitare che l olio da taglio aderisca all involucro perché questo può danneggiarne la superficie 䡬 Le direzioni di taglio possibili con il punzone tipo I vedere Fig 11 sono le direzioni A B e C vedere Fig 4 e possono essere cambiate ma il punzone tipo II può tagliare solo nel...

Page 19: ...li di consumo Poiché una spazzola di carbone troppo larga può creare fastidi al motore sostituire la spazzola con una dello stesso numero indicato nella figura quando essa è logora fino al limite del regolamento e quasi Tenere inoltre sempre pulite le spazzole di carbone e fare in modo che esse scorrano liberamente nell interno del portaspazzola 5 Sostituzione di una spazzola di carbone Togliere l...

Page 20: ...continuo programma di ricerca e sviluppo della HITACHI le caratteristiche riportate in questo foglio sono soggette a cambiamenti senza preventiva comunicazione Informazioni riguardanti i rumori trasmessi dall aria e le vibrazioni I valori misurati sono stati determinati in conformità a EN50144 Il livello di pressione sonora pesato A tipico è di 80 dB A Indossare protezioni per le orecchie Il valor...

Page 21: ... vrij om het gereedschap te bedienen 13 Buig u nooit te ver naar voren Kies een goede plaats en behoud altijd uw evenwicht 14 Behandel het gereedschap voorzichtig Zorg ervoor dat het gereedschap scherp en schoon is zodat een goed en veilig prestatievermogen wordt verkregen Volg de gebruiksaanwijzing voor het smeren en het verwisselen van toebehoren Inspecteer de snoeren regelmatig op beschadiging ...

Page 22: ...van het apparaat Doet u dit toch dan kan dit beschadiging van het apparaat veroorzaken 䡬 Het aanbrengen van snij olie dunne vloeibare smeerolie machine olie e d langs de snijlijn kan de slijtage van de drevel en de matrijs verminderen Zorg ervoor dat er geen snij olie op de behuizing van het apparaat komt aangezien hierdoor het oppervlak beschadigd kan raken 䡬 Met ponsstempel I zie Afb 11 kunt u i...

Page 23: ... de motor Dientengevolge dienen de koolborstels vervangen te worden met borstels die hetzelfde nummer hebben als de afbeelding aantoont wanneer de koolborstel versleten of bijna versleten is Bovendien moeten de koolborstels altijd schoon zijn en zich in vrij de borstelhouders bewegen kunnen 5 Het wisselen van de koolborstel Men demonteert de borsteldeksel met een steeksleutel Men kan de koolborste...

Page 24: ...aande kennisgeving gewijzigd worden AANTEKENING Op grond van het voortdurende research en ontwikkelingsprogramma van HITACHI zijn veranderingen van de hierin genoemde technische opgaven voorbehouden Informatie betreffende luchtgeluid en trillingen De gemeten waarden zijn verkregen overeenkomstig EN50144 Het doorsnee A gewogen geluiddruknivo is 80 dB A Draag gehoorbescherming De doorsnee gewogen ef...

Page 25: ... ambas manos quedan libres para operar la herramienta 13 No extenderse excesivamente para efectuar un trabajo Mantener en todo momento un buen balance y base de apoyo 14 Mantener cuidadosamente las herramientas Tener las siempre limpias y afiladas para obtener un mejor rendimiento y un funcionamiento más seguro Seguir siempre las instrucciones para la lubricación y el cambio de accesorios Inspecci...

Page 26: ...ina lubrique las superficies de deslizamiento alrededor del troquel y el punzón consulte la Fig 1 con la cantidad adecuada de aceite para máquinas CORTAR PRECAUCION 䡬 No intente nunca cortar materiales demasiado grandes para la capacidad de la máquina porque podrá dañar ésta 䡬 La aplicación de lubricante para corte aceite para husos aceite para máquinas etc a lo largo de la línea de corte puede di...

Page 27: ...ección Cambio del punzón y matriz 2 Inspeccionar los tornillos de montaje Regularmente inspeccionar todos los tornillos de montaje y asegurarse de que estén apretados firmemente Si cualquier tornillo estuviera suelto volver a apretarlo inmediatamente El no hacer esto provocaría un riesgo serio 3 Mantenimiento de motor La unidad de bobinado del motor es el verdadero corazón de las herramientas eléc...

Page 28: ...cos Por consiguiente algunas partes por ejemplo números de códigos y o diseño pueden ser modificadas sin previo aviso OBSERVACION Debido al programa continuo de investigación y desarrollo de HITACHI éstas especificaciones están sujetas a cambio sin previo aviso Información sobre el ruido propagado por el aire y vibración Los valores medidos fueron determinados de acuerdo con EN50144 El nivel de pr...

Page 29: ...com óleo e objetos cortantes 12 Mantenha fixa a peça a trabalhar Utilize dispositivos de fixação ou uma morsa para prender a peça a trabalhar É mais seguro do que a fixação manual e permite manejar a ferramenta com ambas as mãos 13 Controle sua posição Escolha uma posição segura e mantenha sempre o equilíbrio 14 Efetue uma manutenção cuidadosa das ferramentas Tenha as ferramentas sempre afiadas e ...

Page 30: ...que sejam muito grandes para a capacidade da máquina pois isso pode danificá la 䡬 A aplicação de óleo de corte óleo de eixo óleo de máquina etc ao longo da linha de corte pode reduzir o desgaste do perfurador e da matriz Tenha cuidado de evitar a aderência do óleo de corte ao estojo pois a superfície pode se danificar 䡬 A forma da perfuração I veja Fig 11 têm três direções de corte A B e C veja Fi...

Page 31: ... escova 5 Troca de escova de carvão Desmonte a tampa da escova com uma chave de fenda A escova de carvão pode ser então facilmente removida 6 Lista de peças para conserto A Item N B Código N C N Usado D Observações CUIDADO Consertos modificações e inspeção de Ferramentas Elétricas da Hitachi devem ser realizados por uma Oficina Autorizada da Hitachi Esta lista de peças pode ser útil se apresentada...

Page 32: ...ntidas estão sujeitas a mudanças sem aviso prévio Informação a respeito de ruídos e vibração do ar Os valores medidos foram determinados de acordo com EN50144 Nível típico de pressão sonora de peso A 80 dB A Use protetores de ouvido O valor típico da aceleração média ponderada da raiz quadrada não excede 2 5 m s2 ...

Page 33: ...ντικειµένου πάνω στο οποίο εργάζεστε Είναι πιο ασφαλές απ το να χρησιµοποιείτε το χέρι σας και επιπρ σθετα ελευθερώνει και τα δυο χέρια για να λειτουργήσετε το εργαλείο 13 Μην προεκτείνεστε ιατηρήστε πάντοτε το κατάλληλο πάτηµα και ισορροπία 14 Συντηρείτε τα εργαλεία µε προσοχή ιατηρείτε τα εργαλεία που κ βουν αιχµηρά και καθαρά για καλύτερη και ασφαλέστερη απ δοση Ακολουθήστε τις οδηγίες για τη λ...

Page 34: ...ην προσπαθήσετε να κ ψετε υλικά που είναι πολύ µεγάλα για την ικαν τητα του µηχανήµατος επειδή µε τον τρ πο αυτ µπορεί να προκληθεί ζηµιά 䡬 Η χρήση λαδιού κοπής αξονέλαιο µηχανικ λάδι κ τ λ κατά µήκος της γραµµής κοπής µπορεί να ελαττώσει την φθορά της µήτρας και της σγρ µπιας ώστε προσοχή ώστε να αποφύγετε να έρθει σε επαφή το λάδι κοπής µε το περίβληµα επειδή µπορεί να πάθει ζηµιά η επιφάνειά το...

Page 35: ...ισµών δώστε προσοχή για την αποφυγή της προσκ λλησης της βρωµιάς µέσα στο κάλυµµα των ταχυτήτων µέσα στο στήριγµα της µήτρας και γύρω απ το πιστ νι 1 Αντικατάσταση της σγρ µπιας a Ξεσφίξετε την εξάγωνη κοίλη κοντραβίδα Μ8 που στερεώνει το στήριγµα της µήτρας βλέπε Εικ 4 και αφαιρέστε το στήριγµα της µήτρας b Ξεσφίξετε την εξάγωνη κοίλη κοντραβίδα Μ5 που στερεώνει τη σγρ µπια στο πιστ νι και βγάλτε...

Page 36: ...χουν σε κάθε χώρα πρέπει να ακολουθούνται ΤΡΟΠΟΠΟΙΗΣΗ Τα Ηλεκτρικά Εργαλεία Hitachi βελτιώνονται συνεχώς και τροποποιούνται για να συµπεριλάβουν τις τελευταίες τεχνολογικές προ δους Κατά συνέπεια ορισµένα τµήµατα δηλ κωδικοί αριθµοί και ή σχεδιασµ ς µπορούν να αλλάξουν χωρίς προηγούµενη ειδοποίηση ΣΗΜΕΙΩΣΗ Εξαιτίας του συνεχιζ µενου προγράµµατος έρευνας και ανάπτυξης της Hitachi τα τεχνικά χαρακτη...

Page 37: ...60 098E 1 220V 230V 7 3 360 098F 1 240V 8 954 642 2 D4 60 9 1 340 127C 1 110V 115V 10 9 2 340 127D 1 120V 127V 10 9 3 340 127E 1 220V 230V 10 9 4 340 127M 1 240V 10 AUS 9 5 340 127L 1 220V 230V 10 NZL ITA FRA HOL AUT FRG ESP POR SUI GBR 9 6 340 127G 1 220V 230V 10 SAF 9 7 340 127J 1 110V 10 GBR 10 930 630 2 11 626 VVM 1 626VVMC2ERPS2S 12 993 546 1 D6 13 998 034 1 14 998 037 1 M5 6 15 998 030 1 16 ...

Page 38: ...37 ...

Page 39: ...uisición 4 Nombre y dirección del cliente 5 Nombre y dirección del distribudor Se ruega poner el sellú del distribudor con su nombre y dirección CERTIFICAT DE GARANTIE 1 No de modèle 2 No de série 3 Date d achat 4 Nom et adresse du client 5 Nom et adresse du revendeur Cachet portant le nom et l adresse du revendeur CETTIFICADO DE GARANTIA 1 Nùmero do modelo 2 Nùmero do série 3 Data de compra 4 Nom...

Page 40: ...39 1 2 3 4 5 ...

Page 41: ...40 ...

Page 42: ... OF CONFORMITY We declare under our sole responsibility that this product is in conformity with standards or standardized documents EN50144 EN55014 and EN61000 3 in accordance with Council Directives 73 23 EEC 89 336 EEC and 98 37 EC This declaration is applicable to the product affixed CE marking Deutsch ERKLÄRUNG ZUR KONFORMITÄT MIT CE REGELN Wir erklären mit alleiniger Verantwortung daß dieses ...

Reviews: