background image

ADJUSTMENT (others)


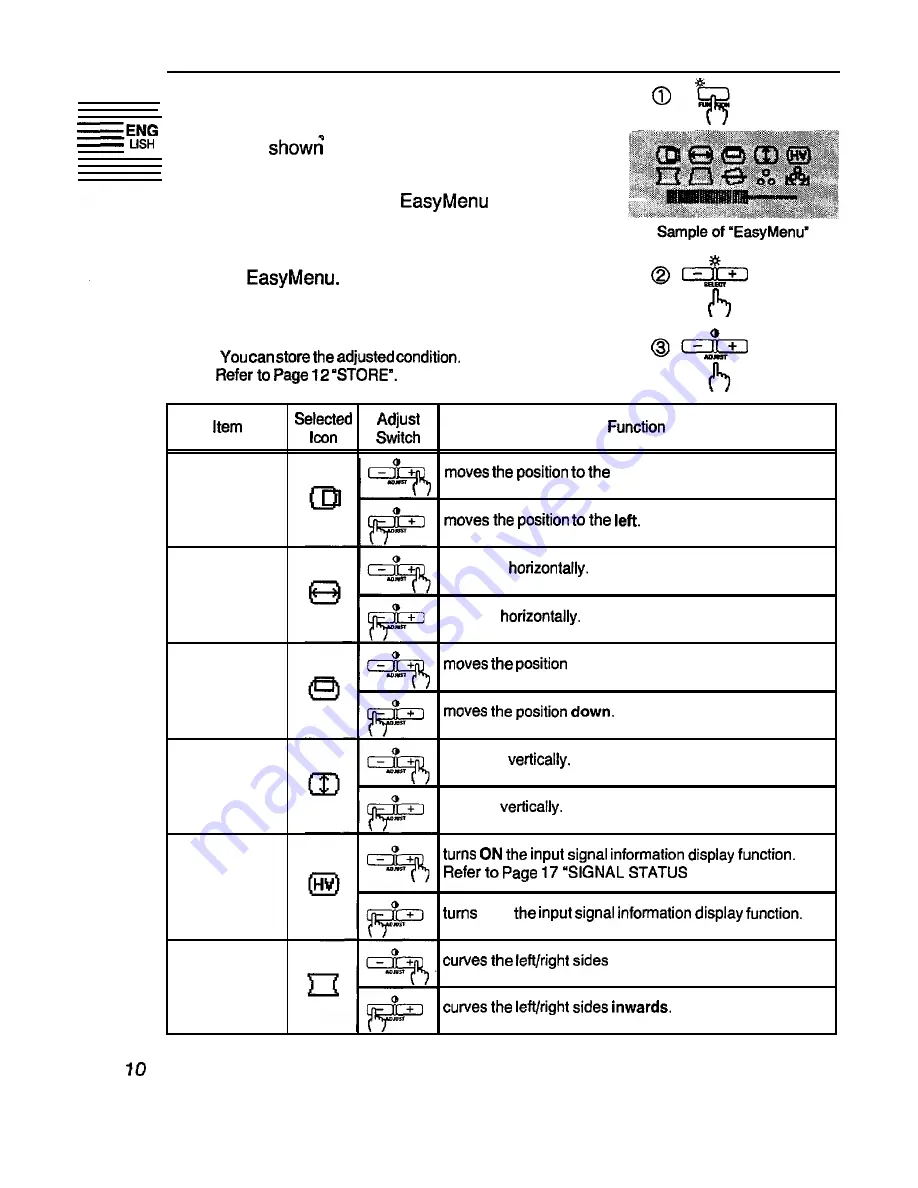
You can adjust the items shown in the following


table, as 

 below.

1. Press the FUNCTION switch. The Function

LED will light, and the 

 will appear.

2. Select the item by the SELECT switches. The

selected item is indicated by magenta icon on

the 

3. Adjust the selected item by the ADJUST

switches.


.


right.

H. Position


H. Size

expands 

shrinks 

V. Position


up.


V. Size

expands 

shrinks 

Signal
Status

Display


OFF 


Pincushion


outwards.


Summary of Contents for CM1711MET-PCMP

Page 1: ...ation READ THE INSTRUCTIONS INSIDE CAREFULLY KEEP THIS USER MANUAL FOR FUTURE REFERENCE For future reference record the serial number of your colour monitor SERIAL No EPA POLLUTION PREVENTER This monitor is Energy Star compliant when used with a computer equipped with VESA DPMS The serial number is located on the rear of the monitor The Energy Star emblem does not represent E P A endorsement of an...

Page 2: ......

Page 3: ...2 CAUTIONS 3 INSTALLATION 4 STANDARD SETTINGS 8 OPERATION 9 POWER SAVING SYSTEM 14 PLUG PLAY 14 SPECIFICATIONS 15 TRADEMARK ACKNOWLEDGMENT VGA is a registered trademark of International Business Machines Corporation Apple and Macintosh are registered trademarks of Apple Computer Inc VESA is a trademark of a nonprofit organization Video Electronics Standard Association Energy Star is a trademark of...

Page 4: ...andard factory settings Digital Colour Control Function Red green and blue colour balance is adjustable by digital control Adjusted colour setting can be stored and recalled by the Colour Select li function Power Saving System The Environmental Protection Agency has established a voluntary program by which manufacturers enable computer products to go into low power states while not being used This...

Page 5: ...CLEANING This monitor has a non glare and anti electrostatic treatment on the surface of the screen Use water or alcoholic solvent with soft cloth like gauze to clean the surface of the screen NEVER use abrasive glass cleaner containing highly concentrated ammonia and strong base chemicals since they damage the surface treatment Clean the cabinet and controls with a lightly moistened soft cloth DO...

Page 6: ... Tilt Swivel Base I FRONT VIEW Rear Cover AC Inlet I Signal Input CoYector I REAR VIEW A NOTICE INSTALL THE UNIT IN ADEQUATE ENVIRONMENT DO NOT expose this monitor to rain or moisture to prevent electric shock or fire hazard This unit is designed to be used in an office or business environment DO NOT subject the unit to vibrations dust or corrosive gases 4 ...

Page 7: ... Inlet of the monitor I Insert the plug of the power cord to a receptacle of the correct voltage AC Inlet yt 1 1 to a receptacle of the correct voltage POW Cord a a 11 AQ REARVIEW B NOTICE q In USA Canada use a UL LlSTED CSA LABELLED or CERTIFIED power cord set meeting the following specifications Rating min 125V 7A Length max 3 1 m Type SVT or SJT Plug type NEMA 5 15P Parallel blade Grounding typ...

Page 8: ...ed extension lead or consult your dealer Should it be necessary to change the mains plugs this must be carried out by a competent person preferably a qualified electrician If there is no alternative to cutting off the mains plug ensure that you dispose of it immediately having first removed the fuse to avoid a possible shook hazard by inadvertent connection to the mains supply WARNING THIS EQUIPME...

Page 9: ... the Power Switch of the monitor first then the computer Refer to Page 9 POWER ON OFF NOTICE w After turning OFF the switch wait at least 5 seconds to restart the monitor Otherwise the monitor may operate unusually n If the picture doesn t appear turn OFF the power switch make sure of the following and wait at least 30 seconds to restart the monitor Make sure the power switch of the computer power...

Page 10: ...idth should be more than 1 O us Horizontal back porch should be more than 1 2 us Horizontal blanking width should be more than 3 0 ps for 31 kHz 55 kHz or 2 7 ps for 55 kHz 82 kHz w The following vertical timing conditions are recommended Vertical front porch should be more than 10 9 us Vertical sync width should be less than 0 3 ms Vertical back porch should be more than 400 us Vertical blanking ...

Page 11: ...al power on H Wait for about 10 minutes before repeating the function ADJUSTMENT Contrast Brightness 1 s l You can adjust Contrast Brightness by the ADJUST g sTi _kI SELECT switches as shown in the following table n lng n z L ri i i 8 I n When the Function LED lights press the FUNCTION switch before the adjustment of Contrast Brightness Sample of EasyMenu n The On Screen Display function of EasyMe...

Page 12: ...the adjusted condition Refer to Page 12 STORE Item Selected Adjust Icon Switch Function moves the position to the right H Position moves the position to the left H Size expands horizontally shrinks horizontally V Position moves the position up moves the position down V Size expands vertically shrinks vertically Signal Status Display turns ON the input signal information display function Refer to P...

Page 13: ...ere are no factory settings of selects the previous colour mode U Refer to Page 17 STORE n When the selected colour B reached to its maximum or makes the selected colour weaker minimum end and you still need to adjust the colour adjust the other two colours to the other direction 11 ...

Page 14: ...e video modes may not be discriminated as different Colour Balance One setting is allowed to the colour balance When the colour balance Red Green Blue lJ is selected Rotation One setting is allowed When the monitor Contrast One setting is allowed detects a valid signal Brightness n It is normally not necessary to store them manually No operation of about 15 Colour Select seconds stores the current...

Page 15: ... When the monitor The Function LED blinks detects no sync signal N Verity power switch of the computer or a sync signal which is and cable connection out of set up specifi cation or is unstable When the monitor will go The Power LED lights on ORANGE into the power saving N Verify power switch of the computer mode and cable connection Refer to page 19 I I VIDEO MUTING l When the monitor has detecte...

Page 16: ... VESA DPMS compliant PC s and or graphic controllers e This monitor complies with VESA DDC1 2B specifications Plug Play is a system with computer peripherals including monitors and operating system It works when the monitor is connected to DDC ready computer that is running an operating system software that is capable for the plug play ...

Page 17: ...le Image Size Viewable Image Area Colour Temperature Warm up Time Power Supply Dimensions Weight Environmental Condition 15 9 inches 404 mm diagonal Horizontal 325 mm Vertical 245 mm Standard Colour Balance l 9300 K Standard Colour Balance 2 6500 K Colour Balance U User defined 30 minutes to reach optimum performance level AC 100 120 200 240 V Automatically select Provided with Power Save Circuit ...

Reviews: