background image

24

ENGLISH

SETUP OPERATION (continued)

  How to Use the Remote to Control your External Devices

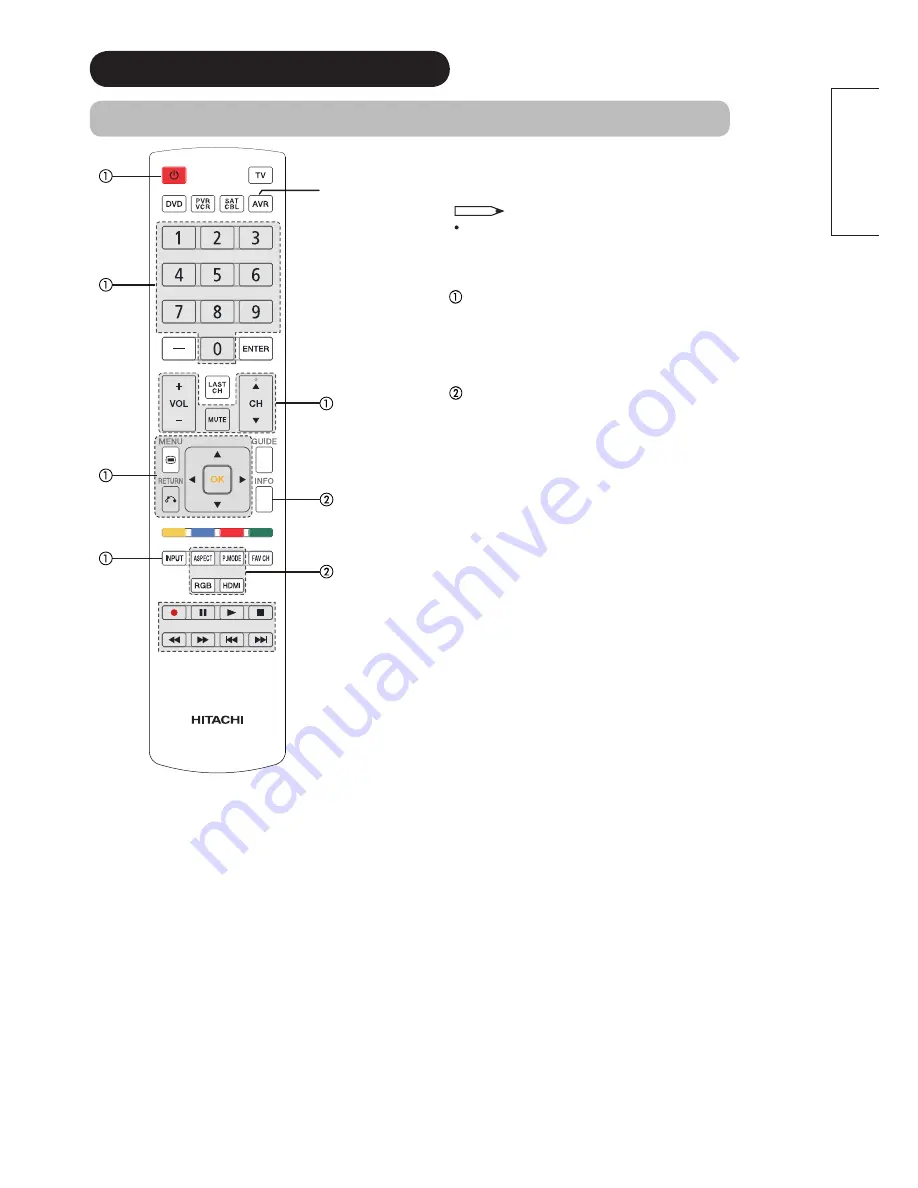
AVR Device 

Button

MY AUDIO/VIDEO RECEIVER (AVR)

CODE IS:

____________________

NOTE

 Refer to the operating guide of the AVR for operation of 

the buttons exclusively for the AVR.

PRECODED AVR buttons

These buttons transmit the chosen precoded cable codes :

-Power

-Channel Up & Down -Input

-Number PAD -Vol Up & Down

-Mute

-Cursor PAD

-Menu

-Return

EXCLUSIVE TV mode buttons

These buttons are for operating the TV :

-P. Mode

-HDMI

-Info

-Aspect

-RGB

Summary of Contents for ACV01U - LCD Direct View TV

Page 1: ...EP THIS OPERATING GUIDE FOR FUTURE REFERENCE Operating Guide Model Name AVC08U Audio Video Center This Audio Video Center is intended to be use with Hitachi Ultra Thin monitors that includes remote controls This AVC08U does not include a remote control Audio Video Center with ATSC NTSC QAM tuning Selectable Upscaling to 1080i 1080p High Definition Output HDMI 3 HDMI V 1 3a with CEC Input 2 Composi...

Page 2: ... 2 Conect your A V Center to the UT Monitor 09 3 Antenna Connection 10 4 Power On 10 COMPONENT NAMES 11 Main Unit 11 Remote Control 12 PREPARATION 13 Remote Control Battery Installation 13 Handling the Remote Control 13 Main Unit Installation 13 CONNECTION 14 1 Connect your Equipment to the A V Center 14 Connecting to Equipment Having HDMI or DVI Output Terminals 14 Connecting to Equipment Having ...

Page 3: ...or replacement of the obsolete outlet Protect the power cord from being walked on 10 or pinched particularly at plugs convenience receptacles and the point where they exit from the apparatus Only use the attachments accessories specified by 11 the manufacturer Use only with the cart stand tripod 12 bracket or table specified by the manufacturer or sold with the apparatus When a cart is used use ca...

Page 4: ...ommunications However there is no guarantee that interference will not occur in a particular installation If this equipment does cause harmful interference to radio or television reception which can be determined by turning the equipment off and on the user is encouraged to try to correct the interference by one or more of the following measures If the Audio Video Center is connected with a Monito...

Page 5: ...ity for any loss damage or injury as a result of misuse Reproduction copying utilization modification and or transmission in whole or in part of this manual are prohibited except by prior written consent All other products and company names used in this manual are trademarks or registered trademarks of their respective owners Trademark Credits VESA is a registered trademark of the Video Electronic...

Page 6: ...ts are clearly indicated in or adjacent to an illustration the symbol to the left indicates that the power plug should be disconnected from the power outlet WARNING There is a risk of fire electric shock or serious injury If serious problems occur unplug the power cord immediately Serious problems such as Smoke abnormal odor or noise emitted from the product No picture no sound or distorted pictur...

Page 7: ...t of a lightning storm To reduce the risk of electric shock do not touch the product when lightning occurs Do not do anything that may damage the power cord Do not damage modify twist forcibly bend heat or pull excessively on the power cord Do not place heavy objects including the unit itself on top of the power cord If the power cord is damaged contact 800 HITACHI for repairs or exchange Use only...

Page 8: ...se fire electric shock or personal injury may result Connect the power plug securely Improper connection will cause overheating and may result in fire Do not touch the pins of the plug while connecting it to the wall socket This could cause electric shock If the plug is not suitable for the wall socket contact your dealer for replacement Do not handle the power cord with wet hands This could resul...

Page 9: ...ust the direction of the radio antenna in order not to receive interference from the unit Keep the radio away from the unit Infrared communication devices Infrared communication devices such as cordless microphones or cordless headphones may not operate properly around the unit This is because of communication failure Please note that this is not a malfunction When you dispose of the product at th...

Page 10: ... any degradation 2 1 NOTE The A V Center is intended to be used with Hitachi LCD UT Monitors that include remote controls The A V Center does not include a remote control User Manual Warranty Cards Easy Graphic Guide IN OUT HDMI Cable Power Cord NOTE Please be sure to insert completely all HDMI cables when connecting to avoid abnormal picture Remember to attached the UT Monitor supplied cushion ar...

Page 11: ...door antenna connect the VHF or UHF antenna leads to screws of the VHF or UHF adapter Plug the adapter into the antenna terminal on the A V Center c When both VHF and UHF antennas are connected Attach an optional antenna cable mixer to the TV antenna terminal and connect the cables to the antenna mixer Consult your dealer or service store for the antenna mixer To outdoor VHF or UHF Antenna To Ante...

Page 12: ...sure that pristine high definition im ages retain the highest video quality from the source all the way to your monitor screen y Optical Output This jack provides Digital Audio Output for your audio device that is Dolby Digital and PCM compatible such as an audio amplifier u HDMI Output To UT Monitor The A V Center HDMI output terminal AV Out is connected to the UT Monitor Only one cable is used t...

Page 13: ...VCR SAT CBL Press this button to use as a SELECT feature Channel Up Down Buttons TV PVR VCR SAT CBL Changes up or down the channel Mute Monitor TV AVR Press this button once to turn off temporally the audio level press it again to restore audio level Guide Button SAT CBL PVR DVD Press this button to access the program guide of TV and other devices Info Button Monitor TV DVD SAT CBL PVR Shows the i...

Page 14: ...te control Do not spill water or any liquid on the remote control Do not place the remote control on a wet surface Do not place the remote control under direct sunlight or near sources of excessive heat Use the remote control within a distance of about 5m 16 from the front of the unit s remote control sensor and within an angle of about 30 degrees on both sides Handling the Remote Control The remo...

Page 15: ...I CEC function you can interface the connected equipment through the HDMI terminal automatically if the connected equipment meets an industry standard HDMI CEC Consumer Electronics Control Please check if the connected equipment supports HDMI CEC before using this function Information The HDMI High Definition Multimedia Interface is a multimedia I O Input Output interface Only one cable is used to...

Page 16: ...ipped with standard Video terminals output NOTE Please be sure to insert completely all cables when connecting to avoid abnormal picture and sound Make sure that the video and audio terminals are connected to the same external device Cable plugs are often color coded Match colors of plugs and terminals i e connect red to red white to white etc For details of the output format of an external device...

Page 17: ...utput The Volume of the amplifier is controlled by the amplifier not by the A V Center Unit The OPTICAL OUT terminal outputs all audio sources 2 Connect your Audio Video Center to the UT Monitor The A V Center HDMI output terminal AV Out is connected to the UT Monitor Only one cable is used to transmit all video audio control signals thus facilitating an easy connection Moreover the digital signal...

Page 18: ...Center Power Plug to the Wall Socket Connect the power cord after completing all other connections AC Wall Socket AVC Rear Panel CAUTION Do not use a power supply voltage other than that indicated AC120 60Hz It may cause fire or electric shock ...

Page 19: ...EC function pressing the power on off button on the remote control will power down both the UT Monitor and the A V Center The Indicating Lamp Status Indicating Lamp Power Status Off Off Red Standby mode Blue On NOTE If the image does not appear on the UT Monitor screen at all or if there is any problem with it see TROUBLESHOOTING on 37 38 This may help you to solve the problems After turning On it...

Page 20: ...to blue NOTE You can decrease the volume by pressing the Volume Down button while the sound is muted Channel Selector Favorite Channel The CHANNEL SELECTOR buttons are used to select channels lock access code etc Use the CHANNEL SELECTOR buttons to enter one two or three numbers to select channels Enter 0 first for channels 1 to 9 or simply press the single digit channel you wish to tune then pres...

Page 21: ...I 720p Input mode Signal mode When DVI is detected HDMI mode Input 1 Video Composite mode YPbPr 3 480p Input mode Signal mode YPbPr Component mode Air 15 1 KPBS HD 3 25 PM DIGITAL CHANNELS Digital Channel Alternate Rating Main Picture Source Channel Indication Broadcast Channel Indication Clock Audio Broadcast Program Information Auto Closed Caption Setting D Show Name 3 00PM 3 30PM ST TV G REGION...

Page 22: ...digit preset code is entered When this occurs the remote control is programmed for your cable box If the cable box does not turn off try a different four digit preset code The remote will now control your Cable box 7 Repeat the same procedure for your set top box or satellite receiver select SAT CBL your DVD select DVD your VCR PVR select VCR PVR or your AVR select AVR NOTE If your external device...

Page 23: ...or Buttons Last CH EXCLUSIVE TV mode Monitor buttons These buttons are for operating the TV P Mode HDMI Input Aspect Vol Up Down RGB Mute MY SET TOP BOX SATELLITE RECEIVER CODE IS ____________________ NOTE Refer to the operating guide of the Set Top Box Satellite Receiver for operation of the buttons exclusively for the Set Top Box Satellite Receiver PRECODED SET TOP BOX SATELLITE buttons These bu...

Page 24: ...Return Number PAD Guide Dash Enter EXCLUSIVE TV mode Monitor buttons These buttons are for operating the TV P Mode HDMI Input Aspect Vol Up Down RGB Mute MY VCR PVR CODE IS ____________________ NOTE Refer to the operating guide of the VCR PVR for operation of the buttons exclusively for the VCR PVR PRECODED VCR PVR buttons These buttons transmit the chosen precoded VCR PVR codes Power Cursor OK Re...

Page 25: ...___________ NOTE Refer to the operating guide of the AVR for operation of the buttons exclusively for the AVR PRECODED AVR buttons These buttons transmit the chosen precoded cable codes Power Channel Up Down Input Number PAD Vol Up Down Mute Cursor PAD Menu Return EXCLUSIVE TV mode buttons These buttons are for operating the TV P Mode HDMI Info Aspect RGB ...

Page 26: ... 0121 EMEREX 0032 EMERSON 0037 0184 0240 0000 0121 0043 0209 0002 0278 0479 1593 FISHER 0039 0047 0000 0104 0046 FUJI 0035 0033 FUJITSU 0000 FUNAI 0037 0000 0072 0278 1593 GARRARD 0000 GATEWAY 1972 GE 0060 0035 0048 0240 0000 0065 GEMINI 0060 GENEXXA 0037 0000 0278 GO VIDEO 0240 0432 0526 0614 GOLDSTAR 0035 0037 0039 0000 0278 0038 GOODMANS 0037 0081 0000 0072 0278 GRADIENTE 0000 GRANADA 0081 0042...

Page 27: ...65 ONKYO 0503 0627 1769 OPPO 0575 1224 1525 2185 OPTIMUS 0571 PALSONIC 0672 0852 PANASONIC 0503 0490 0571 0703 1641 1762 PHILCO 0675 PHILIPS 0503 0539 0646 0675 1267 1340 1354 2056 2084 PIANODISC 1024 PIONEER 0525 0571 0142 0631 1571 POLAROID 1020 1061 1086 POLK AUDIO 0539 PORTLAND 0770 PRESIDIAN 0675 PRIMA 2126 2127 PROCEED 0672 PROSCAN 0522 PROVISION 0778 RADIONETTE 0741 RADIOSHACK 0571 RCA 0522...

Page 28: ...it means that it cannot be selected or adjusted In order to appear A V Center menu on Main Menu A V Center Control need to be activated on Funcion HDMI Control menu Select Language Select the language from the list so that the OSD menu can be displayed in the selected language The default setting is English US How to set Language 1 Enter the Language menu from the Main Menu 2 Select your preferred...

Page 29: ...ing based on the Canadian ratings system 31 Canadian Ratings FRN Block various types of movies and television programming based on the Canadian French ratings system 31 Region 5 Ratings system for DTV Signal to block various types of programs 31 Menu Page Timers Set The Clock Set Clock Settings 34 Set Sleep Timer Set Sleep Timer intervals 30 min intervals 00 30 3 00 34 Menu Page Setup Set The OSD ...

Page 30: ...utput Dolby Digital Select this feature if the TV is connected to an amplifier receiver with a Dolby Digital only decoder it will provide six independent soundtrack channels through the optical output jack Digital Audio PCM Select this feature if the TV is connected to an amplifier receiver with a PCM only decoder it will provide two independent soundtrack channels through the optical output jack ...

Page 31: ...ect OR Channel List Auto Channel Scan Signal Meter Channel Manager Move SEL Select NOTE The Signal Meter will not be available grayed out when watching analog channels The Channel List cannot be updated by only changing the cable source Auto Channel Scan must be performed for the Channel List to be updated IMPORTANT NOTICE United States federal law requires broadcasters to stop transmitting analog...

Page 32: ...ue to its content see page 32 Canadian Ratings Eng Use CANADIAN RATINGS ENG to block any type of movie and television program in Canada that you feel might be inappropriate in its content see page 32 Canadian Ratings Frn Use CANADIAN RATINGS FRN to block Canadian French programs according to various program ratings that you feel might be inappropriate in its content see page 33 Region 5 Use REGION...

Page 33: ... to imitate dangerous acts which they may see on television Any realistic depictions of violence will be infrequent discreet of low intensity and will show the consequences of the acts Other Content Guidelines There will be no profanity nudity or sexual content G General Audience Violence Guidelines Will contain very little violence either physical or verbal or emotional Will be sensitive to theme...

Page 34: ...mming restricted to adults Contains constant violence or scenes of extreme violence Region 5 Alternate Ratings Example Only G General audiences All ages admitted PG Parental guidance suggested Some material may not be suitable for children PG 13 Parents strongly cautioned Some material may be inappropriate for children under 13 R Restricted Under 17 requires accompanying parent or adult guardian N...

Page 35: ...te AM or PM MONTH DAY and YEAR Set Sleep Timer Select this feature to set your SLEEP TIMER from 30 minutes to 3 hours 30 minute increments Use the button repeatedly to set your Timer from 0 00 0 30 1 00 1 30 2 00 2 30 and 3 00 Audio Video Timers Setup Move SEL Select Channel Manager Locks OR Set Sleep Timer Set The Clock Timers Move SEL Select 0 00 AM PST NOTE When AUTOMATICALLY ADJUST CLOCK FOR D...

Page 36: ... or Analog Captions are for Analog programs Caption Mode CAPTIONS is for the program you are viewing TEXT is for additional information such as news reports or a TV program guide This information covers the entire screen and viewing the TV program is not possible Text may not be available with every program Channel 1 is used for the primary language usually English 2 3 4 are sometimes used for a o...

Page 37: ...oper instructions to get this upgrade In order to receive written notification please complete and return the warranty card 1 Insert the USB flash drive 2 Press the OK button to select UPGRADE NOW and start upgrading 3 Unplug the AC power cord when the UPGRADE is complete NOTE Any power interruption during the upgrade process will cancel the upgrade When this happens repeat the upgrade procedure F...

Page 38: ...lected Check if the UT Monitor is in Standby mode or Power Save mode Adjust the values in Picture and Audio on UT Monitor menu 14 17 29 Multiple images normal sound Check the connections to external equipment 14 17 Intermittent interference Check if the source of interference is shielded correctly Move these kinds of electrical devices away from the unit About LCD Display Technology The following ...

Page 39: ...N Refer to When the Following Messages Appears on the Screen 37 14 17 No picture UT Monitor indicating lamp Green Check if the signal cable is connected correctly and securely Check if the A V Center to UT Monitor cable is connected correctly and securely Adjust the level of Brightness and Contrast lower 14 17 The top of the unit and surface of the panel heat up This may occur if you use the unit ...

Page 40: ...Input Impedance 75 Ohm 10 Audio 470 mVrms Max 2 Vrms or less Input Impedance 270KOhm or more 2 Component Video and L R Audio Video Luminance Y 1 0 0 2 Vp p PBPR 0 7 0 14 Vp p 3 HDMI V 1 3a Resolution 480i 480p 720p 1080i 1080p Deep Color x v Color Lip Sync CEC HDCP High Bandwidth Digital Content Protection USB 1 1 For S W Upgrade only Output Terminals 1 HDMI V 1 3a Resolution 1080i 1080p Deep Colo...

Page 41: ...ata0 19 Hot Plug Detect 10 TMDS Clock Recommended Signal List With HDMI input No Signal mode Signal Name Resolution Vertical frequency Hz 1 VGA 640 X 480 59 94 3 480i 720 1440 X 480 59 94 5 480p 720 X 480 59 94 6 1080i 59 94 1920 X 1080 59 94 7 1080i 60 1920 X 1080 60 00 8 720p 59 94 1280 X 720 59 94 9 720p 60 1280 X 720 60 00 10 1080p 59 94 1920 X 1080 59 94 11 1080p 60 1920 X 1080 60 00 12 1080p...

Page 42: ...ed and if necessary the location of the nearest Authorized Service Facility in your area Please present proof of purchase and or delivery receipts to the Hitachi Authorized Service Facility and service will be rendered in accordance with the terms of the limited warranty as stated on your warranty card or operating guide Hitachi Home Electronics America Inc Customer Service Support PO Box 3900 Peo...

Page 43: ...re using or installing your Product please complete this form and attach your sales receipt and retain them for your records This will help facilitate proper warranty coverage MODEL NO SERIAL NO DEALER NAME DATE OF PURCHASE DEALER ADDRESS CITY STATE Warranty Limitations This Hitachi Limited Warranty does not cover A Any Product that has been modified or repaired in a manner not previously authoriz...

Page 44: ...GREE WITH ALL THE TERMS AND CONDITIONS OF THIS AGREEMENT OR ALL THE TERMS AND CONDITIONS OF ANY DIFFERENT OR SUPPLEMENTARY LICENSE THAT MAY ACCOMPANY SUCH UPGRADE A DO NOT USE ANY HITACHI PROVIDED FLASH CARD OR OTHER MEDIA B DO NOT PERFORM INSTALL ANY HITACHI PROVIDED UPGRADE SOFTWARE ON YOUR PRODUCT AND C PROMPTLY RETURN SUCH FLASH CARD OR OTHER MEDIA TO HITACHI EXPORT RESTRICTIONS 5 HITACHI is l...

Reviews: