background image

- 7 -

“The Plasma TV is a very high techology
product giving you fine picture details. Occa-
sionally, a few non-active pixels may remain
still on the screen. Long-time unmoving still
pictures may cause permanent shade effect
on the screen and even the picture has been
changed, its influence lasts as ghost pic-
ture. This ghost effect may disturb the user
even though it will diminish in the course of
time. To prevent this, don't leave still pictures
for example teletext pages or frozen pictures
on the screen for a long time. Please note
that this does not affect the performance of
your product.”

“DO NOT LEAVE YOUR TV AT STAND-BY
OR OPERATING WHEN YOU LEAVE YOUR
HOUSE”

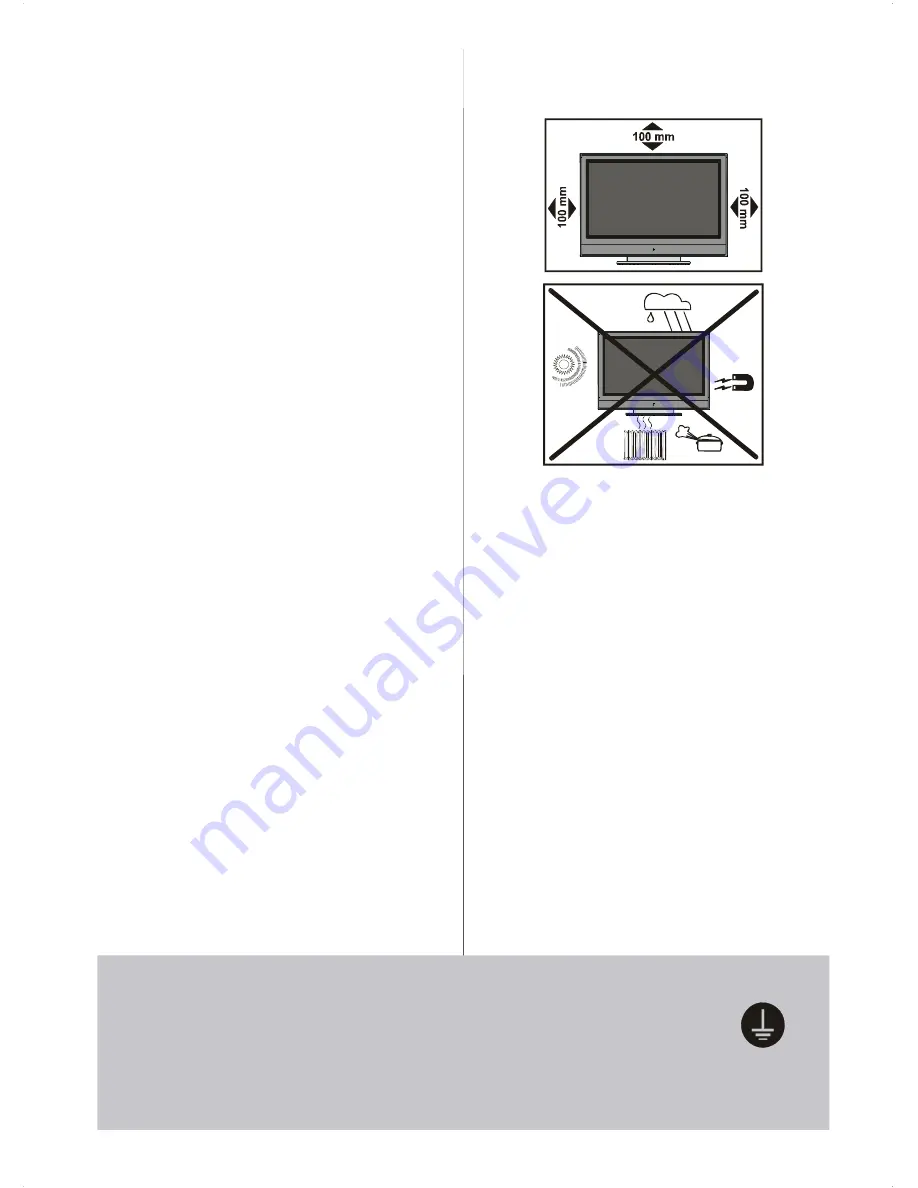
6.Heat and Flames

The set should not be placed near to naked
flames and sources of intense heat,such as
an electric heater. Ensure that no naked
flame sources, such as lighted candles, are
placed on top of the set.

7. Lightning

In case of storm and lightning or when go-
ing on holiday, disconnect the power cord
from the wall outlet.

8. Replacement Part

When replacement parts are required, be sure
the service technician has used replacement
parts which are specified by the manufacturer
or have the same specifications as the origi-
nal one. Unauthorised substitutions may re-
sult in fire, electrical shock, or other hazards.

9 . Servicing

Please refer all servicing to qualified per-
sonnel. Do not remove the cover yourself as
this may result in an electric shock.

Instructions for waste disposal:

• Packaging and packaging aids are recy-

clable and should principally be recycled.
Packaging materials, such as foil bag, must
be kept away from children.

• Battery, including those which is heavy

metal-free, should not be disposed of with
household waste. Please dispose of used
battery in an environmentally sound man-
ner. Find out about the legal regulations
which apply in your area.

• The mains plug is used to disconnect the TV

from the mains and therefore it shall remain
readily operable.

S

ec

urely connect

the


ground


wire.

Be sure to ground the connection properly.

Connect the ground terminal of the AC inlet of this display with the
ground terminal provided


at the power outlet using the enclosed power cord.

If


the provided plug


does not fit your outlet, consult an electrician for

r

eplacement


of the


obsolete outlet.

Warning:

To prevent injury, this device must

be securely attached to the floor/wall in ac-
cordance with the installation instrutions.

Summary of Contents for 42PD8600

Page 1: ...GB D F I Instructions for use Bedienungsanleitung Notice d utilisation Istruzioni per l uso 42PD8A10 42PD8600 ...

Page 2: ...icator 17 PIP and PAP modes 17 Freeze Picture 18 Zoom Modes 18 Teletext 19 To Operate Teletext 19 To Select A Page Of Teletext 19 To Select Index Page 19 To Select Teletext WithATV Programme 19 To Select Double Height Text 19 To Reveal Concealed Information 19 To Stop Automatic Page Change 19 To Select A Subcode Page 19 PAT Picture and Text 20 To Exit Teletext 20 To Display The Time 20 Fastext 20 ...

Page 3: ...Teletext mode Menu On Off Go back to previous menu a P Programme Up Cursor Up _ Volume Down Cursor Left t OK Enter Volume Up Cursor Right b P Programme Down Cursor Down Mute On Off Freeze On Off Aspect ratio 0 9 Digit buttons Teletext On Off f PIP PAP TV TV PIP position Sub page Time Update Hold Index Page 31 Expand 32 Reveal 33 Mix These buttons can control most Hitachi DVD Players and Recorders ...

Page 4: ... 3 PLASMATV FRONT VIEW REAR VIEW ON OFF SWITCH LED SPEAKER SPEAKER ...

Page 5: ...MENU button TV AV button Power cord input S VHS Input Video Input Audio Inputs Headphone Audio Line Outs Subwoofer Out Scart 3 EXT 3 PC Audio Input Aerial Scart 2 EXT 2 Scart 1 EXT 1 HDMI Input EXT 6 Component Audio Inputs s Component Video YPbPr Inputs VGA Input EXT 5 EXT 4 ...

Page 6: ... in PC When no valid signal is detected after 5 minutes the TV switches itself automatically to stand by mode PLL Channel Search PC Input Support up to SXGA 1280 x 1024 Stereo PC Audio Input Plug Play for Windows 9X ME 2000 XP 3D Comb Filter Audio Line Out Panel Features 42 inch PLASMA display High resolution 1024x1080 Contrast ratio 3000 1 typical B r ig h t n e s s t y p i c a l 1 4 0 0 c d m 2 ...

Page 7: ...n or moisture ABOVE ALL NEVER let anyone especially children push anything into holes slots or any other opening in the case this could re sult in a fatal electric shock NEVER guess or take chances with elec trical equipment of any kind it is better to be safe than sorry 1 Power Source The set should be operated only from a 220 240V AC 50 Hz outlet Ensure you select the correct voltage setting for...

Page 8: ...ent parts which are specified by the manufacturer or have the same specifications as the origi nal one Unauthorised substitutions may re sult in fire electrical shock or other hazards 9 Servicing Please refer all servicing to qualified per sonnel Do not remove the cover yourself as this may result in an electric shock Instructions for waste disposal Packaging and packaging aids are recy clable and...

Page 9: ...t two AA R6 or equivalent type batteries inside Place the batteries in the right direc tions Replace the battery cover NOTE Remove the batteries from remote control handset when it is not to be used for a long period Otherwise it can be damaged due to any leakage of batteries SwitchingTheTVON OFF To switch the TV on Your TV will switch on in two steps 1 Connect the power supply cord to the sys tem...

Page 10: ... by using the buttons on the control panel at the bottom of the TV Volume Setting Press the button to decrease volume or the button to increase volume so a volume level scale slider will be dis played at the bottom of the screen Programme Selecting Press the button to select the next programme or the button to select the previous programme Entering The Menu Press the MENU button on the control pan...

Page 11: ... 63 Brightness By pressing a b button select Bright ness Press button to increase brightness Press _ button to decrease brightness Brightness level can be adjusted between 0 and 63 Sharpness By pressing a b button select Sharp ness Press button to increase sharp ness Press _ button to decrease sharp ness Sharpness level can be adjusted be tween 0 and 31 Colour By pressing a b button select Colour ...

Page 12: ... level can be adjusted between 0 and 63 Equalizer By pressing a b button select Equalizer Press _ or OK button to enter equalizer menu SOUND Equalizer Sound Mode User 120Hz 500Hz 1 5kHz 5kHz 0 10kHz 0 0 0 0 In equalizer menu the sound mode can be changed to User Pop Rock Jazz Flat and Classic by pressing _ button Equalizer menu settings can be changed only when Sound Mode is User Select the desire...

Page 13: ...sound effect on or off If the current sound system is Mono and the sound effect is switched on then the sound will be heard as if it is Ste reo If the current sound system is Stereo switching this effect on will give a more spa tial effect Pressing _ button will turn this feature on or off Dynamic Bass Dynamic Bass is used to increase bass ef fect of the TV set By pressing a b button select Dynami...

Page 14: ... the button then the zoom mode will automatically change to Default Zoom setting See also Zoom Modes on page 18 Blue Background You can set the TV to automatically change to a blue screen if the signal is weak or ab sent or when there is no input from an exter nal device The Blue Background feature can be turned on or off by pressing _ button Menu Background By pressing a b button select Menu Back...

Page 15: ... _ button or Digit Buttons Colour System By pressing a b button select Colour System Press _ button to change the colour system to PAL PAL60 SECAM or AUTO Note In EXT mode you can choose NTSC 3 58 and NTSC 4 43 as well Sound System By pressing a b button select Sound System Press _ button to change the sound system to BG DK I or L L Fine Tune By pressing a bbutton select Fine Tune Press _ button t...

Page 16: ...ons Press the GREEN button By navigation buttons move the selected programme to the decided programme space and press the GREEN button again Delete To delete a programme press the YELLOW button Pressing the YELLOW button again erases the selected programme from the programme list and the programmes below shift one up APS Automatic Programming System When you press the BLUE button for APS the follo...

Page 17: ...ect Autoposition item by using a b buttons Press or OK button Warning Auto position adjustment recom mended to be done with the full screen im age for the proper adjustment H Horizontal Position This item shifts the image horizontally to right hand side or left hand side of the screen Select H Position item by using a b but ton Use _ button to adjust the value V Vertical Position This item shifts ...

Page 18: ...ramme Number Programme Name Sound Indicator and Zoom Mode are dis played on the upper right side of the screen when a new programme is entered or button is pressed Mute Indicator It is placed in the upper left side of the screen when enabled To cancel mute there are two alternatives the first one is pressing the button and the second one is increasing decreasing the volume level PIP and PAP modes ...

Page 19: ...ality or when you want to change the ZOOM mode change to another ZOOM mode manually Full This uniformly stretches the left and right sides of a normal picture 4 3 aspect ratio to fill the wide TV screen For 16 9 aspect ratio pictures that have been squeezed into a normal picture 4 3 aspect ratio use the Full mode to restore the pic ture to its original shape 16 9 Zoom This zooms up the wide pictur...

Page 20: ...uble Height Text Press the button for the top half of the in formation page to be displayed in double height text Press the button again for the bottom half of the information page to be displayed in double height text Press the button once more for the full page of normal height text To Reveal Concealed Information Pressing the button once will reveal an swers on a quiz or games page Pressing the...

Page 21: ...ly according to the transmission If TOP text transmission is present colour coded buttons will appear in status row If TOP text transmission is not present sta tus row will not appear The subject heading for information may be located in coloured box In Top mode the a or b commands will re quest the next or previous page respectively If TOP text transmission is not available in case of operation o...

Page 22: ...Search For And Store The Test Signal Of The Video Recorder Unplug the aerial cable from the aerial socket of your video recorder Switch on your TV and put the video recorder on the test signal See the booklet for your video recorder Enter the Install menu and select search Search for the test signal of your video re corder in the same way as you searched for and stored the TV signals Store the tes...

Page 23: ...eripheralEquipment ANT IN CAMCORDER AUDIO IN R L VIDEO IN N OUT IN UT DECODER FOR SATELLITERECEIVER VIDEO HEADPHONE AUDIO AerialConnection VHF UHF 75 Round 75 ohm coaxial cable Rear of TV Outdoor Aerial Connection ...

Page 24: ...ble damaged Are suitable plugs used to connect the aerial If you are in doubt consult your dealer No Picture means that your TV is not receiv ing any transmission Have you pressed the correct buttons on the remote control Try once more Sound You can not hear any sound Did you per haps interrupt the sound pressing the button Sound is coming from only one of the speakers Is the balance set to one di...

Page 25: ...HANNELINDICATOR On Screen Display RFAERIALINPUT 75 Ohm unbalanced OPERATINGVOLTAGE 220 240V AC 50 Hz AUDIO German Nicam Stereo AUDIO OUTPUT POWER WRMS 10 THD 2 x 10 POWER CONSUMPTION W max 360 W 3 W Stand by PANEL 16 9 display 42 106 cm visible Screen Size DIMENSIONS mm Weight kg without stand 96 1045 727 35 5 D L H DIMENSIONS mm ISO 13406 2 Pixel fault class Class II ...

Page 26: ...orizontal Vertical Hor kHz Ver Hz 1 640 400 31 5 70 2 640 480 31 5 60 3 848 480 31 0 60 4 640 480 37 9 72 5 640 480 37 5 75 6 640 480 43 3 85 7 800 600 35 2 56 8 800 600 37 9 60 9 800 600 48 1 72 10 800 600 46 9 75 11 800 600 53 7 85 12 1024 768 48 4 60 13 1024 768 56 5 70 14 1024 768 60 0 75 15 1024 768 68 7 85 16 1152 864 67 5 75 17 1280 1024 64 0 60 18 1280 768 47 8 60 19 1280 768 56 1 70 Mode ...

Page 27: ... Toshiba Zenith Philips Orion JVC Shinco Samsung Skyworth Sony Bubuko INFO 1 INFO 2 INFO 3 INFO 4 INFO 5 INFO 6 INFO 7 INFO 8 INFO 9 INFO 0 INFO INDEX INFO MIX INFO SUB PAGE INFO UPDATE INFO REVEAL INFO TV TEXT Example To operate HITACHI DVD player press and hold the INFO button followed by the 1 button INFO button INDEX button SUB PAGE button REVEAL button UPDATE button TV TEXT button MIX button ...

Page 28: ... 27 AppendixC MainandPIP PAPPictureCombinations ...

Page 29: ...modified by any person other than an Hitachi authorised engineer iii The product serial number has not been removed or altered This guarantee does not apply to product acquired second hand or for commercial or com munal use This guarantee does not cover the replacement of exhausted batteries the adjustment of user controls or aerial alignment Any parts replaced under this guarantee shall become th...

Page 30: ... connect the aerial through a VCR Aerial RF Socket Aerial RF Socket wall socket wall socket Aerial RF Lead Aerial RF Lead Optional Scart Lead TV to VCR Aerial RF Socket VCR RF connector lead VCR to TV It is recommended that a scart lead should be fitted between your TV and VCR to enhance your picture and sound quality Scart leads are essential if you have a stereo TV and VCR and wish to obtain ste...

Page 31: ... IN ANT IN RF Lead to Aerial RF Lead to Aerial RF Lead from VCR to Satellite RF Lead from VCR to TV Satellite LNB lead Satellite LNB lead RF Lead from Satellite to TV Aerial Aerial VCR Scart Lead to AV 1 on TV Scart Lead to EXT 1 on TV AV 1 TV TV VCR VCR AV 2 PLASMA TV PLASMA TV GB ...

Page 32: ...switched on the set will be in standby Press the channel up down P and the indicator on the front of the set will illuminate red P or numeric buttons 1 2 3 to operate insert plug European plug UK plug Front View Programme Up Volume Up Volume Down Programme Down To select a programme number To return to previous menu To enter the main menu Also used for navigation in menus GB ...

Page 33: ...receiver connected to your TV please ensure that they are switched on before automatic tuning begins In the case of a VCR insert a pre recorded tape and begin playback of your equipment These measures ensure that all your external equipment is tuned in during the Auto Setup procedure First of all choose and by using and buttons This will affect the sort process in APS To start APS press the RED or...

Page 34: ... KISTA 20147 MILAN SWEDEN ITALY Tel 08 562 711 00 Tel 02 487861 Fax 08 562 711 11 Fax 02 48786381 Servizio Clienti Email csgswe hitachi eu com Tel 02 38073415 Email customerservice italy hitachi eu com HITACHI EUROPE AB HITACHI EUROPE S A S Norway Branch Nuf Lyon Office Strandveien 18 Digital Media Group 1366 Lysaker 94 Quai Charles de Gaulles 69006 Lyon NORWAY FRANCE Tel 67519030 Tel 04 72 14 29 ...

Reviews: