background image

EN

 6

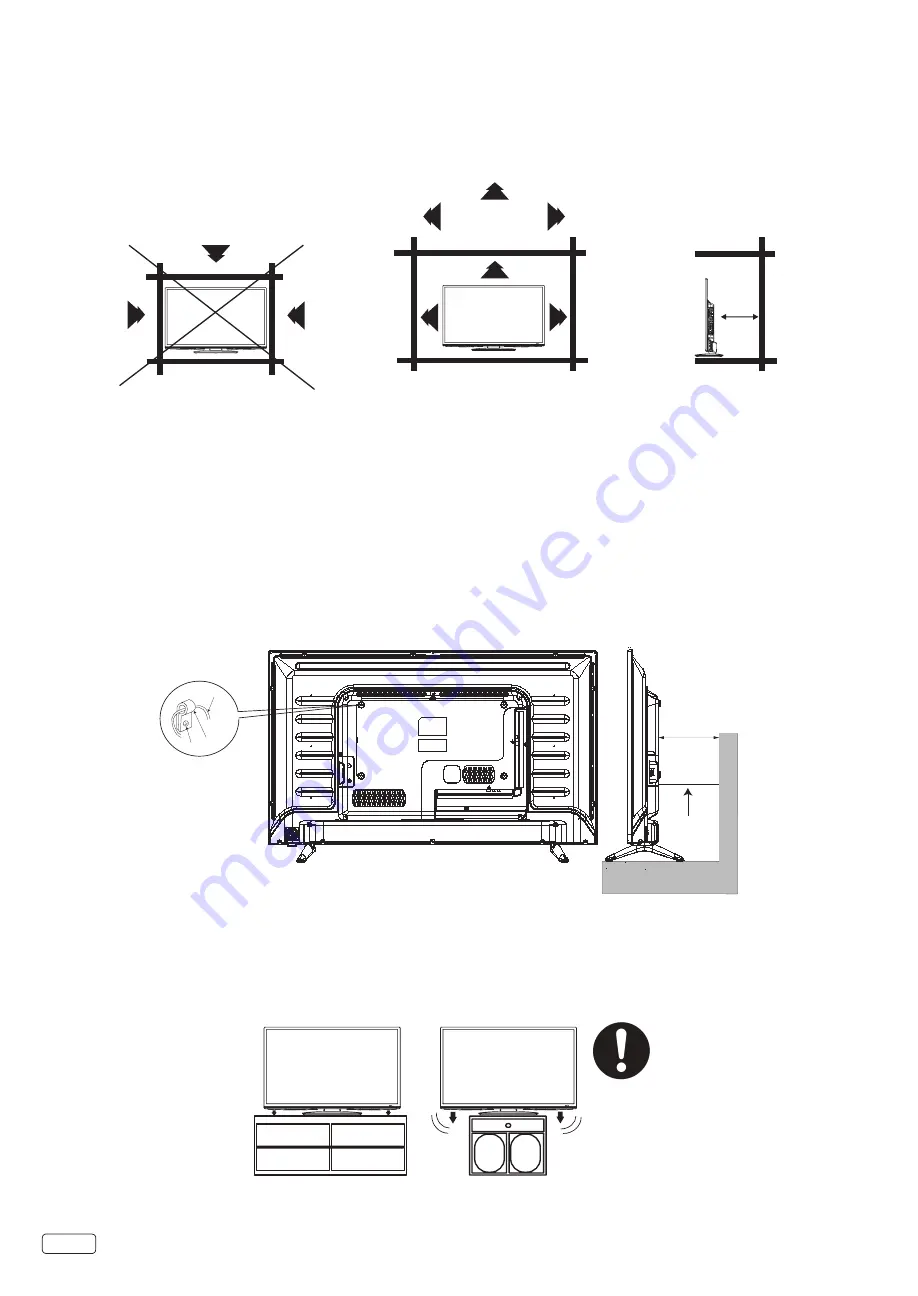
The unit emits heat when in operation. Do not place any covers or blankets on the unit, this may cause overheating. Do not block 

ventilation holes, or set up near radiators. Do not place in direct sunlight. When placing on a shelf leave 4 inches (10 cm) free space 

around the entire unit.

Notes when mounting the TV on a wall

If the unit is to be mounted on the wall, contact the retailer where you purchased the TV for advice, and have the equipment professionally 

installed. Incomplete or improper installation may cause injury to you, and/or damage to the TV.

The screws M6 thread type should be used. The insertion length must be within 10-12 mm. 

If the insertion length is less than 10 mm the weight can not be maintained.

If the insertion length is more than 

12 mm 

a space is created between the Wall Mount Bracket and the Television.

(Insertion Length) = (Screw Length) - (Washers Thickness) - (Mounting Bracket Thickness)

Securing to a Wall

1

 Use metallic wire, screw and clamp (not provided) on the rear of the TV as shown below.

2

 Keep the TV 4 inches away from the wall, except when mounted using the wall mount bracket, and secure to the wall as shown below:

Wire

Clamp

Screw

Wire

4 inches

NOTICE FOR TV CABINET

If the unit is placed on a cabinet smaller than the length of the unit, it could result in instability and the unit may tumble over, making a risk 

of personal, possibly fatal injury. Also, this would seriously damage the product. Accordingly, Hitachi accepts no responsibility or liability 

for any injuries or property damage resulting from the improper installation.

NO !!

YES !!

SAFETY PRECAUTIONS

4 inches

4 inches

Y(VIDEO)

4 inches

4 inches

Y(VIDEO)

4 inches

4 inches

Y(VIDEO)

Summary of Contents for 40E31

Page 1: ...tional assistance please call Toll Free 800 HITACHI 800 448 2244 or visit our website at www hitachi us tv Keep this Owner s Guide for future reference Record the model name and serial number of your LCD Television for future reference This information is located on the back of the television CONGRATULATIONS OWNER S GUIDE OG_40E31_120517 ...

Page 2: ...e rear of the unit WARNING This equipment has been tested and found to comply with the limits for a Class B digital device pursuant to Part 15 of the FCC Rules These limits are designed to provide reasonable protection against harmful interference in a residential installation This equipment generates uses and can radiate radio frequency energy and if not installed and used in accordance with the ...

Page 3: ...ch power lines or circuits When installing an outside antenna system extreme care should be taken to keep from touching such power lines or circuits as contact with them might be fatal 17 Do not overload wall outlets and extension cords as this can result in a risk of fire or electric shock 18 Do not push objects through any openings in this unit as they may touch dangerous voltage points or short...

Page 4: ...mouth immediately gargle and consult with your doctor Also if the liquid gets in your eyes or touches your skin consult with your doctor after rinsing for at least 15 minutes or longer in clean water Possible Adverse Effects on LED Panel If a fixed non moving pattern remains on the LED Panel for long periods of time the image can become permanently engrained in the LED Panel and cause subtle but p...

Page 5: ...5 EN CHILD SAFETY NOTICE ...

Page 6: ...sertion length is more than 12 mm a space is created between the Wall Mount Bracket and the Television Insertion Length Screw Length Washers Thickness Mounting Bracket Thickness Securing to a Wall 1Use metallic wire screw and clamp not provided on the rear of the TV as shown below 2Keep the TV 4 inches away from the wall except when mounted using the wall mount bracket and secure to the wall as sh...

Page 7: ...th 2 screws supplied each side as shown in Figure 1 Be sure to follow the above instructions Insufficient tightening or incorrect installation of the stand will not support your TV correctly and could result in damage or injury from tip over Figure 1 Stands L R Screws Screws How to remove the stand When you transport this product remove the stand and pack it flat against the back of the unit in th...

Page 8: ...11 Battery Precautions 12 Antenna connections 13 Cable TV connections 13 Chapter 2 TV Operation Starting setup 14 TV operation 14 Quick guide for menu operation 15 Convenience functions 16 Channels setup 19 Labeling channels 20 Setting the Parental Control 20 Closed Caption 22 CC options 23 Aspect Switching 23 JPEG Viewer 24 Chapter 3 Addition Information Reception disturbances 25 Troubleshooting ...

Page 9: ... ON the TV from Stand by mode B When the TV is ON 1 Press to display the control menu OSD On screen Display 2 Press to select OK 3 Press and hold for more than 2 seconds to set the TV to standby 2 CH CH buttons A Press to change the channel B Press to navigate up down while in the OSD 3 VOL VOL buttons A Press to change the volume level B Press to navigate right left while in the OSD CH CH ...

Page 10: ...PECT selection OSD Repeatedly press to set the sleep timer from 5 to 240 minuets To cancel the sleep timer press SLEEP until Off appears Press to call the Picture Mode on screen display menu RETURN Return to the previous channel in TV mode Volume UP DOWN Increase or decrease the TV s volume Press to display information about the TV status MUTE MUTE Reduces the TV s volumes to its minimum level Pre...

Page 11: ... connect a USB device HDMI1 HDMI2 ARC HDMI3 The HDMI inputs receives digital audio and video from an HDMI device AV IN PC AUDIO IN This input is used to connect a range of equipment such as DVD players or satellite receivers to the AV input To use the AV input connect the device s video output to the TV s Video input The AUDIO IN L R input use RCA audio cables to connect the audio output for the A...

Page 12: ... rupture Follow battery manufacturer s directions Please use caution when inserting batteries to avoid battery damage If the spring terminal in the remote control remains in contact with a side of a damaged battery it can cause a short circuit Never use damaged batteries as they can become very hot and are dangerous Before using the remote control batteries must first be installed Use two AAA size...

Page 13: ...e TV service with scrambled premium channels If you subscribe to a Cable TV service in which basic channels are unscrambled and premium channels require the use of a Converter Descrambler box you may wish to use a signal Splitter and an A B Switch box available from the Cable TV company or an electronics supply store Follow the connections shown below With the switch in the B position you can dire...

Page 14: ...essing VOL VOLUME or The volume level will be indicated on the screen by a volume bar If the volume increases the number of bars also increases If the volume decreases the number of bars also decreases 3 Set the Source option to the appropriate selection see Air Cable selection on page 19 4 Press the Direct Channel Selection Buttons 0 9 to select the channel TO SELECT ANALOG CHANNELS 1 9 Press 1 9...

Page 15: ...the current information on the screen When the TV receives a digital signal the digital information will appear Channel number DTV Signal condition Channel label if preset Broadcast program name Parental Control Close Caption Display Program guide Current date and time Resolution Audio language Press INFO again to clear the display MUTE Press MUTE to switch off the sound The TV s sound will be sil...

Page 16: ...ess You can adjust the picture quality to your preference Available only when you selected Custom Contrast Color Tint Sharpness Color Temperature Cool Bluish Standard Neutral Warm Reddish Advanced Settings Aspect See page 23 Noise Reduction Set the level of decreasing noise included in the video signal Off Low Middle High Dynamic contrast Use this feature to change the black level automatically ac...

Page 17: ...the digital audio jack on your TV Raw PCM Surround Sound The dynamic presence and sound created offers a thoroughly enjoyable listening experience Off On Perfect Volume Volume level is adjusted automatically to lower volume of loud scenes and to raise volume of quieter scenes Off On Time Sleep Timer Sleep Timer switches the TV to standby after a defined period of time To cancel the Sleep Timer set...

Page 18: ...isplay customer support information Reset Select Yes then press SELECT Restore Video Audio except Audio Language Time Sleep Timer Time Format and Auto Sleep only and Setup except Menu Language settings to the default factory settings No Yes Setup Wizard See page 14 HDMI CEC CEC Control Select On to enable CEC features Device Auto Power Off When the user turns off the TV all active CEC enabled devi...

Page 19: ...inutes to complete channel scan Depending on the reception condition the progress bar may not advance for several minutes please be patient If you press MENU while scanning the channel scan will stop NOTE If you are unsure of the digital channels available in your area you may visit www antennaweb org to receive a list based on your address or zip code If you require further assistance you may cal...

Page 20: ...tation can be set to restrict children from viewing or hearing violent scenes or pictures that you may choose to exclude The restriction applies to TV Movie Canada English Rating and Canada French Rating if this data is transmitted You may set this restriction separately To use the Parental Control function you must register a password To enter a password 1 Select Lock then press 2 Press 0000 usin...

Page 21: ...ral Audience PG Parental Guidance 14 Programming contains themes or content which may not be suitable for viewers under the age of 14 18 Adult Canada French ratings Off Exempt programming G General All ages and children contains minimal direct violence but may be integrated into the plot in a humorous or unrealistic manner 8ans General but inadvisable for young children May be viewed by a wide pub...

Page 22: ...WHAT IS CLOSED CAPTIONING This television has the capability to decode and display Closed Captioned television programs Closed Captioning will display text on the screen for hearing impaired viewers Captions This Closed Caption mode will display text on the screen in English or another language Generally Closed Captions in English are transmitted on CC1 and Closed Captions in other languages are t...

Page 23: ... image and it will be shown on the screen with same amount of pixels CC options When you have selected Custom as the display method you can adjust the various setting listed below This feature is designed to customize Digital Caption only 1 Select Setup Closed Caption then press or OK 2 Press or to set CC Mode to CC On or CC On Mute 3 Select Option then press or OK 4 Press or to select Mode then p...

Page 24: ...s not in USB mode Back up all the data in the USB storage device in case if data was lost due to unexpected accident We do not assume any liability for the losses by misuse or malfunction Not all USB storage devices are compatible with this TV The character that exceeds the display area is not displayed Do not use a USB extension cable Playable files are JPEG jpg jpeg USB Browser File Selection NO...

Page 25: ...ry to install a special antenna to improve the picture RADIO FREQUENCY INTERFERENCE The interference produces moving ripples or diagonal streaks and in some cases causes loss of contrast in the picture Keep the television away from Radio Adjust Radio antennas in order for the television not to receive interference The antenna cable of Radio should be kept away from the television Use a coaxial cab...

Page 26: ... when using with other units SYMPTOMS POSSIBLE SOLUTIONS TV does not operate Make sure the power cord is plugged in Try another AC outlet Power is off check fuse or circuit breaker Unplug unit for an hour then plug it back in Poor sound or no sound Station or Cable TV experiencing problems tune to another station Check sound adjustments Volume or Mute Check for sources of possible interference Che...

Page 27: ...Hz sampling frequency 16 20 24 bits per sample Antenna VHF UHF In 75 ohms coaxial PC Monitor Mini Dsub 15pin Outputs Audio 0 2 V p p 75 ohms terminated Digital audio Optical Speakers Integrated speakers Bottom side Audio output power 5 0W 5 0W THD 10 Power supply AC 120V 60Hz Power consumption Operation 75W Standby 0 5W Weight 16 8 lbs 7 6kg Dimensions Width 36 3 8 924 2mm Height 23 7 16 595 0mm D...

Page 28: ...ase be prepared to submit proof of purchase and or delivery receipts to your 800 HITACHI Customer Service Representative Warranty coverage will be provided in accordance with the provisions of your Limited Warranty see the Limited Warranty page in this operating guide Pour de plus amples renseignements sur le service durant la periode couverte par la garantie sur le fonctionnement ou pour de l ass...

Page 29: ...ect or damage caused by exposure to hostile operating environments such as areas containing dust and or smoke E Damage caused by power surges accidents natural disasters or any other events or circumstances outside Hitachi s control F Any Product used in any manner inconsistent with the acceptable set up usage safety or installation configurations identified in the Product s Operating Guide G Any ...

Page 30: ... Memo ...

Page 31: ... Memo ...

Reviews: