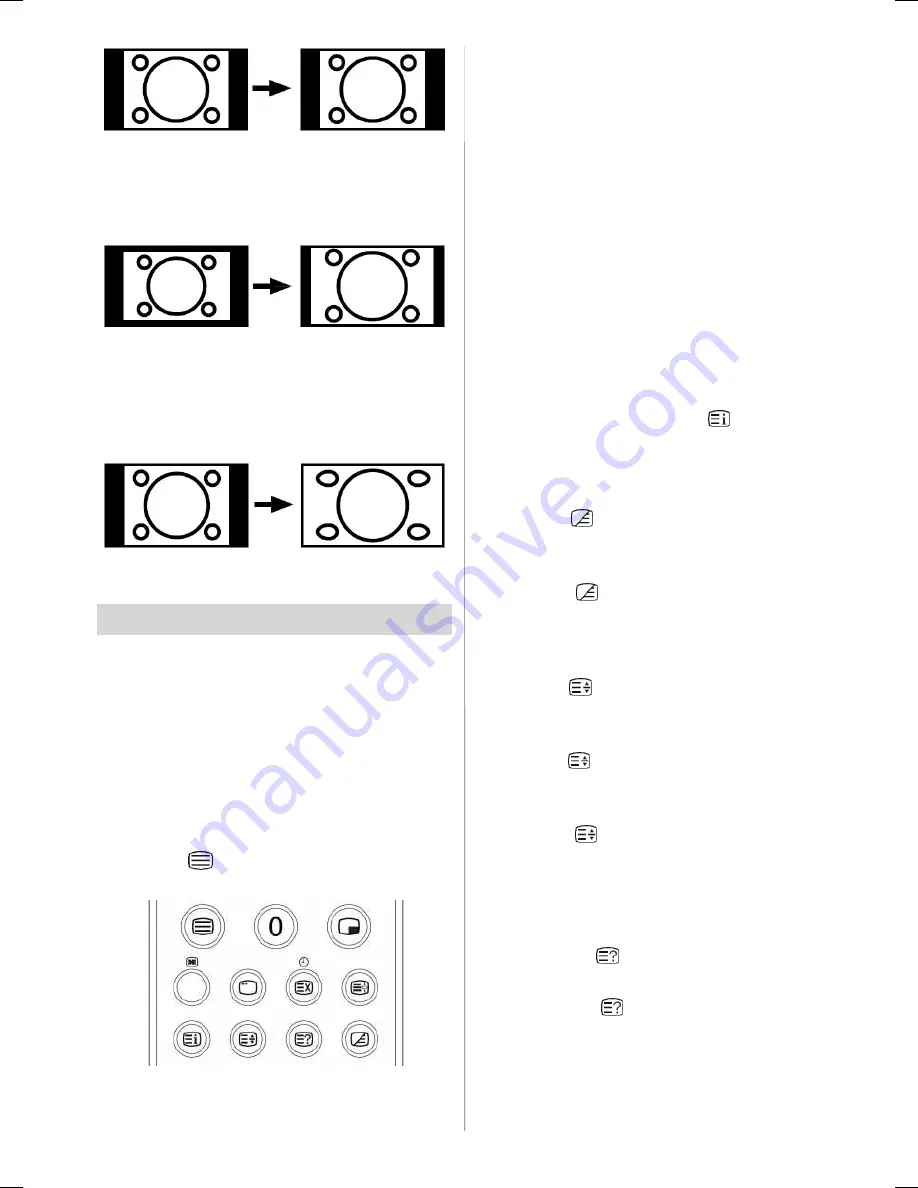
background image

- 18 -

14:9 Zoom:

This zooms up the wide picture (14:9 aspect
ratio) to the upper and lower limits of the
screen.

Panoramic:

This stretches the left and right sides of a
normal picture (4:3 aspect ratio) to fill the
screen, without making the picture appear
unnatural.

The top and bottom of the picture are slightly
cut off.

Teletext

Teletext is an information system that dis-
plays text on your TV screen. Using the Tele-
text information system you can view a page
of information on a subject that is available
in the list of contents (index).

To Operate Teletext

• Select a TV station where Teletext is being

transmitted.

• Press the

button. Usually the list of con-

tents (index) is displayed on the screen.

To Select A Page Of Teletext

• Press the appropriate digit buttons for the

required Teletext page number.

The selected page number is displayed in
the top left corner of the screen. The Teletext
page counter searches until the selected
page number is located, the desired page is
then displayed on the screen.

• Press the

button to move the Teletext

screen forward one page at a time.

• Press the

button to move the Teletext

screen backward one page at a time.

To Select Index Page

• To select the page number of the index (gen-

erally page 100), press the

button.

To Select Teletext With A TV
Programme

• Press the

button. The text is now super-

im po sed o ver t he pr og ram me on t he
screen.

• Press the

button again to return to the

Teletext page.

To Select Double Height Text

• Press the

button for the top half of the in-

formation page to be displayed in double
height text.

• Press the

button again for the bottom half

of the information page to be displayed in
double height text.

• Press the

button once more for the full

page of normal height text.

To Reveal “Concealed”
Information

• Pressing the

button once will reveal an-

swers on a quiz or games page.

• Pressing the

button again will conceal

the revealed answers.

01-ENG-3730W-CLE967 UK-HITACHI 37 INCH TFT-TRIDENT-(LG)-50090848.p65

19.03.2007, 08:49

18

Summary of Contents for 37LD8500

Page 1: ...GB D F I Instructions for use Bedienungsanleitung Notice d utilisation Istruzioni per l uso 37LD8550 37LD8500 ...

Page 2: ...ons 24 Appendix A PC Input Typical Display Modes 25 Appendix B DVD Player Selection 26 Appendix C Main and PIP PAP Picture Combinations 27 UK Guarantee 28 Remote Control Buttons 2 LCDTV 3 Preparation 5 Features 5 Panel Features 5 Safety Precautions 5 Before Switching On Your TV 8 Power Connection 8 Connections To The Aerial Input Socket8 How To Connect Other Devices 8 Inserting Batteries In The Re...

Page 3: ...in Teletext mode Menu On Off Go back to previous menu P Programme Up Cursor Up Volume Down Cursor Left t OK Enter Volume Up Cursor Right P Programme Down Cursor Down Mute On Off Freeze On Off Aspect ratio 0 9 Digit buttons Teletext On Off f PIP PAP TV TV PIP position Sub page Time Update Hold Index Page 31 Expand 32 Reveal 33 Mix These buttons can control most Hitachi DVD Players and Recorders Ple...

Page 4: ... 3 LCD TV FRONT VIEW REAR VIEW LED SPEAKER SPEAKER Power Cord Input Power On Off button ...

Page 5: ... switch Power cord input Power On Off button S VHS Input Video Input Audio Inputs s Headphone Audio Line Outs s Subwoofer Out PC Audio Input Aerial Scart 2 EXT 2 Scart 1 EXT 1 HDMI Input EXT 5 Component Audio Inputs s Component Video YPbPr Inputs VGA Input EXT 4 EXT 3 TV AV MENU P CH EXT 4S ...

Page 6: ... by mode PLL Frequency Search PC Input Support up to WXGA 1366 x 768 Stereo PC Audio Input Plug Play for Windows 9X ME 2000 XP 3D Comb Filter Audio Line Out Panel Features 37 inch TFT LCD display High resolution 1366x768 Contrast ratio 800 1 typical Brightness typical 500 cd m2 Display colour 16 7 Million SafetyPrecautions Please read the following recommended safety precautions carefully for your...

Page 7: ...g in the case this could re sult in a fatal electric shock NEVER guess or take chances with elec trical equipment of any kind it is better to be safe than sorry 1 Power Source The set should be operated only from a 220 240V AC 50 Hz outlet Ensure you select the correct voltage setting for your conve nience 2 Power Cord Do not place the set a piece of furniture etc on the power cord mains lead or p...

Page 8: ...per sonnel Do not remove the cover yourself as this may result in an electric shock WARNING When the device is not in use for a long time disconnect from power Instructions for waste disposal Packaging and packaging aids are recy clable and should principally be recycled Packaging materials such as foil bag must be kept away from children Battery including those which is heavy metal free should no...

Page 9: ... type batteries inside Place the batteries in the right direc tions Replace the battery cover NOTE Remove the batteries from remote control handset when it is not to be used for a long period Otherwise it can be damaged due to any leakage of batteries SwitchingTheTVON OFF To switch the TV on Your TV will switch on in two steps 1 Connect the power supply cord to the sys tem Press Power On Off switc...

Page 10: ...Operating with the buttons on the TV set Volume setting and programme selection can be made by using the buttons on the control panel at the right side of the TV Volume Setting Press the button to decrease volume or the button to increase volume so a volume level scale slider will be dis played at the bottom of the screen Programme Selecting Press the P CH button to select the next programme or th...

Page 11: ...can be changed directly by pressing the button Contrast By pressing button select Contrast Press button to increase contrast Press button to decrease contrast Contrast level can be adjusted between 0 and 63 Brightness By pressing button select Bright ness Press button to increase brightness Press button to decrease brightness Brightness level can be adjusted between 0 and 63 Sharpness By pressing ...

Page 12: ...y pressing button select Volume Press button to increase volume level Press button to decrease volume level Volume level can be adjusted between 0 and 63 Equalizer By pressing button select Equalizer Press or OK button to enter equalizer menu SOUND Equalizer Sound Mode User 120Hz 500Hz 1 5kHz 5kHz 0 10kHz 0 0 0 0 In equalizer menu the sound mode can be changed to User Pop Rock Jazz Flat and Classi...

Page 13: ...rom around the room instead of from the set speakers Pressing the buttons will turn the fea ture on or off SubWoofer It is possible to connect an external active subwoofer to the set to give a much deeper bass effect By pressing button select Subwoofer Subwoofer can be set to On or Off Set Subwoofer to On when you connect an external subwoofer to the set Feature menu By pressing button select the ...

Page 14: ...ss ing button Menu Timeout By pressing button select Menu Timeout Press button to change menu timeout to 15 sec 30 sec or 60 sec Teletext Language By pressing button select Teletext Language Press button to change Teletext Language to West East Cyrillic Turk Gre or Arabic This will normally be set to West for Western Europe Install menu By pressing button select the fourth icon Install menu appear...

Page 15: ...l the pages up or down by pressing the navigation buttons to see all the programmes in TV mode except the AV mode By cursor action programme selection is done automatically Name To change the name of a decided programme select the programme and press the RED button The first letter of the selected name starts to blink Press button to change that let ter and button to select the other letters By pr...

Page 16: ... PC mode Press the button The menu will be dis played in the middle of the screen PC Picture Position Menu By pressing button select the first icon PC Picture Position menu appears on the screen Autoposition PC PICTURE POSITION H Position 1024x768 H 48kHz V 60Hz V Position Dot Clock Phase 50 50 50 50 Autoposition If you shift the picture horizontally or vertically to an unwanted position use this ...

Page 17: ...R Red G Green B Blue Select Reset and press or OK button to reset the picture modes to factory default settings Sound Menu By pressing button select the third icon Sound menu appears on the screen The items in this menu are described at Sound menu starting page 11 Feature Menu By pressing button select the fourth icon Feature menu appears on the screen The items in this menu are described at Featu...

Page 18: ...e same time Freeze Picture You can freeze the picture on the screen by pressing the button At PIP and PAP lay outs only the main picture can be frozen Zoom Modes Zoom mode can be changed by pressing the button You can change the screen size according to the picture aspect ratio Select the optimum one from the following ZOOM modes Note You can only choose 4 3 and FULL in PC mode Auto When a WSS Wid...

Page 19: ...e top left corner of the screen The Teletext page counter searches until the selected page number is located the desired page is then displayed on the screen Press the button to move the Teletext screen forward one page at a time Press the button to move the Teletext screen backward one page at a time To Select Index Page To select the page number of the index gen erally page 100 press the button ...

Page 20: ...nformation captured from Tele text will be displayed on the screen If the programme being watched does not have Teletext transmission no information will be displayed Fastext Your TV supports the 1000 page Teletext system When the page number of any of the 1000 pages in memory is entered the system will not search for the requested page instead it will display the page auto matically If the reques...

Page 21: ... you will need to subscribe to the broadcast ing organisation whose programmes you wish to receive This organisation will supply you a corresponding decoder unit to allow the programmes to be unscrambled For further information ask your dealer See also the booklet supplied with your decoder Connect a decoder with an aerial socket to the TV Connect the aerial cable Connect a decoder without an aeri...

Page 22: ...via S VHS input and audio inputs of AV inputs by using S VHS cables Connect The Decoder To The Video Recorder Some video recorders have a special Scart socket for decoder Connect a Scart cable to the Scart socket of your decoder and to the special Scart socket of your video recorder Refer to the booklet of your video recorder To connect your video recorder to the TV re fer to the TV and Video Reco...

Page 23: ...obtain stereo sound from your equipment These leads can be purchased from your Hitachi dealer orany good High Streetelectrical retailer TFT LCD TV or through a satellite decoder ANT IN RF Lead to Aerial Satellite LNB lead RF Lead from Satellite to TV Aerial Scart Lead to EXT 1 on TV TV VCR TFT LCD TV or through a VCR and satellite decoder ANT IN ANT IN RF Lead to Aerial RF Lead from VCR to Satelli...

Page 24: ...mage the TV screen coating layer Poor Picture Have you selected the correct TV system Is your TV set or house aerial located too close to non earthed audio equipment or neon lights etc Mountains or high buildings can cause double pictures or ghost images Some times you can improve the picture quality by changing the direction of the aerial Is the picture or Teletext unrecognisable Check if you hav...

Page 25: ...CONSUMPTION W max 180 W 3 W Stand by PANEL 16 9 display 37 Screen Size DIMENSIONS mm Weight kg without stand D L H DIMENSIONS mm 106 934 647 27 Information for users applicable in European Union countries This symbol on the product or on its packaging means that your electrical and electronic equipment should be disposed at the end of life separately from your household wastes There are separate c...

Page 26: ...ertical Hor kHz Ver Hz 1 640 400 31 5 70 2 640 480 31 5 60 3 848 480 31 0 60 4 640 480 37 9 72 5 640 480 37 5 75 6 640 480 43 3 85 7 800 600 35 2 56 8 800 600 37 9 60 9 800 600 48 1 72 10 800 600 46 9 75 11 800 600 53 7 85 12 1024 768 48 4 60 13 1024 768 56 5 70 14 1024 768 60 0 75 15 1024 768 68 7 85 16 1152 864 67 5 75 17 1280 1024 64 0 60 18 1280 768 47 8 60 19 1280 768 56 1 70 20 1366 768 47 7...

Page 27: ... Toshiba Zenith Philips Orion JVC Shinco Samsung Skyworth Sony Bubuko INFO 1 INFO 2 INFO 3 INFO 4 INFO 5 INFO 6 INFO 7 INFO 8 INFO 9 INFO 0 INFO INDEX INFO MIX INFO SUB PAGE INFO UPDATE INFO REVEAL INFO TV TEXT Example To operate HITACHI DVD player press and hold the INFO button followed by the 1 button INFO button INDEX button SUB PAGE button REVEAL button UPDATE button TV TEXT button MIX button ...

Page 28: ... 27 AppendixC MainandPIP PAPPictureCombinations ...

Page 29: ...r modified by any person other than an Hitachi authorised engineer iii The product serial number has not been removed or altered This guarantee does not apply to product acquired second hand or for commercial or com munal use This guarantee does not cover the replacement of exhausted batteries the adjustment of user controls or aerial alignment Any parts replaced under this guarantee shall become ...

Page 30: ...aight to your TV or connect the aerial through a VCR Aerial RF Socket Aerial RF Socket wall socket wall socket Aerial RF Lead Aerial RF Lead Optional Scart Lead TV to VCR Aerial RF Socket VCR RF connector lead VCR to TV It is recommended that a scart lead should be fitted between your TV and VCR to enhance your picture and sound quality Scart leads are essential if you have a stereo TV and VCR and...

Page 31: ...IN ANT IN RF Lead to Aerial RF Lead to Aerial RF Lead from VCR to Satellite RF Lead from VCR to TV Satellite LNB lead Satellite LNB lead RF Lead from Satellite to TV Aerial Aerial VCR Scart Lead to on TV EXT 1 Scart Lead to EXT 1 on TV AV 1 TV TV VCR VCR AV 2 TFT LCD TV TFT LCD TV GB ...

Page 32: ... the indicator on the front of the set will illuminate red P or numeric buttons 1 2 3 to operate insert plug European plug and switch on insert plug UK plug Front View Programme Up Volume Up Volume Down Programme Down To select a programme number To return to previous menu To enter the main menu Also used for navigation in menus TV AV MENU P CH Power Cord Input Power on off button Plug the mains l...

Page 33: ...iver connected to your TV please ensure that they are switched on before automatic tuning begins In the case of a VCR insert a pre recorded tape and begin playback of your equipment These measures ensure that all your external equipment is tuned in during the Auto Setup procedure First of all choose Language and Country by using 5 6 and 3 4 buttons This will affect the sort process in APS To start...

Page 34: ...e italy hitachi eu com france consommateur hitachi eu com Digital Media Group 94 Quai Charles de Gaulles 69006 Lyon HITACHI EUROPE LTD CZECH REPUBLIC Na Sychrove 975 8 101 27 Pr aha 10 Bohdalec TEL 267 212 383 FAX 267 212 385 Email info hitachi be dmg eeu hitachi eu com HITACHI EUROPE S A GREECE HITACHI EUROPE S A HITACHI EUROPE AB SWEDEN NORWAY 364 Kifissias Ave 1 Delfon Str 152 33 Chalandri Athe...

Reviews: